In the dynamic world of online presence, a robust and functional website is no longer a luxury but a fundamental necessity. For millions, WordPress stands as the platform of choice, powering everything from personal blogs to multinational corporate sites. While WordPress out-of-the-box offers incredible flexibility, its true power lies in its extensibility through plugins. These powerful software components allow you to add new features, enhance existing functionalities, and tailor your website to your precise needs without writing a single line of code.
Whether you’re looking to boost your site’s SEO, integrate an e-commerce store, fortify its security, or simply add a contact form, there’s likely a WordPress plugin designed for the task. This comprehensive guide will walk you through the various methods of installing WordPress plugins, from the simplest dashboard-based approaches to more advanced manual installations via FTP. We’ll also delve into best practices for choosing, managing, and maintaining your plugins to ensure your WordPress site remains secure, performant, and perfectly aligned with your digital strategy.
Understanding WordPress Plugins: The Building Blocks of Your Website
Before we dive into the “how-to,” let’s establish a clear understanding of what WordPress plugins are and why they are indispensable tools for anyone managing a website. Think of WordPress as the operating system for your website; plugins are the apps that run on it, expanding its capabilities exponentially.
What are WordPress Plugins and Why You Need Them?
At its core, a WordPress plugin is a piece of software containing a group of functions that can be added to a WordPress website. They are designed to extend the core functionality of WordPress, allowing users to customize their sites without needing extensive programming knowledge. From minor tweaks to significant system overhauls, plugins can achieve a vast array of objectives.
For instance, a Tech-focused website might leverage plugins for advanced analytics integration, code syntax highlighting, or to display specific software reviews. A Brand manager might use plugins for social media integration, custom font management, or to build visually appealing landing pages that resonate with their brand identity. Meanwhile, a business focused on Money and online income would rely heavily on e-commerce plugins like WooCommerce, payment gateway integrations, or plugins for subscription management and financial reporting.
Without plugins, WordPress would be a powerful but somewhat basic content management system. With them, it transforms into a highly adaptable platform capable of serving almost any purpose. They save countless hours of development time and significant financial investment, making advanced features accessible to everyone.
The Ecosystem of WordPress Plugins: Free vs. Premium
The WordPress plugin ecosystem is vast and diverse, offering options for every budget and requirement. Primarily, plugins fall into two categories: free and premium.
Free Plugins:
The official WordPress Plugin Directory (wordpress.org/plugins/) hosts tens of thousands of free plugins. These are developed by individuals and companies, often supported by community contributions or by offering premium versions alongside their free counterparts.
- Pros: Cost-effective, easily accessible, often widely tested and reviewed, good for basic functionalities.
- Cons: Support can be limited (relying on community forums), features might be basic, and development updates might be less frequent for less popular plugins.
Premium Plugins:
Premium plugins are sold by developers or companies, often through their own websites or marketplaces like CodeCanyon. They typically offer more advanced features, dedicated customer support, and regular updates.
- Pros: Comprehensive features, professional support, regular updates ensuring compatibility and security, often higher quality and reliability.
- Cons: Involves a monetary investment (either a one-time purchase or a subscription), requires careful research to ensure value for money and developer reputation.
When making a choice, consider your website’s needs, your budget, and the long-term implications for your Brand and potential for Money generation. A well-chosen premium plugin can be a worthwhile investment, providing features and support that ultimately enhance your online presence and productivity.
Method 1: Installing Plugins Directly from the WordPress Dashboard
This is by far the easiest and most common method for installing WordPress plugins, particularly for free plugins available in the official WordPress directory, and for premium plugins that provide a downloadable .zip file. It requires no technical expertise beyond navigating your WordPress admin area.
Step-by-Step: Searching and Installing Free Plugins
This method is ideal for most users and the first place you should look when seeking to expand your site’s functionality.
- Log in to Your WordPress Dashboard: Access your website’s admin area by navigating to
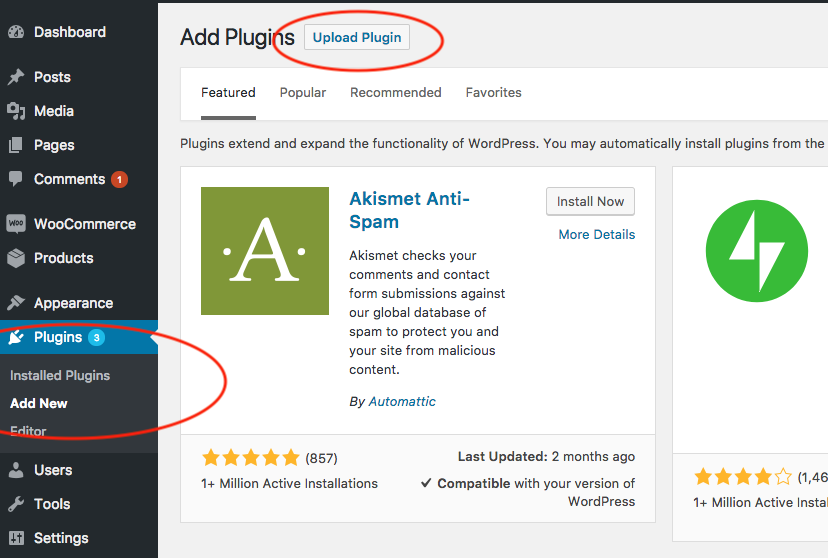
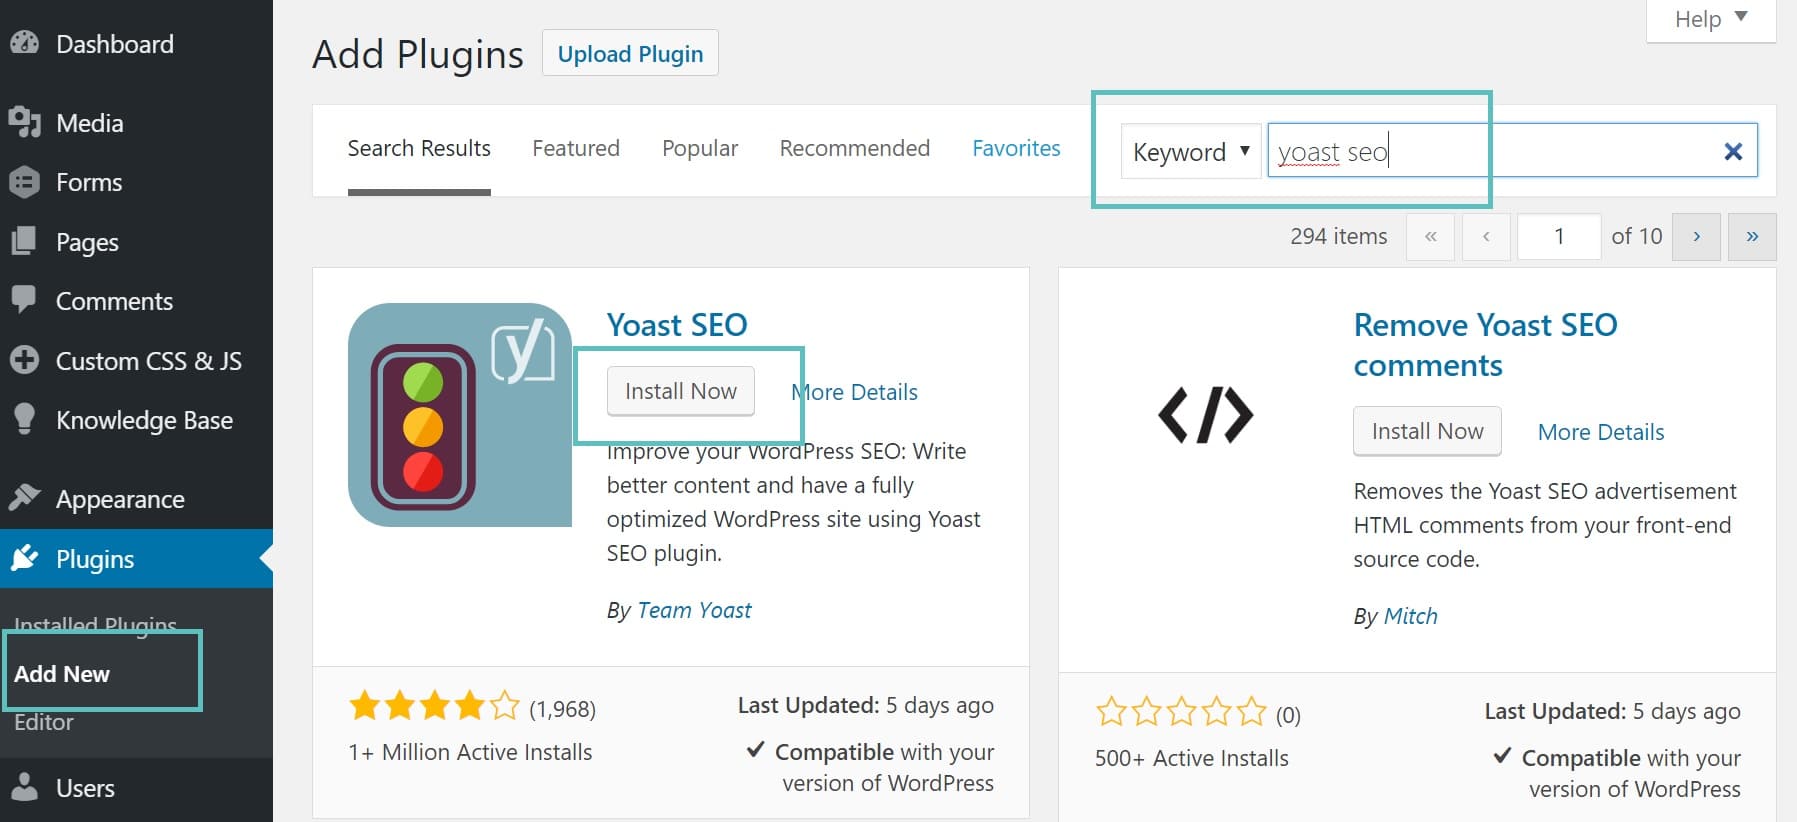
yourdomain.com/wp-adminand entering your credentials. - Navigate to the Plugins Section: In the left-hand sidebar of your dashboard, hover over “Plugins” and click on “Add New.” This will take you to the “Add Plugins” page, which features a prominent search bar.
- Search for Your Desired Plugin: Use the search bar on the right side of the page to type in the name of the plugin you’re looking for (e.g., “Yoast SEO,” “Contact Form 7,” “Akismet Anti-Spam”). You can also browse by “Featured,” “Popular,” “Recommended,” or “Favorites.”
- Review Plugin Details: Before installing, it’s wise to click on “More Details” for any plugin that catches your eye. This pop-up will provide crucial information:
- Description: What the plugin does.
- Installation: Specific instructions if needed.
- Screenshots: Visuals of the plugin in action.
- Reviews: User ratings and comments, which are vital for understanding user experience and reliability.
- Last Updated: Indicates how recently the plugin was maintained. A plugin not updated in over a year could pose compatibility or security risks.
- Active Installations: A high number often suggests reliability and widespread use.
- Compatibility: Whether it’s tested with your version of WordPress.
- From a Tech and Brand perspective, this review step is critical for digital security and ensuring a smooth user experience on your site.
- Install the Plugin: Once you’ve found a suitable plugin, click the “Install Now” button. WordPress will download and install the plugin files onto your server.
- Activate the Plugin: After the installation is complete, the “Install Now” button will change to “Activate.” You must click “Activate” to enable the plugin’s functionality on your site. If you just install it without activating, it won’t do anything.
- Configure the Plugin: Many plugins require some initial configuration. After activation, you might be redirected to a setup wizard, or a new menu item will appear in your dashboard (often under “Settings,” “Tools,” or its own dedicated menu). Follow the instructions to tailor the plugin to your needs.
Installing Uploaded Plugins (for Premium or Custom Plugins)
This method is used when you have a plugin file as a .zip archive, typically for premium plugins purchased from third-party developers, custom-developed plugins, or free plugins downloaded manually from sources other than the official directory.
- Download the Plugin File: Obtain the
.zipfile for your premium or custom plugin from the developer’s website or marketplace. Crucially, ensure the file is a plugin’s.zipfile and not a theme.zipor any other compressed file. Some premium themes bundle plugins, but you usually need to extract the plugin’s.zipfrom the main download package. - Log in to Your WordPress Dashboard: As before, access
yourdomain.com/wp-admin. - Navigate to “Add New” Plugin Section: Go to “Plugins” > “Add New.”
- Click “Upload Plugin”: At the top of the “Add Plugins” page, you’ll see a button labeled “Upload Plugin.” Click it.
- Choose the Plugin File: Click the “Choose File” button, then navigate to where you saved the
.zipfile on your computer and select it. - Install Now: Click the “Install Now” button. WordPress will upload the
.zipfile, extract its contents, and place them in the correct directory on your server. - Activate the Plugin: Once the installation is complete, click “Activate Plugin” to enable it.
- Configure as Needed: Just like with free plugins, you’ll likely need to configure the settings for your newly activated premium plugin. This often involves entering a license key, which is usually provided by the plugin developer when you purchase it. This license key is important for receiving updates and support, which are crucial for the long-term digital security and performance of your Tech infrastructure and the integrity of your Brand.
Method 2: Manual Plugin Installation via FTP/SFTP
While the dashboard methods are convenient, there are situations where manual installation via File Transfer Protocol (FTP) or Secure File Transfer Protocol (SFTP) becomes necessary. This method offers more control and is particularly useful for advanced users, troubleshooting, or handling larger files.
When to Use Manual Installation?
Understanding when to opt for manual installation is key to efficient WordPress management. You might use this method if:
- Your WordPress dashboard is inaccessible: For example, if a plugin conflict or error has caused the “White Screen of Death,” preventing you from logging in.
- You encounter upload limits: Your web host might have a file size limit for uploads via the dashboard, which large plugins can sometimes exceed.
- You’re installing custom-developed plugins: Developers often prefer to upload their work directly.
- You’re troubleshooting: Manually uploading or deleting plugin folders can help diagnose issues.
- Server issues prevent dashboard upload: Sometimes, server configurations can interfere with the dashboard’s file upload functionality.
This method requires a basic understanding of file systems and FTP clients, aligning more with advanced Tech users.
A Detailed Guide to FTP Installation
Before you begin, you’ll need an FTP client (like FileZilla, Cyberduck, or WinSCP) and your FTP/SFTP credentials (hostname, username, password, port), which you can typically find in your web hosting account’s control panel.
- Download and Unzip the Plugin File: Download the plugin’s
.zipfile to your computer. Unlike the dashboard upload, you must unzip this file first. The unzipped folder will contain all the plugin’s files. It’s crucial that this folder is the main plugin folder (e.g., if you downloadedmy-plugin.zip, when you unzip it, you should see a folder namedmy-plugincontainingindex.phpand other plugin files, not another folder inside it). - Connect to Your Website via FTP/SFTP: Open your FTP client and connect to your web server using your credentials.
- Navigate to the Plugins Directory: Once connected, you’ll see your website’s file structure. Navigate to
wp-content/plugins/. This is where all your WordPress plugins reside. - Upload the Unzipped Plugin Folder: On your local computer’s side of the FTP client, locate the unzipped plugin folder (e.g.,
my-plugin). Drag and drop this entire folder into thewp-content/plugins/directory on your server. Wait for the upload to complete. This can take a few minutes depending on the plugin’s size and your internet speed. - Activate the Plugin from the WordPress Dashboard: After the upload is complete, log in to your WordPress dashboard. Go to “Plugins” > “Installed Plugins.” You should see the newly uploaded plugin listed there.
- Activate and Configure: Click the “Activate” link next to your plugin. Once activated, proceed with any necessary configuration, just as you would with other installation methods.
Important Precautions:
- Backup Your Website: Always, always, always create a full backup of your website (files and database) before performing any manual changes, especially involving FTP. This is a critical Digital Security measure that can save your Brand and Money from potential catastrophic data loss or downtime.
- Verify File Integrity: Ensure the
.zipfile you downloaded is from a trusted source to prevent malicious code injection, which could compromise your site’s Tech integrity. - Correct Folder Structure: Double-check that you’re uploading the main plugin folder and not an extra wrapper folder. Incorrect structure will prevent the plugin from appearing in your dashboard.
Best Practices for Managing Your WordPress Plugins
Installing plugins is only half the battle. Effective plugin management is essential for a high-performing, secure, and user-friendly website. Neglecting these best practices can lead to security vulnerabilities, slow loading times, and even site crashes, all of which negatively impact your Brand reputation and potential for Money generation.
Choosing the Right Plugins: Performance, Security, and Compatibility
With thousands of plugins available, discerning the good from the bad is crucial. Thoughtful selection impacts your site’s overall health and your online success.
- Prioritize Performance: Every plugin adds code to your site, potentially slowing it down. Opt for lightweight, well-coded plugins. Check reviews for mentions of performance impact. A slow website harms user experience and SEO, thus indirectly affecting your Brand and Money.
- Security First: Plugins are a common entry point for hackers if they are poorly coded or not regularly updated.
- Source: Download from the official WordPress directory or reputable premium marketplaces/developers.
- Reviews & Ratings: Look for plugins with high ratings and positive security-related comments.
- Last Updated: A plugin that hasn’t been updated in a long time is a red flag. It might have unpatched vulnerabilities or compatibility issues with newer WordPress versions.
- Active Installations: A high number often indicates a well-supported and secure plugin, but don’t blindly trust it.
- Developer Reputation: Research the developer. Do they have a track record of security patches and good support?
- Check Compatibility: Ensure the plugin is compatible with your current WordPress version and other essential plugins or your theme. Incompatibility is a frequent cause of site errors.
- Features vs. Bloat: Don’t install plugins with excessive features you don’t need. Simpler plugins often perform better.
- Support: For critical functionalities, check the availability and responsiveness of developer support, especially for premium plugins where you’re paying for this service.
Keeping Plugins Updated and Secure
Outdated plugins are one of the biggest security risks for any WordPress site. Regular updates are not just about new features; they often include critical security patches and bug fixes.
- Automate if Possible, Review Always: WordPress allows for automatic plugin updates. While convenient, it’s wise to review what’s included in an update before applying it, especially for major plugins. Some updates can introduce conflicts.
- Backup Before Updating: Before performing any significant updates, always create a full website backup. This allows you to revert your site if an update causes issues. This is an essential Digital Security and Productivity practice.
- Staging Environment: For business-critical websites, consider using a staging environment (a clone of your live site) to test updates before deploying them to your live site. This prevents downtime and protects your Brand reputation.
- Monitor for Vulnerabilities: Keep an eye on WordPress security news and vulnerability databases (like WPScan) for alerts about specific plugin vulnerabilities.
Deactivating vs. Deleting Plugins: What You Need to Know
Properly managing inactive plugins is crucial for site hygiene and security.
- Deactivating a Plugin: This temporarily disables the plugin’s functionality without removing its files or settings from your database. Deactivated plugins still reside on your server, consuming disk space and potentially posing a security risk if they are outdated.
- When to Deactivate: If you need to temporarily disable a feature, troubleshoot a conflict, or are not sure if you’ll use the plugin again soon.
- Deleting a Plugin: This completely removes the plugin’s files from your server and typically removes any associated database entries (though some plugins leave “orphan” data behind, requiring manual cleanup).
- When to Delete: If you are certain you will no longer use a plugin. Never leave inactive plugins lying around on your server. They are potential security vulnerabilities and can make your site management more cluttered.
Troubleshooting Common Plugin Issues
Despite best practices, issues can arise. Knowing how to approach them can save your site.
- White Screen of Death (WSOD): This often indicates a critical PHP error, frequently caused by a plugin conflict.
- Solution: Access your site via FTP, navigate to
wp-content/plugins/, and rename the folder of the suspected plugin (or all plugins) to temporarily deactivate them. If the site comes back, reactivate plugins one by one to find the culprit.
- Solution: Access your site via FTP, navigate to
- Plugin Conflicts: Two plugins trying to do similar things or using conflicting code can cause errors.
- Solution: Deactivate all plugins and reactivate them one by one, checking your site after each activation until you find the conflicting pair.
- Checking Error Logs: Your web host’s control panel usually provides access to PHP error logs. These logs offer valuable clues about what’s going wrong. This is a fundamental Tech troubleshooting step.
- Seeking Support: For premium plugins, contact the developer’s support team. For free plugins, use the plugin’s support forum on WordPress.org. Provide detailed information about your issue, including any error messages.
Conclusion
WordPress plugins are the unsung heroes of countless websites, transforming basic installations into powerful, feature-rich platforms. By understanding the various installation methods – from the user-friendly WordPress dashboard to the more technical FTP approach – you gain the essential skills to customize your site effectively.
However, the journey doesn’t end with installation. Proactive management, including thoughtful selection based on performance and security, regular updates, and decisive action on unused plugins, is paramount. By adhering to these best practices, you ensure your WordPress site remains secure, fast, and robust, providing a seamless experience for your visitors. This diligent approach not only safeguards your Digital Security and optimizes your site’s Tech performance but also directly contributes to a stronger Brand presence and supports your financial objectives, whether through direct online income or enhanced business operations. Master your plugins, and you master your WordPress site’s potential.
aViewFromTheCave is a participant in the Amazon Services LLC Associates Program, an affiliate advertising program designed to provide a means for sites to earn advertising fees by advertising and linking to Amazon.com. Amazon, the Amazon logo, AmazonSupply, and the AmazonSupply logo are trademarks of Amazon.com, Inc. or its affiliates. As an Amazon Associate we earn affiliate commissions from qualifying purchases.