In the rapidly evolving landscape of technology, Python stands out as a remarkably versatile and powerful programming language. Its adoption spans from web development and data science to artificial intelligence and automation. However, the true power of Python is unlocked not just by the core language itself, but by the vast ecosystem of third-party libraries and packages that extend its capabilities. This is where pip, the Python Package Installer, becomes an indispensable tool.
For anyone venturing into Python development, understanding how to install and use pip is a fundamental step. It’s the gateway to effortlessly incorporating pre-built solutions, accelerating your development process, and leveraging the collective ingenuity of the Python community. Whether you’re a complete beginner setting up your first Python environment or an experienced developer looking for a refresher, this guide will walk you through the essential steps to get pip up and running.
Understanding Pip: The Cornerstone of Python Package Management
Before we dive into the installation process, it’s crucial to grasp what pip is and why it’s so important. pip is the de facto standard package manager for Python. Think of it as a sophisticated librarian for your Python projects. Its primary role is to install, upgrade, and uninstall Python packages from the Python Package Index (PyPI) and other sources.
Why is Package Management so Critical?
- Efficiency and Reusability: Instead of reinventing the wheel for common tasks (like web scraping, data analysis, or machine learning), developers can leverage existing, well-tested libraries.
pipmakes accessing these libraries incredibly straightforward. - Dependency Management: Modern software projects often rely on multiple external libraries, which themselves might depend on other libraries.
pipmeticulously manages these dependencies, ensuring that all the necessary components are installed correctly, preventing version conflicts and runtime errors. - Community Collaboration: The Python Package Index (PyPI) hosts hundreds of thousands of packages contributed by developers worldwide.
pipbridges the gap between these invaluable resources and your local development environment. - Reproducibility: With
pip, you can create arequirements.txtfile that lists all the packages and their specific versions used in a project. This allows you to easily recreate the exact same environment on another machine or for another developer, ensuring consistency and reproducibility.
In essence, pip democratizes access to a vast repository of Python tools, significantly boosting productivity and fostering innovation within the Python ecosystem.
Installing Python: The Prerequisite for Pip
The good news is that for most modern Python installations, pip is included by default. Therefore, the first and most critical step is ensuring you have Python itself installed on your system. The installation process for Python varies slightly depending on your operating system (Windows, macOS, or Linux).
Installing Python on Windows
-
Download the Python Installer:
- Navigate to the official Python website: https://www.python.org/downloads/
- Download the latest stable release installer for Windows. Typically, you’ll want the 64-bit version unless you have a very old 32-bit system.
-
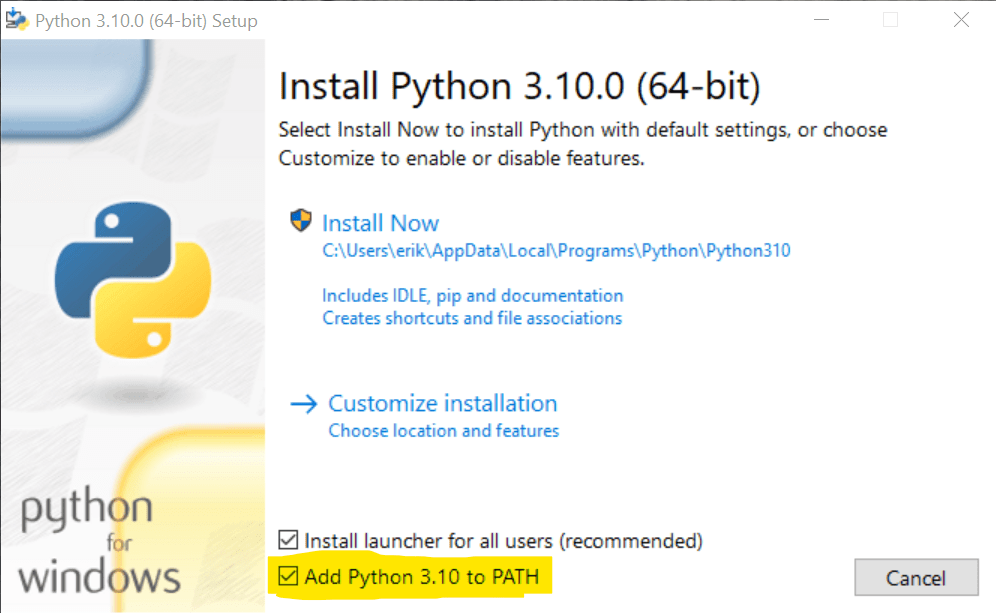
Run the Installer:
- Locate the downloaded
.exefile and double-click it to start the installation. - Crucially, on the first screen of the installer, make sure to check the box that says “Add Python X.Y to PATH”. This is a very important step as it allows you to run Python and
pipcommands from any directory in your command prompt or PowerShell. If you miss this, you’ll have to manually configure your system’s PATH environment variable later, which can be a more complex process. - Choose “Install Now” for a default installation, which is usually sufficient for most users. You can opt for “Customize installation” if you have specific requirements.
- Locate the downloaded
-
Verify the Installation:
- Open the Command Prompt or PowerShell. You can do this by searching for “cmd” or “PowerShell” in the Windows search bar.
- Type the following command and press Enter:
bash

python --version
This should display the Python version you just installed (e.g.,Python 3.11.4). - Next, verify that
pipis installed by typing:
bash

pip --version
This should show you the version ofpipthat came bundled with your Python installation.
Installing Python on macOS
macOS comes with a version of Python pre-installed, but it’s often an older version. It’s highly recommended to install a newer version of Python from the official Python website.
-
Download the Python Installer:
- Go to the official Python downloads page: https://www.python.org/downloads/mac-osx/
- Download the latest stable macOS installer (a
.pkgfile).
-
Run the Installer:
- Double-click the downloaded
.pkgfile. - Follow the on-screen prompts. The installer typically handles adding Python to your PATH automatically.
- Double-click the downloaded
-
Verify the Installation:
- Open the Terminal application. You can find it in
Applications > Utilities > Terminalor by searching for “Terminal” in Spotlight. - Type the following command and press Enter:
bash

python3 --version
Note that on macOS,python3is often used to refer to the newer Python installation to avoid conflicts with the system’s older Python. - To check for
pip, use:
bash

pip3 --version
Again,pip3is the command typically associated with your newer Python 3 installation.
- Open the Terminal application. You can find it in
Installing Python on Linux
Most Linux distributions come with Python pre-installed, but like macOS, it might be an older version. You can install newer versions via your distribution’s package manager or by compiling from source. Using the package manager is generally the easiest method.
For Debian/Ubuntu based systems:
-
Update Package Lists:
- Open your terminal and run:
bash

sudo apt update
- Open your terminal and run:
-
Install Python 3:
- Run the following command:
bash

sudo apt install python3 python3-pip
This command installs both Python 3 and its associatedpippackage.
- Run the following command:
-
Verify the Installation:
- In the terminal, check the Python version:
bash

python3 --version
- Check the
pipversion:
bash

pip3 --version
- In the terminal, check the Python version:
For Fedora/CentOS/RHEL based systems:
-
Update Package Lists (Fedora):
- Open your terminal and run:
bash

sudo dnf update
- Open your terminal and run:
-
Install Python 3:
- Run the following command:
bash

sudo dnf install python3 python3-pip
- Run the following command:
-
Verify the Installation:
- Check the Python version:
bash

python3 --version
- Check the
pipversion:
bash

pip3 --version
- Check the Python version:
Managing Pip: Upgrading and Using Pip Effectively
Once Python is installed and pip is accessible, keeping pip itself up-to-date is a good practice. Newer versions of pip often include performance improvements, bug fixes, and support for the latest features in the Python ecosystem.
Upgrading Pip
You can upgrade pip using pip itself. This is a common operation and a testament to pip‘s self-sufficiency.
On Windows:
Open Command Prompt or PowerShell and run:
python -m pip install --upgrade pip
or
py -m pip install --upgrade pip
On macOS and Linux:
Open your Terminal and run:
python3 -m pip install --upgrade pip
This command tells Python to run the pip module and install the latest version of pip. The --upgrade flag ensures that if pip is already installed, it will be upgraded to the newest available version.
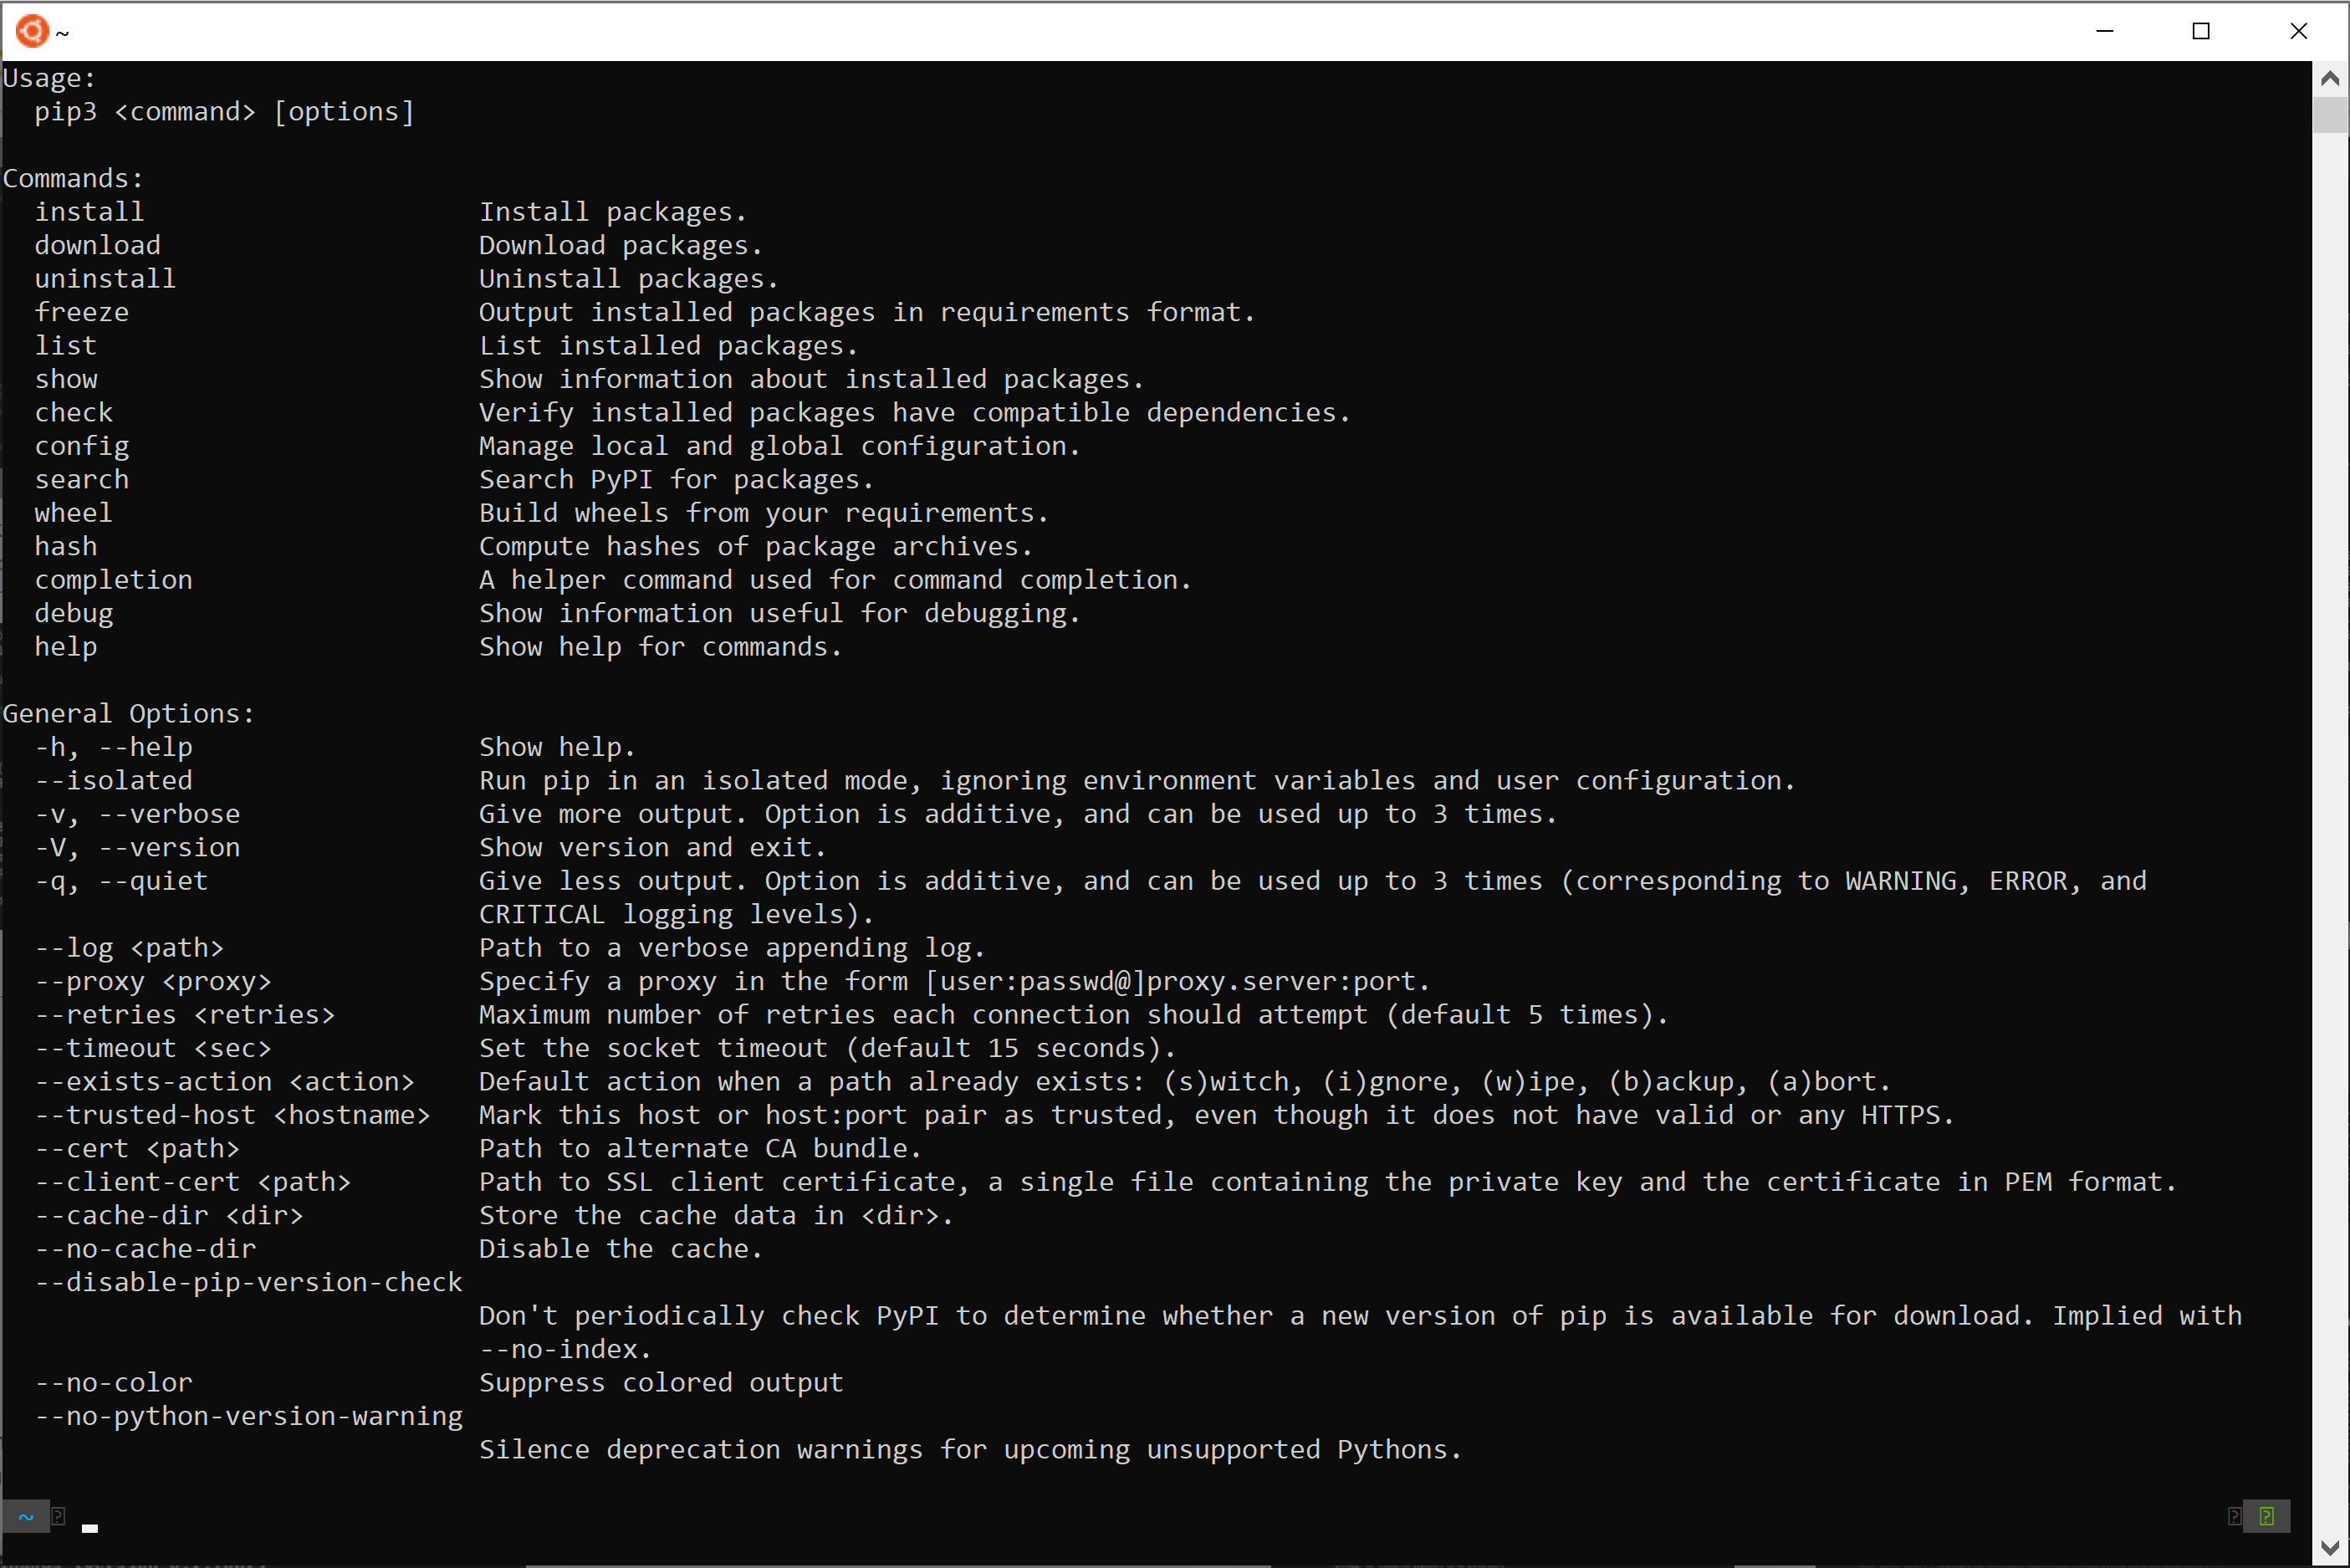
Basic Pip Commands for Package Management
Now that you have pip installed and potentially upgraded, let’s look at some fundamental commands you’ll use regularly:
Installing a Package
To install a package, you use the install command followed by the package name. For example, to install the popular web framework Flask:
pip install Flask
If you’re on macOS or Linux, you might need to use pip3:
pip3 install Flask
Listing Installed Packages
To see all the packages currently installed in your Python environment, use the list command:
pip list
or
pip3 list
This will output a neat table of installed packages and their versions.
Showing Package Information
To get detailed information about a specific installed package, including its version, location, and dependencies, use the show command:
pip show Flask
or
pip3 show Flask
Uninstalling a Package
If you no longer need a package, you can uninstall it using the uninstall command:
pip uninstall Flask
or
pip3 uninstall Flask
pip will usually ask for confirmation before proceeding with the uninstall.
Freezing Packages (Creating requirements.txt)
As mentioned earlier, creating a requirements.txt file is crucial for project reproducibility. You can generate this file automatically using the freeze command:
pip freeze > requirements.txt
or
pip3 freeze > requirements.txt
This command lists all installed packages and their exact versions and saves them to a file named requirements.txt in your current directory.
Installing Packages from a requirements.txt File
To install all the packages listed in a requirements.txt file (e.g., when setting up a project on a new machine), you can use the install command with the -r flag:
pip install -r requirements.txt
or
pip3 install -r requirements.txt
This command reads the file and installs each package listed with its specified version.
Advanced Considerations: Virtual Environments
While installing packages globally with pip works for simple projects, it can lead to conflicts when different projects require different versions of the same library. This is where virtual environments come in.
A virtual environment is an isolated Python environment that has its own set of installed packages, independent of the system’s global Python installation. This is a best practice in Python development and highly recommended for any serious project.
Creating and Activating a Virtual Environment
Python 3.3 and later versions include a module called venv for creating virtual environments.
-
Navigate to your Project Directory:
Open your terminal and change directory to your project’s root folder. -
Create a Virtual Environment:
Use thevenvmodule to create a virtual environment. A common convention is to name the environment folder.venvorvenv:python3 -m venv .venv(On Windows, you might use
python -m venv .venvorpy -m venv .venv)This command creates a
.venvdirectory within your project folder, containing a copy of the Python interpreter and associated files. -
Activate the Virtual Environment:
Once created, you need to activate the environment to start using it.- On Windows (Command Prompt):
bash

.venvScriptsactivate
- On Windows (PowerShell):
bash

.venvScriptsActivate.ps1
(You might need to adjust your execution policy for PowerShell:Set-ExecutionPolicy RemoteSigned -Scope CurrentUser) - On macOS and Linux:
bash

source .venv/bin/activate
When the virtual environment is active, you’ll see its name in parentheses at the beginning of your command prompt, e.g.,
(.venv) C:UsersYourUserYourProject>. - On Windows (Command Prompt):
-
Install Packages within the Virtual Environment:
Now, anypip installcommands you run will install packages only within this active virtual environment. For example:(.venv) C:UsersYourUserYourProject> pip install requestsThis
requestspackage will only be available when this.venvenvironment is activated. -
Deactivate the Virtual Environment:
When you’re done working on your project, you can deactivate the virtual environment by simply typing:deactivateYour command prompt will return to its normal state.
By using virtual environments, you ensure that your projects are isolated, dependencies are managed cleanly, and you avoid conflicts that can plague larger development efforts.
Conclusion
Mastering pip is an essential step for any Python developer. It empowers you to tap into the incredible richness of the Python ecosystem, saving you time, improving your code quality, and enabling you to build more complex and sophisticated applications. From installing Python itself to understanding the power of virtual environments, this guide has provided you with the foundational knowledge to confidently install and use Python’s pip. As you continue your Python journey, remember that pip is your constant companion, facilitating your access to the tools that will help you innovate and succeed in the ever-expanding world of technology.