In today’s fast-paced digital landscape, flexibility and efficiency are paramount. Whether you’re a seasoned developer, a curious student, a small business owner, or simply an enthusiast eager to explore new operating systems without committing to a full system overhaul, virtualization stands as a cornerstone technology. Among the various virtualization solutions available, Oracle VM VirtualBox has carved out a significant niche, offering a powerful, open-source, and free platform for running multiple guest operating systems concurrently on a single host machine.
This guide delves deep into the process of installing VirtualBox on an Ubuntu system, transforming your machine into a versatile hub for diverse computing tasks. Beyond the technical steps, we’ll explore how mastering this tool aligns with core principles of technology adoption, brand enhancement, and financial prudence, making it an indispensable asset for anyone looking to maximize their digital capabilities.
The Power of Virtualization: Why VirtualBox Matters
Virtualization, at its heart, is the creation of a virtual version of something, whether that’s a server, desktop, storage device, or network resource. In the context of VirtualBox, it allows your Ubuntu operating system (the host) to run other operating systems like Windows, Fedora, Kali Linux, or even older versions of Ubuntu itself (the guests) within isolated virtual environments. This capability is not just a technological marvel; it’s a strategic advantage.
Embracing Technological Versatility (Tech)
For anyone deeply embedded in the tech world, VirtualBox is an essential utility. It addresses several critical needs:
- Software Development and Testing: Developers frequently need to test applications across different operating systems and environments without maintaining multiple physical machines. VirtualBox provides an isolated sandbox where new code can be rigorously tested without risking the integrity of the host system. This is invaluable for ensuring cross-platform compatibility and identifying bugs early in the development cycle.
- Exploring New Operating Systems: Curious about the latest Windows build, a specific Linux distribution, or an older macOS version? VirtualBox allows you to experiment freely. It’s a risk-free playground to learn, test features, and decide if a particular OS is right for your needs before committing to a dual-boot setup or a dedicated machine.
- Digital Security and Sandboxing: Virtual machines offer an excellent layer of security. Suspicious files, potentially malicious software, or untested applications can be run within a VM. If anything goes wrong, the threat is contained within the virtual environment and cannot affect your host system, making it a crucial tool for cybersecurity professionals and vigilant users alike.
- Legacy Software Support: Many businesses and individuals still rely on older software that may only run on specific, outdated operating systems. VirtualBox provides a lifeline, allowing users to run these legacy applications in a compatible virtual environment on a modern Ubuntu machine, extending the lifespan and utility of critical software.
- AI/ML Experimentation: While resource-intensive AI models often require dedicated hardware, VirtualBox can be used for experimenting with lighter AI/ML frameworks or learning environments, setting up specific library versions, or even testing different data science toolchains in isolated environments without cluttering your main OS.
Building Brand Authority and Professionalism (Brand)
While VirtualBox might seem purely technical, its strategic use can subtly but significantly contribute to personal and corporate branding:
- Demonstrating Expertise: As a tech professional or an organization, showcasing the ability to effortlessly manage and operate diverse software environments signals a high level of technical proficiency and adaptability. Running live demos of software on various OS using VirtualBox projects an image of preparedness and comprehensive understanding.
- Streamlined Demonstrations and Training: For trainers, educators, or sales professionals, VirtualBox enables standardized, consistent demonstration environments. Imagine needing to show a client how your software works on both Windows and Linux – VirtualBox makes this seamless, creating a polished and professional presentation that reinforces confidence in your product or service.
- Consistency in Development and Deployment: For development teams, using virtualized environments helps standardize development setups, ensuring that everyone is working with the same dependencies and configurations. This consistency reduces “it works on my machine” issues, leading to more reliable deployments and a stronger brand reputation for quality software.
Smart Resource Management and Financial Gain (Money)
VirtualBox, being a free and open-source solution, inherently offers significant financial benefits, but its impact on your bottom line goes further:
- Cost Savings: The most apparent benefit is avoiding the need to purchase multiple physical computers for different operating systems. One powerful Ubuntu machine can host several virtual ones, drastically reducing hardware expenditure. It’s also free software, eliminating licensing costs associated with proprietary virtualization platforms.
- Increased Productivity, Reduced Downtime: By providing isolated testing environments, VirtualBox minimizes the risk of system crashes or conflicts on your primary OS. This translates directly to less downtime and more productive work hours, which for businesses, means higher output and revenue. For individuals, it means more time for side hustles or skill development.
- Facilitating Online Income and Side Hustles:
- Freelance Development: Freelancers can set up client-specific development environments without cluttering their main system, enabling them to take on diverse projects efficiently.
- Content Creation: Virtual machines are perfect for recording tutorials on different operating systems or software configurations, expanding content possibilities for bloggers, YouTubers, and online educators.
- Software Consulting: Consultants can quickly spin up various OS configurations to diagnose client issues or demonstrate solutions without needing an array of physical machines.
- Efficient Resource Allocation: Virtualization allows for dynamic allocation of system resources. You can assign CPU cores, RAM, and disk space to virtual machines as needed, ensuring that your host system remains responsive while still providing adequate resources for your guests. This optimization prevents over-provisioning and wasted resources.
Having understood the profound implications of VirtualBox, let’s now dive into the practical steps of getting it up and running on your Ubuntu system.
Preparing Your Ubuntu System for VirtualBox Installation
Before we embark on the installation journey, a few preparatory steps are essential to ensure a smooth and successful deployment. These steps focus on system readiness and dependency management.
Step 1: Update Your Ubuntu System
Keeping your system updated is a fundamental practice for security, stability, and access to the latest software packages. Open your terminal (Ctrl+Alt+T) and execute the following commands:
sudo apt update
sudo apt upgrade -y
sudo apt autoremove -y
sudo apt update: Refreshes the list of available packages from the Ubuntu repositories.sudo apt upgrade -y: Installs any available updates for the packages currently installed on your system. The-yflag automatically confirms prompts.sudo apt autoremove -y: Removes packages that were automatically installed to satisfy dependencies for other packages but are no longer needed.
This ensures your system has the latest patches and dependencies, minimizing potential conflicts during the VirtualBox installation.
Step 2: Install Necessary Dependencies and Kernel Modules
VirtualBox relies on certain build tools and kernel modules to function correctly. Install them with this command:
sudo apt install build-essential dkms linux-headers-$(uname -r) -y
build-essential: Provides compilers and libraries necessary for building software from source, which VirtualBox might need.dkms(Dynamic Kernel Module Support): This package ensures that VirtualBox kernel modules are automatically recompiled whenever your Linux kernel is updated. This is crucial for seamless operation after kernel upgrades.linux-headers-$(uname -r): Installs the headers for your currently running Linux kernel. VirtualBox needs these headers to compile its kernel modules specific to your system.$(uname -r)automatically fetches your current kernel version.
After installing these, it’s often a good idea to reboot your system to ensure all changes are applied, especially if new kernel headers were installed:
sudo reboot
Step 3: Enable Virtualization in BIOS/UEFI
For VirtualBox to perform optimally and for 64-bit guest operating systems to run, hardware virtualization support (Intel VT-x or AMD-V) must be enabled in your computer’s BIOS/UEFI settings.
- How to check: In your terminal, run
lscpu | grep 'Virtualization:'. If it showsVT-xorAMD-V, it’s enabled. If the command returns nothing or shows a disabled status, you’ll need to enable it. - How to enable: Reboot your computer and enter the BIOS/UEFI setup (usually by pressing Del, F2, F10, or F12 during startup). Navigate to the “CPU Configuration,” “Processor,” or “Virtualization Technology” section. Look for options like “Intel VT-x,” “Intel Virtualization Technology,” “AMD-V,” or “SVM Mode” and enable them. Save your changes and exit.
This step is critical for performance and compatibility.
Installing VirtualBox on Ubuntu: Two Primary Methods
There are two main approaches to installing VirtualBox on Ubuntu: using the official Ubuntu repositories or adding Oracle’s official VirtualBox repository. The latter is generally preferred for getting the latest version quickly.
Method 1: Installing from Oracle’s VirtualBox Repository (Recommended)
This method ensures you always receive the latest stable version of VirtualBox directly from Oracle, along with timely updates.
1. Add the Oracle VirtualBox GPG Key
First, you need to import Oracle’s public key to verify the authenticity of the packages you’ll download:
wget -O- https://www.virtualbox.org/download/oracle_vbox_2016.asc | sudo gpg --dearmor --yes --output /usr/share/keyrings/oracle-virtualbox-2016.gpg
wget -O- https://www.virtualbox.org/download/oracle_vbox.asc | sudo gpg --dearmor --yes --output /usr/share/keyrings/oracle-virtualbox.gpg
These commands download the GPG keys and store them in the /usr/share/keyrings directory, which apt will use to verify packages from the VirtualBox repository.
2. Add the VirtualBox Repository to Your Sources List
Next, add the VirtualBox repository URL to your system’s software sources. This command appends the repository line to a new file that apt will read:

echo "deb [arch=amd64 signed-by=/usr/share/keyrings/oracle-virtualbox-2016.gpg] https://download.virtualbox.org/virtualbox/debian $(lsb_release -cs) contrib" | sudo tee /etc/apt/sources.list.d/virtualbox.list
$(lsb_release -cs) automatically inserts your Ubuntu version’s codename (e.g., jammy for Ubuntu 22.04, focal for Ubuntu 20.04). This ensures you get the correct repository for your specific Ubuntu release.
3. Update Package Lists and Install VirtualBox
Now that the new repository is added, update your package lists to include the VirtualBox packages and then install VirtualBox:
sudo apt update
sudo apt install virtualbox-7.0 -y # Or virtualbox-6.1, depending on the version you target
Note: Replace virtualbox-7.0 with the specific version you wish to install if you prefer an older release, e.g., virtualbox-6.1. Always verify the latest stable version available on the VirtualBox website to ensure you’re installing the most current package name.
Method 2: Installing from Ubuntu’s Default Repositories (Easier, but might not be the latest version)
Ubuntu’s default repositories often include VirtualBox, but it might not be the absolute latest version. This method is simpler if you prioritize ease over the bleeding edge.
sudo apt update
sudo apt install virtualbox -y
After installation, you can launch VirtualBox from your applications menu or by typing virtualbox in the terminal.
Post-Installation Configuration and Essential Enhancements
Installing VirtualBox is just the first step. To unlock its full potential and ensure a seamless virtualized experience, there are a couple of crucial post-installation steps.
1. Installing the VirtualBox Extension Pack
The VirtualBox Extension Pack adds significant functionality to your virtual machines, including:
- USB 2.0 and USB 3.0 host controller support
- VirtualBox RDP (Remote Desktop Protocol)
- Disk encryption
- NVMe and PXE boot for Intel cards
Crucially, the Extension Pack version MUST match your installed VirtualBox version.
1. Download the Extension Pack
Go to the official VirtualBox download page: https://www.virtualbox.org/wiki/Downloads. Under “VirtualBox X.Y.Z Oracle VM VirtualBox Extension Pack,” click on “All supported platforms” to download the .vbox-extpack file.
2. Install the Extension Pack
You can install it directly from the VirtualBox GUI:
- Open VirtualBox.
- Go to
File>Tools>Extension Pack Manager. - Click the
Installicon (a green plus sign). - Navigate to where you downloaded the
.vbox-extpackfile and select it. - Review the license agreement and click
Install. You’ll be prompted for yoursudopassword.
Alternatively, via the terminal:
sudo VBoxManage extpack install --replace /path/to/Oracle_VM_VirtualBox_Extension_Pack-X.Y.Z.vbox-extpack
Replace /path/to/Oracle_VM_VirtualBox_Extension_Pack-X.Y.Z.vbox-extpack with the actual path and filename of your downloaded Extension Pack. --replace ensures it updates if an older version exists.
2. Installing Guest Additions (Inside Each Virtual Machine)
Once you’ve installed a guest operating system (e.g., Windows 10, another Ubuntu instance) inside VirtualBox, installing “Guest Additions” is vital for optimal performance and integration. Guest Additions are a set of device drivers and system applications that enhance interaction between the host and guest OS. They provide:
- Better video resolution support
- Seamless mouse integration
- Shared clipboard functionality (copy-paste between host and guest)
- Drag-and-drop support
- Folder sharing
- Time synchronization
- Improved graphics and overall performance
How to Install Guest Additions:
- Start your guest operating system in VirtualBox.
- Once the guest OS is running, from the VirtualBox menu bar, go to
Devices>Insert Guest Additions CD image.... - Inside the guest OS:
- For Windows guests: An autorun prompt should appear. Follow the on-screen instructions. If not, open “This PC” or “My Computer” and manually run the
VBoxWindowsAdditions.exefile from the virtual CD drive. - For Linux guests: A virtual CD-ROM will appear. You might need to manually mount it and run the installation script from a terminal.
bash

sudo mkdir -p /mnt/cdrom

sudo mount /dev/cdrom /mnt/cdrom

sudo /mnt/cdrom/VBoxLinuxAdditions.run

sudo reboot
(You may need to installbuild-essentialandlinux-headersinside the guest Linux VM first, similar to how we prepared the host.)
- For Windows guests: An autorun prompt should appear. Follow the on-screen instructions. If not, open “This PC” or “My Computer” and manually run the
- After installation, reboot the guest operating system for changes to take effect.
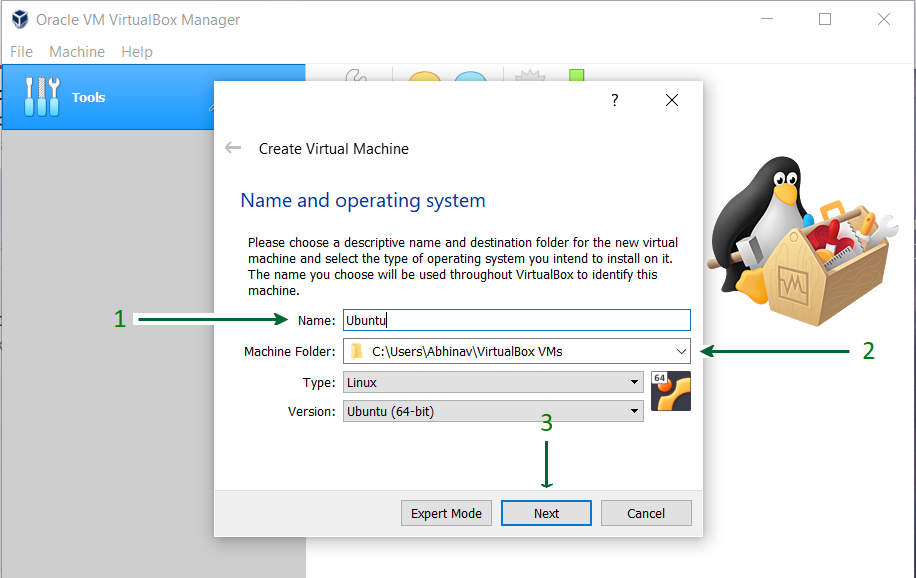
Basic Virtual Machine Creation: Your First Virtual Environment
With VirtualBox installed and enhanced, you’re ready to create your first virtual machine.
- Launch VirtualBox.
- Click the
Newbutton. - Name and Operating System: Give your VM a descriptive name (e.g., “Windows 10 Pro”). VirtualBox will often auto-detect the OS type and version based on the name. Choose the correct
Type(e.g., Microsoft Windows) andVersion(e.g., Windows 10 (64-bit)). - Memory Size: Allocate RAM. Give it enough to run comfortably (e.g., 4GB for Windows 10, 2GB for lightweight Linux distros), but don’t take too much from your host.
- Hard Disk: Select
Create a virtual hard disk nowand clickCreate.- Hard disk file type: VDI (VirtualBox Disk Image) is the default and recommended.
- Storage on physical hard disk:
Dynamically allocatedis generally preferred as it only uses space as the VM needs it, growing up to a set maximum.Fixed sizereserves all space immediately, which can be faster but less flexible. - File location and size: Choose a location for your virtual hard disk and set a reasonable size (e.g., 50GB for Windows, 20GB for Linux).
- Create! Your VM is now created.
- Install OS: Select your new VM in the VirtualBox Manager and click
Start. It will prompt you for an ISO image of the operating system you wish to install. Point it to your downloaded ISO file, and proceed with the standard OS installation process within the virtual machine window.
Troubleshooting Common VirtualBox Issues
While VirtualBox is generally stable, you might encounter issues. Here are solutions to common problems:
1. “VT-x/AMD-V hardware acceleration is not available on your system”
- Cause: Hardware virtualization (Intel VT-x or AMD-V) is not enabled in your computer’s BIOS/UEFI settings, or it’s being used by another hypervisor.
- Solution: Refer to “Step 3: Enable Virtualization in BIOS/UEFI” in the preparation section. Ensure no other virtualization software (like Hyper-V on Windows hosts) is running or conflicting.
2. “Kernel driver not installed (rc=-1908)” or similar kernel module errors
- Cause: VirtualBox kernel modules failed to load or compile, often after a kernel update, or due to missing dependencies.
- Solution:
- Ensure
dkmsandlinux-headers-$(uname -r)are installed (as per preparation steps). - Rebuild the VirtualBox kernel modules:
sudo /sbin/vboxconfig - If that fails, try uninstalling and reinstalling
virtualboxanddkms.
- Ensure
3. USB devices not recognized in the guest OS
- Cause: The VirtualBox Extension Pack is not installed, or your user is not part of the
vboxusersgroup. - Solution:
- Install the VirtualBox Extension Pack (as per post-installation steps).
- Add your user to the
vboxusersgroup:sudo usermod -aG vboxusers $USER(replace$USERwith your actual username if not currently logged in as the user). You’ll need to log out and log back in (or reboot) for the change to take effect. - Inside the VM settings, under
USB, ensure the correct USB controller (USB 2.0 or 3.0) is selected and add filters for the specific USB devices you want to use.
4. Poor graphics performance or lack of shared clipboard/drag-and-drop
- Cause: Guest Additions are not installed or are outdated within the guest operating system.
- Solution: Install or reinstall Guest Additions inside the problematic guest VM (as per post-installation steps). Ensure you reboot the guest after installation. Also, within the VM settings, under
Display, increase video memory and enable 3D acceleration if available and supported by the guest OS.
Conclusion: VirtualBox as a Catalyst for Digital Empowerment
Installing VirtualBox on Ubuntu is more than just a technical procedure; it’s an investment in your digital capabilities. It empowers you to break free from the limitations of a single operating system, fostering an environment where experimentation, secure testing, and diverse application usage can thrive.
For the tech enthusiast and professional, VirtualBox provides the ultimate sandbox for learning, development, and system administration without compromise. For those focused on branding, it offers the tools for polished demonstrations, consistent development environments, and a clear signal of technological prowess. And for anyone mindful of their finances, VirtualBox delivers incredible value, reducing hardware costs, boosting productivity, and opening avenues for new income streams through efficient resource utilization.
By following this comprehensive guide, you’ve not only installed a powerful piece of software but also unlocked a world of possibilities for innovation, learning, and productivity. Embrace the flexibility of virtualization, and watch as your Ubuntu machine transforms into a versatile command center for all your computing needs. The journey into advanced computing begins with a single, well-configured virtual machine.
aViewFromTheCave is a participant in the Amazon Services LLC Associates Program, an affiliate advertising program designed to provide a means for sites to earn advertising fees by advertising and linking to Amazon.com. Amazon, the Amazon logo, AmazonSupply, and the AmazonSupply logo are trademarks of Amazon.com, Inc. or its affiliates. As an Amazon Associate we earn affiliate commissions from qualifying purchases.