
Virtualization has revolutionized how we interact with operating systems, offering unparalleled flexibility, security, and efficiency. For anyone looking to explore the vast world of Linux, specifically Ubuntu, without committing to a full dual-boot setup or purchasing dedicated hardware, Oracle VM VirtualBox provides an elegant and free solution. This comprehensive guide will walk you through the entire process of installing Ubuntu, one of the most popular and user-friendly Linux distributions, within a VirtualBox virtual machine (VM), from initial setup to post-installation enhancements.
Installing Ubuntu in VirtualBox allows you to experiment with a new operating system in a safe, isolated environment. It’s perfect for developers testing applications across different platforms, students learning Linux commands, or casual users curious about an alternative to Windows or macOS. By the end of this tutorial, you’ll have a fully functional Ubuntu system running seamlessly on your existing computer, ready for exploration and productivity.
1. Prerequisites and Initial Preparations
Before we embark on the installation journey, it’s crucial to ensure your host system is ready and you have all the necessary components downloaded. A little preparation goes a long way in ensuring a smooth installation experience.
Understanding Your System Requirements
While VirtualBox and Ubuntu are relatively lightweight, a virtual machine still requires resources from your host computer. For a comfortable experience with Ubuntu:
-
Processor (CPU): A modern multi-core processor is highly recommended. Crucially, virtualization technology (Intel VT-x or AMD-V) must be enabled in your computer’s BIOS/UEFI settings. Without this, VirtualBox will struggle to run 64-bit operating systems. Check your motherboard manual or manufacturer’s website for instructions on enabling this feature.
-
Memory (RAM): Your host system should ideally have at least 8GB of RAM. We will allocate a portion of this (e.g., 4GB) to the Ubuntu VM.
-
Storage (Hard Drive): Ensure you have sufficient free disk space on your host machine. For the virtual hard disk, a minimum of 25-30GB is recommended for Ubuntu, especially if you plan to install additional software.
-
Operating System: VirtualBox supports Windows, macOS, and Linux as host operating systems.
Essential Downloads
You’ll need two primary software packages for this installation:
-
Oracle VM VirtualBox:
VirtualBox is the virtualization software that will host your Ubuntu VM. You can download the latest version from the official VirtualBox website (virtualbox.org). Make sure to download the correct installer for your host operating system (Windows hosts, OS X hosts, Linux distributions, etc.).
-
Ubuntu ISO Image:
This is the installation file for the Ubuntu operating system. For most users, we recommend downloading the latest Long Term Support (LTS) version of Ubuntu Desktop, as it receives security updates and support for five years. You can find the ISO image on the official Ubuntu website (ubuntu.com/download/desktop). Choose the 64-bit version.
Installing Oracle VM VirtualBox
Once you’ve downloaded the VirtualBox installer, proceed with the installation on your host system:
-
For Windows: Double-click the
.exefile and follow the on-screen prompts. Accept the default settings unless you have specific reasons to change them. You might be prompted to install device drivers during the process; allow these installations. -
For macOS: Open the
.dmgfile and double-click the VirtualBox.pkg installer. Follow the prompts. You may need to grant system extensions permissions in System Preferences > Security & Privacy. -
For Linux: Follow the specific instructions for your distribution on the VirtualBox download page, typically involving adding a repository and using your package manager (e.g.,
sudo apt install virtualbox).
After VirtualBox is installed, it’s also a good practice to download and install the VirtualBox Extension Pack from the VirtualBox website. This pack provides additional functionalities like USB 2.0 and USB 3.0 support, VirtualBox RDP, disk encryption, and NVMe boot. While not strictly necessary for the initial installation, it enhances the overall VM experience. Simply download the .vbox-extpack file and double-click it (or go to File > Preferences > Extensions in VirtualBox Manager) to install it.
2. Creating a New Virtual Machine for Ubuntu
With VirtualBox installed and your Ubuntu ISO ready, the next step is to create a new virtual machine that will house your Ubuntu installation. This involves configuring its virtual hardware specifications.
Launching VirtualBox and Initiating VM Creation
-
Open VirtualBox Manager: Launch the VirtualBox application on your host computer. You’ll see the main VirtualBox Manager window.
-
Click “New”: In the toolbar, click the “New” button (or go to Machine > New). This will open the “Create Virtual Machine” wizard.
Configuring Basic VM Settings
Follow the wizard, providing the following details:
-
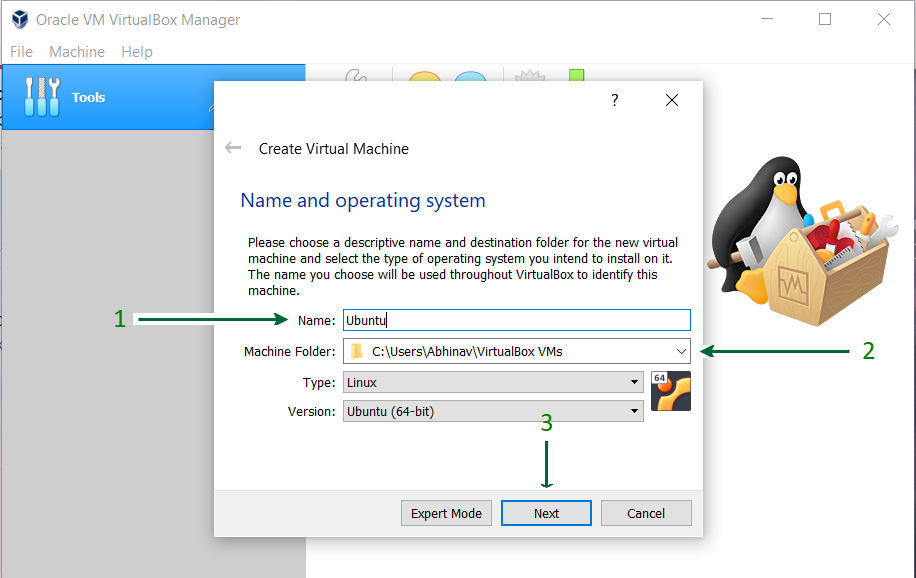
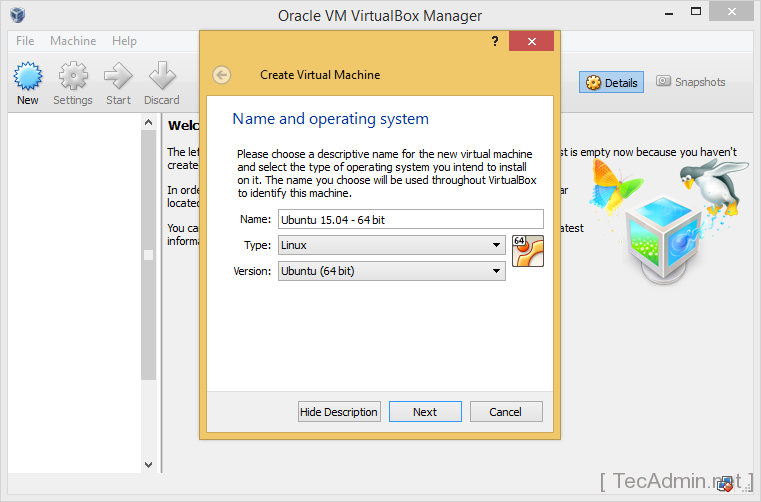
Name and Operating System:
-
Name: Give your virtual machine a descriptive name, such as “Ubuntu 22.04 LTS” or “My Ubuntu VM”.
-
Folder: You can choose the location where your VM files will be stored. The default location is usually fine.
-
Type: Select “Linux”.
-
Version: Select “Ubuntu (64-bit)”. VirtualBox is usually smart enough to pre-select this based on the name if it includes “Ubuntu”. Click “Next”.
-
-
Memory Size:
- RAM: Allocate RAM for your virtual machine. A minimum of 2048 MB (2GB) is required for Ubuntu Desktop, but 4096 MB (4GB) or more is highly recommended for a smoother user experience, especially if you plan to multitask. Do not allocate more than half of your host system’s RAM to avoid performance issues on your host. Click “Next”.
-
Hard Disk:
- Select “Create a virtual hard disk now” and click “Create”.
-
Hard Disk File Type:
- Choose “VDI (VirtualBox Disk Image)” as the file type. This is the native format for VirtualBox and generally the best choice. Click “Next”.
-
Storage on Physical Hard Disk:
- Select “Dynamically allocated”. This means the virtual disk file will only grow as you use it, up to its maximum size. This saves disk space on your host compared to a “Fixed size” disk. Click “Next”.
-
File Location and Size:
-
Location: The default location is usually within your VirtualBox VMs folder.
-
Size: This is the maximum size your virtual hard disk can grow to. For Ubuntu, 25-30 GB is a good starting point. If you plan to install many applications or store large files, you might want to allocate more (e.g., 50-60 GB). Click “Create”.
-
You have now created the virtual machine container. It appears in the left panel of the VirtualBox Manager.
Advanced VM Configuration (Optional but Recommended)
Before starting the VM, it’s a good idea to fine-tune a few more settings for optimal performance and functionality. Select your newly created VM in the VirtualBox Manager and click “Settings” (or right-click the VM and choose Settings).
-
System Settings:
-
Go to System > Processor. Increase the number of Processors to 2 or more, if your host CPU has enough cores. Do not exceed the number of physical cores on your host.
-
Ensure “Enable PAE/NX” is checked.
-
Go to System > Motherboard. Ensure “Enable I/O APIC” is checked.
-
Check that “Hardware Virtualization” (VT-x/AMD-V) is enabled in the Acceleration tab.
-
-
Display Settings:
-
Go to Display > Screen. Increase Video Memory to at least 64MB or 128MB.
-
Check “Enable 3D Acceleration”. This helps with graphical performance within the VM.
-
-
Storage Settings:
-
Go to Storage. Under “Controller: IDE,” click the “Empty” optical drive icon.
-
On the right side, click the small CD icon next to “Optical Drive:” and choose “Choose a disk file…” (or “Choose/Create a Virtual Optical Disk…”).
-
Navigate to where you saved your Ubuntu ISO image and select it. This attaches the ISO as if it were a physical DVD in the VM’s optical drive, allowing it to boot from it.
-
-
Network Settings (Optional):
- Go to Network > Adapter 1. The default “NAT” mode is generally fine for most users, allowing your VM to access the internet. If you need more advanced networking (e.g., for server testing or specific network configurations), you might explore “Bridged Adapter” later.
Click “OK” to save all the changes to your VM’s settings.
3. The Ubuntu Installation Process

Now that your virtual machine is configured and ready, it’s time to actually install Ubuntu onto its virtual hard drive. This process is very similar to installing Ubuntu on a physical computer.
Starting the Virtual Machine
-
Select VM and Start: In the VirtualBox Manager, select your Ubuntu VM from the list on the left and click the “Start” button in the toolbar.
-
Boot from ISO: The VM will power on and should automatically boot from the Ubuntu ISO image you attached. You’ll see the Ubuntu boot menu or directly start into the live environment.
Navigating the Ubuntu Installer
Once Ubuntu starts loading, you’ll enter the graphical installer:
-
Language Selection: On the initial screen, select your preferred language from the left pane and then click “Install Ubuntu.”
-
Keyboard Layout: Choose your keyboard layout. The installer usually detects this correctly, but you can test it in the provided text field. Click “Continue.”
-
Updates and Other Software:
-
Normal installation: This installs a web browser, utilities, office software, games, and media players. This is suitable for most users.
-
Download updates while installing Ubuntu: It’s recommended to check this box to ensure your system is up-to-date from the start.
-
Install third-party software for graphics and Wi-Fi hardware and additional media formats: This is also recommended, as it installs proprietary drivers and codecs that might enhance compatibility and media playback. Click “Continue.”
-
Disk Partitioning and Installation Type
This is a crucial step, but remember you are operating within a virtual machine, so there’s no risk to your host system’s data.
-
Installation Type:
-
Select “Erase disk and install Ubuntu.” Crucially, this refers only to the virtual hard disk you created for the VM, NOT your physical hard drive. This is the safest and easiest option for a VM. The installer will automatically manage the virtual disk partitioning.
-
Click “Install Now.”
-
-
Confirm Changes: A warning message will appear, listing the changes that will be made to the virtual disk. Review it and click “Continue” to proceed.
Regional Settings and User Creation
-
Where are you?: Click on your location on the map (or type it in) to set your timezone. Click “Continue.”
-
Who are you?:
-
Your name: Enter your full name.
-
Your computer’s name: This will be automatically suggested, but you can change it.
-
Pick a username: A username will be suggested based on your name.
-
Choose a password: Create a strong password and confirm it.
-
Login Option: Select “Require my password to log in” for better security. “Log in automatically” is less secure but faster.
-
Click “Continue.”
-
Completing the Installation
The installer will now begin copying files and installing Ubuntu onto your virtual hard disk. This process can take some time, depending on your host system’s performance and internet speed (if downloading updates).
Once the installation is complete, you’ll see a message prompting you to “Restart Now.” Click this button.
Important: After the VM restarts, if it tries to boot back into the installer, it means the virtual optical drive is still attached. VirtualBox usually detects this and prompts you to “Please remove the installation medium, then press ENTER.” If not, you can manually “eject” the ISO: while the VM is off, go to its Settings > Storage, select the Ubuntu ISO under the IDE controller, and click the small disk icon with a minus sign to remove it. Then start the VM again.
Your Ubuntu VM should now boot into your newly installed system, presenting you with the login screen. Enter the password you created, and you’ll be greeted by the Ubuntu desktop!
4. Post-Installation: Enhancing Your Ubuntu VM Experience
While Ubuntu is now installed, a few additional steps can significantly improve its performance, usability, and integration with your host system. These are primarily achieved through the installation of VirtualBox Guest Additions.
Installing VirtualBox Guest Additions
VirtualBox Guest Additions are a set of software drivers and system applications designed to improve the performance and usability of guest operating systems (like Ubuntu) running in VirtualBox. They enable features such as:
-
Improved Video Performance: Better screen resolutions, including seamless resizing of the VM window.
-
Seamless Mouse Integration: Your mouse cursor moves smoothly between the host and guest without needing to capture/release it.
-
Shared Clipboard: Copy and paste text and images between your host and guest OS.
-
Drag and Drop: Move files directly between host and guest.
-
Shared Folders: Easily access files from your host system within the VM.
To install Guest Additions:
-
Boot into Ubuntu VM: Log into your Ubuntu desktop.
-
Insert Guest Additions CD Image: From the VirtualBox menu bar at the top of your host screen, go to
Devices > Insert Guest Additions CD image.... -
Run the Installer:
-
A dialog might pop up in Ubuntu asking to “Run” the software found on the virtual CD. Click “Run” and enter your password if prompted.
-
If no dialog appears, open the “Files” application in Ubuntu, navigate to the “VirtualBox Guest Additions” CD drive (it might be labeled
VBox_GAs_...), right-click an empty area, and select “Open in Terminal”. -
In the terminal, run the command:
sudo sh ./VBoxLinuxAdditions.run -
Enter your password and let the script run. It will install the necessary drivers.
-
-
Reboot VM: Once the installation finishes, restart your Ubuntu VM (
sudo rebootin terminal or click the power icon and choose Restart).
After rebooting, you should immediately notice improvements, such as the ability to resize the VM window and have the resolution automatically adjust, and your mouse moving seamlessly.
Updating Ubuntu
Keeping your Ubuntu system updated is crucial for security, bug fixes, and access to new features.
-
Open Terminal: Press
Ctrl+Alt+Tto open a terminal window. -
Update Package Lists: Run the command:
sudo apt updateThis fetches the latest information about available packages from the Ubuntu repositories.
-
Upgrade Installed Packages: Run the command:
sudo apt upgradeThis will install any available updates for the software currently on your system. Confirm with
Ywhen prompted. -
Optional: Clean up:
sudo apt autoremove

sudo apt clean
These commands remove unnecessary packages and clear the local repository cache.
Configuring Shared Folders and Clipboard
Now that Guest Additions are installed, you can enable convenient file sharing and clipboard functionality.
-
Shared Clipboard and Drag’n’Drop:
-
With your Ubuntu VM running, go to the VirtualBox menu bar on your host machine:
Devices > Shared Clipboardand select “Bidirectional.” -
Do the same for
Devices > Drag and Dropand select “Bidirectional.”
-
-
Shared Folders:
-
From the VirtualBox menu on your host:
Devices > Shared Folders > Shared Folder Settings.... -
In the pop-up window, click the small “Add new shared folder” icon (a folder with a plus sign).
-
Folder Path: Click “Other” and browse to a folder on your host system that you want to share with Ubuntu.
-
Folder Name: VirtualBox will suggest a name; you can keep it or change it.
-
Check “Auto-mount” and “Make Permanent.”
-
Click “OK” and then “OK” again to close the settings.
-
Accessing in Ubuntu: Your shared folder will typically be mounted under
/media/sf_<your_shared_folder_name>in Ubuntu. You may need to add your user to thevboxsfgroup to access it:sudo usermod -aG vboxsf $USERThen, restart your VM for the changes to take effect.
-
Adjusting Display Resolution
With Guest Additions, your Ubuntu display resolution should automatically adjust when you resize the VirtualBox window. If not, or if you prefer a fixed resolution:
-
In Ubuntu, go to
Settings > Displays. -
You should now have a wide range of resolutions available. Select your desired resolution and click “Apply.”
Conclusion
Congratulations! You have successfully installed Ubuntu within VirtualBox, configured it for optimal performance, and enhanced its usability with Guest Additions. You now have a fully functional Linux environment at your fingertips, safely isolated from your primary operating system.
This setup offers a powerful sandbox for learning, development, and experimentation. Whether you’re a seasoned developer needing to test applications in a Linux environment, a curious user taking their first steps into the world of open-source, or an educator demonstrating Linux concepts, a VirtualBox Ubuntu VM is an invaluable tool. Embrace the flexibility of virtualization, explore the rich features of Ubuntu, and continue your journey into the vast and innovative realm of technology.
aViewFromTheCave is a participant in the Amazon Services LLC Associates Program, an affiliate advertising program designed to provide a means for sites to earn advertising fees by advertising and linking to Amazon.com. Amazon, the Amazon logo, AmazonSupply, and the AmazonSupply logo are trademarks of Amazon.com, Inc. or its affiliates. As an Amazon Associate we earn affiliate commissions from qualifying purchases.