In today’s rapidly evolving technological landscape, having a versatile and robust operating system is paramount. Ubuntu, a free and open-source Linux distribution, has consistently ranked as a top choice for users seeking performance, security, and flexibility. Whether you’re a seasoned tech enthusiast, a student exploring new digital frontiers, or a professional aiming to enhance your productivity, understanding how to install Ubuntu can unlock a world of possibilities. This comprehensive guide will walk you through the entire installation process, from preparing your system to the final configurations, ensuring a smooth and successful transition.
Understanding Ubuntu and Its Advantages
Before diving into the installation steps, it’s beneficial to grasp what makes Ubuntu stand out in the crowded OS market. Ubuntu is built upon the Debian Linux distribution, offering a user-friendly experience that appeals to both beginners and advanced users. Its open-source nature means it’s free to download, use, and distribute, making it an economically attractive option. This transparency also fosters a vibrant community that actively contributes to its development and provides extensive support.
The advantages of choosing Ubuntu are numerous:
- Cost-Effective: As mentioned, Ubuntu is entirely free. This eliminates licensing fees that are common with proprietary operating systems, making it ideal for individuals and organizations looking to manage their IT budgets effectively. This aligns perfectly with the principles of smart personal finance and efficient business operations.
- Security: Ubuntu boasts a strong security framework. Regular updates and a proactive community identify and patch vulnerabilities swiftly, making it a more secure choice against malware and viruses compared to some other operating systems. This is crucial for both personal digital security and corporate reputation management.
- Flexibility and Customization: Ubuntu offers unparalleled flexibility. Users can customize almost every aspect of the operating system, from the desktop environment to individual application settings. This level of control is highly valued by developers, designers, and anyone who needs an OS tailored to their specific workflow.
- Vast Software Repository: Ubuntu provides access to a massive repository of free and open-source software. From office suites and creative tools to development environments and server applications, you can easily find and install the software you need with a few clicks.
- Performance: Ubuntu is known for its efficiency and can run smoothly on a wide range of hardware, including older machines that might struggle with more resource-intensive operating systems. This can breathe new life into existing hardware, a smart approach to personal finance and gadget longevity.
- Strong Community Support: The Ubuntu community is one of the largest and most active in the open-source world. This means that if you encounter any issues or have questions, you can find a wealth of information, forums, and tutorials to help you.
Preparing for Ubuntu Installation
A successful installation hinges on proper preparation. This section will guide you through the essential steps to ensure your system is ready to welcome Ubuntu.
1. Backing Up Your Data
This is arguably the most critical step. Before making any significant changes to your system’s storage, it is imperative to back up all your important files, documents, photos, and any other data you cannot afford to lose. While the Ubuntu installation process is generally safe, accidents can happen, and having a backup will provide peace of mind.
- External Hard Drives/SSDs: The most straightforward method is to copy your files to an external storage device.
- Cloud Storage Services: Services like Google Drive, Dropbox, or OneDrive can be used to sync your important files. Ensure your sync is complete before proceeding.
- Network Attached Storage (NAS): For more advanced users or businesses, a NAS device offers a centralized and robust backup solution.
2. Downloading the Ubuntu ISO Image
The Ubuntu operating system is distributed as an ISO image file, which is a complete archive of the installation disc. You’ll need to download this file from the official Ubuntu website.
- Navigate to the Official Ubuntu Website: Go to ubuntu.com.
- Select the Latest LTS Version: For most users, especially those prioritizing stability and long-term support, downloading the latest Long Term Support (LTS) version is recommended. LTS versions receive security updates and maintenance for five years. As of my last update, this would be Ubuntu 22.04 LTS (“Jammy Jellyfish”).
- Choose the Desktop Version: Ensure you download the “Desktop” image for installing Ubuntu on your personal computer or laptop.
- Download the ISO: The download will begin automatically once you select the appropriate version. This file can be quite large, so ensure you have a stable internet connection.
3. Creating a Bootable USB Drive or DVD
Once you have the ISO image, you need to write it to a bootable medium that your computer can use to start the installation process. A USB flash drive is the most common and recommended method due to its speed and reusability.
Using a USB Drive
You will need a USB flash drive with at least 8GB of storage. The process of creating a bootable USB will erase any existing data on the drive, so back up anything important from the USB first.
- For Windows Users:
- Rufus: A popular and user-friendly free tool. Download Rufus from its official website.
- Open Rufus, select your USB drive, click “SELECT” to choose your downloaded Ubuntu ISO file, and click “START.” Confirm any prompts about erasing the drive.
- For macOS Users:
- Disk Utility and Terminal: macOS has built-in tools. You can use the
ddcommand in Terminal for a more technical approach, or third-party tools like Etcher. - Balena Etcher: A cross-platform, open-source tool that is very easy to use. Download Etcher, select your Ubuntu ISO, select your USB drive, and click “Flash!”
- Disk Utility and Terminal: macOS has built-in tools. You can use the
- For Linux Users:
- Startup Disk Creator (Ubuntu): If you’re already on Ubuntu, this tool is often pre-installed and straightforward.
- dd command (Terminal): Open a terminal and use the command
sudo dd if=/path/to/ubuntu.iso of=/dev/sdX bs=4M status=progress(replace/path/to/ubuntu.isowith the actual path to your ISO file and/dev/sdXwith your USB drive identifier – be extremely careful to identify the correct drive!).
Using a DVD (Less Common)
If you prefer to use a DVD, you’ll need a blank DVD and a DVD burner. Most burning software on Windows, macOS, or Linux will have an option to “Burn Image” or “Burn ISO.” Select your Ubuntu ISO file and burn it to the DVD.
4. Checking Your System Requirements
While Ubuntu is known for its efficiency, it’s good practice to ensure your hardware meets the minimum requirements for a smooth experience.
- Processor: 2 GHz dual-core processor or better.
- RAM: 4 GB of system memory (more is always better for multitasking and performance).
- Storage: 25 GB of free hard drive space (for the OS and applications; more is recommended if you plan to install many programs).
- Graphics Card: Capable of 1024×768 resolution.
- Internet Connection: Required for downloading updates and software during installation.
5. Understanding Installation Options: Dual Booting vs. Replacing
You have two primary choices when installing Ubuntu:
- Dual Booting: This allows you to keep your existing operating system (e.g., Windows) and install Ubuntu alongside it. When you start your computer, you’ll be presented with a menu to choose which OS to boot into. This is ideal for users who need access to both operating systems for different tasks or software.
- Replacing Existing OS: This option will erase your current operating system and install Ubuntu as the sole operating system on your computer. This is a good choice if you’re committed to Ubuntu and want a clean slate.
For dual-booting, you’ll need to ensure you have free unallocated space on your hard drive. This can often be managed during the Ubuntu installation process, or you can pre-partition your drive using your current OS’s disk management tools.
The Ubuntu Installation Process: Step-by-Step
With your preparations complete, you’re ready to begin the installation. This section will guide you through each stage of the installer.
1. Booting from Your Installation Media
- Insert the Bootable USB/DVD: Plug in your bootable USB drive or insert your DVD into the computer.
- Restart Your Computer: Reboot your machine.
- Access Boot Menu/BIOS: Immediately after powering on your computer, you’ll need to press a specific key to access the Boot Menu or BIOS/UEFI settings. Common keys include
F2,F10,F12,Del, orEsc. The exact key varies by manufacturer, and it’s often displayed briefly on the screen during startup. - Select Boot Device: In the Boot Menu, select your USB drive or DVD drive as the primary boot device. If you entered BIOS/UEFI, you’ll need to navigate to the boot order settings and move your USB/DVD drive to the top of the list.
- Save and Exit: Save your changes and exit the BIOS/UEFI. Your computer should now boot from the Ubuntu installation media.
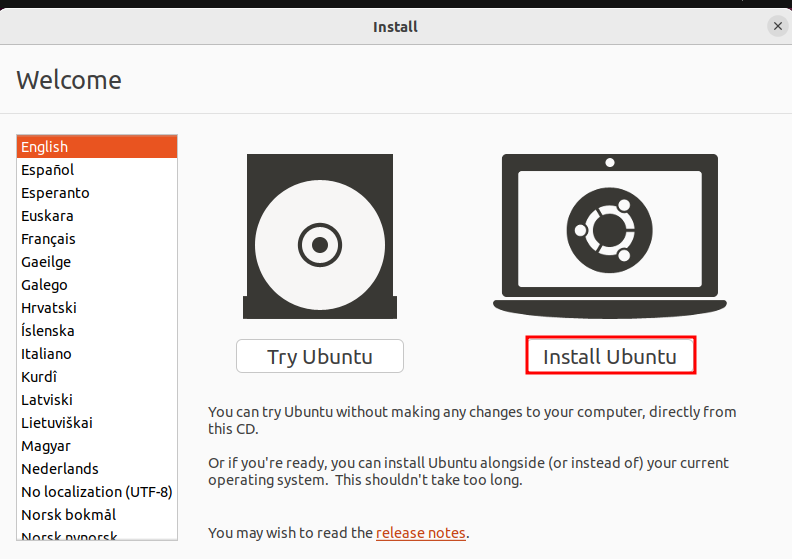
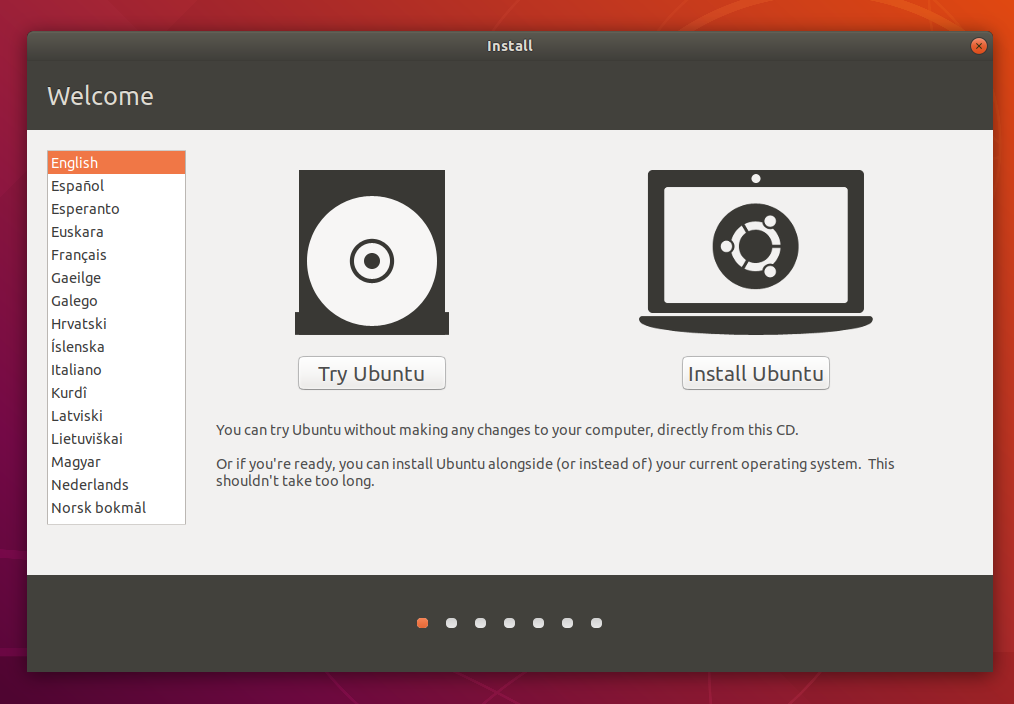
2. Welcome and Initial Setup
Upon booting from the USB/DVD, you’ll be greeted by the Ubuntu boot menu.
- Try Ubuntu or Install Ubuntu: You’ll typically see two main options:
- “Try Ubuntu without installing”: This option boots into a live session of Ubuntu directly from the USB drive. It allows you to explore the desktop environment, test hardware compatibility, and even try out some applications before committing to an installation. This is highly recommended for a first-time user.
- “Install Ubuntu”: This option directly starts the installation wizard.
- Choose Your Language: Select your preferred language for the installation process and for your Ubuntu system. Click “Continue.”
- Keyboard Layout: Choose your keyboard layout. You can test it in the provided text box. Click “Continue.”
3. Updates and Other Software
This screen presents important options regarding software installation.
- Normal Installation vs. Minimal Installation:
- Normal Installation: Installs a web browser, utilities, office software, games, and media players. This is suitable for most users.
- Minimal Installation: Installs a web browser and basic utilities. This is for users who want to build their system from the ground up or who have limited disk space.
- Download updates while installing Ubuntu: Checking this option will download the latest updates for Ubuntu during the installation process. This saves you time later but requires a stable internet connection.
- Install third-party software for graphics and Wi-Fi hardware, Flash, MP3 and other media: This is highly recommended. It installs proprietary drivers and codecs that are often needed for hardware like Wi-Fi cards, graphics cards, and for playing various media formats. Click “Continue.”
4. Installation Type (The Crucial Step)
This is where you decide how Ubuntu will be installed on your hard drive.
- Install Ubuntu alongside [Your Current OS]: If you’re dual-booting, this option will automatically resize your existing partitions to make space for Ubuntu. The installer will suggest a partition layout, and you can usually adjust the slider to allocate space between the two operating systems. This is the easiest option for dual-booting.
- Erase disk and install Ubuntu: This option will format your entire hard drive and install Ubuntu as the only operating system. Ensure you have backed up all your data before selecting this.
- Something else: This option provides complete manual control over disk partitioning. You will create, delete, and resize partitions yourself. This is for advanced users who want to create custom partition schemes or have specific requirements.
For Dual Booting (Recommended for most):
- Select “Install Ubuntu alongside [Your Current OS]”.
- You’ll see a visual representation of your hard drive and how space will be allocated.
- Drag the slider to adjust the space allocated to Ubuntu and your existing OS. Aim for at least 25GB for Ubuntu, but more is better if you plan to install many applications.
- Click “Install Now.”
For Replacing Existing OS:
- Select “Erase disk and install Ubuntu”.
- The installer will warn you that all data will be erased. Confirm your decision.
- Click “Install Now.”
For Manual Partitioning (“Something else”):
- You’ll see a list of your hard drives and partitions.
- You’ll typically need to create at least two partitions:
- Root Partition (
/): This is where the operating system files will be installed. Format it asExt4 journaling file systemand set the mount point to/. Allocate at least 20-25GB. - Swap Area: This acts as virtual RAM. The recommended size is usually equal to or double your RAM, or a minimum of 2GB. Format it as
swap area. - Home Partition (
/home): (Optional but recommended) This is where your personal files and user settings will be stored. Separating it makes it easier to reinstall Ubuntu in the future without losing your data. Format it asExt4 journaling file systemand set the mount point to/home.
- Root Partition (
- Ensure the “Device for boot loader installation” is set to your primary hard drive (e.g.,
/dev/sda– NOT a specific partition like/dev/sda1). - Click “Install Now.”
Confirming Changes:
After selecting your installation type, the installer will show you a summary of the changes to be made to your disk. Review this carefully and click “Continue.”
5. Location and User Account Setup
- Where are you? Select your time zone on the world map. This sets the system clock. Click “Continue.”
- Who are you? This is where you create your user account:
- Your name: Your full name (this is for display purposes).
- Your computer’s name: The hostname your computer will have on the network (e.g., “my-ubuntu-pc”).
- Pick a username: A short, lowercase name for your user account (e.g., “john”).
- Choose a password: A strong, memorable password for your user account.
- Confirm your password: Re-enter your password.
- Login automatically / Require my password to log in: It’s generally recommended to require a password for security.
- Click “Continue.”
6. Installation Progress
The installer will now begin copying files and configuring your system. This process can take anywhere from 15 minutes to over an hour, depending on your computer’s speed and the options you selected (e.g., downloading updates). You can observe the progress on the screen, which often shows highlights of Ubuntu’s features.
7. Restart and First Boot
Once the installation is complete, you’ll see a message prompting you to restart your computer.
- Restart Now: Click this button.
- Remove Installation Media: You will be prompted to remove the USB drive or DVD and press Enter. Do this promptly to ensure your computer boots into the newly installed Ubuntu system and not back into the installer.
Upon restarting, if you chose to dual-boot, you will see the GRUB boot loader menu, allowing you to select either Ubuntu or your other operating system. If you replaced your OS, Ubuntu will boot directly.
Post-Installation Configuration and Next Steps
Congratulations! You have successfully installed Ubuntu. Now, let’s fine-tune your system and explore its capabilities.
1. Initial System Updates
Even if you downloaded updates during installation, it’s a good practice to check for any newly released updates immediately after your first boot.
- Open the Software Updater: You can usually find “Software Updater” in the application menu.
- Check for Updates: The application will scan for available updates.
- Install Updates: Click “Install Now” to download and install any pending updates. This is crucial for maintaining system security and stability.
2. Installing Essential Software
Ubuntu comes with a good selection of pre-installed software, but you’ll likely want to add more.
- Ubuntu Software Center: This is Ubuntu’s graphical application store, similar to app stores on smartphones. Search for applications, read reviews, and install them with ease.
- Command Line (APT): For users comfortable with the terminal, the Advanced Packaging Tool (APT) is incredibly powerful.
- To update your package list:
sudo apt update - To upgrade installed packages:
sudo apt upgrade - To install a package (e.g., VLC media player):
sudo apt install vlc
- To update your package list:
Popular Software Categories and Examples:
- Web Browsers: Firefox (usually pre-installed), Chrome, Brave.
- Office Suites: LibreOffice (usually pre-installed), WPS Office.
- Media Players: VLC, Rhythmbox, Audacious.
- Image Editors: GIMP, Krita.
- Video Editors: Shotcut, OpenShot, DaVinci Resolve (requires manual installation).
- Development Tools: VS Code, Sublime Text, Docker, Git.
- Communication: Slack, Discord, Telegram.
3. Exploring the Desktop Environment (GNOME)
Ubuntu’s default desktop environment is GNOME, known for its clean and intuitive interface.
- The Dash/Activities Overview: Pressing the
Superkey (Windows key) or clicking “Activities” in the top-left corner opens the overview. Here you can launch applications, search for files, and manage your workspaces. - Workspaces: Ubuntu supports virtual desktops, allowing you to organize your open windows into separate spaces, enhancing productivity.
- System Settings: Access the “Settings” application from the Activities overview to customize your display, Wi-Fi, Bluetooth, power management, appearance, and more.
4. Customization and Personalization
Ubuntu offers extensive customization options to make it truly yours.
- Themes and Appearance: Change the desktop theme, icons, fonts, and wallpaper through the “Appearance” settings.
- Extensions: GNOME Extensions can add new functionality and tweak the user interface. You can find and install them via the GNOME Extensions website and browser integration.
- Dock/Panel: Customize the position and behavior of the dock (the application launcher on the left side by default).
5. Security Best Practices
- Regular Updates: Keep your system updated for the latest security patches.
- Strong Passwords: Use complex, unique passwords for your user account and any online services.
- Firewall (UFW): Ubuntu comes with the Uncomplicated Firewall (UFW). Ensure it’s enabled, especially if you’re on a network where you don’t fully trust other devices. You can manage it via the terminal:
sudo ufw enablesudo ufw status
- Be Cautious with Software: Only install software from trusted sources, primarily the Ubuntu Software Center or reputable PPAs (Personal Package Archives).

Conclusion
Installing Ubuntu is a rewarding process that opens the door to a powerful, flexible, and secure computing experience. Whether you’re looking to breathe new life into older hardware, seeking a more secure and customizable alternative to proprietary operating systems, or venturing into the world of open-source development, Ubuntu is an excellent choice. By following this guide, you can confidently navigate the installation process and begin enjoying the many benefits that this leading Linux distribution has to offer. Remember, the Ubuntu community is always there to help, so don’t hesitate to explore, experiment, and learn. Your journey into the world of Ubuntu has just begun.
aViewFromTheCave is a participant in the Amazon Services LLC Associates Program, an affiliate advertising program designed to provide a means for sites to earn advertising fees by advertising and linking to Amazon.com. Amazon, the Amazon logo, AmazonSupply, and the AmazonSupply logo are trademarks of Amazon.com, Inc. or its affiliates. As an Amazon Associate we earn affiliate commissions from qualifying purchases.