In the rapidly evolving landscape of technology, your choice of operating system (OS) is more than just a technical preference; it is a strategic decision that impacts your productivity, your digital security, and even your personal brand. Whether you are a developer looking for a robust environment for AI tools, a freelancer trying to optimize your business finance by moving away from expensive software subscriptions, or a tech enthusiast eager to explore the world of open-source software, Ubuntu remains the gold standard of Linux distributions.
Installing Ubuntu from a USB drive is the most efficient and popular method to breathe new life into an old laptop or to set up a high-performance workstation. This guide will walk you through the entire process, from preparing your hardware to fine-tuning your new environment for maximum efficiency.
Preparation: What You Need Before Starting the Transition
Before we dive into the technical steps, it is essential to understand why this move matters within the context of your digital life. Transitioning to Ubuntu isn’t just about changing an interface; it’s about taking control of your hardware. In terms of “Money” and “Personal Finance,” Ubuntu is entirely free, eliminating the need for recurring license fees and reducing the overhead costs of your tech stack.
Hardware and Software Requirements
To ensure a smooth installation, you must gather a few essential items. First, you will need a USB flash drive with at least 8GB of capacity. Ensure the drive is empty or that you have backed up its contents, as the creation process will erase everything on it.
From a “Tech” perspective, your computer should ideally meet the following minimum requirements for Ubuntu 22.04 LTS (or newer):
- A 2 GHz dual-core processor or better.
- 4 GB of system memory (RAM).
- 25 GB of free hard drive space.
- Internet access (helpful for installing updates and third-party drivers during the setup).
Protecting Your Data and Digital Security
Before making any major changes to your operating system, backing up your data is the most critical step in maintaining your digital security. Use a cloud service or an external hard drive to save your documents, photos, and browser bookmarks. When you reformat a drive to install a new OS, there is no “undo” button for lost data. For those focusing on “Brand Strategy” and “Corporate Identity,” ensuring that your client files and brand assets are safely stored off-machine prevents catastrophic downtime.
Step 1: Creating the Bootable Ubuntu USB Drive
The first technical hurdle is turning a standard USB stick into a “bootable” device that your computer can recognize as an installation source. To do this, you need two things: the Ubuntu ISO file and a flashing tool.
Downloading the Ubuntu ISO
Head over to the official Ubuntu website. You will typically see two versions: the “LTS” (Long Term Support) and the “Interim” release. For most users, especially those using their machine for business finance or professional branding work, the LTS version is highly recommended. It offers five years of guaranteed security updates and stability, ensuring your workflow isn’t interrupted by experimental bugs.
Using Rufus or BalenaEtcher
Once you have the ISO file (which is usually around 3-4 GB), you need software to “burn” it to the USB.
- For Windows Users: Rufus is the industry standard. It is lightweight, fast, and reliable. Open Rufus, select your USB drive, select the Ubuntu ISO you just downloaded, and click “Start.”
- For macOS/Linux Users: BalenaEtcher is an excellent, user-friendly tool. Its “Flash from file” interface is intuitive, making it nearly impossible to select the wrong drive by mistake.
Once the process finishes, your USB drive is no longer just a storage device; it is now a portable gateway to the Linux ecosystem.
Step 2: Configuring Your PC to Boot from USB
Most computers are programmed to boot from the internal hard drive by default. To install Ubuntu, we need to intercept this process and tell the hardware to look at the USB port first.
Accessing BIOS/UEFI Settings
Restart your computer with the USB drive plugged in. As soon as the screen lights up, you will need to tap a specific function key repeatedly. This key varies by brand:
- Dell: F12
- HP: F9 or Esc
- Lenovo: F12 or Fn+F12
- ASUS/Acer: F2 or F12
This will bring up the “Boot Menu.” Select your USB drive (often labeled as “UEFI: [USB Name]”) from the list. If you cannot find a boot menu, you may need to enter the BIOS/UEFI setup (usually via the Del or F2 key) and change the “Boot Priority” so that “Removable Devices” or “USB” is at the top of the list.
In the spirit of “Digital Security,” this is also where you might encounter “Secure Boot.” While modern Ubuntu versions support Secure Boot, some specialized hardware might require you to disable it temporarily to allow the Linux kernel to initialize properly.
Step 3: The Ubuntu Installation Process
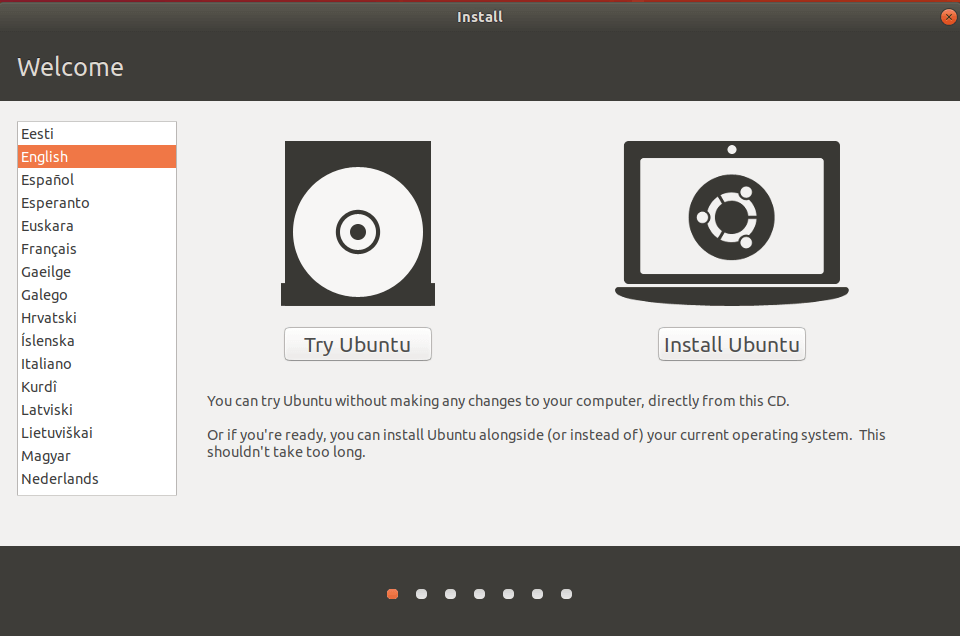
Once your computer boots from the USB, you will be greeted by the Ubuntu “Grub” menu. Select “Try or Install Ubuntu.” The system will load a live version of the OS into your RAM, allowing you to test your Wi-Fi, sound, and display before committing to the installation.
Choosing Your Installation Type
After clicking the “Install Ubuntu” icon on the desktop, you will follow a series of prompts:
- Keyboard Layout: Choose your preferred language.
- Updates and Other Software: Choose “Normal Installation.” I highly recommend checking the box that says “Install third-party software for graphics and Wi-Fi hardware.” This ensures that proprietary drivers (like those for NVIDIA cards) are installed, which is vital for those using AI tools or video editing software for their brand marketing.
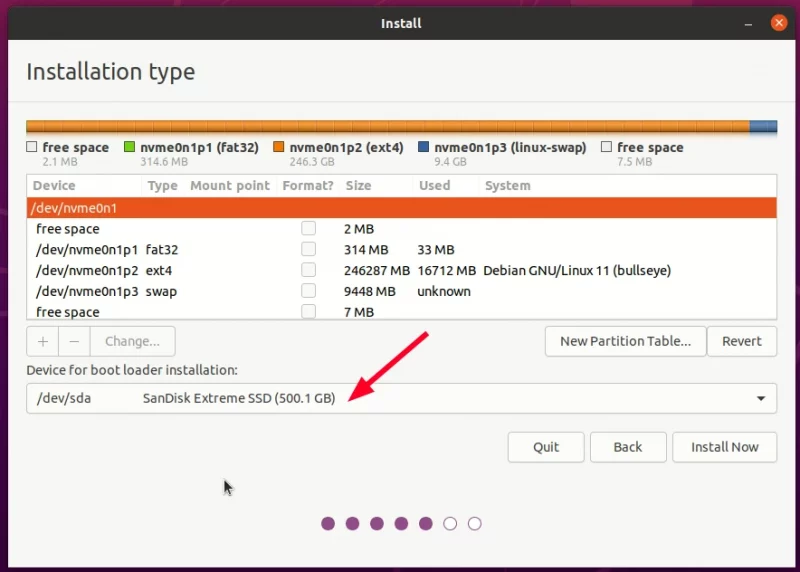
- Installation Type: This is the most crucial choice.
- Erase disk and install Ubuntu: This is the cleanest option if you want Ubuntu to be your only OS. It optimizes the drive for Linux performance.
- Install Ubuntu alongside [Windows/macOS]: This is “Dual Booting.” It allows you to choose between operating systems every time you turn on the computer—ideal for those who need specific Windows-only financial tools but want Linux for their daily productivity.
Finalizing User Accounts and Time Zones
The installer will ask for your location to set the clock and then prompt you to create a user account. Choose a strong password. From a “Digital Security” perspective, Linux is inherently more secure than Windows, but a weak password remains a vulnerability. You can also choose to “Require my password to log in” for extra protection of your personal and business data.
Post-Installation: Optimizing Ubuntu for Productivity and Security
Once the installation is complete, the system will ask you to remove the USB drive and restart. Welcome to your new desktop! However, the work doesn’t stop here. To truly leverage Ubuntu for your “Side Hustles” or “Corporate Identity” work, you need to optimize the environment.
Installing Essential Software and Drivers
The first thing you should do is open the “Terminal” (Ctrl+Alt+T) and run a quick update:
sudo apt update && sudo apt upgrade
This ensures every piece of software is patched against the latest vulnerabilities. Next, visit the “Software Center” to install the tools that drive your income and creativity:
- Productivity: LibreOffice (pre-installed) or OnlyOffice for document management.
- Design & Brand Strategy: GIMP (Photo editing), Inkscape (Vector graphics), and OBS Studio for content creation.
- Money & Finance: HomeBank or GnuCash to track your investments and online income.
- Tech & AI: Install Python, Docker, or VS Code to begin exploring AI tools and software development.
Customizing the UI for Personal Branding
Linux is famous for its customization. You can change themes, icons, and dock positions to match your aesthetic. For professionals, a clean, distraction-free desktop environment can significantly boost productivity. Explore “GNOME Tweaks” to fine-tune how your OS feels, ensuring it aligns with the professional image you want to maintain.
Conclusion: The Future of Your Digital Workspace
Installing Ubuntu from a USB drive is more than just a technical tutorial; it is an entry point into a world of digital sovereignty. By choosing Linux, you are prioritizing security, embracing cost-effective software solutions, and joining a global community of innovators.
Whether you are managing a brand, tracking personal finance, or building the next big AI tool, Ubuntu provides a stable, powerful, and free foundation. Now that your installation is complete, take the time to explore the terminal, experiment with new apps, and enjoy the speed and reliability of an operating system designed for the modern age. Your journey into the world of open-source technology has just begun.
aViewFromTheCave is a participant in the Amazon Services LLC Associates Program, an affiliate advertising program designed to provide a means for sites to earn advertising fees by advertising and linking to Amazon.com. Amazon, the Amazon logo, AmazonSupply, and the AmazonSupply logo are trademarks of Amazon.com, Inc. or its affiliates. As an Amazon Associate we earn affiliate commissions from qualifying purchases.