In an increasingly digital world, a reliable internet connection is no longer a luxury but a fundamental necessity for work, education, entertainment, and staying connected with loved ones. At the heart of this connection in most homes and small offices lies the router. Among the myriad of options available, TP-Link has carved out a significant niche, celebrated for its blend of performance, affordability, and user-friendly design. This guide will walk you through the entire process of installing your TP-Link router, transforming you from a hesitant beginner into a confident network administrator. Beyond just getting online, we’ll delve into optimizing your setup, securing your network, and understanding how a robust, well-configured router contributes to your overall digital security and productivity.
Laying the Foundation – Why TP-Link and What You Need
Before we dive into the technicalities, it’s worth understanding why TP-Link often stands out in the crowded market of networking hardware. Their commitment to innovation and accessibility has made them a go-to brand for millions, and a little preparation can make your installation process remarkably smooth.
The TP-Link Advantage: Reliability and Innovation
TP-Link is a global leader in networking products, renowned for its diverse portfolio, which includes everything from basic home routers to advanced mesh Wi-Fi systems and business-grade networking solutions. Their brand strategy revolves around providing cutting-edge technology—such as Wi-Fi 6, Wi-Fi 7, and robust mesh networking capabilities—at competitive price points. This focus on value for money, coupled with an emphasis on intuitive setup processes, positions TP-Link as an excellent choice for both tech novices and seasoned enthusiasts. Opting for a TP-Link router means investing in a device backed by years of innovation, strong customer support, and a commitment to keeping you connected reliably. For our readers interested in Tech trends, TP-Link consistently integrates the latest wireless standards, ensuring your network is future-proofed for the evolving demands of smart homes and increasing device connectivity.
Essential Preparations Before You Begin
A little planning goes a long way. Gathering the necessary items and information beforehand will streamline the installation process significantly, preventing frustrating pauses and backtracking.
- Your New TP-Link Router: Unbox it and ensure all components are present: the router unit, power adapter, Ethernet cable, and quick start guide.
- Existing Modem: Your internet service provider (ISP) typically provides this device, which brings the internet into your home. Ensure it’s working correctly.
- Internet Service Provider (ISP) Account Information: You might need your account username and password, especially if your internet connection type requires PPPoE (Point-to-Point Protocol over Ethernet). This information is crucial for configuring your internet connection.
- A Computer (PC or Laptop): Ideally, one with an Ethernet port, as a wired connection is often more stable and reliable for initial setup than Wi-Fi. If you only have Wi-Fi-only devices, that’s usually fine too, but a wired connection can simplify troubleshooting.
- Optimal Location for Your Router: Consider where your router will live. Centrality is key for Wi-Fi signal distribution. Avoid placing it near large metal objects, cordless phones, microwaves, or dense walls, which can interfere with the signal. Elevation can also help.
- Pen and Paper (Optional, but Recommended): To jot down new Wi-Fi passwords, administrative credentials, and other important settings. This acts as your personal digital security log.
The Physical Connection – Hardware Setup
This is the tangible part of the installation, involving connecting cables and powering up your devices. Don’t worry, it’s designed to be straightforward, even for those who shy away from hardware.
Unboxing and Identifying Components
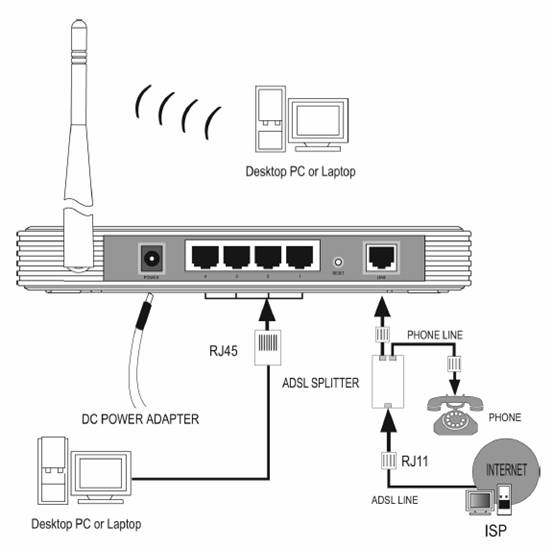
Carefully unbox your new TP-Link router. You’ll typically find the router itself, a power adapter, and an Ethernet cable. Familiarize yourself with the ports on the back of the router. Most TP-Link routers feature:
- WAN/Internet Port (often blue): This is where the internet comes into your router from your modem.
- LAN Ports (often yellow, numbered 1-4): These are for connecting wired devices like computers, gaming consoles, or smart TVs directly to your router.
- Power Port: For the power adapter.
- Reset Button (a tiny pinhole): Used to restore the router to factory default settings. You’ll usually need a paperclip to press it.
- Wi-Fi Button (sometimes labeled WPS/Wi-Fi): To enable/disable Wi-Fi or initiate Wi-Fi Protected Setup (WPS).
Connecting Your Router to the Modem
This step establishes the crucial link between your internet service and your new TP-Link network.
- Power Down: Turn off your existing modem and any computer you’ll use for setup. Unplug them from the power outlet. This is a crucial step that helps prevent IP address conflicts and ensures a clean connection.
- Disconnect Old Router (if applicable): If you’re replacing an old router, disconnect it completely from your modem.
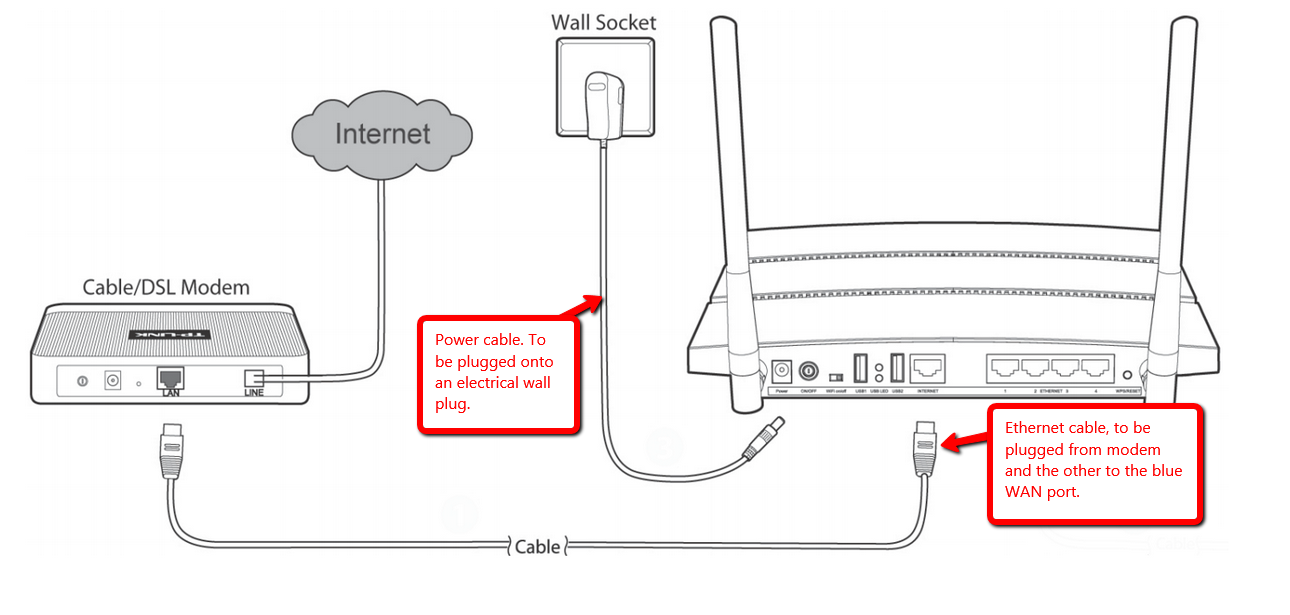
- Connect Modem to TP-Link Router: Take the Ethernet cable provided by TP-Link (or one you know is good) and connect one end to the WAN/Internet port (usually blue) on your new TP-Link router. Connect the other end of this Ethernet cable to the Ethernet port on your modem.
- Connect Computer (Optional, but Recommended for Setup): For a stable initial setup, connect your computer directly to one of the LAN ports (yellow, numbered) on your TP-Link router using another Ethernet cable. This ensures you have a reliable connection to access the router’s configuration page. If you don’t have an Ethernet port on your computer, you’ll connect wirelessly later.
Powering Up and Indicator Lights
Now that everything is physically connected, it’s time to bring your network to life.
- Power On Modem: Plug your modem back into the power outlet and turn it on. Wait a few minutes for it to fully boot up and establish an internet connection. Look for its indicator lights to stabilize (often a solid green light for internet activity).
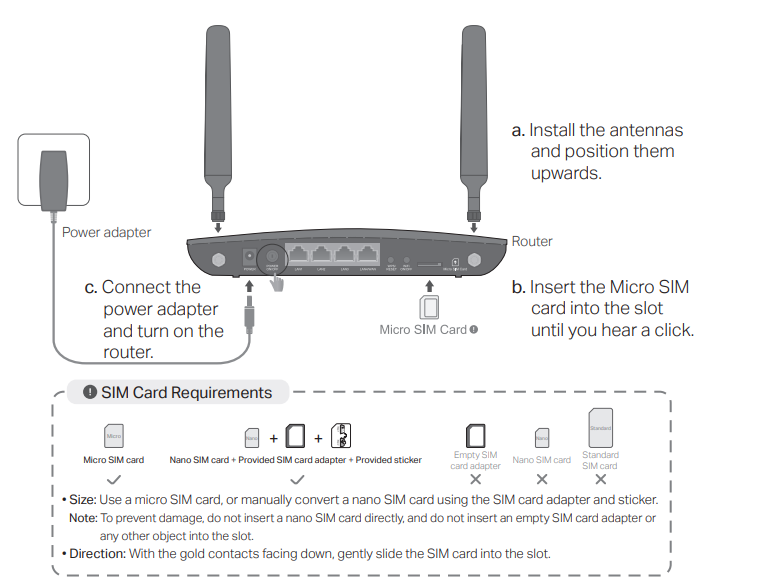
- Power On TP-Link Router: Connect the power adapter to your TP-Link router’s power port and plug it into a wall outlet. Press the power button if your router has one.
- Observe Indicator Lights: Your TP-Link router will have several LED indicator lights on its front panel. After a minute or two, observe them:
- Power Light: Should be solid green.
- Wi-Fi Light(s): Should be solid or blinking, indicating Wi-Fi is active.
- Internet/WAN Light: This is critical. It should be solid green or amber, indicating a successful connection to your modem and the internet. If it’s off or red, there’s a problem with the modem-router connection or your ISP’s service.
- LAN Lights (if devices are connected): Will be solid or blinking if you have wired devices connected to the LAN ports.
Once the indicator lights suggest a healthy connection, you’re ready to move to the software configuration.
Diving into Digital – Software Configuration
This stage involves accessing your router’s brain via a web browser and telling it how to connect to the internet and distribute Wi-Fi. TP-Link routers are known for their intuitive web interfaces and helpful quick setup wizards.
Accessing the TP-Link Web Interface
This is your control panel for the router.
- Open a Web Browser: On the computer connected to your router (either wired or wirelessly to the default Wi-Fi network listed on your router’s sticker), open any web browser (Chrome, Firefox, Edge, Safari).
- Enter Router’s IP Address: In the address bar, type
http://tplinkwifi.netorhttp://192.168.0.1orhttp://192.168.1.1. The specific address is usually printed on a sticker on the bottom or back of your TP-Link router. Press Enter. - Login: You’ll be prompted for a username and password. For new TP-Link routers, the default credentials are often
adminfor both username and password. Again, check the sticker on your router for the exact default login. If you’ve previously changed it and forgotten, you might need to perform a factory reset using the reset pinhole button.
Navigating the Quick Setup Wizard
TP-Link’s Quick Setup Wizard is designed to get you online in just a few steps.
- Start the Wizard: Once logged in, the router interface will likely greet you with an option to “Start Quick Setup” or “Run Setup Wizard.” Click on this.
- Time Zone: Select your local time zone. This helps with logging, scheduling Wi-Fi, and parental control features.
- Internet Connection Type: This is one of the most important steps. The wizard will try to detect your connection type automatically, but you might need to confirm or manually select it. Common types include:
- Dynamic IP (DHCP): Most common for cable modems. The ISP automatically assigns an IP address.
- Static IP: Less common for homes, used when your ISP provides a fixed IP address, subnet mask, gateway, and DNS servers.
- PPPoE: Common for DSL connections. You’ll need to enter your ISP-provided username and password.
- L2TP/PPTP: Less common for standard home users.
- If unsure, choose “Auto-Detect” or consult your ISP.
- MAC Clone (if required): Some ISPs require routers to use the MAC address of a previously registered device (like your computer or old router). If prompted, select “Do Not Clone MAC Address” unless your ISP specifically instructed you otherwise.
- Wireless Settings: This is where you configure your Wi-Fi network.
- Wireless Network Name (SSID): This is the name your Wi-Fi network will broadcast. Change it from the default (e.g., “TP-LinkXXXX”) to something unique and recognizable, but avoid using personal information. For example, “TheConnectedHome5G” or “OfficeNet_2.4G”.
- Wireless Password: Crucial for security. Create a strong, unique password (at least 12 characters, mixing uppercase, lowercase, numbers, and symbols). Never use the default password provided by the router or simple passwords like “password123”. This is a key digital security measure to protect your network.
- If your router supports both 2.4GHz and 5GHz bands, you can usually configure separate SSIDs and passwords for each or use “Smart Connect” to combine them under one name.
Configuring Your Internet Connection Type
As noted in the Quick Setup Wizard, selecting the correct internet connection type is paramount. If the auto-detection fails or you need to reconfigure, you can usually find these settings under “Network” > “Internet” or “WAN” in the advanced settings. Double-check your ISP details if you encounter issues. Often, a simple reboot of both the modem and router after saving these settings can solidify the connection.
Securing Your Digital Frontier and Beyond
Getting online is just the first step. Protecting your network from unauthorized access and optimizing its performance are equally important for a safe, efficient, and productive digital experience.
Prioritizing Security: Changing Default Credentials
The single most critical security step you can take after installation is to change the router’s default login credentials (username and password for tplinkwifi.net). The default “admin/admin” combination is widely known and a prime target for attackers.
- Navigate to “System Tools” or “Administration” > “Password” in your router’s web interface.
- Change the default username (if allowed) and, more importantly, create a strong, unique password for accessing the router’s settings. This password should be different from your Wi-Fi password.
- Write this new credential down in a secure place. This simple step vastly improves your digital security posture, protecting your home network from unauthorized configuration changes, which could lead to compromised personal or financial data.
Keeping Up-to-Date: Firmware Updates
Router firmware is the operating system for your device. Manufacturers regularly release updates to improve performance, add new features, and, most importantly, patch security vulnerabilities.
- Check for firmware updates periodically. In the router interface, look for “System Tools” > “Firmware Upgrade” or “Firmware Update.”
- Visit the TP-Link support website for your specific router model to download the latest firmware. Follow the instructions carefully for installation.
- Updating firmware is a vital Tech practice that ensures your router benefits from the latest security fixes, protecting your network against emerging threats.
Exploring Advanced Features: Guest Networks, QoS, Parental Controls
TP-Link routers often come packed with advanced features that can enhance your network’s usability and security.
- Guest Network: Create a separate Wi-Fi network for guests. This isolates guest devices from your main network, preventing them from accessing your shared files or smart home devices. It’s an excellent digital security practice.
- Quality of Service (QoS): Prioritize certain types of traffic (e.g., video streaming, online gaming) to ensure smooth performance for critical applications, even when your network is busy. This optimizes productivity and entertainment.
- Parental Controls: Manage and monitor internet access for children, set time limits, or block specific websites. This feature is invaluable for family digital security and responsible internet use.
- Port Forwarding/VPN Server: For advanced users needing to access specific services from outside their home network (e.g., a home server or security camera feed).
Troubleshooting Common Installation Hurdles
Even with careful steps, you might encounter issues. Here are quick fixes for common problems:
- No Internet Connection:
- Double-check all cable connections (modem to router WAN port).
- Reboot both modem and router.
- Verify your internet connection type and ISP credentials in the router settings.
- Check your modem’s status lights; if they indicate no internet, the issue might be with your ISP.
- Can’t Access
tplinkwifi.net:- Ensure your computer is connected to the TP-Link router (wired or its default Wi-Fi).
- Try different default IP addresses (
192.168.0.1,192.168.1.1). - Temporarily disable any VPN or proxy software on your computer.
- Clear your browser’s cache.
- Wi-Fi Not Showing Up:
- Ensure the Wi-Fi light on the router is on.
- Check wireless settings in the router interface to confirm Wi-Fi is enabled and the SSID is broadcasting.
- Check if the Wi-Fi button on the router is toggled on.
Optimizing Your Network for Peak Performance
Once installed, a few final tweaks can significantly improve your network’s range, speed, and overall efficiency, potentially saving you money by making the most of your existing internet plan.
Strategic Router Placement
The physical location of your router dramatically affects Wi-Fi signal strength and coverage. Aim for a central location in your home, preferably elevated and unobstructed. Avoid placing it:
- In closets or cabinets.
- Behind large furniture.
- Near dense materials like concrete or brick walls.
- Close to other electronics that emit radio frequencies (microwaves, cordless phones, baby monitors).
Optimizing placement is a free and effective way to boost your Tech experience.
Beyond the Basics: Mesh Systems and Wi-Fi 6
For larger homes or those with dead zones, traditional routers might not be enough. TP-Link offers innovative solutions:
- Mesh Wi-Fi Systems (e.g., TP-Link Deco): These systems use multiple units to create a unified network that covers every corner of your home, eliminating dead zones and providing seamless roaming. It’s a significant upgrade for serious Tech enthusiasts.
- Wi-Fi 6 (802.11ax) Routers: If your devices support it, upgrading to a Wi-Fi 6 router can dramatically improve speeds, capacity, and efficiency, especially in environments with many connected devices. Keep an eye on Wi-Fi 7 for even more advanced future-proofing. Investing in newer technology can feel like a “Money” outlay, but it pays off in long-term productivity and network stability.
The Long-Term Benefits of a Well-Configured Network
A properly installed and maintained TP-Link router is more than just a gateway to the internet; it’s the backbone of your digital life. It ensures reliable connectivity for all your smart devices, supports your work-from-home setup, enables high-quality streaming, and secures your sensitive data. By taking the time to set up your router correctly and implement the recommended security measures, you not only enhance your digital experience but also safeguard your financial information and personal privacy. This proactive approach to digital security and network optimization is a smart investment in your overall well-being and productivity, ultimately demonstrating the Brand’s commitment to delivering both performance and peace of mind.
By following these steps, you’ve not only installed your TP-Link router but also laid the groundwork for a robust, secure, and efficient home network. Enjoy your seamless connectivity!
aViewFromTheCave is a participant in the Amazon Services LLC Associates Program, an affiliate advertising program designed to provide a means for sites to earn advertising fees by advertising and linking to Amazon.com. Amazon, the Amazon logo, AmazonSupply, and the AmazonSupply logo are trademarks of Amazon.com, Inc. or its affiliates. As an Amazon Associate we earn affiliate commissions from qualifying purchases.