In the ever-evolving landscape of technology, our laptops are indispensable tools for work, entertainment, and creativity. As software becomes more sophisticated and demanding, the need for robust hardware performance becomes paramount. One of the most effective and accessible ways to significantly improve your laptop’s speed and responsiveness is by upgrading its Random Access Memory (RAM). This guide will walk you through the entire process, from understanding what RAM is and why it matters, to selecting the right modules, and finally, performing the physical installation. Whether you’re a seasoned tech enthusiast or a beginner looking to breathe new life into an aging machine, this tutorial will equip you with the knowledge and confidence to successfully install more RAM on your laptop.
Understanding RAM and Its Impact on Laptop Performance
Before diving into the installation process, it’s crucial to grasp what RAM is and how it influences your laptop’s overall performance.
What is RAM?
RAM, or Random Access Memory, is a type of volatile computer memory that acts as your laptop’s short-term working space. When you open an application or a file, it is loaded from your laptop’s storage (hard drive or SSD) into RAM. The processor then accesses this data directly from RAM, which is significantly faster than accessing it from storage. Think of RAM as your desk; the more desk space you have, the more documents and tools you can spread out and access quickly. The less RAM you have, the more you have to shuffle things around, leading to slower performance.
Why Does More RAM Mean Better Performance?
The amount of RAM your laptop has directly impacts its ability to handle multiple tasks simultaneously and run demanding applications smoothly.
-
Multitasking: If you’re someone who frequently juggles multiple browser tabs, runs several applications at once (like a word processor, a music player, and an email client), or switches between different programs, sufficient RAM is essential. With ample RAM, your laptop can keep all these active applications readily accessible, allowing for seamless switching and preventing lag. Insufficient RAM forces your system to constantly swap data between RAM and your slower storage drive, a process known as “paging” or “swapping,” which dramatically slows down your experience.
-
Running Demanding Applications: Modern software, especially for tasks like video editing, graphic design, gaming, virtual machines, and large-scale data analysis, requires a substantial amount of RAM to function optimally. These applications often load large datasets and complex processes into memory. If your laptop doesn’t have enough RAM, these programs will struggle to run, leading to frequent crashes, long loading times, and a generally frustrating user experience.
-
Overall System Responsiveness: Even everyday tasks like booting up your laptop, launching applications, and browsing the web can feel sluggish with limited RAM. More RAM allows your operating system and frequently used programs to remain loaded in memory, leading to quicker response times and a smoother overall feel.
-
Future-Proofing: As technology advances, software requirements tend to increase. Investing in more RAM now can ensure your laptop remains capable of handling future applications and operating system updates for a longer period, extending its useful lifespan.
How Much RAM Do You Need?
The amount of RAM that’s “enough” depends entirely on your usage patterns. Here’s a general guideline:
-
4GB RAM: This is the bare minimum for basic computing tasks like web browsing (with a limited number of tabs), email, and word processing. You’ll likely experience slowdowns if you try to multitask heavily or run more demanding software.
-
8GB RAM: This is often considered the sweet spot for most users. It provides a good balance for general productivity, moderate multitasking, casual gaming, and light creative work. You’ll notice a significant improvement in speed and responsiveness compared to 4GB.
-
16GB RAM: If you’re a power user, a gamer, a creative professional, or someone who regularly works with large datasets or virtual machines, 16GB is highly recommended. It offers ample headroom for demanding applications and extensive multitasking.
-
32GB RAM and Beyond: This level of RAM is typically reserved for professional workstations used for intensive tasks such as 3D rendering, complex video editing, scientific simulations, or running multiple virtual machines simultaneously.
Identifying Your Laptop’s RAM Specifications and Compatibility
Before you can purchase new RAM, you need to know what kind of RAM your laptop currently uses and what its limitations are. This is arguably the most critical step to avoid buying incompatible modules.
Determining Your Current RAM Type and Speed
There are several ways to find out what RAM your laptop has:
-
Task Manager (Windows):
- Press
Ctrl + Shift + Escto open the Task Manager. - Go to the “Performance” tab.
- Click on “Memory.”
- Here, you’ll see the total amount of RAM installed, the speed (e.g., 2666MHz, 3200MHz), and the form factor (usually SODIMM for laptops). You might also see the number of slots used.
- Press
-
System Information (Windows):
- Type “System Information” into the Windows search bar and open it.
- Navigate to “System Summary.”
- Look for “Installed Physical Memory (RAM)” and “Total Physical Memory.” The speed might be listed under “BIOS Version/Date” or within the details of a specific hardware component if you drill down.
-
About This Mac (macOS):
- Click the Apple menu in the top-left corner.
- Select “About This Mac.”
- Under the “Overview” tab, you’ll see the amount of memory. To find the speed and type, click “System Report…” and then navigate to “Memory” under “Hardware.”
-
Manufacturer’s Website or Documentation: The most reliable way is to check your laptop’s specific model number on the manufacturer’s website. They usually provide detailed specifications, including the type and maximum supported RAM.
Understanding RAM Form Factors: SODIMM vs. DIMM
Laptops exclusively use SODIMM (Small Outline Dual In-line Memory Module) modules. These are much smaller than the DIMM (Dual In-line Memory Module) modules found in desktop computers. You cannot use desktop RAM in a laptop, and vice-versa.
RAM Speed and Timings
RAM speed is measured in megahertz (MHz) and indicates how quickly data can be transferred. Common speeds for laptops include 2400MHz, 2666MHz, 3200MHz, and higher. While faster RAM can offer a performance boost, it’s crucial to:
- Match Existing Speed (if upgrading): If your laptop has multiple RAM slots and you’re only replacing one module or adding another to an existing populated slot, it’s generally best to match the speed of the existing module. Your system will run all RAM at the speed of the slowest installed module.
- Stay Within Laptop Limits: Your laptop’s motherboard has a maximum supported RAM speed. Installing RAM that’s faster than what your system supports won’t provide any benefit and could potentially cause instability or prevent the system from booting.
RAM Capacity and Motherboard Limitations
Each laptop motherboard has a maximum amount of RAM it can support, both in total capacity (e.g., 16GB, 32GB) and per slot.
- Checking Maximum Supported RAM: Again, the manufacturer’s website for your specific laptop model is the best source for this information. Look for “Maximum RAM” or “Memory Support.”
- Number of RAM Slots: Laptops typically have one or two RAM slots. Some ultrabooks or very slim laptops may have RAM soldered directly to the motherboard, making upgrades impossible. You’ll need to check if your slots are accessible.

Choosing the Right RAM Modules
Once you know your laptop’s requirements, you can start shopping. Look for RAM modules that are:
- Correct Type: DDR3, DDR4, or DDR5 SODIMM. DDR4 is the most common for recent laptops, while DDR5 is found in newer models. You absolutely must get the correct generation.
- Correct Speed: Match your existing RAM speed or the maximum supported speed of your laptop.
- Correct Capacity: Ensure the total capacity you aim for (e.g., 16GB by adding an 8GB module to an existing 8GB module) does not exceed your laptop’s maximum support.
- Reputable Brands: Stick with well-known brands like Crucial, Kingston, Corsair, G.Skill, and Samsung. These brands offer reliable products and often have excellent compatibility checkers on their websites.
Crucial System Scanner: A highly recommended tool is the Crucial System Scanner. You download a small program that scans your system and tells you exactly what RAM is compatible and available for purchase from their store. Many other RAM manufacturers offer similar tools.
The Installation Process: A Step-by-Step Guide
With the correct RAM modules in hand, it’s time to perform the installation. This process is generally straightforward, but it requires care and attention to detail.
Pre-Installation Checklist and Safety Precautions
Before you begin, ensure you have the following:
- Your New RAM Modules: Double-check that they are compatible.
- Small Phillips Head Screwdriver: Most laptop screws are small and require a Phillips head. Some might require a Torx screwdriver, so check your laptop’s design beforehand.
- Anti-Static Wrist Strap (Recommended): Static electricity can damage sensitive computer components. Wearing an anti-static wrist strap connected to a grounded metal object (like the unpainted metal part of your PC case, or even a grounded metal pipe) is highly recommended.
- A Clean, Well-Lit Workspace: Avoid working on carpet, as it generates static. A wooden table is ideal.
- Your Laptop’s Power Adapter and Battery: You’ll need to disconnect these.
- A Small Container: To keep track of screws.
- Your Laptop’s Service Manual (Optional but Recommended): Search online for “[Your Laptop Model] service manual” or “[Your Laptop Model] RAM upgrade guide.” This will provide exact locations of screws and panels for your specific model.
Safety Precautions:
- Power Off Completely: Shut down your laptop entirely, not just put it to sleep.
- Unplug Everything: Disconnect the power adapter and any other connected peripherals (USB drives, external monitors, etc.).
- Remove the Battery (If Possible): For many laptops, the battery can be easily removed from the bottom. This adds an extra layer of safety to prevent accidental power-ups. If your battery is internal and not easily removable, proceed with caution and ensure the laptop is fully powered off.
- Ground Yourself: Before touching any internal components, touch a grounded metal object to discharge any static electricity. Wear your anti-static wrist strap if you have one.
- Handle RAM with Care: Hold RAM modules by their edges. Avoid touching the gold connectors or the black chips on the module.
- Be Gentle: Do not force components. If something doesn’t seem to fit, re-check your alignment and the steps.
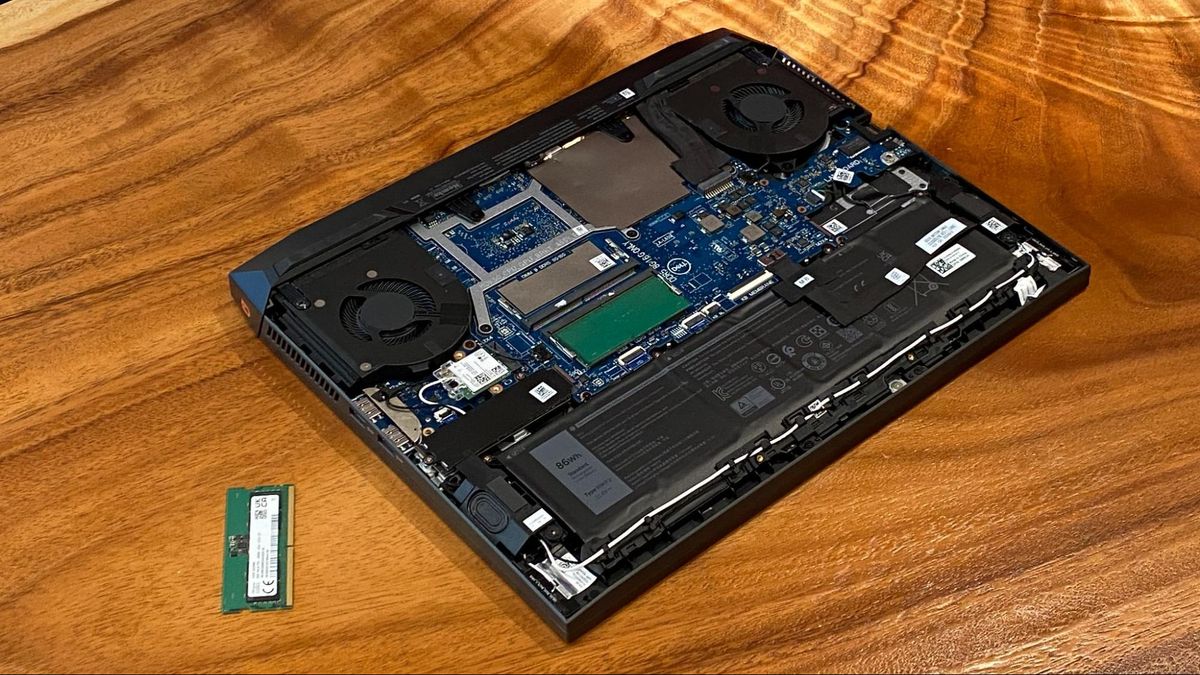
Accessing the RAM Slots
The location of the RAM slots varies greatly between laptop models. There are generally two common ways to access them:
- Dedicated Access Panel: Many laptops have a small, separate panel on the underside secured by one or two screws. This panel is specifically for accessing the RAM and sometimes the hard drive. This is the easiest scenario.
- Removing the Entire Bottom Cover: On other laptops, particularly thinner ones, you’ll need to remove the entire bottom cover to access the internal components, including the RAM slots. This usually involves removing numerous screws around the perimeter of the bottom of the laptop. Be very careful to note the length and location of each screw, as they can vary.
- Locate the Panel/Screws: Flip your laptop over and look for the designated access panel or the screws surrounding the bottom cover.
- Remove Screws: Using your Phillips head screwdriver, carefully remove the screws. Place them in your container.
- Open the Panel/Cover:
- If there’s a dedicated panel, it might lift off or slide.
- If you’re removing the bottom cover, you may need to gently pry it away from the chassis with a plastic spudger or a credit card once all screws are removed. Work your way around the edges to release the clips holding it in place. Be patient and don’t force it.
Removing Old RAM (If Necessary)
If you are replacing existing RAM, you’ll need to remove the old modules first.
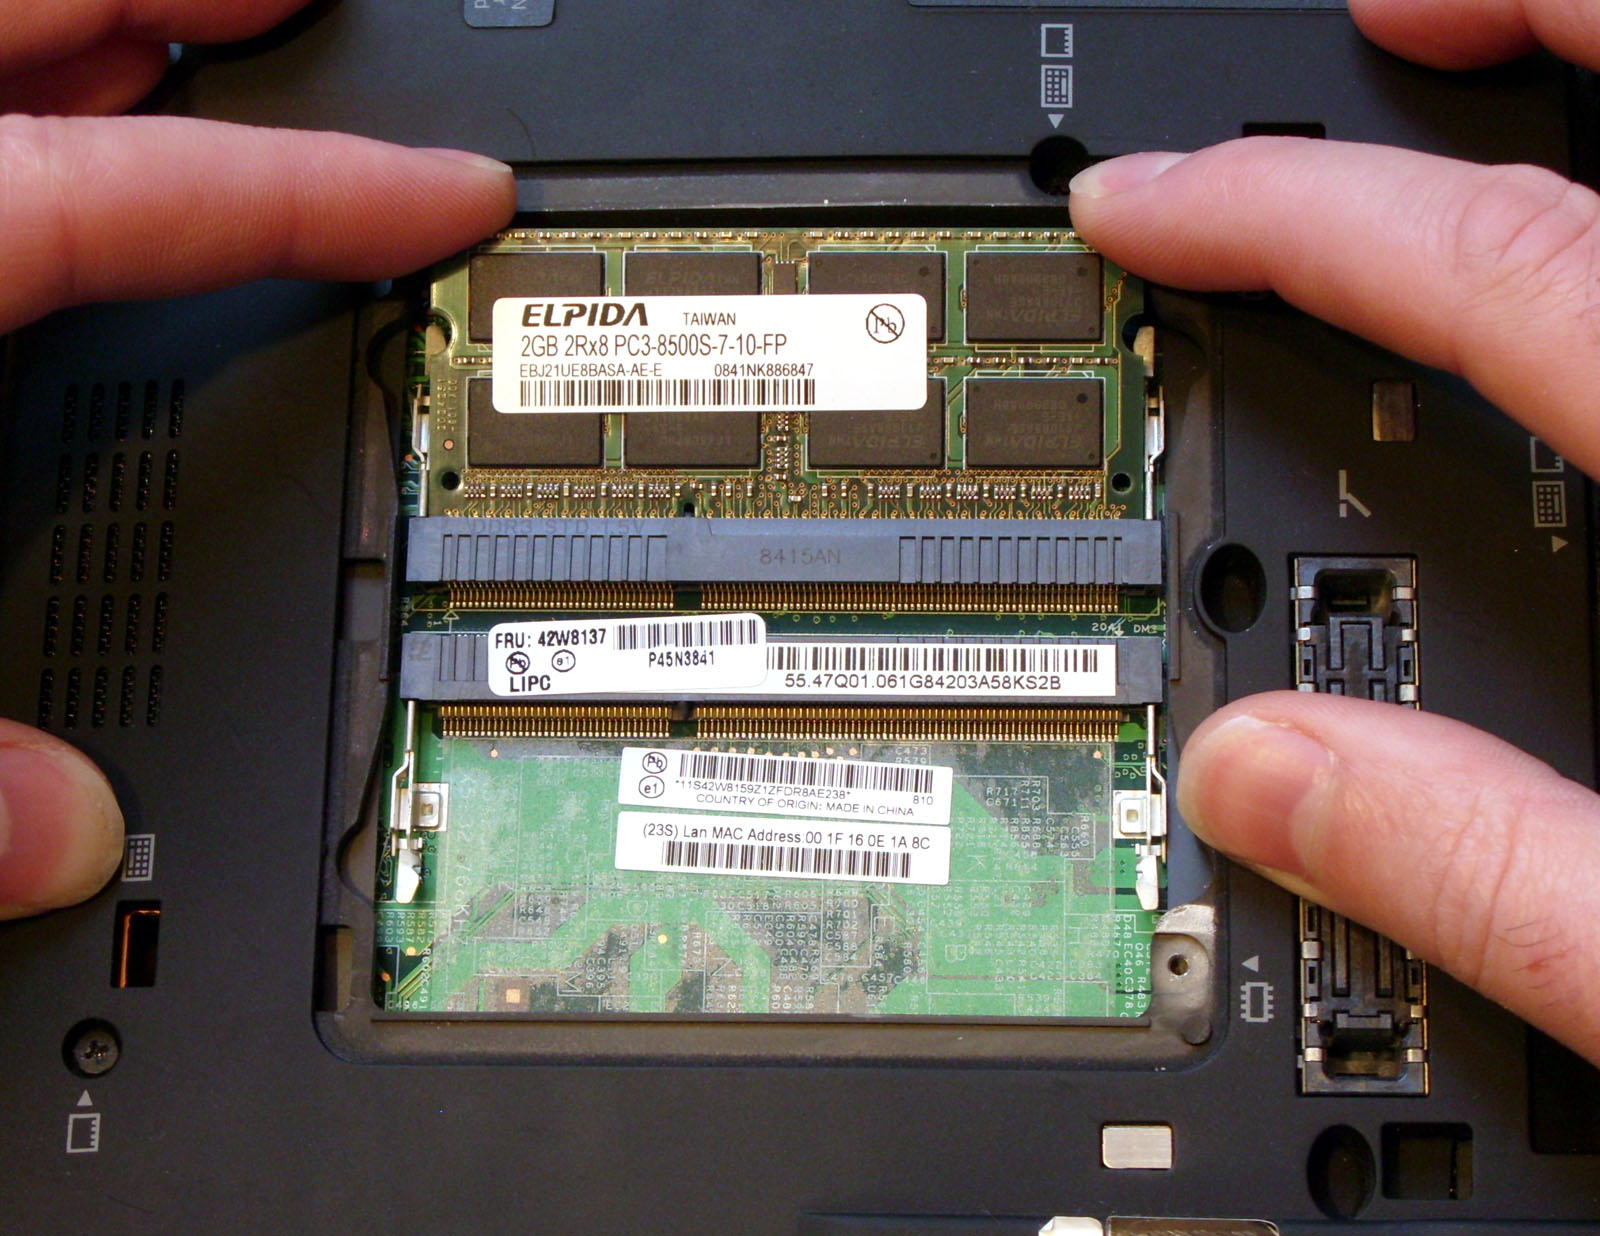
- Locate the RAM Modules: Once the access panel or bottom cover is removed, you should see one or two long, thin modules held in place by clips on either side.
- Release the Clips: Gently push outwards on the metal clips on both ends of the RAM module simultaneously. The module will then pop up at an angle.
- Gently Remove the Module: Once it’s at an angle, you can carefully pull the RAM module straight out of its slot.
Installing New RAM Modules
Now it’s time to install your new RAM.
- Align the Notch: Each RAM module has a notch in its gold connector. This notch corresponds to a key in the RAM slot on the motherboard. Ensure the notch on your new RAM module is aligned with the key in the slot. You can only insert the module in one direction.
- Insert at an Angle: Hold the new RAM module by its edges and insert it into the slot at approximately a 45-degree angle, just like the old one popped out.
- Push Down to Secure: Once the module is seated in the slot, gently but firmly push down on the top edge of the module until it clicks into place. The clips on either side should snap back and secure the module, holding it flat against the motherboard.
- Repeat for Second Module (If Applicable): If your laptop has two RAM slots and you’re installing a second module, repeat the process, ensuring it’s seated correctly.
Reassembling Your Laptop
- Replace the Panel/Cover: Carefully place the access panel or bottom cover back into its original position.
- Reinsert Screws: Screw all the screws back in, ensuring you use the correct screws for each location.
- Reinstall Battery (If Removed): If you removed the battery, reinsert it now.
Post-Installation Verification and Troubleshooting
After physically installing the RAM, it’s essential to verify that your laptop recognizes the new memory and that everything is functioning correctly.
Booting Up and Checking System Recognition
- Connect Power: Plug in your laptop’s power adapter.
- Power On: Turn on your laptop.
- Observe Boot Process: The first boot after a RAM upgrade might take slightly longer as the system initializes the new memory.
- Check RAM in System Information:
- Windows: Open Task Manager (
Ctrl + Shift + Esc) and go to the “Performance” tab, then “Memory.” You should see the new, total amount of RAM reflected here. Alternatively, use System Information as described earlier. - macOS: Go to Apple menu > About This Mac > System Report… > Memory.
- Windows: Open Task Manager (
- Verify Speed: Ensure the reported RAM speed is as expected. If you installed faster RAM but it’s running at a slower speed, it might be due to the motherboard’s limitations or the speed of existing RAM.
Common Issues and Troubleshooting Tips
While RAM installation is usually straightforward, sometimes issues can arise.
-
Laptop Won’t Boot (Black Screen):
- Reseat the RAM: The most common cause is a poorly seated RAM module. Power off, unplug, remove the battery, and carefully reseat both modules, ensuring they click into place.
- One Module at a Time: If you installed two new modules, try booting with only one installed at a time. This helps identify if one of the new modules is faulty.
- Check Compatibility: Double-check that the RAM type, speed, and capacity are compatible with your laptop.
- Static Discharge: Ensure you grounded yourself properly.
-
System Instability (Crashes, Blue Screens):
- Faulty RAM: One of the new RAM modules might be defective. Test them individually if possible.
- Incompatibility: Even if the type is correct, there might be subtle compatibility issues with your specific motherboard.
- Overheating: Ensure your laptop’s cooling system is functioning correctly, especially after adding more components.
-
RAM Not Showing Full Amount:
- Incorrect Seating: As mentioned, reseating is key.
- Motherboard Limit: You might be exceeding your laptop’s maximum supported RAM capacity.
- Windows 32-bit Limitation: If you are running a 32-bit version of Windows, it can only address approximately 4GB of RAM, regardless of how much you install. You’ll need to upgrade to a 64-bit operating system to utilize more RAM.
-
BIOS/UEFI Settings: In rare cases, you might need to access your laptop’s BIOS/UEFI settings (usually by pressing F2, F10, F12, or Del during boot) to ensure RAM is configured correctly, though most modern systems auto-detect it.
By following these steps and taking appropriate precautions, you can successfully upgrade your laptop’s RAM and enjoy a significant boost in performance, making your computing experience smoother, faster, and more efficient. This upgrade is a cost-effective way to extend the life and capabilities of your beloved laptop.
aViewFromTheCave is a participant in the Amazon Services LLC Associates Program, an affiliate advertising program designed to provide a means for sites to earn advertising fees by advertising and linking to Amazon.com. Amazon, the Amazon logo, AmazonSupply, and the AmazonSupply logo are trademarks of Amazon.com, Inc. or its affiliates. As an Amazon Associate we earn affiliate commissions from qualifying purchases.