
In an increasingly connected world, smart home devices have become indispensable tools for enhancing security, convenience, and peace of mind. Among the pioneers in this domain, Ring has carved out a significant niche, offering a range of innovative solutions from video doorbells to comprehensive home security systems. Whether you’re aiming to monitor your doorstep, secure your property, or simply streamline daily interactions, a Ring device is a powerful asset. However, unlocking its full potential begins with a proper, seamless installation.
This comprehensive guide is designed to demystify the installation process for your Ring device, transforming what might seem like a daunting technical task into an empowering DIY project. We’ll walk you through every critical step, from initial preparations and understanding your device to the intricate details of physical mounting, wiring (if applicable), and software configuration. Our goal is to equip you with the knowledge and confidence to install your Ring device correctly the first time, ensuring optimal performance and long-term reliability. By following these instructions, you’ll not only bring your smart security vision to life but also gain a deeper appreciation for the technology protecting your home.
I. Preparing for a Smooth Ring Installation
Before you even unbox your new Ring device, a little preparation goes a long way. The success of your installation hinges on having the right tools, a suitable environment, and a clear understanding of what lies ahead. This foundational phase ensures you’re not caught off guard by unexpected requirements, allowing for a more efficient and stress-free setup.
A. Essential Tools and Components: What You’ll Need
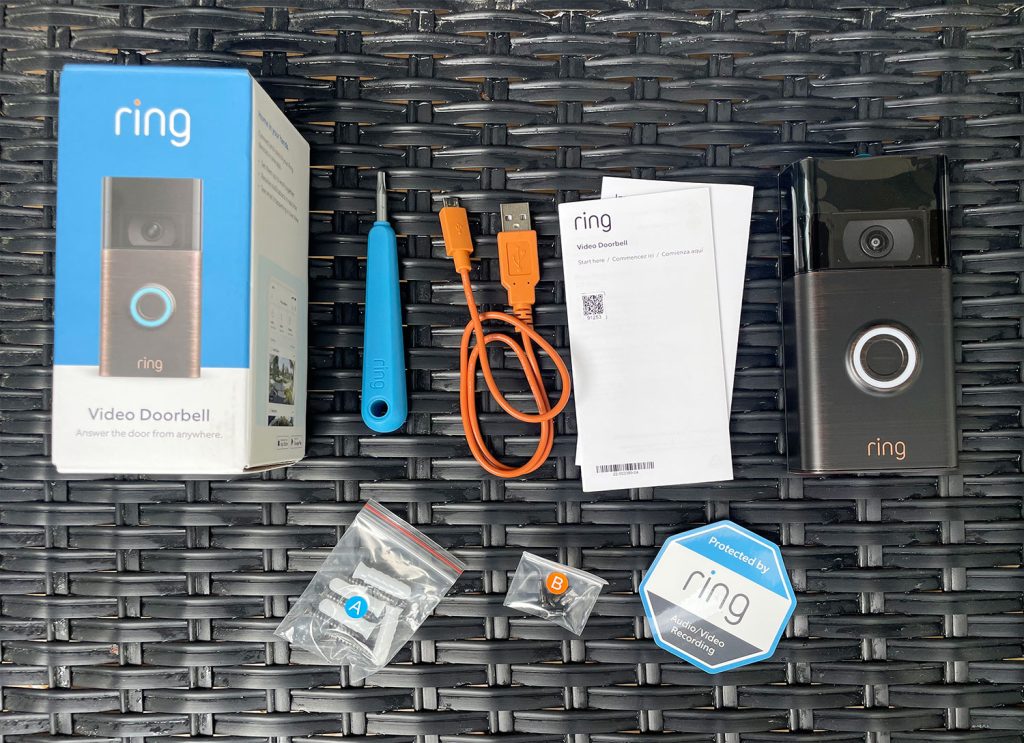
Gathering all necessary tools and components beforehand is crucial. While Ring devices typically come with most specialized parts, having a standard set of household tools ready will significantly expedite the process.
- Your Ring Device: Naturally, ensure you have the correct Ring product, whether it’s a Video Doorbell (Wired, Battery, Pro, Elite), a Stick Up Cam, Floodlight Cam, or another Ring security component. Familiarize yourself with its specific model and any unique features it might possess.
- Charging Cable (if battery-powered): For battery-operated devices, it’s paramount to fully charge the battery before installation. This can take several hours, so plan accordingly. A full charge ensures the device has ample power to complete the setup process and perform initial firmware updates without interruption.
- Screwdriver and Drill: Most Ring devices require mounting, and this typically involves screws. Ring usually provides a specialized screwdriver and screws, but having a standard Phillips head screwdriver and a power drill with appropriate drill bits (often 1/4 inch for masonry) is highly recommended. The drill makes pilot holes, ensuring a secure and clean installation, especially on brick or stucco.
- Mounting Hardware: Your Ring device package will include mounting brackets, screws, and wall anchors. Always use the provided hardware as it’s specifically designed for your device. If you’re mounting on a different surface (e.g., vinyl siding), you might need specialized clips or shims, which Ring sometimes provides or can be purchased separately.
- Level: A small spirit level or a digital level on your smartphone app is invaluable for ensuring your device is mounted perfectly straight. This isn’t just for aesthetics; a level mount can impact the field of view for cameras.
- Pencil: For marking drill holes accurately before you start drilling.
- Ladder (if installing at height): For devices like floodlight cameras or Ring Cams mounted high on a wall, a sturdy ladder is essential for safety and ease of installation.
- Chime Kit (for wired doorbells): If you’re replacing an existing wired doorbell, Ring Video Doorbells often require a “Pro Power Kit” or similar chime kit to ensure compatibility with your home’s existing doorbell chime. This kit prevents damage to your chime and ensures proper power delivery to your Ring device. Always follow the specific instructions for your doorbell model regarding the chime kit.
- Safety Goggles: When drilling, especially into masonry, safety goggles are recommended to protect your eyes from debris.
- Multimeter (optional, for wired doorbells): If you’re replacing an existing wired doorbell and are unsure about the voltage, a multimeter can help you verify that your doorbell transformer provides between 8-24 VAC (Volts Alternating Current), which is typically required for most wired Ring doorbells.
B. Network Readiness and App Download
Connectivity is the backbone of any smart home device. Your Ring device relies on a robust Wi-Fi connection to communicate with your smartphone and the Ring servers.
- Strong Wi-Fi Signal: Before installation, test the Wi-Fi signal strength at the intended mounting location. You can use your smartphone to check Wi-Fi bars or download a Wi-Fi analyzer app. A weak signal will lead to connection drops, delays in notifications, and poor video quality. If the signal is weak, consider repositioning your router or investing in a Wi-Fi extender or mesh network system. Ring devices generally operate on the 2.4 GHz Wi-Fi band, which offers better range than 5 GHz, though some newer models support both.
- Wi-Fi Password: Have your Wi-Fi network name (SSID) and password readily available. You’ll need these during the in-app setup process.
- Ring App Download and Account Creation: Download the official Ring app from the Apple App Store or Google Play Store onto your smartphone or tablet. If you don’t already have one, create a Ring account. This involves providing an email address, creating a password, and agreeing to their terms of service. Setting up your account in advance saves time during the actual device pairing.
- Enable Bluetooth (for setup): Many Ring devices utilize Bluetooth during the initial setup process to communicate with your phone before connecting to Wi-Fi. Ensure Bluetooth is enabled on your smartphone.
II. The Physical Installation Journey
With your tools ready and network confirmed, it’s time to get hands-on. This section focuses on the physical mounting and, for wired devices, the electrical connections. Safety is paramount, especially when dealing with electricity. If you’re uncomfortable with any electrical work, it’s always best to consult a qualified electrician.
A. Choosing Your Spot and Mounting the Plate
The placement of your Ring device is critical for optimal performance and effective monitoring.
- Optimal Height (for Doorbell Cameras): For Ring Video Doorbells, the recommended installation height is approximately 48 inches (1.2 meters) from the ground. This height allows the camera to capture a wide view, including visitors’ faces and packages on your doorstep. Adjust slightly based on your specific doorbell model’s field of view and the height of your typical visitors.
- Clear Line of Sight: Ensure there are no obstructions (plants, railings, walls) that would block the camera’s view or the motion sensor’s detection range.
- Power Source (for wired devices): If you’re installing a wired Ring Video Doorbell, verify that your existing doorbell wiring is accessible and functional at the desired location. Turn off power at the circuit breaker before touching any wires.
- Marking and Drilling:
- Remove Existing Doorbell (if applicable): If you’re replacing an existing wired doorbell, carefully remove it after ensuring the power is off at the breaker.
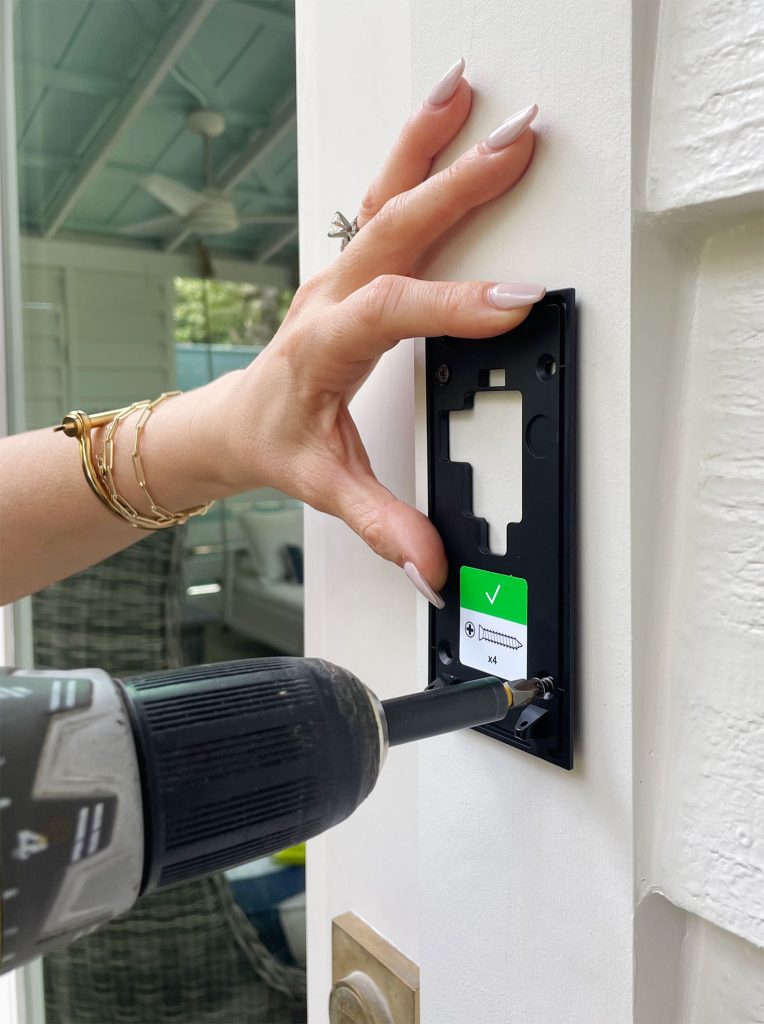
- Position the Mounting Plate: Hold the Ring mounting bracket or device against the wall at your chosen height. Use the built-in level (if applicable) or your separate level to ensure it’s straight.
- Mark Drill Holes: Use your pencil to mark the locations for the drill holes through the mounting plate.
- Drill Pilot Holes: Using your drill and the appropriate drill bit (usually 1/4 inch for masonry, smaller for wood), carefully drill pilot holes at your marked spots. If drilling into stucco, brick, or concrete, insert the provided wall anchors into the pilot holes. Gently tap them flush with a hammer if necessary.
- Secure the Mounting Plate: Align the mounting plate with the drilled holes and secure it using the provided screws. Ensure it’s firmly attached to the wall. Do not overtighten.
B. Wiring Your Ring Doorbell (for Wired Models)
This step is specific to wired Ring Video Doorbells. ALWAYS ensure the power to your doorbell circuit is OFF at the breaker before proceeding with any wiring.
- Locate Doorbell Wires: Two low-voltage wires should be protruding from your wall where your old doorbell was (or where you drilled for new wires). These are typically thin, copper wires.
- Connect Wires to Ring Terminal Screws: Loosen the two terminal screws on the back of your Ring Video Doorbell. Loop one doorbell wire around each terminal screw. It doesn’t matter which wire goes to which screw as low-voltage circuits are not polarized.
- Tighten Screws: Tighten the terminal screws firmly to secure the wires. Ensure there are no loose strands of wire that could cause a short circuit.
- Tuck Wires: Gently push any excess wiring back into the wall opening to create space for the Ring device to sit flush.
- Install the Chime Kit (if required): If your Ring model requires a “Pro Power Kit” or similar chime kit, this typically involves installing a small device directly into your home’s indoor doorbell chime. Follow the specific instructions provided with your Ring device for this step. This usually involves removing the cover of your indoor chime, connecting the chime kit wires to specific terminals, and then replacing the cover. This step is critical for proper power regulation and to prevent damage to your existing chime.
C. Securing the Device
Once the mounting plate is fixed and wiring (if any) is complete, it’s time to attach the Ring device itself.
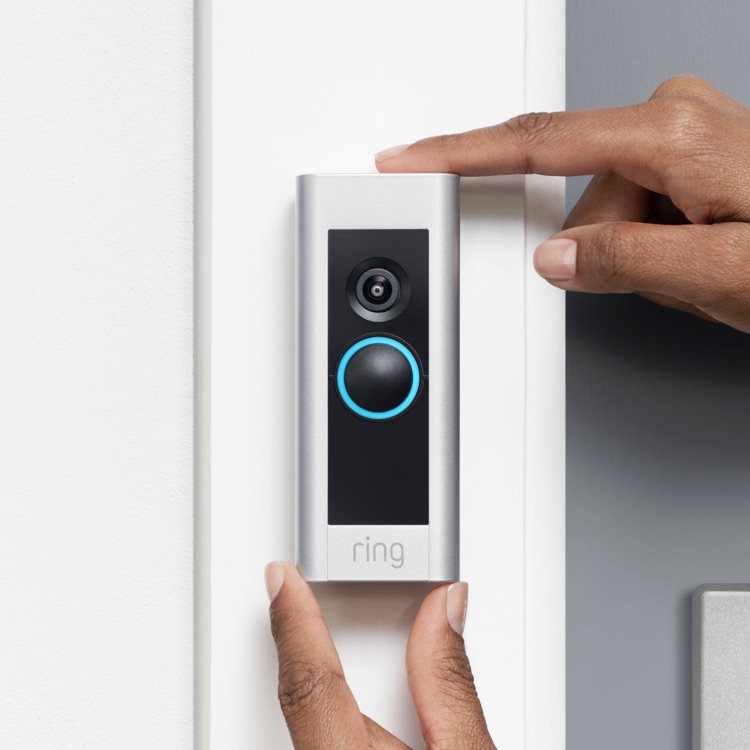
- Attach the Ring Device: Carefully align the back of your Ring device with the mounting plate. For battery-powered models, the battery typically slides into the device before this step. Snap or slide the device into place, ensuring it clicks securely.
- Tighten Security Screw: Most Ring devices come with a small security screw located at the bottom of the device. Use the specialized screwdriver provided by Ring (or a compatible one) to tighten this screw. This screw secures the device to the mounting plate, deterring theft and ensuring it stays firmly in place. Do not overtighten, as this can strip the screw or damage the casing.
- Restore Power (for wired devices): If you turned off the power at the circuit breaker, now is the time to restore it. Your Ring device should power on, indicated by a glowing light ring or specific LED pattern.
III. Bringing Your Ring Online: Software Setup
Physical installation is only half the battle. The next crucial step is to connect your Ring device to your home Wi-Fi network and configure it through the Ring app. This is where your device truly comes to life, ready to monitor and protect.
A. Connecting to Wi-Fi and the Ring App
This stage bridges the gap between your physical device and your digital control center.
- Open the Ring App: Launch the Ring app on your smartphone or tablet.
- Select “Set Up a Device”: Tap the “Set Up a Device” option, then choose the type of Ring device you are installing (e.g., Doorbells, Security Cams).
- Scan the QR Code: The app will prompt you to scan the QR code located on your Ring device (often on the back, inside the battery compartment, or on the packaging). This code contains your device’s unique identifier. If scanning fails, you may have an option to manually enter a 5-digit PIN.
- Confirm Location: The app will ask you to confirm your address or set up a new location. This is important for emergency services integration (if subscribed to Ring Protect Plus) and for accurate event logging.
- Give Your Device a Name: Assign a descriptive name to your device (e.g., “Front Door,” “Backyard Camera”). This helps you identify it easily, especially if you have multiple Ring devices.
- Enter Setup Mode: Your Ring device will typically enter setup mode automatically, indicated by a spinning or pulsing light on the device. If it doesn’t, the app will guide you on how to manually put it into setup mode (usually by pressing a small button on the side or back).
- Connect to Ring’s Temporary Network: Your phone will temporarily disconnect from your home Wi-Fi and connect to a special Wi-Fi network broadcast by your Ring device (e.g., “Ring-XXXXXX”). Follow the in-app prompts to do this.
- Connect to Your Home Wi-Fi: Once connected to the Ring network, the app will ask you to select your home Wi-Fi network from a list and enter its password. This is where that strong Wi-Fi signal at your installation spot pays off.
- Device Updates: After successfully connecting to your home Wi-Fi, your Ring device may automatically download and install firmware updates. Allow this process to complete without interruption. Your device might restart during this time.
B. Customizing Settings for Optimal Performance
Once your Ring device is online, fine-tuning its settings will ensure it meets your specific security and monitoring needs.
- Motion Zones: This is one of the most powerful features. Define specific areas within the camera’s field of view where you want motion detected. Exclude high-traffic areas like public sidewalks or busy roads to reduce unwanted notifications and conserve battery life (for battery models). Draw custom zones in the app to focus on your driveway, front path, or specific entry points.
- Motion Sensitivity: Adjust the sensitivity of the motion detection. If you’re getting too many false alerts (e.g., from passing cars or blowing leaves), lower the sensitivity. If it’s missing important events, increase it. Some models offer “People Only Mode” to filter out non-human motion.
- Privacy Zones: If your camera captures areas you don’t want recorded (e.g., a neighbor’s window), you can create privacy zones that permanently black out those sections in the video feed.
- Notification Settings: Customize how and when you receive alerts. You can choose push notifications, email alerts, and even link to Alexa devices for announcements. Set notification schedules to avoid disturbances during specific times.
- Linked Devices: If you have other Ring devices (e.g., a Chime, other cameras, or a Ring Alarm system), you can link them within the app. For example, you can set a Ring Floodlight Cam to start recording when your Video Doorbell detects motion.
- Live View: Test the Live View feature to ensure you can see and hear clearly through your device. Speak through the two-way talk feature to confirm the microphone and speaker are working.
- Doorbell Settings (for Doorbells): Customize your chime sound, adjust the volume, and manage connected indoor chimes.
IV. Troubleshooting Common Installation Hiccups
Even with careful preparation, you might encounter minor issues. Knowing how to diagnose and resolve common problems can save you time and frustration.
A. Power and Connectivity Issues
These are the most frequent challenges users face.
- No Power / Device Not Turning On:
- Wired Devices: Double-check that the power is on at the circuit breaker. Ensure the wires are securely connected to the Ring device’s terminals and the chime kit (if used) is correctly installed. Use a multimeter to verify voltage at the doorbell wires if unsure (should be 8-24 VAC). If you have a digital chime, ensure the correct setting is selected in the Ring app for your chime type, as some are incompatible or require specific wiring.
- Battery Devices: Confirm the battery is fully charged and correctly inserted. Try re-seating the battery.
- Unable to Connect to Wi-Fi:
- Incorrect Password: Re-enter your Wi-Fi password carefully. Passwords are case-sensitive.
- Weak Signal: As discussed earlier, test Wi-Fi signal strength at the device location. If weak, consider a Wi-Fi extender or moving your router closer.
- Router Issues: Restart your home Wi-Fi router and modem. Ensure your router’s firewall isn’t blocking Ring’s connection (though this is rare for standard home setups).
- 2.4 GHz vs. 5 GHz: Ensure your device is attempting to connect to the correct Wi-Fi band. Most Ring devices prefer 2.4 GHz for better range. If you have a dual-band router, ensure both bands have distinct names or your device is smart enough to pick the right one.
- Device Offline After Setup: This often indicates an unstable Wi-Fi connection. Verify signal strength. If the device was just updated, it might need a few minutes to fully restart and reconnect.
B. App Configuration Challenges
Sometimes the issues are within the app’s settings.
- Motion Detection Not Working / Too Many Alerts: Review your motion zones and sensitivity settings. Ensure you’ve excluded irrelevant areas and set the sensitivity appropriately for your environment. Check that “People Only Mode” is enabled if you desire to filter out non-human motion.
- Poor Video Quality / Lagging Video: This is almost always a Wi-Fi bandwidth issue. Ensure your internet connection is robust and there isn’t excessive network congestion from other devices. Test signal strength again. If using cellular data for Live View, check your mobile network’s speed.
- No Audio / Muted Audio: Check the microphone and speaker settings within the Ring app. Ensure they haven’t been accidentally muted. Test the two-way talk feature.
- Notifications Not Received: Check your phone’s notification settings for the Ring app. Ensure notifications are enabled. Also, verify that notification settings within the Ring app itself are configured correctly for each device.
- Firmware Update Failures: If an update fails repeatedly, ensure your device has a stable Wi-Fi connection and sufficient power. Try restarting the device and attempting the update again. If the issue persists, contact Ring support.
V. Maximizing Your Ring Experience & Final Thoughts
Successfully installing your Ring device is just the beginning of enjoying a smarter, more secure home. With your device now fully operational, you can leverage its features to their fullest extent, contributing to both your peace of mind and the overall efficiency of your living space.
A. Beyond Basic Installation: Tips for Optimal Performance
- Regular Software Updates: Always keep your Ring app and device firmware updated. Ring frequently releases updates that improve performance, add new features, and patch security vulnerabilities.
- Battery Management (for battery devices): For battery-powered Ring devices, monitor battery life through the app. A notification will alert you when it’s low. Charging takes several hours, so plan for downtime or have a spare battery ready. Cold weather can significantly impact battery performance, so be mindful of this during winter months.
- Subscription Benefits: Consider a Ring Protect subscription plan. These plans unlock features like cloud video recording (allowing you to review past events), professional monitoring for alarm systems, and extended warranties. For a small monthly fee, this can significantly enhance the value and security provided by your Ring devices.
- Integrate with Other Smart Home Devices: Ring devices seamlessly integrate with other smart home ecosystems, particularly Amazon Alexa. Link your Ring devices to Alexa to receive announcements when motion is detected or the doorbell is pressed, view live feeds on Echo Show devices, or even arm/disarm your Ring Alarm system with voice commands.
- Clean Your Device: Periodically clean the camera lens and motion sensor window with a soft, damp cloth to ensure clear video quality and accurate motion detection. Dust, dirt, and spiderwebs can obscure the view and trigger false alerts.
Installing a Ring device might seem like a complex endeavor at first glance, but by methodically following these steps, you empower yourself to take control of your home’s security. From meticulous preparation to the final touches of software configuration and ongoing maintenance, each stage contributes to a robust and reliable smart home system. You’re not just installing a gadget; you’re integrating a watchful guardian into your daily life, offering convenience, control, and, most importantly, peace of mind. Embrace the technology, follow this guide, and enjoy the enhanced security and connectivity that your Ring device brings to your home.
aViewFromTheCave is a participant in the Amazon Services LLC Associates Program, an affiliate advertising program designed to provide a means for sites to earn advertising fees by advertising and linking to Amazon.com. Amazon, the Amazon logo, AmazonSupply, and the AmazonSupply logo are trademarks of Amazon.com, Inc. or its affiliates. As an Amazon Associate we earn affiliate commissions from qualifying purchases.