
In the rapidly evolving landscape of artificial intelligence, TensorFlow has emerged as the cornerstone for developers, researchers, and data scientists worldwide. Developed by the Google Brain team, this open-source library provides a flexible ecosystem of tools, libraries, and community resources that allow practitioners to push the state-of-the-art in machine learning and build production-grade AI applications. However, the first hurdle many face is not designing the architecture of a neural network, but rather establishing a robust, high-performance environment where TensorFlow can thrive.
Installing TensorFlow is more than a simple command-line execution; it is an exercise in environmental management and hardware optimization. Whether you are deploying on a local workstation, a cloud-based server, or an edge device, understanding the nuances of the installation process ensures that your models run efficiently and without the friction of dependency conflicts.
Establishing the Foundation: Prerequisites and System Requirements
Before diving into the installation commands, it is imperative to audit your system architecture. TensorFlow is resource-intensive and relies heavily on specific software versions to maintain stability and performance. Neglecting these prerequisites often leads to the “DLL load failed” or “ModuleNotFoundError” issues that plague many beginners.
Python Environment Compatibility
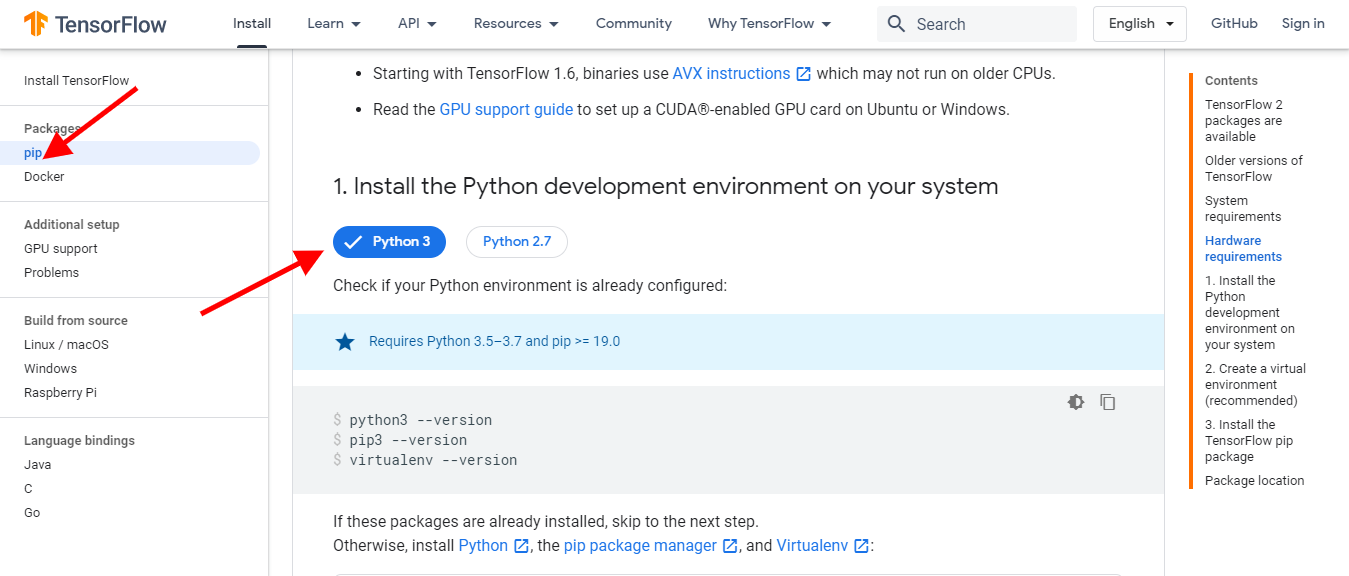
TensorFlow is primarily a Python-centric library. As of the current development cycle, TensorFlow supports Python versions ranging from 3.7 to 3.11. It is critical to ensure your Python installation is 64-bit, as the 32-bit versions do not support the complex mathematical operations required by the library’s backend. Developers often recommend using a version slightly behind the absolute latest release to ensure that all secondary dependencies—such as NumPy and SciPy—have caught up with compatibility patches.
Hardware Considerations: CPU vs. GPU
One of the most significant decisions in the installation process is determining your hardware acceleration path. A CPU-only installation is sufficient for learning basic concepts or running small-scale models. However, for deep learning tasks involving large datasets or complex architectures (like Transformers or CNNs), a GPU-only approach is nearly mandatory. TensorFlow leverages NVIDIA hardware through CUDA (Compute Unified Device Architecture) and cuDNN (CUDA Deep Neural Network library). Before proceeding, verify that your GPU has a “Compute Capability” score of 3.5 or higher to ensure compatibility with modern TensorFlow releases.
Operating System Nuances
While TensorFlow is cross-platform, the experience varies across Windows, macOS, and Linux. Linux is generally considered the “native” environment for TensorFlow, offering the most straightforward path for GPU acceleration. Windows users often find the best stability by using the Windows Subsystem for Linux (WSL2), which allows them to run a Linux environment directly on Windows without the overhead of a traditional virtual machine. For macOS users, especially those on M1/M2/M3 Silicon, Apple provides a specific tensorflow-metal plug-in to leverage the integrated GPU power of the ARM architecture.
Streamlining the Process: Standard Installation Methods
Once the prerequisites are satisfied, you must choose an installation strategy. The modern tech stack offers several pathways, ranging from direct package management to isolated containerization.
The Python Package Index (pip) Route
For most developers, pip is the standard tool for installation. To avoid polluting your system’s global Python environment—which can lead to catastrophic version conflicts between different projects—it is best practice to use a virtual environment.
Using the built-in venv module, you can create an isolated space:
- Create the environment:
python -m venv tf_env - Activate it:
source tf_env/bin/activate(Linux/macOS) or.tf_envScriptsactivate(Windows). - Install TensorFlow:
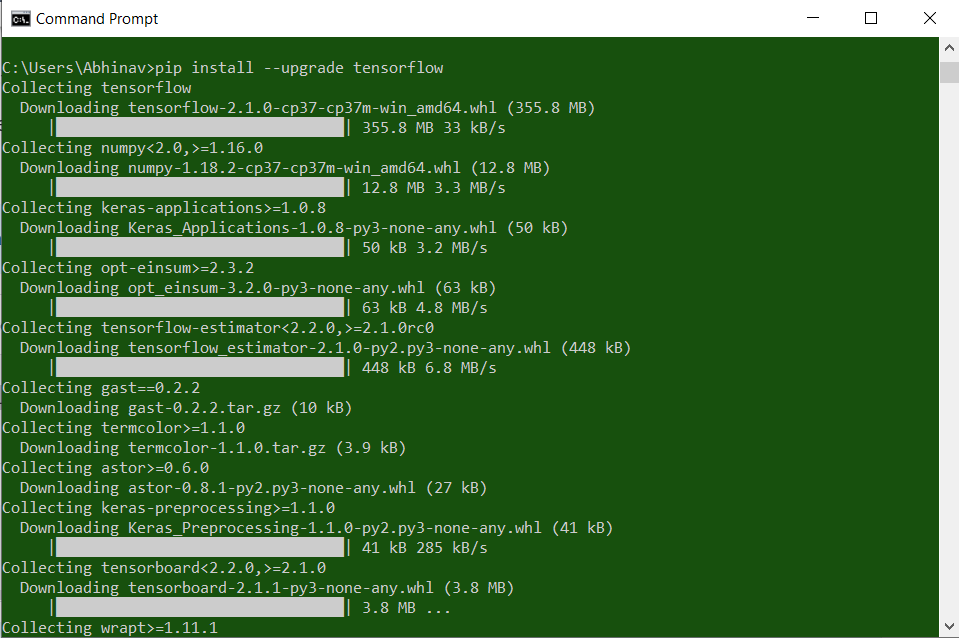
pip install --upgrade tensorflow
This method ensures that the specific version of TensorFlow and its myriad of dependencies remain contained within that single project folder.
Managing Environments with Conda
For data scientists who prefer a more managed ecosystem, Anaconda or Miniconda is an excellent alternative. Conda is particularly adept at handling non-Python dependencies, such as the CUDA toolkit. By running conda install -c apple tensorflow-deps (on Mac) or conda install tensorflow-gpu (on Windows/Linux), the package manager automatically resolves complex C++ and driver dependencies that pip might struggle with. This “all-in-one” approach reduces the manual labor involved in configuring the underlying system drivers.
Containerization with Docker
In professional DevOps and MLOps environments, Docker is the gold standard. Using the official TensorFlow Docker images eliminates the “it works on my machine” syndrome. By pulling a pre-configured image—such as tensorflow/tensorflow:latest-gpu—you gain an environment where the OS, Python, CUDA, and TensorFlow are already harmonized. This is particularly useful for teams who need to scale their training across multiple cloud instances without manually configuring each node.
Optimizing Performance: Enabling GPU Support with CUDA and cuDNN
For those looking to harness the power of high-end hardware, the standard installation is only the first step. To enable GPU acceleration, TensorFlow must be able to communicate with the NVIDIA drivers.
Understanding NVIDIA Requirements
The relationship between the TensorFlow version and the CUDA Toolkit version is rigid. If you install a version of CUDA that is too new for your version of TensorFlow, the library will default back to the CPU, significantly slowing down your computations. It is vital to consult the official “Tested Build Configurations” table on the TensorFlow website. This documentation maps specific TensorFlow versions to their required CUDA and cuDNN counterparts.
Configuring the Path and Drivers
After installing the NVIDIA drivers and the CUDA Toolkit, you must ensure that your system’s environment variables (the PATH) point correctly to the CUDA binaries. On a Linux system, this involves modifying the .bashrc or .zshrc file to include the CUDA library paths. On Windows, this requires manual editing of System Environment Variables. Failure to do this correctly results in TensorFlow being unable to “see” the GPU, even if the hardware is physically present and the drivers are installed.
Validating Your Setup: Testing and Debugging Common Hurdles
Installation is not complete until it is verified. A successful command-line installation does not always guarantee that the library is functioning optimally or that it has access to the intended hardware.
Running the Verification Script
To verify the installation, you should run a short Python script within your environment. By executing import tensorflow as tf; print(tf.config.list_physical_devices('GPU')), you can confirm whether TensorFlow has successfully initialized the GPU. If the output returns an empty list while you have a GPU installed, it indicates a mismatch in driver versions or a failure in the CUDA path configuration.
Resolving Version Conflicts
A common issue in the tech world is “dependency hell.” TensorFlow relies on specific versions of libraries like Protobuf, Six, and Gast. If you have other packages installed that require different versions of these libraries, your TensorFlow installation may break. The most effective way to resolve this is to start with a fresh virtual environment and install TensorFlow first, letting it dictate the versions of the sub-dependencies, and then adding other packages one by one.
Handling Path Errors and DLL Issues
On Windows, users frequently encounter the “Could not load dynamic library ‘cudart64_110.dll'” error. This usually means the CUDA toolkit version doesn’t match the TensorFlow requirement, or the file is missing from the system path. The solution is often as simple as renaming a newer DLL file or ensuring the correct CUDA bin folder is added to the system’s environment variables.
Future-Proofing Your Environment: Best Practices for AI Development
In the tech industry, the only constant is change. TensorFlow updates frequently, bringing performance improvements and new API features. Maintaining your environment is an ongoing task that requires a disciplined approach.
Using Virtual Environments for Every Project
The single most important practice in TensorFlow development is isolation. Never install TensorFlow in your system’s base Python directory. By using a different virtual environment for every project, you can have one project running TensorFlow 1.15 (for legacy support) and another running the latest TensorFlow 2.x without them interfering with each other. This modularity is the hallmark of a professional developer.
Monitoring Resource Utilization
Once installed, it is important to monitor how TensorFlow uses your hardware. Tools like nvidia-smi (for NVIDIA GPUs) or the TensorBoard profiling tool allow you to see if your installation is effectively utilizing the available VRAM and compute units. If you notice high CPU usage but low GPU usage during model training, it may indicate a bottleneck in your data pipeline or a misconfiguration in how TensorFlow was compiled for your specific hardware.
Keeping TensorFlow and Drivers Updated
Finally, stay informed about the release notes of new TensorFlow versions. Often, a simple pip install --upgrade tensorflow can unlock significant speed improvements through better XLA (Accelerated Linear Algebra) compilation or updated Keras integrations. However, always pair these updates with a corresponding check of your GPU drivers to ensure that the entire stack remains in sync.
By following this structured approach—from auditing hardware to validating software hooks—you transform the installation of TensorFlow from a technical hurdle into a strategic foundation for your machine learning journey. In the realm of AI, a stable environment is the launchpad for innovation.
aViewFromTheCave is a participant in the Amazon Services LLC Associates Program, an affiliate advertising program designed to provide a means for sites to earn advertising fees by advertising and linking to Amazon.com. Amazon, the Amazon logo, AmazonSupply, and the AmazonSupply logo are trademarks of Amazon.com, Inc. or its affiliates. As an Amazon Associate we earn affiliate commissions from qualifying purchases.