In the diverse ecosystem of Linux distributions, software management has evolved significantly. While modern package managers like APT, DNF, and Pacman offer seamless “one-click” installations via official repositories, there remains a fundamental skill every Linux enthusiast, developer, and system administrator must master: handling tar files. Often referred to as “tarballs,” these files are the backbone of software distribution in the open-source world. Whether you are installing a cutting-edge beta tool, a proprietary driver, or a custom-compiled application, understanding how to manipulate and install from tar archives is essential. This guide provides an in-depth exploration of the tar utility, the extraction process, and the various workflows required to transform a compressed archive into a functional application on your Linux system.
Demystifying the Tarball: Evolution and Architecture
Before diving into terminal commands, it is crucial to understand what a tar file actually is. The term “tar” stands for Tape ARchive. Historically, it was developed in the early days of Unix to write data to sequential I/O devices like tape drives. Today, it serves as a method to bundle multiple files and directories into a single file while preserving critical metadata, such as permissions, ownership, and directory structures.
What is a Tar File?
A standard .tar file is not actually compressed; it is merely an archive—a container holding other files. However, in the modern Linux landscape, tar is almost always paired with a compression utility to reduce file size for easier transfer over the internet. This results in the “tarball” format. Unlike the ZIP format common in Windows, which compresses files individually within the archive, Linux tarballs usually compress the entire archive as a single stream, often resulting in better compression ratios.
Understanding Compression Algorithms (Gzip, Bzip2, XZ)
When you encounter a tar file, the file extension tells you which compression algorithm was used. Selecting the right flag during extraction depends on this extension:
- .tar.gz or .tgz: Compressed using Gzip. This is the most common format due to its balance between speed and compression ratio.
- .tar.bz2 or .tbz2: Compressed using Bzip2. It generally offers better compression than Gzip but is slower to process.
- .tar.xz: Compressed using XZ. This provides the highest compression levels, making it ideal for large source code repositories, though it requires more CPU power to decompress.
Navigating the Command Line: The Essential Tar Syntax
The tar command is a powerhouse with dozens of options, but for the purpose of installing software, you only need to master a specific subset. Working within the terminal provides the precision necessary to ensure files are placed in the correct directories with the appropriate permissions.
The Core Anatomy of the Tar Command
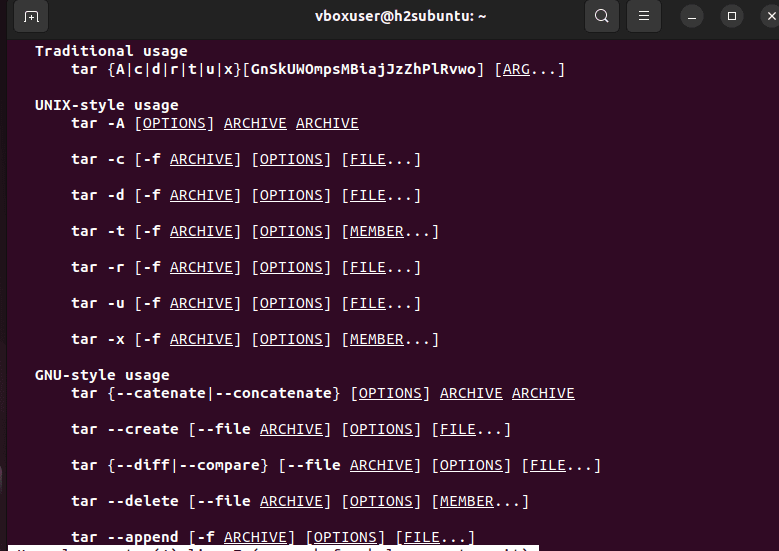
The basic structure of a tar command follows this pattern: tar [options] [archive_name]. To extract a file, you will almost always use a combination of the following flags:
-x: Extract. This tells the utility to pull files out of the archive.-v: Verbose. This lists every file as it is being extracted, which is helpful for verifying the contents.-f: File. This specifies the name of the archive you are working with. This flag must always come last in the sequence of options because it expects the filename to follow immediately.-C: Directory. This allows you to extract the files into a specific destination folder rather than the current working directory.
Extracting Different Archive Formats
While modern versions of the tar utility are smart enough to auto-detect the compression format, it is a professional best practice to know the specific flags:
- For .tar.gz:
tar -xzvf filename.tar.gz(The-zflag invokes Gzip). - For .tar.bz2:
tar -xjvf filename.tar.bz2(The-jflag invokes Bzip2). - For .tar.xz:
tar -xJvf filename.tar.xz(The uppercase-Jflag invokes XZ).
If you are unsure of the compression, simply using tar -xvf filename will usually suffice on most modern Linux distributions (like Ubuntu, Fedora, or Arch), as the utility will identify the header automatically.
From Archive to Executable: The Installation Pipeline
Extracting the files is only the first step. “Installing” a tar file can mean different things depending on what is inside the archive. Generally, software distributed via tarballs falls into three categories: pre-compiled binaries, source code, or scripted installers.
Working with Pre-compiled Binary Tarballs
Many software vendors (like Google for Chrome or JetBrains for their IDEs) distribute Linux software as pre-compiled binaries. These are “portable” versions of the software that do not require compilation.
After extracting the archive, you will likely find a folder containing an executable file. Usually, you can run the application directly by navigating into the folder and executing the binary (e.g., ./studio.sh or ./bin/program). To “install” this system-wide, professionals typically move the extracted folder to /opt/ and create a symbolic link in /usr/local/bin/ so the command can be run from anywhere in the terminal.
Compiling from Source: The Traditional Linux Way
If the tarball contains source code (often indicated by the presence of a src folder or files ending in .c and .cpp), you must build the software for your specific hardware architecture. This process follows the classic “Three-Step” workflow:
- ./configure: This script checks your system for necessary dependencies (libraries, compilers) and creates a
Makefile. If this step fails, it usually means you are missing a development library (e.g.,libssl-dev). - make: This command compiles the source code into binary executables. Depending on the size of the program and your CPU speed, this can take anywhere from seconds to hours.
- sudo make install: This final step copies the compiled binaries and documentation to the appropriate system directories (like
/usr/local/bin/).
Executing Shell Scripts and Python Installers
Occasionally, a tarball will contain a dedicated installation script, often named install.sh, setup.py, or configure.py. In these cases, after extraction, you must give the script execution permissions using chmod +x install.sh and then run it with ./install.sh. These scripts automate the placement of files and the configuration of system environment variables.
Advanced Management and System Integration
An installation is not truly complete until the software is integrated into your system workflow. Simply extracting a file to your Downloads folder is a recipe for a cluttered system and broken paths.
Handling Permissions and Ownership
Linux is a multi-user system built on strict permission protocols. If you are installing software into system directories like /usr/ or /opt/, you must use sudo (SuperUser Do). However, be cautious: extracting a tarball as root can sometimes lead to files having root ownership in your home directory, which can cause issues later. Always check ownership using ls -l and, if necessary, correct it with chown.
Managing the PATH Environment Variable
If you have installed a binary in a custom location, such as ~/apps/mytool/bin, the terminal will not recognize the command mytool unless that directory is in your PATH. To fix this, you can append the directory to your shell configuration file (like .bashrc or .zshrc):
export PATH=$PATH:/home/username/apps/mytool/bin
After saving the file and running source ~/.bashrc, your newly installed software will be accessible from any terminal prompt.
Cleaning Up and Dependency Resolution
One of the disadvantages of installing via tarballs compared to package managers is the lack of automatic dependency resolution. If a program fails to run after extraction, use the ldd command on the binary to see which shared libraries are missing. Additionally, once the installation is successful and the binaries are moved to their permanent home, it is a best practice to delete the original tarball and the temporary extraction folder to save disk space.
Conclusion
Mastering the installation of tar files is a rite of passage in the Linux world. It grants you the freedom to use software that isn’t yet available in official repositories and provides a deeper understanding of how the Linux operating system handles files, permissions, and compilation. By understanding the nuances of compression formats, the precision of the tar command, and the various installation workflows—from simple binary execution to complex source compilation—you empower yourself to take full control of your computing environment. While package managers offer convenience, the tarball offers universality, ensuring that regardless of your distribution, you have the tools to install any software the open-source community provides.