
The way we consume music is constantly evolving, and for many, Spotify remains the undisputed king of streaming. But what if you’re looking to go beyond the standard Spotify interface? What if you desire a more personalized, visually appealing, and functionally enhanced music experience? This is where Spicetify comes in. Spicetify is a powerful command-line tool that allows you to customize your Spotify desktop client with themes, extensions, and a wealth of other modifications. If you’re a Mac user looking to unlock the full potential of your Spotify listening sessions, this guide will walk you through the straightforward process of installing Spicetify on your macOS device.
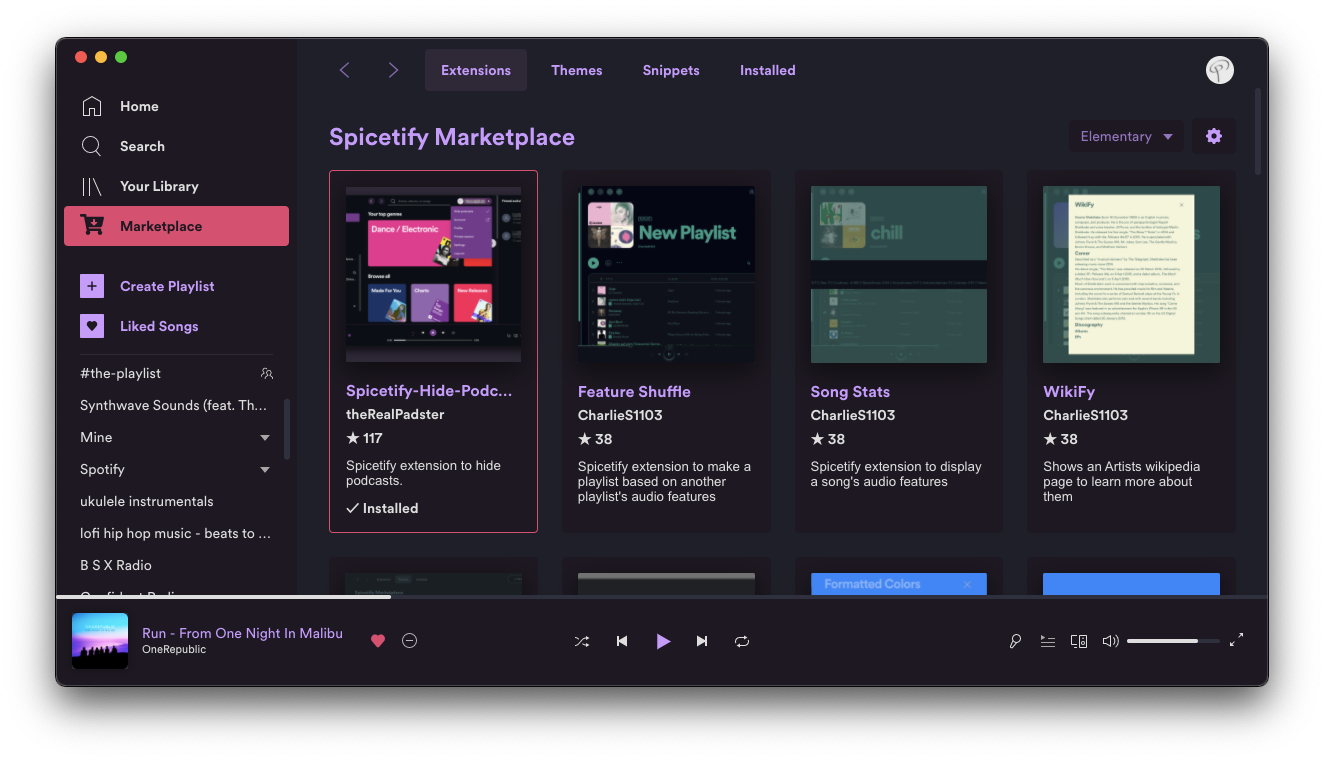
This article falls squarely within our Tech section, offering a practical tutorial for software customization. We’ll be diving into the world of apps and software, providing a step-by-step approach to enhancing a popular digital tool. While not directly about brand strategy, understanding how to personalize a widely used application like Spotify can indirectly influence user perception and create a more engaged brand experience for Spotify itself. Similarly, while the primary focus isn’t financial, the efficiency and satisfaction gained from a customized user experience could be seen as an indirect benefit to productivity, aligning with our broader Tech and Money (in terms of maximizing the value of your digital subscriptions) categories.
Why Customize Spotify with Spicetify?
Before we get our hands dirty with the installation process, it’s worth understanding the compelling reasons behind customizing Spotify. The default Spotify desktop client, while functional, can feel a bit static for users who crave more aesthetic control and advanced features. Spicetify addresses this by offering a gateway to a vibrant community of developers and designers who create custom themes, extensions, and scripts.
Enhanced Aesthetics and Personalization
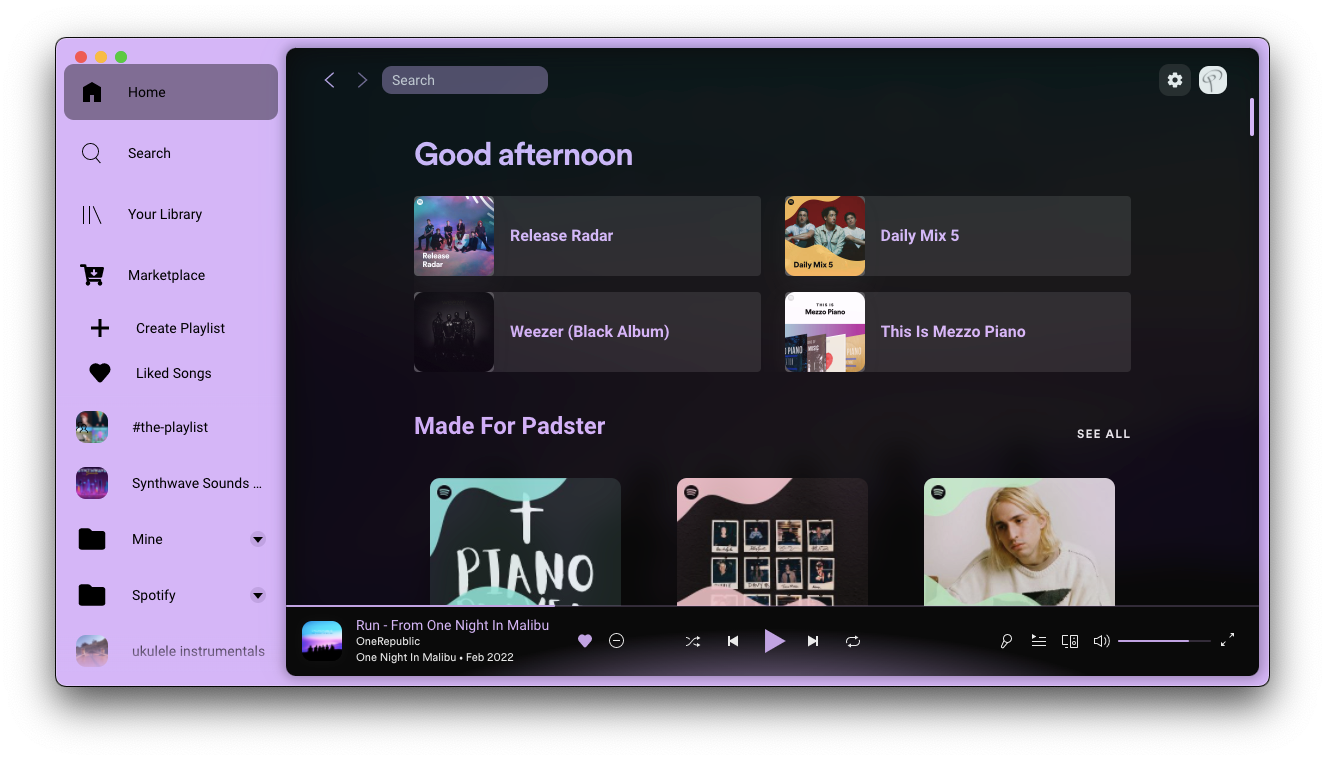
The most immediate benefit of Spicetify is the ability to transform the look and feel of your Spotify client. Gone are the days of being stuck with Spotify’s default color scheme. With Spicetify, you can apply sleek, modern themes that can dramatically alter the visual experience. Imagine a dark mode that’s truly immersive, or a theme inspired by your favorite movie, game, or even another application. This level of personalization makes your music listening feel more intimate and enjoyable. You can tailor the interface to match your mood, your workflow, or simply your personal style. This goes beyond just changing colors; themes can alter fonts, spacing, and even the layout of certain elements, offering a truly unique Spotify experience.
Functional Extensions and Features
Beyond aesthetics, Spicetify opens the door to a range of functional extensions that can significantly improve your Spotify workflow. These extensions can add features that are not natively available in the standard Spotify client. Think about things like:
- Enhanced playback controls: More intuitive ways to manage your music, playlists, and queues.
- Advanced search and filtering: More powerful tools to find exactly the music you’re looking for.
- Integration with other services: Connecting Spotify to other apps or platforms for a more unified digital life.
- Customizable shortcuts and hotkeys: Streamlining your interaction with the application.
- Improved lyrics display: More visually appealing and functional lyric integration.
These extensions are developed by the Spicetify community, meaning the possibilities are constantly expanding. This continuous innovation ensures that your Spotify experience can grow and adapt with your needs.
A Thriving Community
Spicetify thrives on its active and passionate community. This community is the driving force behind the vast library of themes and extensions available. When you install Spicetify, you’re not just installing a tool; you’re joining a community of like-minded individuals who are passionate about music and technology. This community provides support, shares new creations, and collaborates to push the boundaries of what’s possible with Spotify customization. Forums, Discord servers, and GitHub repositories are all hubs where you can find help, inspiration, and fellow enthusiasts.
Prerequisites for Installing Spicetify on Mac
Before we begin the installation, it’s crucial to ensure you have the necessary components in place. Spicetify relies on a few core dependencies to function correctly on your Mac. Having these ready will make the installation process smooth and error-free.
Ensure Spotify Desktop Client is Installed
The most fundamental requirement is that you must have the Spotify desktop application installed on your Mac. Spicetify acts as a modifier for this existing application; it doesn’t replace it. You can download the latest version of the Spotify desktop client directly from the official Spotify website. Make sure it’s up to date, as older versions might have compatibility issues.
Install Homebrew
Homebrew is a package manager for macOS that simplifies the installation of software. Many command-line tools, including Spicetify and its dependencies, are easily installable through Homebrew. If you don’t have Homebrew installed already, you’ll need to do so.
To install Homebrew:
-
Open the Terminal application on your Mac. You can find it in your Applications folder under Utilities, or by searching with Spotlight (Command + Space, then type “Terminal”).
-
Paste the following command into the Terminal and press Enter:
/bin/bash -c "$(curl -fsSL https://raw.githubusercontent.com/Homebrew/install/HEAD/install.sh)" -
Follow the on-screen instructions. This usually involves pressing Enter a few times and may ask for your administrator password.
-
Once the installation is complete, you might see a message suggesting you add Homebrew to your PATH. Follow those instructions carefully; they typically involve running a couple of
echocommands and then sourcing your shell configuration file (e.g.,.zshrcor.bash_profile).
You can verify that Homebrew is installed correctly by typing brew --version in the Terminal.
Install Node.js and npm
Spicetify is built using Node.js, and npm (Node Package Manager) is its accompanying package manager. These are essential for installing and managing Spicetify.
To install Node.js and npm using Homebrew:
-
Open your Terminal application.
-
Run the following command to install Node.js (which includes npm):
brew install node -
Once the installation is complete, you can verify that Node.js and npm are installed by running:
node -v
npm -v
This will display the installed versions of Node.js and npm.
Installing Spicetify on Your Mac
With all the prerequisites in place, we can now proceed with the actual installation of Spicetify. This process involves using the command line to download and install the Spicetify CLI tool.
Step 1: Install the Spicetify CLI
This is the core installation step where we use npm to download and install the Spicetify command-line interface.
- Open your Terminal application.
- Execute the following command to install Spicetify globally:

```bash
npm install -g spicetify-cli
```
The `-g` flag indicates that you want to install Spicetify globally, making it accessible from any directory in your Terminal. This command will download Spicetify and its dependencies. It might take a few moments to complete.
-
After the installation is finished, it’s a good practice to run a command to check if Spicetify is recognized and to see its version. Type:
spicetify --versionIf you see a version number, the installation was successful.
Step 2: Patching Spotify for Spicetify
Spicetify needs to “patch” your Spotify desktop client to enable its customization features. This involves replacing some of Spotify’s default files with Spicetify-compatible versions.
-
In your Terminal, run the following command:
spicetify patchThis command will locate your Spotify installation and apply the necessary patches. It will likely prompt you to confirm the action and may require administrator privileges (by asking for your password).
-
Once the patching is complete, you should see a confirmation message. It is crucial to restart your Spotify desktop client for the patches to take effect. If Spotify was running during the patching process, quit it completely (Cmd + Q) and then relaunch it.
Step 3: Applying Themes and Extensions (Optional but Recommended)
Now that Spicetify is installed and your Spotify client is patched, you can begin customizing! The Spicetify website and its GitHub repository are excellent resources for discovering themes and extensions.
Applying a Theme:
-
First, you need to find a theme you like. Browse the Spicetify-Themes repository on GitHub or other community-curated lists. Themes are typically provided as folders containing CSS files and other assets.
-
To install a theme, you’ll usually place its folder into the Spicetify configuration directory. The default location for Spicetify’s configuration is
~/.config/spicetify/Themes. If this directory doesn’t exist, you can create it. -
Once the theme folder is in place, you can apply it using the Spicetify CLI. For example, if you downloaded a theme named “Dracula,” you would run:
spicetify config current_theme Dracula
spicetify apply
The
spicetify applycommand reloads Spicetify’s configuration, including the newly applied theme.
Installing Extensions:
-
Similar to themes, extensions are also managed by Spicetify. You can often find extensions shared on GitHub.
-
The installation process for extensions can vary, but often involves copying extension files into the
~/.config/spicetify/Extensionsdirectory. -
You can then enable extensions using the Spicetify CLI, for example:
spicetify config extensions SpicetifyExtension.js # Replace with the actual extension filename
spicetify apply
Note on Updates:
As Spicetify and Spotify are constantly updated, you might need to re-patch Spotify after a Spotify update or re-install Spicetify if there are major changes. To update Spicetify itself, simply run:
npm update -g spicetify-cli
Then, you may need to run spicetify patch again.
Troubleshooting Common Installation Issues
While the installation process is generally smooth, you might encounter a few hiccups. Here are some common issues and their solutions:
Spotify Not Found or “Spotify not installed” Error
This usually means Spicetify couldn’t locate your Spotify desktop client.
- Check Spotify Installation: Ensure you have the official Spotify desktop app installed from their website, not a web version or a beta.
- Correct Path: Sometimes, Spicetify might look for Spotify in a non-standard location. You can manually tell Spicetify where Spotify is installed. First, find the Spotify application in your “Applications” folder, right-click it, and select “Show Package Contents.” Navigate to
Contents/Resources/and you should find the Spotify executable. You can then tell Spicetify to use this path. However, this is rarely needed for standard installations. - Permissions: Ensure your user account has the necessary permissions to modify files within the Spotify application bundle.
Command Not Found: spicetify
This error indicates that the spicetify command is not recognized by your system’s PATH.
- Global Installation: Ensure you used
npm install -g spicetify-cli. If you didn’t use-g, Spicetify might only be available in the directory where you ran the command. - Node.js PATH: Verify that Node.js and npm are correctly installed and added to your system’s PATH. Running
node -vandnpm -vshould work, and thebrew install nodecommand typically handles this. If not, you might need to manually configure your shell’s profile file (.zshrcor.bash_profile). - Restart Terminal: Sometimes, a new terminal window is required for PATH changes to take effect. Close and reopen your Terminal.
Patched Spotify Crashes or Doesn’t Load
If your Spotify client starts crashing or behaves erratically after patching:
- Revert Patches: Spicetify provides a way to revert the patches. Run:
bash

spicetify uninstall
This will remove Spicetify and revert any modifications made to Spotify. You can then try reinstalling Spicetify from scratch, ensuring you have the latest versions of all dependencies. - Spotify Update Issues: Sometimes, a recent Spotify update might be incompatible with the current Spicetify version. Check the Spicetify GitHub repository or community forums for any known issues or updates. You might need to wait for a Spicetify update to address compatibility.
- Corrupted Installation: Try completely uninstalling and then reinstalling both Spotify and Spicetify.
Theme or Extension Not Working
- Correct Directory: Double-check that theme and extension files are placed in the correct
~/.config/spicetify/Themesand~/.config/spicetify/Extensionsdirectories respectively. - Configuration Commands: Ensure you are using the correct
spicetify config current_theme [ThemeName]andspicetify config extensions [ExtensionName.js]commands, followed byspicetify apply. - Theme/Extension Compatibility: Verify that the theme or extension you’re trying to use is compatible with your version of Spicetify and Spotify. Older themes might not work with newer versions.
By following these steps and being mindful of common troubleshooting points, you should be able to successfully install Spicetify on your Mac and begin your journey into a more personalized and feature-rich Spotify experience. Enjoy exploring the vast customization possibilities!
aViewFromTheCave is a participant in the Amazon Services LLC Associates Program, an affiliate advertising program designed to provide a means for sites to earn advertising fees by advertising and linking to Amazon.com. Amazon, the Amazon logo, AmazonSupply, and the AmazonSupply logo are trademarks of Amazon.com, Inc. or its affiliates. As an Amazon Associate we earn affiliate commissions from qualifying purchases.