
In the rapidly evolving landscape of the Internet of Things (IoT), home security has transitioned from expensive, hardwired professional installations to accessible, high-tech DIY solutions. At the forefront of this revolution is the Ring outdoor camera ecosystem. Whether you are deploying the Ring Stick Up Cam, the Spotlight Cam, or the Floodlight Cam, the installation process is a sophisticated blend of hardware positioning and software optimization.
This guide provides a comprehensive technical breakdown of how to install and configure your Ring outdoor camera, ensuring your digital security infrastructure is robust, efficient, and seamlessly integrated into your smart home network.
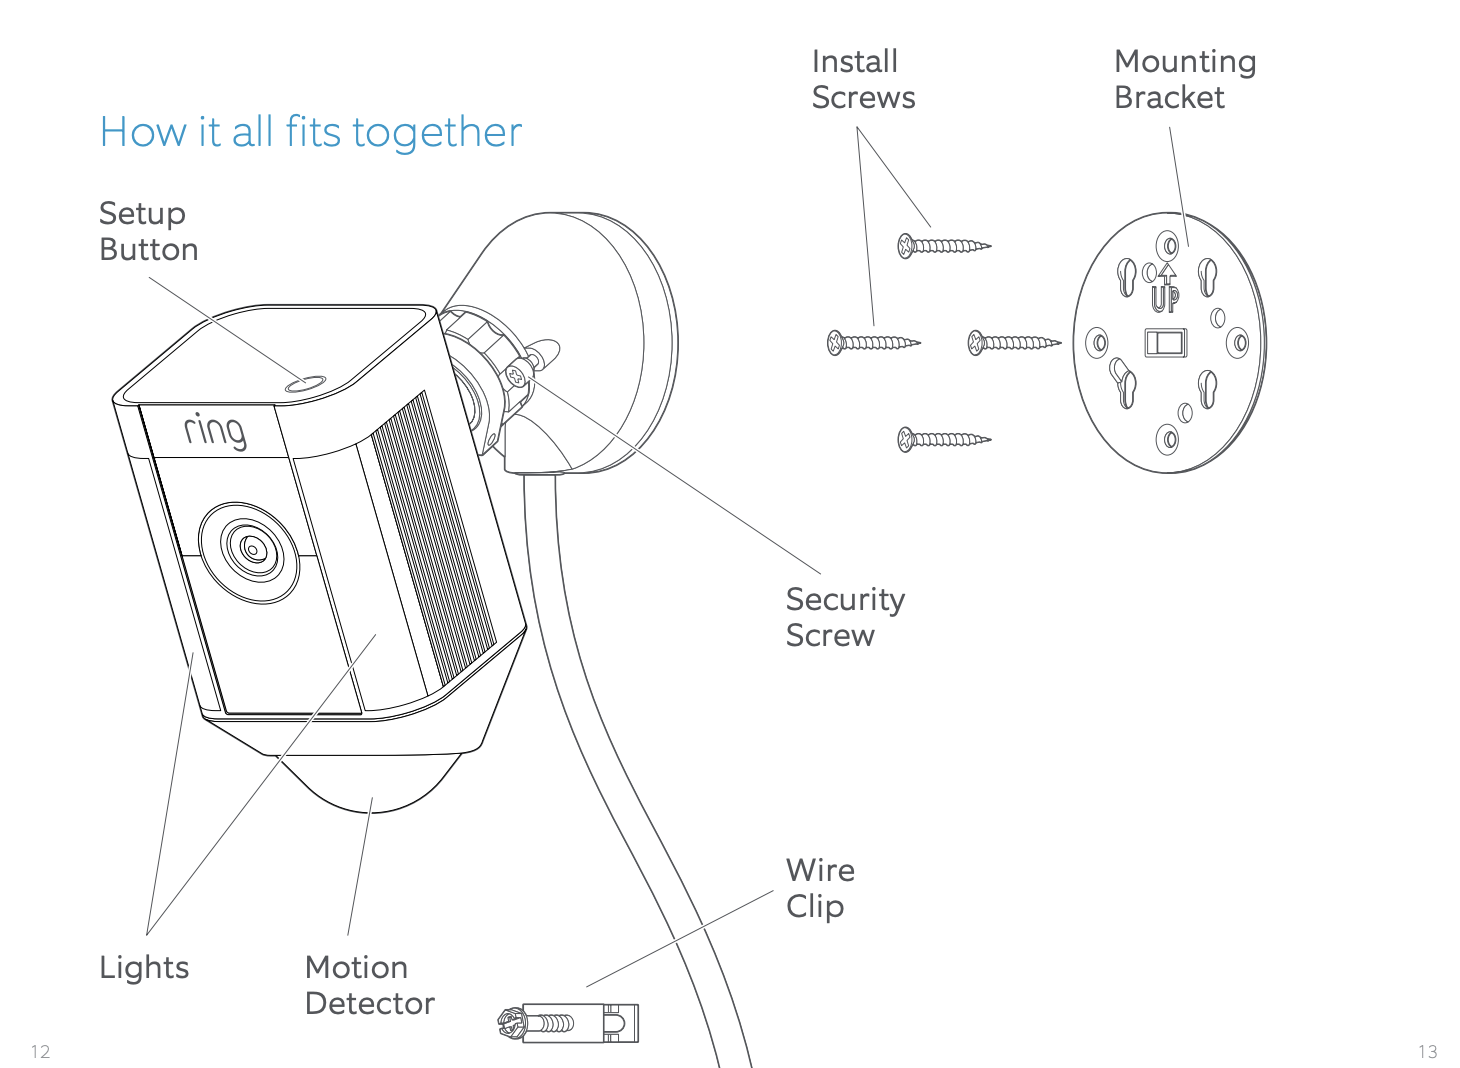
1. Pre-Installation: Network Optimization and Hardware Readiness
Before drilling holes into your exterior walls, successful installation begins with a technical assessment of your environment. A smart camera is only as effective as the network supporting it.
Assessing Wi-Fi Signal Strength (RSSI)
The most common point of failure for outdoor cameras is a weak wireless signal. Ring cameras require a stable 2.4GHz or 5GHz connection (depending on the model). Before mounting, take your smartphone to the intended installation site and check the Wi-Fi signal. In technical terms, you are looking for a healthy Received Signal Strength Indicator (RSSI). An RSSI between -40 and -60 is ideal; anything higher than -70 often results in video latency or frequent disconnections. If the signal is weak, consider installing a Ring Chime Pro or a mesh Wi-Fi system to extend your network’s reach.
Battery vs. Wired vs. Solar Power Configurations
Your choice of power source dictates the complexity of the installation.
- Battery-Powered: Offers the most flexibility in placement but requires periodic recharging.
- Hardwired: Requires a connection to existing junction boxes or a plug-in transformer, providing a “set it and forget it” experience with constant power for advanced features like “Pre-Roll.”
- Solar-Powered: A hybrid approach using a solar panel attachment to keep the battery topped up, ideal for high-sunlight areas.
Essential Tools and Firmware Updates
Modern tech installations require precision. Ensure you have a power drill, a level, and the specialized screwdriver provided in the Ring kit. Before mounting the hardware, it is a technical best practice to “onboard” the device indoors. Scan the QR code on the device via the Ring app and allow it to perform its initial firmware update near your router. This ensures that the device’s software is patched against known vulnerabilities before it is deployed to the field.
2. Strategic Physical Deployment and Mounting Protocols
The physical placement of your camera determines the quality of the data it collects. Positioning is not just about the view; it is about the physics of the Passive Infrared (PIR) sensors.
Mounting the Bracket and Achieving the Optimal Field of View
Most Ring outdoor cameras are designed to be mounted approximately 9 feet (2.75 meters) above the ground. This height provides the optimal balance between a wide Field of View (FOV) and the ability to capture facial details. Using the mounting bracket as a template, mark your pilot holes. If you are mounting on masonry or brick, use the included wall anchors to ensure a secure fit. Ensure the camera is tilted downward at a slight angle; this prevents the sky’s brightness from blowing out the exposure and focuses the PIR sensors on ground-level movement.
Hardwiring and Weatherproofing
For wired models, such as the Ring Floodlight Cam, ensure the power is cut at the breaker before beginning. The technical execution involves connecting the hot (black), neutral (white), and ground (green/copper) wires using wire nuts. Proper weatherproofing is essential for longevity. Ensure the gaskets are seated correctly and consider applying a bead of silicone caulk around the base of the mounting plate to prevent moisture ingress, which can lead to short circuits in the camera’s internal logic boards.
Solar Panel Integration
If you are utilizing a solar accessory, placement is even more critical. The panel requires at least 3–4 hours of direct sunlight daily to maintain a positive charge-to-discharge ratio. Position the panel facing south (in the northern hemisphere) and ensure the cable path to the camera is secured with cable clips to prevent wind-induced wear or tampering.
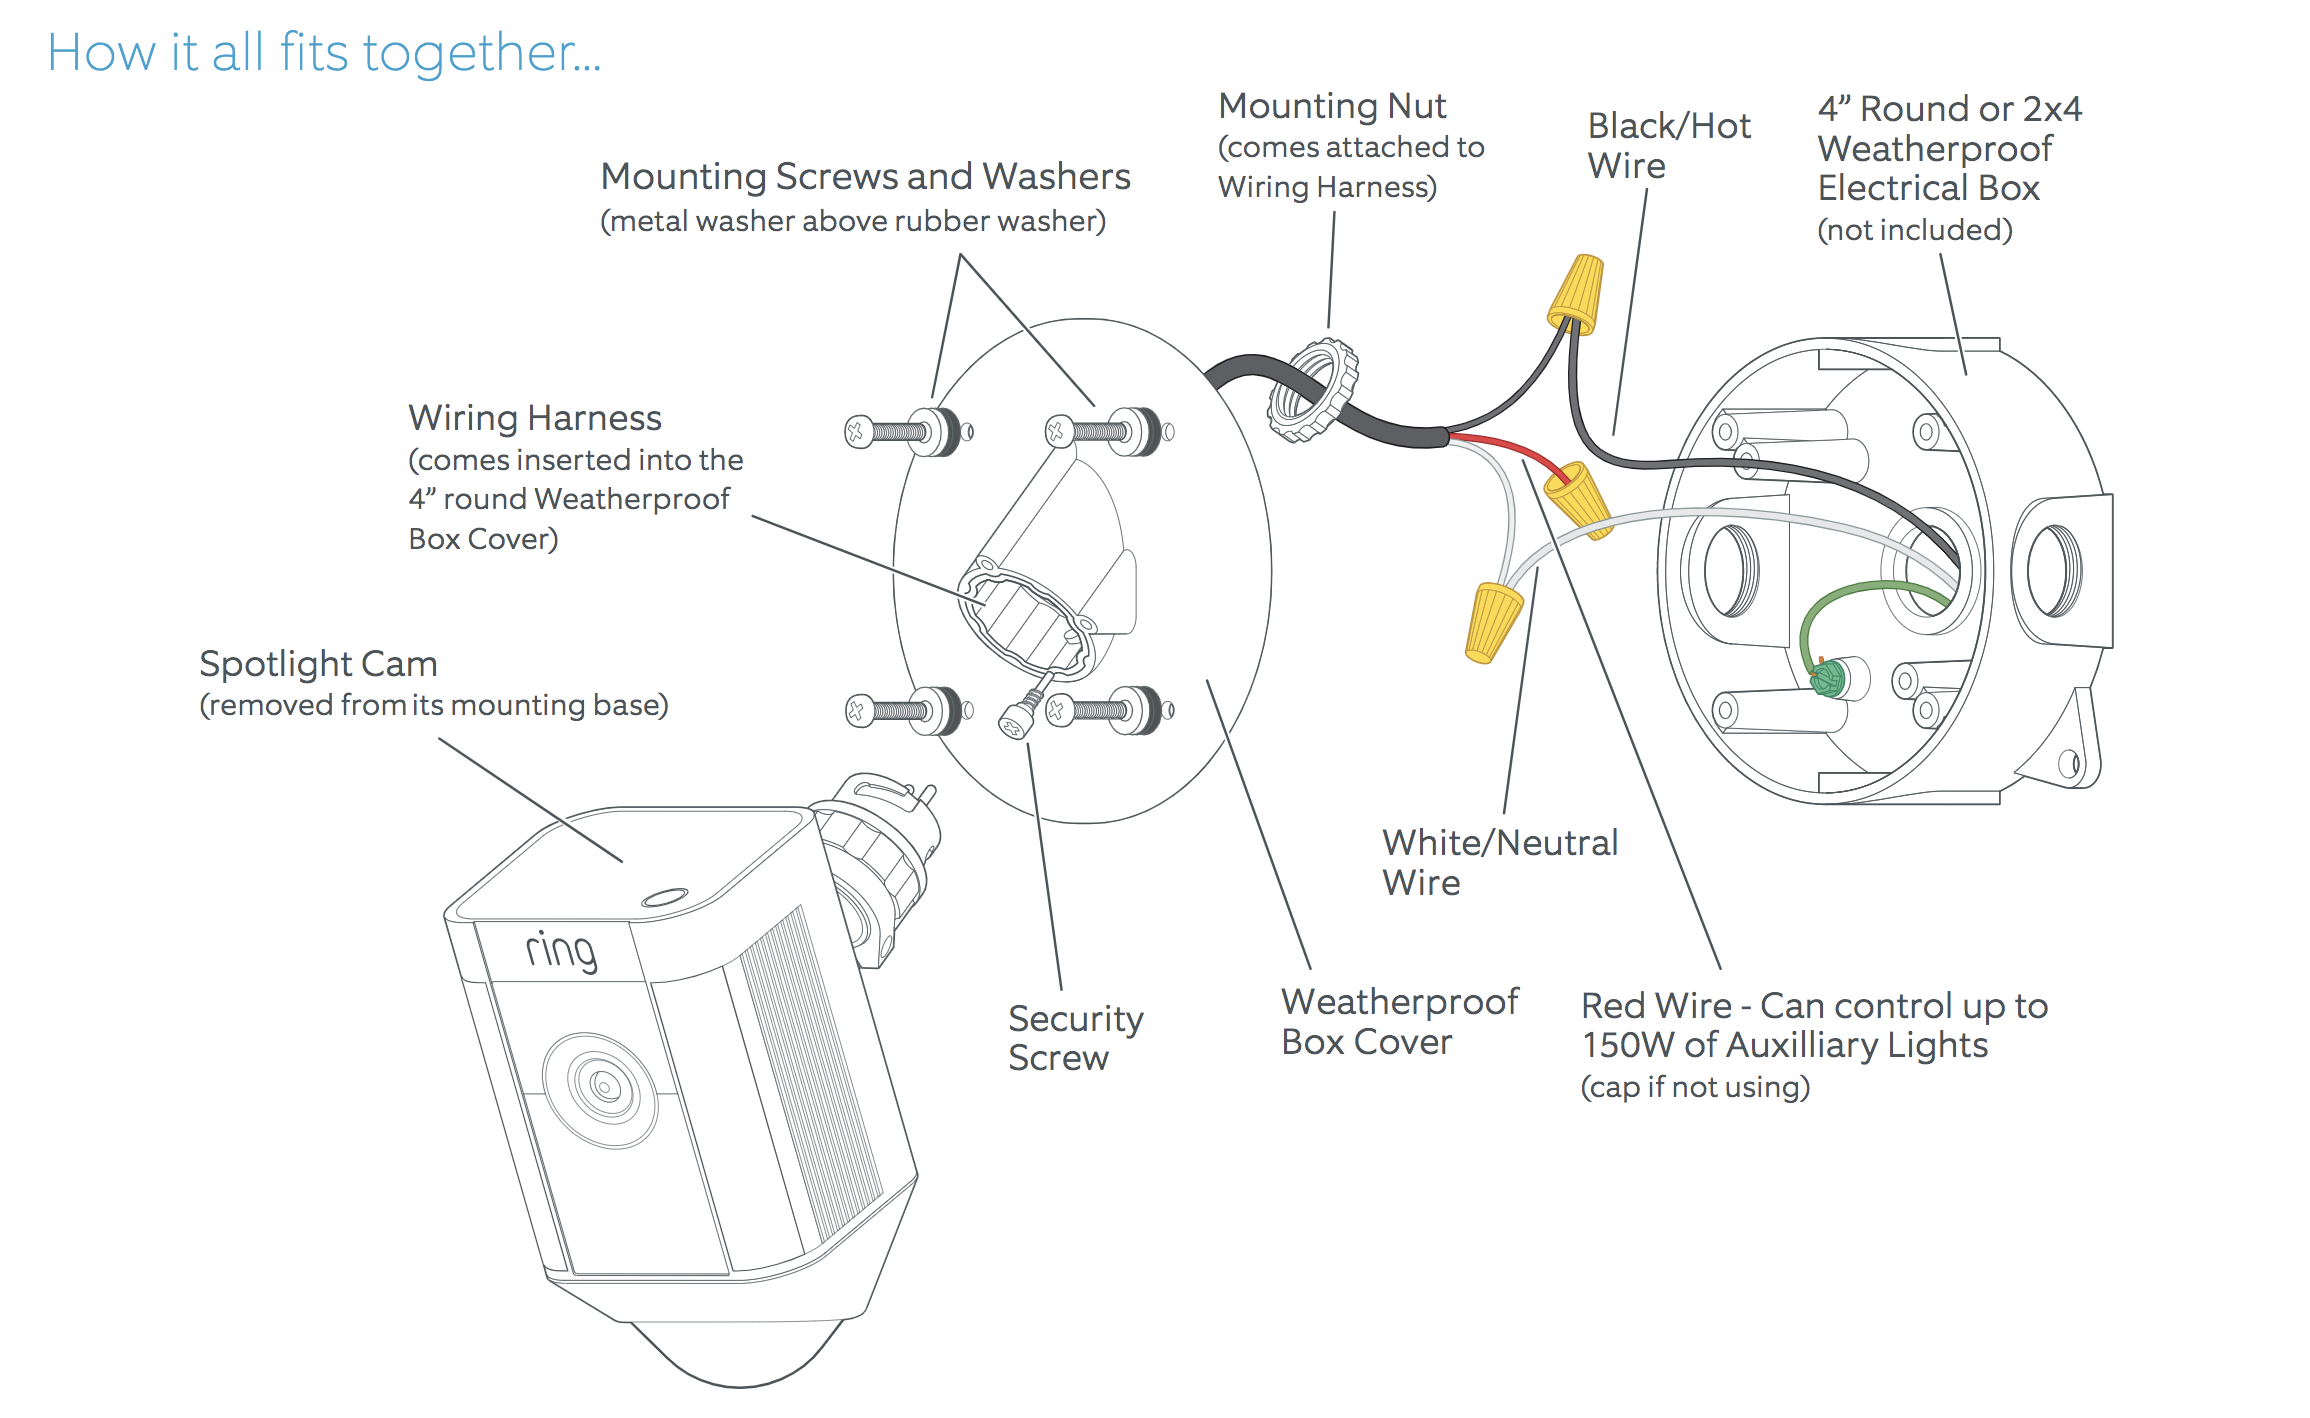
3. Software Calibration and Digital Security Configuration
Once the hardware is physically secured, the “intelligence” of the camera must be calibrated within the Ring application. This stage moves from mechanical installation to software engineering.
Calibrating Advanced Motion Detection (AMD)
Ring cameras use a combination of PIR sensors and computer vision algorithms to detect motion. Within the app, you must define “Motion Zones.” Rather than monitoring the entire FOV, highlight specific areas—like your driveway or porch—to reduce “false positives” from swaying trees or passing cars. High-end models allow for “Bird’s Eye View,” which uses satellite imagery and radar to track the exact path of a visitor on your property, providing a top-down technical map of movements.
Integrating with Smart Home Hubs and API Connectivity
For the tech-savvy user, a Ring camera is a node in a larger ecosystem. Through the Amazon Alexa integration or IFTTT (If This Then That) applets, you can create automated routines. For example, you can program your indoor smart lights to turn on if the outdoor Ring camera detects motion after 11:00 PM. This level of cross-device communication relies on stable API (Application Programming Interface) calls between servers, highlighting the importance of a robust internet connection.
Implementing Hardened Digital Security
As a digital security device, your Ring camera must be protected from unauthorized access.
- Two-Factor Authentication (2FA): Always enable 2FA to ensure that even if your password is compromised, your video feeds remain private.
- End-to-End Encryption: For compatible models, enable video encryption. This ensures that your video data is encrypted from the moment the camera captures it until it reaches your mobile device, meaning even the service provider cannot view your footage.
- Privacy Zones: Use the software to “black out” areas of the feed that may overlook a neighbor’s window, ensuring your security measures remain within legal and ethical boundaries.
4. Performance Optimization and Technical Maintenance
Installation is not a one-time event; maintaining a high-tech surveillance system requires ongoing technical oversight to ensure peak performance.
Managing Storage and Data Retention
Ring cameras utilize cloud-based storage via Ring Protect plans. From a data management perspective, users should regularly review their “Event History.” High-traffic areas can lead to massive amounts of stored data. Understanding the difference between “Snapshot Capture” (periodic low-res photos) and “Live View” (high-def streaming) is vital for managing both battery life and data consumption on your home network.
Environmental Adjustments and Lens Care
Outdoor cameras are subject to the elements. Technically, the “Night Vision” feature relies on Infrared (IR) LEDs. If the lens is covered in dust, pollen, or spider webs, the IR light will reflect off the debris, causing “white-out” in the night footage. A monthly cleaning of the lens with a microfiber cloth is a technical necessity. Additionally, in extreme cold, Li-ion batteries exhibit higher internal resistance, leading to faster discharge. Monitoring the battery percentage through the app’s “Device Health” dashboard allows you to anticipate power failures before they occur.
Troubleshooting Network Latency
If you experience a delay between a motion event and receiving a notification, the issue is often related to “Upload Speed” rather than “Download Speed.” High-definition video streams require at least 1–2 Mbps of dedicated upload bandwidth per camera. Using the “Device Health” tool in the Ring app, you can view the signal strength and packet loss data to diagnose whether your router needs a reboot or if a dedicated wireless access point is required for the exterior perimeter.

Conclusion: The Future of DIY Tech Security
The installation of a Ring outdoor camera represents a significant step in digitizing home security. By following these technical protocols—from optimizing the RSSI signal and precision mounting to configuring advanced motion algorithms and end-to-end encryption—you transform a simple gadget into a sophisticated security asset.
As we move further into the era of AI-driven surveillance and integrated smart cities, the ability to manage and maintain your own digital perimeter is an essential skill. A properly installed Ring camera does more than just record video; it provides data-driven peace of mind through technical excellence. By treating the installation as a holistic project involving hardware, software, and networking, you ensure that your home remains a secure node in the global digital landscape.
aViewFromTheCave is a participant in the Amazon Services LLC Associates Program, an affiliate advertising program designed to provide a means for sites to earn advertising fees by advertising and linking to Amazon.com. Amazon, the Amazon logo, AmazonSupply, and the AmazonSupply logo are trademarks of Amazon.com, Inc. or its affiliates. As an Amazon Associate we earn affiliate commissions from qualifying purchases.