
Navigating today’s busy roads and cramped parking lots can be a daunting task for even the most experienced drivers. Blind spots are a pervasive challenge, making parking maneuvers tricky and increasing the risk of accidents with unseen objects, pedestrians, or even pets. Fortunately, modern technology offers an elegant solution: the car rear camera. What was once a luxury feature found only in high-end vehicles has become an accessible and invaluable safety tool, significantly enhancing driver awareness and simplifying parking.
This guide aims to demystify the process of installing a rear camera in your car, transforming a seemingly complex task into an achievable DIY project. By following these detailed instructions, you’ll not only save on professional installation costs but also gain a deeper understanding of your vehicle’s electrical system, empowering you with new skills. We’ll cover everything from selecting the right camera system to the step-by-step installation, ensuring you drive away with newfound confidence and safety.

I. Why a Rear Camera is an Essential Upgrade for Your Vehicle
The benefits of adding a rear camera to your vehicle extend far beyond simple convenience. It’s an investment in safety, awareness, and even the longevity of your car’s exterior. In an era where vehicle technology is constantly evolving, a rear camera stands out as one of the most practical and impactful upgrades you can make.
Enhanced Safety and Awareness
One of the primary reasons drivers opt for a rear camera is the dramatic improvement in safety. Traditional mirrors, no matter how well-adjusted, cannot eliminate all blind spots directly behind your vehicle. A rear camera provides a wide-angle, real-time view of the area directly behind your car, making it significantly safer to back up, especially in driveways, crowded parking lots, or residential areas where children and pets might be present. This technology acts as an extra set of eyes, reducing the risk of collisions and potentially life-threatening accidents. For parents, delivery drivers, or anyone frequently maneuvering in congested areas, this added layer of security is priceless. The peace of mind that comes from knowing you have a clear view of your surroundings can’t be overstated.
Effortless Parking and Maneuvering
Parking, particularly parallel parking or backing into tight spots, is often cited as one of the most stressful aspects of driving. A rear camera, often equipped with dynamic or static grid lines displayed on your monitor, transforms this challenge into a simple, precise operation. These overlay guides show your vehicle’s trajectory, helping you gauge distances and angles with remarkable accuracy. This visual aid makes parking quicker, reduces the chances of costly fender benders or scrapes, and allows you to confidently fit into spaces you might otherwise have avoided. For larger vehicles like SUVs, trucks, or vans, where rear visibility is naturally limited, a camera becomes an indispensable tool, turning daunting parking tasks into routine movements.
Protecting Your Investment
Beyond safety and convenience, a rear camera also contributes to protecting your vehicle’s aesthetic and structural integrity. Every minor bump, scratch, or dent from backing into an unseen object chips away at your car’s resale value and can lead to expensive repair bills. By providing a clear view of obstacles, the camera helps prevent these incidents, keeping your vehicle looking newer for longer and preserving its market value. Furthermore, some insurance providers might even offer slight reductions on premiums for vehicles equipped with advanced safety features like rear cameras, recognizing their role in accident prevention. Considering the potential costs of repairs and increased insurance rates after an accident, the initial investment in a rear camera and the time spent on DIY installation can offer significant financial returns in the long run.
II. Choosing the Right Rear Camera System
Before you even think about grabbing tools, the most crucial first step is selecting the appropriate rear camera system for your specific needs and vehicle. The market is flooded with options, each offering a different blend of features, installation complexity, and cost. Understanding these variations is key to making an informed decision that ensures satisfaction and optimal performance.
Wired vs. Wireless Systems: Pros and Cons
The fundamental distinction among rear camera systems lies in how they transmit the video signal to your display:
- Wired Systems: These are generally considered the most reliable option. A physical cable runs from the camera at the rear of your car all the way to the display unit (either a dedicated monitor or your car’s existing head unit).
- Pros: Superior image quality due to direct signal transmission, minimal interference, and consistent performance. Often more affordable initially as they don’t require wireless transmitters.
- Cons: Installation is more labor-intensive, requiring careful routing of cables through the vehicle’s interior, which can be time-consuming and somewhat challenging for novices.
- Wireless Systems: These systems use a transmitter to send the video signal wirelessly from the camera to a receiver connected to your display.
- Pros: Significantly easier to install as there’s no need to run a lengthy video cable from front to back. This reduces installation time and complexity.
- Cons: Can be susceptible to interference from other wireless devices or vehicle electronics, potentially leading to occasional lag, signal drops, or a slightly lower image quality. They also typically require power for both the camera and the wireless transmitter, which adds complexity to the power source connection.
For a DIY enthusiast, a wireless system might seem appealing for its ease of installation. However, for maximum reliability and consistent high-quality images, especially if you plan to keep the vehicle long-term, a wired system is generally the preferred choice. The “Tech” aspect here relates to the signal transmission methods – understanding the reliability trade-offs between physical wires and electromagnetic waves.
Understanding Camera Types: License Plate, Flush Mount, and More
Beyond wired vs. wireless, cameras come in various mounting styles, each suited for different aesthetic preferences and installation complexities:
- License Plate Frame Cameras: These are arguably the easiest to install. The camera is integrated directly into a new license plate frame that simply replaces your existing one.
- Pros: Minimal drilling or modification to the vehicle’s body. Quick and straightforward to mount.
- Cons: May sit lower than optimal, potentially offering a slightly restricted view. Can be more visible and thus more prone to theft or damage.
- Surface Mount (Bracket Mount) Cameras: These cameras come with a small bracket that can be mounted above the license plate, on the bumper, or near the trunk handle.
- Pros: Versatile placement options, allowing you to choose the best viewing angle. Generally require only small screws or strong adhesive for mounting.
- Cons: Still somewhat visible. May require drilling small pilot holes.
- Flush Mount (Drill-In) Cameras: These cameras are designed to be integrated seamlessly into the vehicle’s body, typically requiring a hole to be drilled into the bumper or trunk lid.
- Pros: Most aesthetically pleasing, almost factory-like appearance. Highly discreet.
- Cons: Requires drilling a precise hole into your vehicle’s exterior, which can be intimidating for some and is irreversible. Often involves more complex wiring and sealing to prevent water ingress.
- Rearview Mirror Replacement/Clip-on Monitors: Some systems integrate the display directly into a new rearview mirror that replaces your existing one, or clips over it.
- Pros: Keeps your dashboard clutter-free. Mirror acts as a dual-purpose display.
- Cons: Can be more expensive. Image might appear smaller. Some find looking at the mirror for a camera feed less intuitive than a dashboard screen.
When considering “Brand” and “Money,” opting for a reputable brand (e.g., Pioneer, Kenwood, Garmin, or specialized automotive tech brands) often guarantees better quality components, clearer optics, and more durable construction, reducing the chances of premature failure and ensuring your investment lasts. While cheaper generic options exist, they often compromise on image sensor quality, waterproofing, and overall reliability.
Key Features to Look For: Resolution, Night Vision, Viewing Angle
To maximize the “Tech” benefits of your camera, pay attention to these crucial specifications:
- Resolution: Higher resolution (e.g., 720p or 1080p) translates to a clearer, more detailed image, making it easier to spot small obstacles. Avoid cameras with very low resolution (e.g., 480p) if clarity is a priority.
- Night Vision: Look for cameras with good low-light performance. Some use infrared (IR) LEDs to illuminate the area behind the car in complete darkness, while others rely on highly sensitive image sensors to enhance existing ambient light. This is a critical safety feature for nighttime parking.
- Viewing Angle: A wider viewing angle (typically 120-170 degrees) provides a broader perspective of the area behind your car, minimizing blind spots. Be wary of excessively wide angles (e.g., 180+ degrees) as they can introduce significant “fisheye” distortion, making objects appear further away than they are.
- Waterproofing (IP Rating): Since the camera is exposed to the elements, an IP (Ingress Protection) rating is essential. Aim for IP67 or IP68, indicating high resistance to dust and immersion in water, ensuring longevity.
- Parking Grid Lines: Many cameras offer on-screen grid lines to assist with parking. Some are static, while others are dynamic, bending with your steering wheel input – a premium feature that greatly enhances parking precision.
III. Gathering Your Tools and Preparing for Installation
A successful DIY project hinges on thorough preparation. Having the right tools and materials at hand not only makes the process smoother but also prevents frustrating interruptions and potential damage to your vehicle. This section details what you’ll need and how to perform crucial pre-installation checks.
Essential Tools for a Smooth Installation
While the specific tools might vary slightly depending on your chosen camera and vehicle model, a standard toolkit for this project includes:
- Screwdriver Set: Both Phillips and flathead screwdrivers will be needed for various trim panels and mounting brackets.
- Wire Strippers/Crimpers: For preparing wire ends and making secure electrical connections.
- Electrical Tape: For insulating connections and bundling wires.
- Zip Ties or Cable Clips: To neatly secure wires and prevent rattling.
- Multimeter/Circuit Tester: Absolutely essential for identifying the correct power wires (especially the reverse light wire) and checking electrical continuity. This “Tech” tool is your best friend for electrical work.
- Trim Removal Tools (Plastic Pry Tools): These specialized plastic tools are invaluable for safely prying off interior trim panels without scratching or damaging the plastic. Avoid using metal screwdrivers, which can easily mar surfaces.
- Drill and Drill Bits (Optional): Only if you’ve chosen a flush-mount camera or need to create a pass-through hole for wires. Ensure you have bits appropriate for metal and plastic.
- Flashlight or Headlamp: For illuminating dark spaces in the trunk or under the dashboard.
- Heat Gun (Optional): If using heat-shrink tubing for more robust and waterproof connections.
Investing in quality tools, even for a one-off project, is a “Money” wise decision. Good tools simplify the job, reduce frustration, and prevent costly mistakes caused by inadequate equipment. Brands like Klein Tools for electrical, or Lisle for trim removal, are well-regarded.
Materials Included in Your Kit and Additional Supplies
Your camera kit will typically include:
- The rear camera itself.
- A video cable (RCA cable for wired systems).
- Power cables for the camera (often a red and black wire).
- Mounting hardware (screws, adhesive pads).
- Sometimes, a basic display monitor or adapter for existing head units.
Additional materials you might need to purchase:
- Wire Taps (e.g., T-taps or Scotchloks): For safely tapping into existing vehicle wires without cutting them.
- Fuses: If your camera kit doesn’t include an inline fuse, it’s highly recommended to add one for circuit protection.
- Heat Shrink Tubing: Offers superior insulation and protection for electrical connections compared to electrical tape, especially in areas exposed to moisture.
- Split Loom Tubing or Convoluted Tubing: To protect wires routed through exposed areas (e.g., engine bay, undercarriage) from abrasion and heat.
- Silicone Sealant: For sealing any drilled holes to prevent water leaks.
Pre-Installation Checklist: Planning and Initial Testing
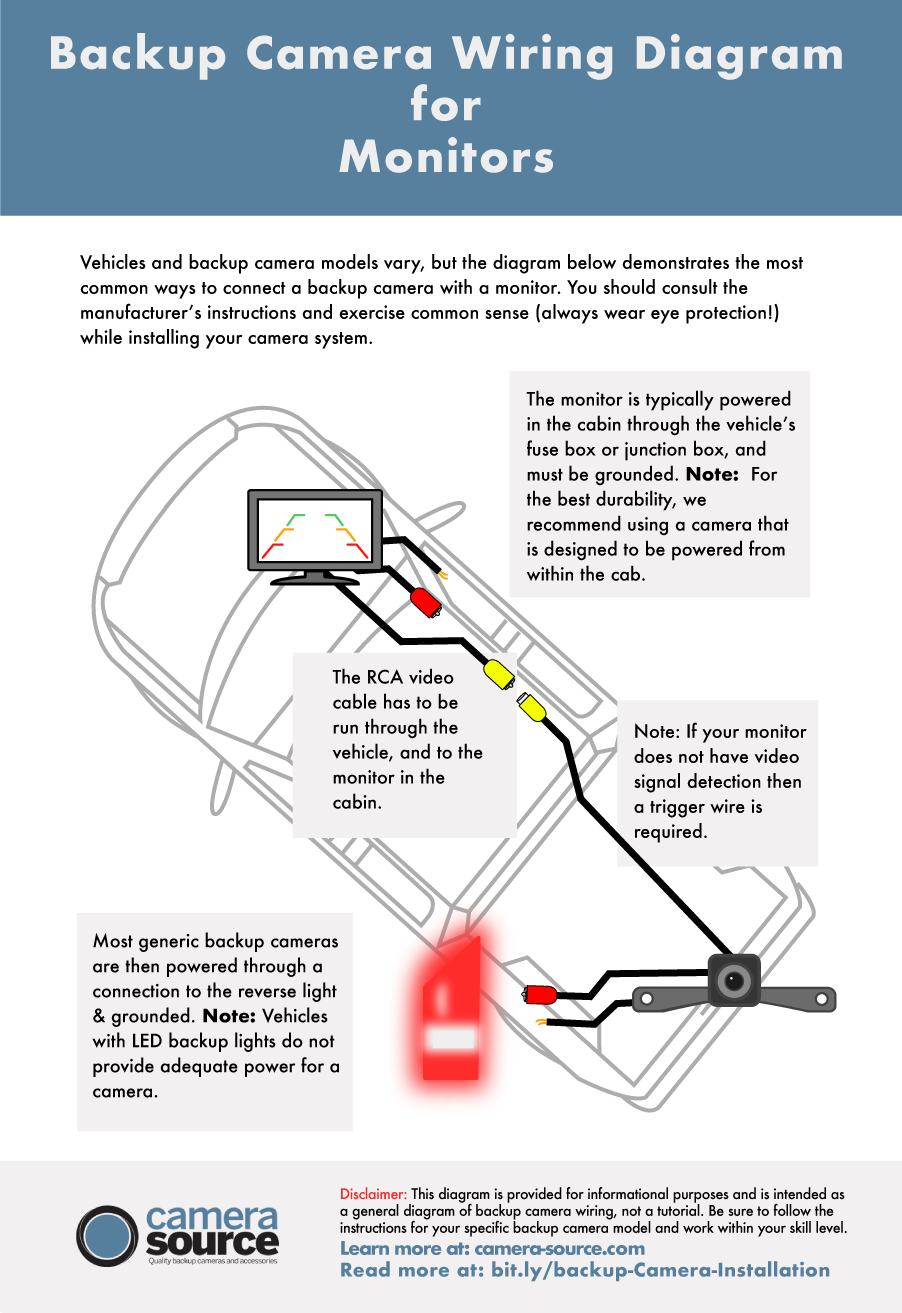
Before dismantling any part of your car, a few critical steps will save you immense hassle:
- Read the Manual: Thoroughly review both your car’s service manual (if available, for wiring diagrams) and the camera’s instruction manual. This provides crucial insights into your specific vehicle’s layout and the camera’s unique requirements.
- Gather All Components: Unpack your camera kit and ensure all listed parts are present. Check for any damage.
- Test the Camera Functionality (Bench Test): This is a critical step. Before mounting anything, temporarily connect the camera and its display unit to a 12V power source (e.g., a car battery charger or a spare 12V battery). This confirms the camera works out of the box and avoids installing a faulty unit. Connect the camera’s power and ground wires to the 12V source, and the video output to the display. If using a head unit, you might need to temporarily connect its reverse trigger wire to 12V as well to activate the camera input.
- Plan Your Wiring Route: Mentally (or even physically, with string) trace the path the video and power cables will take from the rear of the car to the front display unit. Identify entry points into the trunk, paths along the headliner or floor sills, and where the wires will connect to your head unit or monitor. This planning minimizes trim removal and ensures a clean, hidden installation.
- Disconnect the Battery: For any electrical work, always disconnect the negative terminal of your car’s battery. This prevents accidental short circuits and protects your vehicle’s electronics.
IV. Step-by-Step Installation Process
With your tools ready and planning complete, it’s time to get hands-on. This section guides you through the core installation steps, from mounting the camera to integrating it with your vehicle’s electrical system and display.
Mounting the Rear Camera
The mounting process varies significantly based on your chosen camera type:
- License Plate Frame Cameras: Simply unscrew your existing license plate and frame. Slide the camera’s wires through the access hole for your license plate lights (or drill a small, discreet hole if necessary, sealing it later). Secure the new frame and license plate.
- Surface Mount Cameras: Identify the ideal mounting location – typically above the license plate, on the bumper, or near the trunk release handle. Ensure it provides a clear, unobstructed view and is somewhat protected from direct impacts. Mark the screw points, drill pilot holes (if required, using a bit smaller than the screw diameter), and secure the camera bracket with the provided screws. Ensure the camera is level and pointing correctly.
- Flush Mount Cameras: This is the most demanding mounting type. Carefully choose a flat, suitable location on your bumper or trunk lid. Using the camera’s provided drill bit or template, precisely mark the center of the hole. Double-check for any wires or components behind the drilling area before proceeding. Slowly and carefully drill the hole. Insert the camera, ensuring it’s flush and sealed with the provided gaskets or silicone sealant to prevent water ingress. This is where attention to “Brand” quality becomes important; reputable brands often provide better sealing solutions.
Once mounted, make sure the camera’s wires can easily pass into the vehicle’s interior, usually through an existing grommet or a new, sealed hole.
Routing the Video and Power Cables
This is often the most time-consuming part of the installation, requiring patience and a methodical approach. The goal is to conceal the wires for a clean, factory-like finish, protecting them from damage and ensuring they don’t interfere with moving parts.
- Accessing the Trunk/Tailgate Interior: Open your trunk or tailgate. Carefully remove the interior trim panels. This usually involves removing plastic clips and screws. Use your plastic trim removal tools to prevent damage.
- Running Wires from Camera into Vehicle: Feed the camera’s power and video cables from its exterior mounting point into the trunk. If there’s an existing rubber grommet for other wires (e.g., license plate lights), you can carefully pass the camera wires through it, ensuring a tight seal with silicone or electrical tape. If you had to drill a new hole for the camera, ensure the wiring coming into the car is thoroughly sealed to prevent water leaks.
- Routing Through the Vehicle Interior:
- Trunk to Front: Route the main video cable (and power wire for wired systems, if not tapping into reverse lights) along the vehicle’s existing wire harnesses. Tuck the cable neatly under the trunk liner, along the side pillars, under the rear seats, and then along the door sills (kick panels) or under the carpet. Use zip ties to secure the cable to existing wiring looms to prevent rattling and movement.
- Headliner Route (Optional): Some prefer to route the cable along the headliner. This involves carefully prying down the headliner edges and A/B/C pillar trims. This can be more challenging but keeps the floor area clear.
- Reaching the Dashboard: Continue routing the cable towards the dashboard where your display unit is located. You’ll likely need to remove parts of the dashboard trim or the stereo head unit itself to access the back connections.
Connecting to the Reverse Light for Power
The camera needs power, and it’s typically activated when the car is put into reverse. This requires tapping into the reverse light circuit:
- Locate the Reverse Light Wire: In the trunk or tailgate, identify the wiring harness leading to your reverse light bulb. Using your multimeter or circuit tester, find the wire that receives 12V only when the vehicle is in reverse gear. Have a helper shift into reverse (with the engine off and parking brake engaged, or just the ignition on) while you test each wire. The ground wire will be consistently 0V or negative.
- Tap into Power: Once identified, use a wire tap (T-tap) to safely connect the camera’s positive power wire (usually red) to this reverse light wire. Ensure a secure connection.
- Connect Ground Wire: Connect the camera’s ground wire (usually black) to a solid, unpainted metal surface on the car’s chassis (a ground point) or tap into an existing ground wire for the taillight assembly.
Integrating with Your Car’s Display Unit
The video signal needs to reach your display:
- Aftermarket Head Unit: If you have an aftermarket stereo, it likely has a dedicated “Reverse Camera Input” (often an RCA jack) and a “Reverse Trigger Wire” (usually a brown or purple wire labeled “Reverse” or “Back”). Connect the camera’s RCA video cable to the RCA input. Connect the camera’s reverse trigger wire (if present, usually a small red wire attached to the video cable) to the head unit’s reverse trigger wire. This tells the head unit to switch to the camera view when reverse is engaged.
- Standalone Monitor: If using a dedicated monitor, connect the camera’s RCA video cable directly to the monitor’s video input. The monitor will need its own power source, usually tapped from an accessory fuse in your fuse box (power that turns on with the ignition). Some monitors might have a separate reverse trigger input that you can connect to the reverse light circuit, just like with a head unit, to automatically turn on when reversing.
Securing Connections and Reassembling Trim
With all connections made:
- Insulate and Secure: Ensure all electrical connections are well-insulated with electrical tape or heat-shrink tubing. Use zip ties to bundle and secure all cables, preventing them from dangling, rubbing against sharp edges, or rattling while driving. Pay particular attention to protecting wires where they pass through metal bodywork.
- Test Again: Before reassembling all the trim, reconnect your car’s battery and perform a full system test. Put the car in reverse and check if the camera image appears on the display. Verify the image quality and orientation.
- Reassemble Trim: Once everything is confirmed to be working perfectly, carefully replace all removed trim panels, ensuring clips snap back into place and screws are tightened appropriately. Take your time to avoid damaging the trim.
V. Post-Installation: Testing, Troubleshooting, and Maximizing Your Camera’s Potential
The installation isn’t truly complete until you’ve thoroughly tested the system and are familiar with its operation. A few final steps will ensure your new rear camera serves you reliably for years to come.
Initial System Test and Alignment
After reconnecting the battery and reassembling the interior, perform a comprehensive test:
- Functionality Check: Start the car and shift into reverse. Confirm the camera image immediately appears on your display. Shift out of reverse; the image should disappear (or switch back to your normal display). Repeat several times to confirm consistent operation.
- Image Quality Assessment: Check for clarity, color accuracy, and any flickering or distortion.
- Field of View and Alignment: With the car safely in reverse (engine off, parking brake on, or with a spotter), observe the camera’s field of view. Are parking lines (if equipped) accurate? Can you see objects directly behind the bumper? If your camera has adjustable angles, fine-tune it to provide the optimal view. Place a known object (e.g., a traffic cone) a few feet behind your bumper to gauge distance and alignment. This practical test ensures the “Tech” is providing accurate real-world information.
Common Issues and Simple Troubleshooting Tips
Even with careful installation, minor issues can arise. Here are some common problems and their solutions:
- No Image/Black Screen:
- Check Power: Use your multimeter to ensure the camera is receiving 12V power when in reverse, and that the ground connection is solid.
- Check Video Connection: Ensure the RCA video cable is securely plugged into both the camera and the display unit.
- Reverse Trigger Wire: If using an aftermarket head unit, verify the head unit’s reverse trigger wire is correctly connected and receiving 12V when in reverse.
- Faulty Component: If all connections are good, the camera or display unit might be faulty (refer back to your bench test results).
- Flickering or Distorted Image:
- Interference: This is more common with wireless systems. Try rerouting wireless components away from other electronics or power sources. For wired systems, ensure the video cable isn’t running too close to high-voltage wires or engine components.
- Loose Connection: Check all electrical and video connections for tightness.
- Poor Ground: A loose or corroded ground connection can cause signal instability.
- Incorrect Parking Lines/Orientation:
- Camera Angle: Adjust the camera’s physical angle.
- Camera Settings: Some cameras or head units have settings to adjust parking line position or flip the image (if it appears upside down or mirrored).
- Camera Not Turning Off:
- Reverse Light Tap: You might have tapped into a constant 12V source instead of the reverse light wire. Re-test the wire with your multimeter.
Remember, patience is key. Most issues can be resolved by systematically re-checking your connections and power sources.
Beyond Installation: Maintenance and Best Practices
To ensure your rear camera provides reliable service for years:
- Keep the Lens Clean: Periodically wipe the camera lens with a soft, damp cloth to remove dirt, dust, and water spots that can obscure the view. This simple “Tech” maintenance is crucial.
- Check Wiring Annually: Especially if you live in an area with harsh weather or rough roads, occasionally inspect exposed wiring (e.g., in the trunk) for any signs of wear, chafing, or corrosion.
- Seal Integrity: If you drilled holes for installation, periodically check the silicone sealant or grommets to ensure they haven’t degraded and are still providing a waterproof seal.
- Software Updates (for advanced systems): If your head unit or camera system has a software component, check for firmware updates from the manufacturer, as these can improve performance or add features.
By taking care of your newly installed camera, you’ll ensure that your “Money” investment continues to pay dividends in terms of safety and convenience.

Conclusion
Installing a rear camera in your car is more than just a technological upgrade; it’s an enhancement to your driving experience, a significant boost to safety, and a smart financial decision that can prevent costly accidents. While the process may seem intimidating at first, by meticulously following this comprehensive guide, even a novice can confidently undertake this DIY project.
You’ve learned about the critical choice between wired and wireless systems, the various mounting options, and the essential features that differentiate a good camera from a great one. You’ve also acquired the knowledge to gather the right tools, meticulously route cables, and troubleshoot common issues. This journey not only equips your car with an invaluable safety device but also empowers you with practical skills and a deeper understanding of automotive electronics.
Drive with greater confidence, park with unparalleled ease, and enjoy the peace of mind that comes with knowing you’ve successfully integrated cutting-edge automotive technology into your vehicle. Your rear camera isn’t just a gadget; it’s your vigilant co-pilot, guarding your blind spots and making every reverse maneuver safer and simpler.
aViewFromTheCave is a participant in the Amazon Services LLC Associates Program, an affiliate advertising program designed to provide a means for sites to earn advertising fees by advertising and linking to Amazon.com. Amazon, the Amazon logo, AmazonSupply, and the AmazonSupply logo are trademarks of Amazon.com, Inc. or its affiliates. As an Amazon Associate we earn affiliate commissions from qualifying purchases.