
In the rapidly evolving landscape of web development, staying ahead means embracing powerful and efficient tools. Among the pantheon of front-end technologies, React JS stands out as a dominant force, favored by millions of developers and countless enterprises for building dynamic, high-performance user interfaces. Whether you’re a seasoned developer looking to add a critical skill to your arsenal or a newcomer eager to dive into cutting-edge “Software” development, mastering React is an invaluable step. This comprehensive guide will walk you through everything you need to know about installing React JS, setting up your development environment, and launching your first application. By the end of this article, you’ll be well-equipped to embark on your journey into the exciting world of React, a crucial component in today’s “Technology Trends.”

Understanding React JS and Why It Matters for Modern Tech
Before we delve into the mechanics of installation, it’s essential to grasp what React JS is and why it has become such a cornerstone of modern web development. Its principles and advantages are directly tied to the efficiency and scalability demanded by today’s digital products, aligning perfectly with the productivity aspects we often discuss in “Tech.”
What Exactly is React JS?
At its core, React JS is a declarative, efficient, and flexible JavaScript library for building user interfaces. Developed and maintained by Facebook (now Meta), it allows developers to create complex UIs from small, isolated pieces of code called “components.” Unlike a full-fledged framework that dictates an entire application’s architecture, React is a library focused purely on the view layer – what the user sees.
This component-based architecture is a game-changer. Imagine building with LEGO bricks: each brick is a component, a self-contained unit of UI and logic. You can combine these bricks to form larger structures, and reuse them across different parts of your application or even in entirely different projects. This modularity drastically simplifies development, debugging, and maintenance, making it a prime example of efficient “Software” design.
React’s declarative paradigm means you describe what you want your UI to look like for a given state, and React efficiently updates and renders the right components when your data changes. You don’t tell React how to update the DOM (Document Object Model); you simply declare the desired end-state, and React handles the complex manipulations behind the scenes. This approach makes your code more predictable and easier to debug, a significant boon for “Productivity.”
Another key innovation is the Virtual DOM. React maintains a lightweight, in-memory representation of the actual DOM. When data changes, React first updates this Virtual DOM, then compares it with the previous version. It calculates the most efficient way to update the real browser DOM, minimizing direct manipulations and leading to significant performance improvements. This optimization is crucial for building fast, responsive applications that keep users engaged.
Finally, React widely uses JSX (JavaScript XML), a syntax extension that allows you to write HTML-like code directly within your JavaScript. While it might seem unconventional at first, JSX combines the power of JavaScript with the familiarity of HTML, making it intuitive to define UI structures alongside their logic.
The Benefits of Choosing React for Your Projects
The widespread adoption of React isn’t just a trend; it’s a testament to its profound benefits that resonate across individual developers and large-scale enterprises, impacting “Brand” and even “Money” through more efficient product development.
- Enhanced Performance with Virtual DOM: As mentioned, the Virtual DOM significantly boosts performance by intelligently updating only the necessary parts of the UI, leading to faster loading times and a smoother user experience. For any “Brand” aiming for digital excellence, performance is paramount.
- Reusability of Components: The component-based architecture promotes code reusability, reducing development time and ensuring consistency across the application. This translates directly into “Productivity” gains and cost savings in the long run.
- Strong Community and Ecosystem: React boasts an enormous and active community. This means abundant learning resources, extensive third-party libraries, robust tooling, and readily available support, making it easier to overcome challenges and stay updated with “Technology Trends.”
- Flexibility: React is flexible enough to be integrated into existing projects or used to build single-page applications (SPAs), mobile apps (with React Native), and even server-side rendered applications. This adaptability allows businesses to leverage their existing “Software” investments while modernizing their front-end.
- Declarative View: The declarative nature of React makes debugging easier and your code more predictable. You worry less about the intricate details of DOM manipulation and more about the application’s state and how it maps to the UI.
- High Demand in the Job Market: Proficiency in React JS is one of the most sought-after skills for front-end developers. Learning React can significantly enhance your career prospects and earning potential, directly linking to “Money” aspects through “Online Income” or better job opportunities.
By understanding these foundational aspects, you can appreciate the value React brings to the table and why investing time in its installation and learning is a wise decision for anyone serious about modern web development.
Essential Prerequisites for a Seamless React Setup
Before you can begin building beautiful user interfaces with React, you need to ensure your development environment is properly configured. Think of these as the fundamental tools in your digital workbench, essential for any serious “Software” development.
Node.js and npm (Node Package Manager)
The single most critical prerequisite for React development is Node.js. Node.js is a JavaScript runtime environment that allows you to execute JavaScript code outside of a web browser. While React runs in the browser, Node.js is essential for running the build tools, compilers, and development servers that power React applications.
- Why you need it: Node.js enables your machine to understand and execute the JavaScript tools and packages required for React.
- npm (Node Package Manager): When you install Node.js,
npmis automatically installed with it.npmis the default package manager for JavaScript, used to install, manage, and share project dependencies (like React itself, and other libraries). It also allows you to run scripts defined in your project’spackage.jsonfile.
How to Install Node.js:
- Download: Visit the official Node.js website (nodejs.org). You’ll typically see two versions: LTS (Long Term Support) and Current. For most users, the LTS version is recommended as it’s more stable and thoroughly tested.
- Installation: Download the installer appropriate for your operating system (Windows, macOS, or Linux) and follow the installation prompts. It’s usually a straightforward “next, next, finish” process.
- Verification: Once installed, open your terminal or command prompt and run the following commands to verify the installation:
bash

node -v

npm -v
You should see the version numbers printed, indicating a successful installation. If you encounter issues, ensure your system’s PATH variable is correctly configured to include Node.js. - Consider nvm (Node Version Manager): For advanced users or those managing multiple projects that require different Node.js versions,
nvm(Node Version Manager) is highly recommended. It allows you to easily install and switch between different Node.js versions on your machine, preventing compatibility issues.
Your Go-To Code Editor: Visual Studio Code
While any text editor can technically be used for coding React, a powerful and feature-rich Integrated Development Environment (IDE) or code editor can significantly boost your “Productivity.” Visual Studio Code (VS Code) is overwhelmingly popular among web developers for its excellent performance, extensive features, and vast ecosystem of extensions.
- Why you need it: VS Code offers features like syntax highlighting, intelligent code completion (IntelliSense), built-in debugging tools, Git integration, and a plethora of extensions specifically designed for React development.
- Installation: Download VS Code from its official website (code.visualstudio.com) and follow the installation instructions.
- Recommended Extensions for React:
- ES7+ React/Redux/GraphQL/React-Native snippets: Provides useful code snippets to quickly generate common React code structures.
- Prettier – Code formatter: Automatically formats your code to maintain consistent style, saving you time and improving code readability.
- ESLint: Integrates ESLint into VS Code, helping you identify and fix syntax errors and stylistic issues early.
- Auto Rename Tag: Automatically renames the paired HTML/JSX tag when you rename one.
- Bracket Pair Colorizer (or native VS Code bracket pairing): Makes it easier to identify matching brackets with color coding.
Optional but Recommended: Yarn
Yarn is an alternative package manager to npm, developed by Facebook. It offers similar functionality to npm but was initially created to address some performance and consistency issues found in older versions of npm. While modern npm has largely caught up, many developers still prefer Yarn for its speed and reliability.
- How to Install Yarn:
bash

npm install -g yarn
Once installed, you can useyarncommands (e.g.,yarn install,yarn start) instead ofnpmcommands. For this guide, we will primarily usenpmas it is universally available after Node.js installation, but feel free to substitute withyarnif you prefer.
With Node.js, npm, and VS Code in place, your development environment is ready, setting the stage for installing React itself.
Step-by-Step Installation Methods for React Applications
Now that your system is prepared, it’s time to create your first React application. There are several ways to install React, ranging from quick-start tools to more manual configurations. We’ll focus on the two most popular and beginner-friendly methods: Create React App and Vite, both excellent examples of efficient “Software” tooling.
The Classic Approach: Create React App (CRA)
Create React App (CRA) is an officially supported way to create single-page React applications. It provides a ready-to-use development environment with no build configuration required. CRA handles all the complex tooling setup (like Webpack, Babel, ESLint) under the hood, allowing you to focus purely on writing React code. It’s an excellent choice for learning React and for projects that don’t require highly customized build processes.
Steps to create a React app with CRA:
-
Open your terminal or command prompt.
-
Navigate to the directory where you want to create your project. For example:
bash

cd Documents/Development
-
Run the Create React App command:
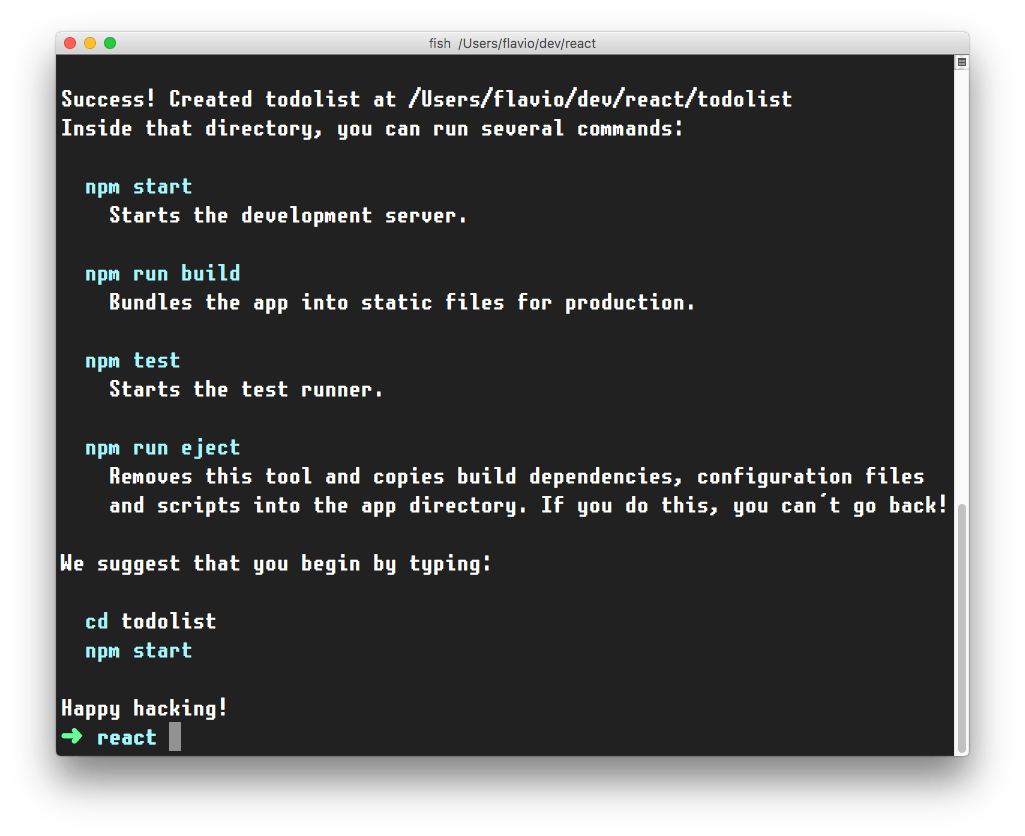
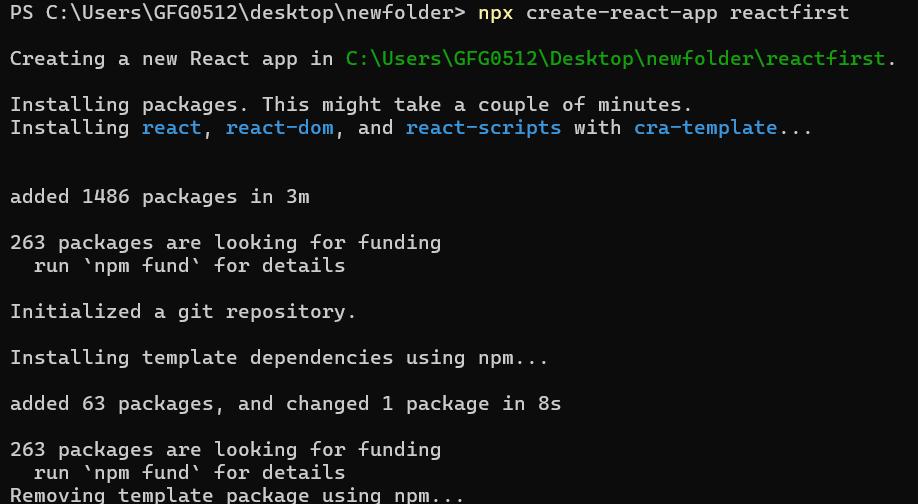
npx create-react-app my-first-react-appnpxis a command runner that comes with npm. It allows you to execute npm package executables without explicitly installing them globally.create-react-appis the package that sets up your project.my-first-react-appis the name of your project. You can choose any name you like, but it should be lowercase and contain no spaces or special characters (hyphens are fine).
This command will take a few minutes to complete as it downloads all the necessary dependencies and sets up the project structure. You’ll see messages indicating its progress.
-
Navigate into your new project directory:
bash

cd my-first-react-app
-
Start the development server:
bash

npm start
This command compiles your React application and opens it in your default web browser (usually athttp://localhost:3000). The development server also features Hot Module Replacement (HMR), meaning that any changes you save in your code will automatically refresh the browser without needing to manually reload the page.
Pros of Create React App:
- Zero Configuration: Easiest way to get started, perfect for beginners.
- Official Support: Maintained by the React team at Facebook.
- Batteries Included: Comes with sensible defaults for testing, linting, and build processes.
Cons of Create React App:
- Can be opinionated: Might feel restrictive for highly customized setups.
- Slower for large projects: Its build process can sometimes be slower compared to newer tools.
- Overhead: For very small projects, it might include more dependencies than strictly necessary.
The Modern & Lean Approach: Vite
Vite (pronounced “veet”) is a next-generation frontend tooling that aims to provide a faster and leaner development experience. It leverages native ES modules in the browser during development, which means no bundling step is required for development. This leads to incredibly fast cold starts and near-instantaneous Hot Module Replacement (HMR), drastically improving “Productivity.” Vite is becoming an increasingly popular choice for new React projects, demonstrating a significant “Technology Trend.”
Steps to create a React app with Vite:
-
Open your terminal or command prompt.
-
Navigate to your desired project directory.
-
Run the Vite creation command:
npm create vite@latest my-vite-app -- --template reactnpm create vite@latestis the command to initialize a new project with the latest version of Vite.my-vite-appis your project name.-- --template reactspecifies that you want to create a React project. You can also specifyreact-tsfor TypeScript.
Vite is significantly faster than CRA, so this process will be much quicker.
-
Navigate into your new project directory:
bash

cd my-vite-app
-
Install dependencies: Vite sets up the
package.jsonbut doesn’t automatically installnode_modules.
bash

npm install

# or yarn install (if you prefer Yarn)

# or pnpm install (if you prefer pnpm)
-
Start the development server:
bash

npm run dev

# or yarn dev (if you prefer Yarn)
Vite will start the development server, usually athttp://localhost:5173(the port might vary). Open this URL in your browser to see your running React application. Just like CRA, Vite also supports HMR.
Pros of Vite:
- Blazing Fast: Extremely fast cold starts and HMR due to native ES module support.
- Lightweight: Less overhead compared to CRA for development.
- Flexible: Highly configurable with plugins and sensible defaults for various frameworks.
- Future-Proof: Represents the direction of modern frontend tooling, an important “Technology Trend.”
Cons of Vite:
- Newer Ecosystem: While rapidly maturing, its ecosystem might not be as vast as CRA’s for very specific edge cases.
- Requires
npm install: An extra step compared to CRA’s single command.
For most new projects and developers, Vite is an excellent choice for its speed and modern approach. However, CRA remains a solid and reliable option, especially for those who prefer an out-of-the-box solution with extensive documentation. Choose the one that best fits your comfort level and project requirements.
Manual Setup (For Advanced Users and Custom Control)
While CRA and Vite are fantastic for getting started, it’s worth noting that React can also be set up manually. This involves configuring tools like Webpack (a module bundler), Babel (a JavaScript compiler to convert modern JS into browser-compatible JS), ESLint (for linting), and potentially PostCSS or Sass for styling.
This approach offers ultimate control over your build process but is significantly more complex and time-consuming. It’s typically reserved for experienced developers who need very specific optimizations or integrations that the default toolchains don’t provide. For beginners, it’s strongly recommended to stick with CRA or Vite to avoid unnecessary complexity and focus on learning React itself, rather than wrestling with build configurations. Understanding the underlying tools is valuable for “Software” engineers, but not a first step.
Launching Your First React Application and Beyond
Congratulations! By following the installation steps, you now have a functional React application ready to be developed. This section will cover how to run your app, understand its basic structure, and outline your next steps in mastering React.
Running Your Development Server
As seen in the installation steps, starting your React application is straightforward:
- For Create React App:
bash

npm start
- For Vite:
bash

npm run dev
In both cases, your terminal will typically display a message indicating that the development server has started and will provide a local URL (e.g., http://localhost:3000 or http://localhost:5173) where your application is accessible.
The beauty of these development servers is Hot Module Replacement (HMR). As you make changes to your React components and save the files, the browser automatically updates, displaying your changes almost instantly without requiring a full page refresh. This iterative development loop is a massive boost to “Productivity” and makes the development process feel incredibly fluid.
Basic Project Structure and Key Files
Regardless of whether you used CRA or Vite, the initial project structure will be similar, designed to provide a clear separation of concerns:
my-react-app/
├── node_modules/         # All installed npm packages
├── public/               # Public assets (index.html, favicon, images)
│   └── index.html        # The main HTML file your app is injected into
├── src/                  # Your source code (where you'll write React components)
│   ├── App.css           # Styling for the main App component
│   ├── App.js            # The main React application component
│   ├── index.css         # Global styles
│   └── index.js          # The entry point of your React application
├── .gitignore            # Files/directories to ignore in Git
├── package.json          # Project metadata, scripts, and dependencies
└── README.md             # Project README file
Key Files and Their Roles:
-
public/index.html: This is the single HTML file that serves as the entry point for your web application. React injects your entire application into adivelement within this HTML file (usually with anid="root"). You generally won’t need to modify this file much, other than perhaps changing the page title or adding meta tags. -
src/index.js: This is the main JavaScript entry point of your React application. It’s responsible for rendering your top-level React component (<App />) into therootDOM element defined inpublic/index.html.import React from 'react'; import ReactDOM from 'react-dom/client'; import './index.css'; import App from './App'; const root = ReactDOM.createRoot(document.getElementById('root')); root.render( <React.StrictMode> <App /> </React.StrictMode> ); -
src/App.js: This file contains your mainAppcomponent, which is typically the root of your application’s component tree. It’s where you’ll start defining your application’s layout and content. -
src/App.css/src/index.css: These files contain the CSS styles for your components and global styles, respectively. -
node_modules/: This directory contains all the third-party libraries and packages your project depends on. It’s managed bynpm(oryarn) and should never be manually edited or committed to version control. -
package.json: This file is crucial. It lists your project’s metadata (name, version), scripts (likestart,build,test), and all your project’s dependencies (dependenciesfor production,devDependenciesfor development-only tools). When you share your project, others can simply runnpm install(oryarn install) to download all necessary dependencies based on this file.
Understanding this basic structure is fundamental to navigating your React project and efficiently adding new features, a vital skill in “Software” development.
What’s Next? Your Journey into React Development
Installing React is just the first exciting step. The real journey begins now, as you dive into the core concepts and build your first interactive UIs. To truly leverage React and stay at the forefront of “Technology Trends,” here’s a roadmap of key areas to explore:
- Learn JSX: Master writing HTML-like code within JavaScript.
- Components, Props, and State: These are the building blocks of any React application.
- Components: Reusable UI elements.
- Props: How data is passed from parent components to child components (read-only).
- State: Data that is managed within a component and can change over time, triggering re-renders.
- Hooks: Introduced in React 16.8, Hooks revolutionized how developers write functional components, allowing them to use state and other React features without writing class components. Key hooks include
useState,useEffect,useContext,useRef, and more. - Event Handling: Learn how to respond to user interactions like clicks, form submissions, and input changes.
- Conditional Rendering and List Rendering: Displaying different UI elements based on conditions and efficiently rendering lists of data.
- React Router: For building single-page applications with multiple views, you’ll need a routing library like React Router to manage navigation.
- State Management: For larger applications, managing state across many components can become complex. Explore solutions like React’s Context API, Redux, Zustand, or Jotai.
- Styling in React: Various methods exist, including plain CSS, CSS Modules, Styled Components, Emotion, and utility-first frameworks like Tailwind CSS.
- Fetching Data: Learn how to integrate with APIs to fetch and display dynamic data using
fetchor libraries like Axios. - Testing: Write unit tests for your components and applications using tools like Jest and React Testing Library to ensure your “Software” is robust and reliable.
- Deployment: Learn how to build your React application for production (
npm run build) and deploy it to hosting platforms like Netlify, Vercel, or AWS S3.
Continuously learning and practicing these concepts will transform you from a beginner into a proficient React developer. This dedication to skill development is not only personally rewarding but also critical for staying competitive in the tech industry, improving your personal “Brand” as a developer, and potentially unlocking new “Money” opportunities through advanced projects or a thriving career.
Conclusion
Installing React JS is your definitive first step into a world of modern, dynamic, and highly performant web application development. Whether you opted for the robust simplicity of Create React App or the lightning-fast efficiency of Vite, you’ve successfully set up the foundation for building incredible user interfaces. This journey, rooted in mastering cutting-edge “Software,” places you firmly within the crucial “Technology Trends” of today.
React’s component-based architecture, declarative nature, and efficient Virtual DOM make it an indispensable tool for any developer aiming to create engaging and scalable web experiences. The powerful ecosystem and supportive community further ensure that you’re never alone in your learning or development process.
From here, the possibilities are limitless. You have the tools, the environment, and the basic understanding to start crafting interactive web applications that users will love. Embrace the learning curve, experiment with different features, and actively build projects. Your proficiency in React JS will not only enhance your technical capabilities but also strengthen your professional “Brand,” potentially opening doors to lucrative “Online Income” opportunities or significant career growth within the broader “Tech” industry.
So, fire up your code editor, dive into the code, and start building. The future of web development awaits, and with React, you’re well on your way to shaping it.
aViewFromTheCave is a participant in the Amazon Services LLC Associates Program, an affiliate advertising program designed to provide a means for sites to earn advertising fees by advertising and linking to Amazon.com. Amazon, the Amazon logo, AmazonSupply, and the AmazonSupply logo are trademarks of Amazon.com, Inc. or its affiliates. As an Amazon Associate we earn affiliate commissions from qualifying purchases.