In an increasingly digital world, the performance of our devices is paramount. Laptops, once considered secondary to desktops for raw power, have evolved into sophisticated machines capable of handling demanding tasks. Yet, even the most robust laptops can eventually feel sluggish, especially when juggling multiple applications, running resource-intensive software, or simply browsing the modern, media-rich internet. Before you consider shelling out for a brand-new device, there’s a surprisingly simple, cost-effective, and highly impactful upgrade you can perform yourself: installing more Random Access Memory, or RAM.
RAM acts as your laptop’s short-term memory, enabling quick access to data that your processor needs to handle ongoing tasks. The more RAM you have, the more applications your laptop can run simultaneously and the smoother its overall operation will be. This guide will walk you through the entire process of upgrading your laptop’s RAM, from understanding why it’s beneficial to verifying your successful installation. It’s a technical skill that’s well within the grasp of most users, promising a significant boost to your device’s speed and responsiveness, often at a fraction of the cost of a new machine.

Why Upgrade Your Laptop’s RAM?
Before diving into the mechanics, it’s worth understanding the compelling reasons why a RAM upgrade is often the smartest move for an aging or underperforming laptop. It’s not just about speed; it’s about efficiency, productivity, and extending the lifespan of your valuable tech investment.
Enhanced Performance and Multitasking
The most immediate and noticeable benefit of increasing your RAM is a dramatic improvement in performance. If you frequently find your laptop stuttering, freezing, or taking an eternity to switch between programs, insufficient RAM is likely a major culprit. Modern operating systems like Windows 10/11 and macOS are RAM-hungry, and when you add web browsers with dozens of tabs, photo editing software, video conferencing tools, and various background processes, your existing memory can quickly become overwhelmed.
More RAM means your system can hold more active data in its fast memory, reducing the need to constantly swap data with the much slower hard drive (even an SSD, while fast, is still slower than RAM). This translates to snappier application launches, smoother transitions, and the ability to seamlessly multitask without frustrating slowdowns. For students, professionals, or anyone who juggles several tasks at once, this enhancement can be a game-changer for daily productivity.
Boosting Productivity for Demanding Tasks
Beyond general multitasking, specific applications thrive on ample RAM. Creative professionals using software like Adobe Photoshop, Premiere Pro, AutoCAD, or Blender will experience significant performance gains. Rendering times can decrease, large files can open and manipulate more quickly, and complex projects become much more manageable. Similarly, gamers will notice smoother frame rates and faster load times, especially in titles that recommend higher RAM capacities. Even for casual users, tasks like video streaming, large file transfers, or running virtual machines benefit immensely from increased memory bandwidth and capacity. This upgrade effectively unlocks the full potential of your laptop’s processor, allowing it to work with a larger, faster cache of data.
Future-Proofing Your Device
Technology evolves at a rapid pace, and today’s standard often becomes tomorrow’s minimum requirement. Upgrading your RAM can help future-proof your laptop to some extent, allowing it to comfortably handle upcoming software updates, more demanding applications, and the general increase in system requirements over time. While it won’t magically transform an old laptop into a cutting-edge powerhouse, it can certainly extend its usable life by several years, making it a more viable machine for future tasks. This strategic upgrade helps you stay relevant in the tech landscape without committing to a full replacement every few years.
Cost-Effectiveness vs. New Laptop Purchase
From a financial perspective, a RAM upgrade is almost always more economical than purchasing a new laptop. High-quality RAM modules are relatively inexpensive, especially compared to the hundreds or thousands of dollars required for a new device. If your laptop’s processor and other components are still adequate, a RAM upgrade offers an incredible return on investment. It’s an intelligent financial decision that breathes new life into existing hardware, saving you money while significantly improving your daily computing experience. This aligns with smart personal finance principles, emphasizing strategic upgrades over impulsive new purchases.
Before You Begin: Essential Preparations and Considerations
Successful RAM installation isn’t just about the physical swap; it’s heavily reliant on proper preparation. Skipping these crucial preliminary steps can lead to compatibility issues, wasted money, or even potential damage to your laptop.
Determining Your Laptop’s RAM Compatibility
This is arguably the most critical step. Not all RAM is created equal, and your laptop will only accept specific types. You need to identify:
- DDR Generation (DDR3, DDR4, DDR5): This is non-negotiable. You cannot mix generations (e.g., DDR3 RAM will not work in a DDR4 slot). Most modern laptops use DDR4 or DDR5.
- Speed (MHz): RAM modules are rated by speed (e.g., 2400MHz, 3200MHz, 4800MHz). Ideally, match the speed of your existing RAM, or buy modules at the fastest speed your laptop and CPU support. If you install faster RAM than your system supports, it will simply downclock to the maximum supported speed. If you install slower RAM, your system will operate at that slower speed.
- Maximum Capacity: Your laptop’s motherboard and operating system have a limit on the total amount of RAM they can address. While most modern laptops support 16GB or 32GB, older models might be limited to 8GB.
- Number of Slots: Laptops typically have one or two RAM slots. Knowing this helps you decide whether you’ll be adding a module, replacing an existing one, or replacing two modules.
- Form Factor: Laptops use SODIMM (Small Outline Dual In-line Memory Module), which is smaller than the DIMM used in desktops.
How to Check Current RAM:
- Windows: Press
Ctrl + Shift + Escto open Task Manager. Go to the “Performance” tab, then click on “Memory.” You’ll see the current capacity, speed, and form factor. You can also usemsinfo32(System Information) to see details. - macOS: Click the Apple menu, choose “About This Mac,” then “Memory.”
- Third-Party Tools: Utilities like CPU-Z provide incredibly detailed information about your CPU, motherboard, and existing RAM modules (including part numbers, which are invaluable for finding replacements).
- Consult Your Laptop’s Manual or Manufacturer’s Website: This is the most reliable source for specific compatibility information, including maximum supported RAM and slot configuration. Input your laptop’s model number on the manufacturer’s support page.
Choosing the Right RAM Modules
Once you know what you need, you can purchase the appropriate RAM. Look for reputable brands like Crucial, Kingston, Samsung, or Hynix. Consider whether you need a single module or a kit of two (if your laptop has two slots and you want to take advantage of dual-channel memory, which can boost performance). Pay attention to latency (CAS Latency or CL) – lower is generally better, but matching it with your existing RAM or keeping it consistent in a new kit is more important.
Gathering Your Tools
You won’t need an elaborate toolkit, but having the right implements makes the process smoother and safer:
- Small Phillips-head screwdriver: Essential for opening the laptop’s back panel. Ensure you have one with a fine enough tip.
- Anti-static wrist strap: Highly recommended. Static electricity can permanently damage sensitive electronic components. Connect it to a grounded metal object.
- Plastic prying tool (spudger): Optional, but useful for gently separating plastic clips or panels without marring the case.
- Clean, well-lit workspace: Crucial for visibility and preventing dropped screws.
Backing Up Your Data
While a RAM upgrade is generally safe, any time you open your laptop and manipulate hardware, there’s a minute risk of something going wrong. Before you start, perform a full backup of your important data. This could be to an external hard drive, a cloud service, or both. This step is non-negotiable for any hardware modification, ensuring peace of mind regardless of the outcome.
The Step-by-Step RAM Installation Process
With all preparations complete, you’re ready for the actual physical installation. Take your time, follow each step carefully, and remember that patience is key.
Powering Down and Disconnecting Your Laptop
Safety first. Before you even think about unscrewing anything:
- Shut Down Completely: Do not just put your laptop to sleep. Perform a full shutdown.
- Remove Power Adapter: Unplug the AC adapter from your laptop and the wall.
- Disconnect Peripherals: Unplug all external devices – USB drives, mice, keyboards, external monitors, etc.
- Wait: Give it a minute or two for any residual power to dissipate.
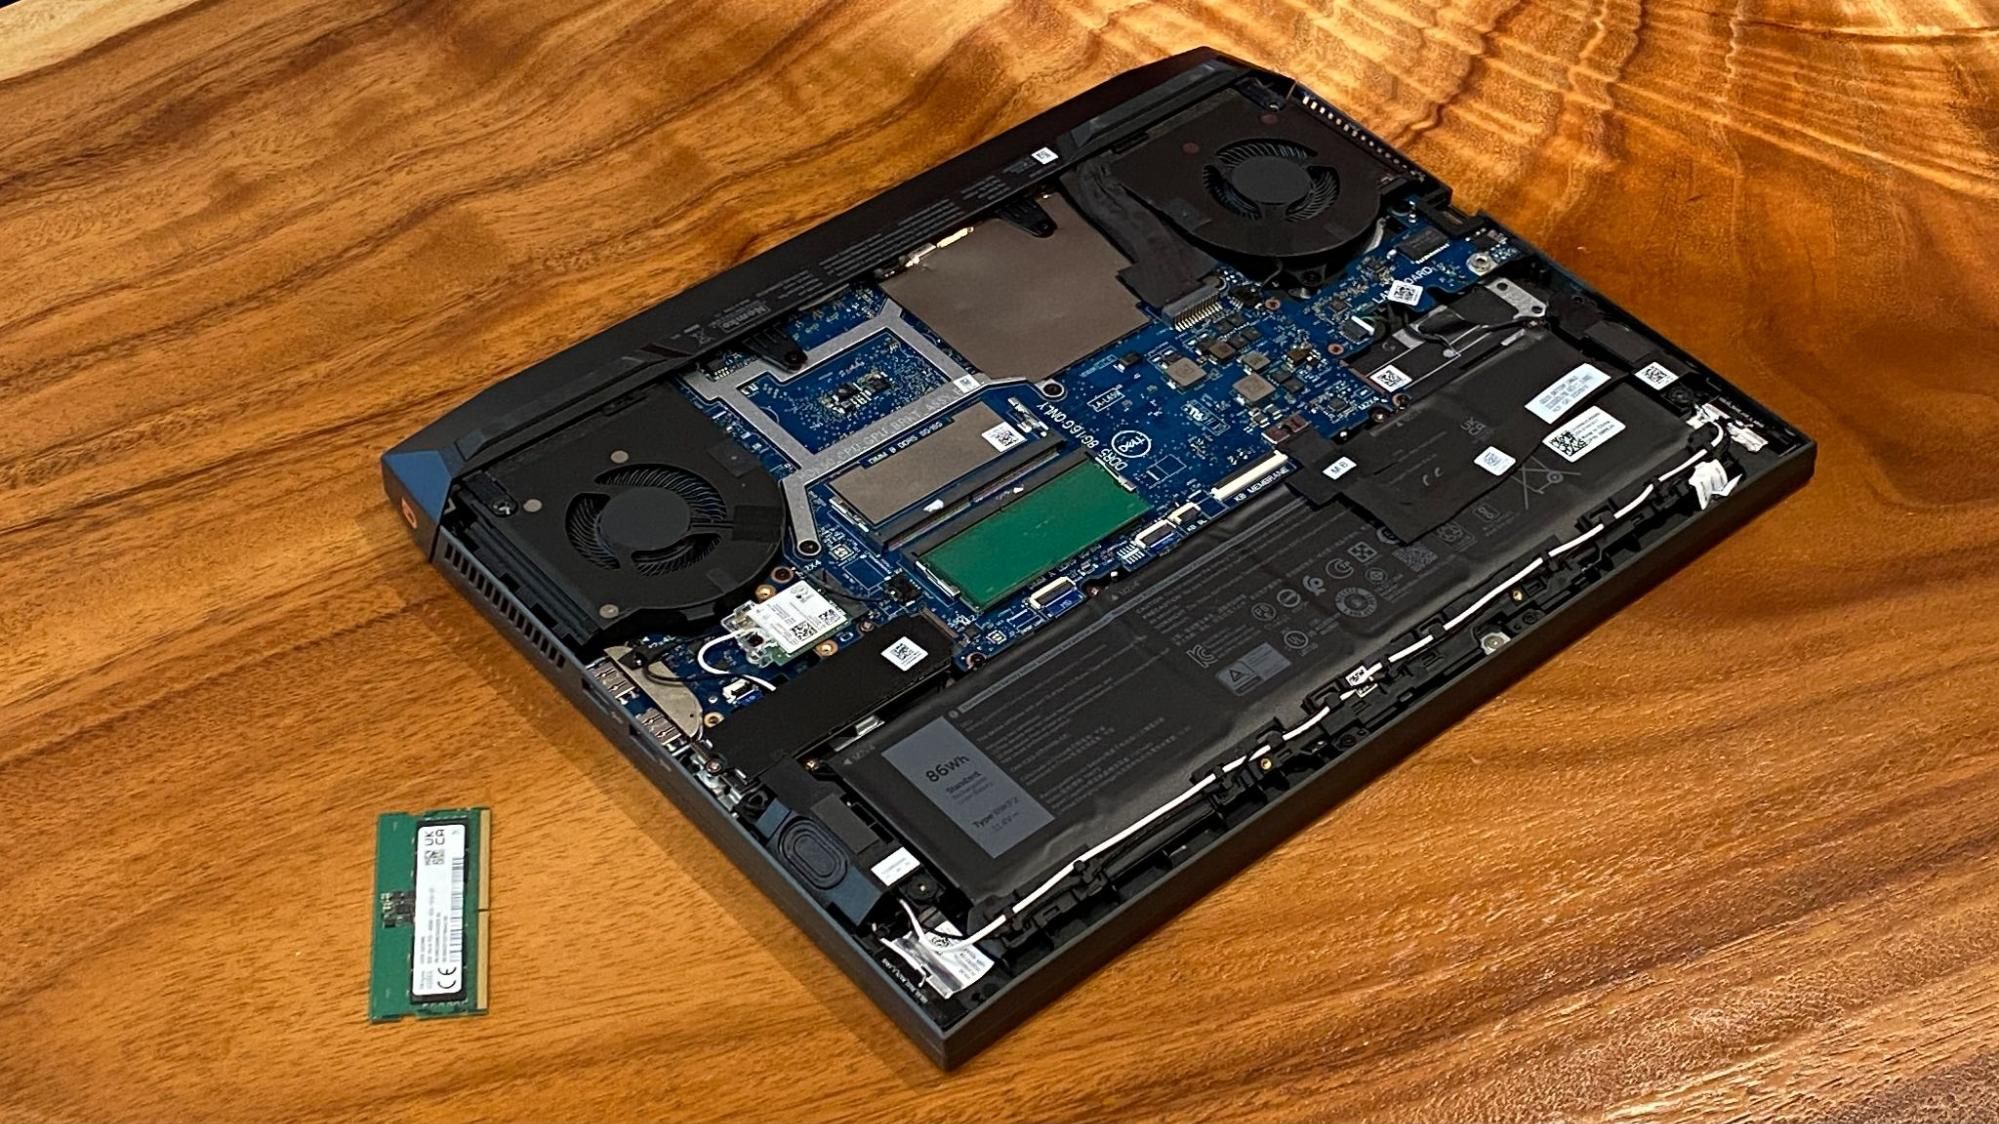
Accessing the RAM Slots
This is often the trickiest part, as laptop designs vary widely:
- Locate the Access Panel: Many laptops have a dedicated small panel on the underside, secured by a few screws, specifically for RAM or storage access. Others require removing the entire bottom cover. Some ultrabooks or business laptops might even require removing the keyboard or top case to access components.
- Remove Screws: Carefully unscrew all visible screws on the back panel. Place them in a methodical way (e.g., a small container or on a magnetic mat) to remember where each screw came from, as they can sometimes differ in length.
- Carefully Open the Panel/Case:
- If it’s a small access panel, it should lift off easily once screws are removed.
- If it’s the entire bottom case, you might need to gently pry it open using a plastic tool, starting from a corner or seam. Listen for small clicks as plastic clips disengage. Be very gentle to avoid breaking clips or damaging the casing.
- Disconnect the Battery (if accessible and necessary): In many designs, it’s safer to disconnect the laptop’s internal battery before touching any components. Locate the battery connector (usually a small ribbon cable) and gently pull it straight up or out from its socket. If the battery is not easily accessible or removable, ensure you are wearing an anti-static wrist strap and working on a grounded surface.
Removing Old RAM (If Applicable)
If you’re replacing existing RAM, this is how:
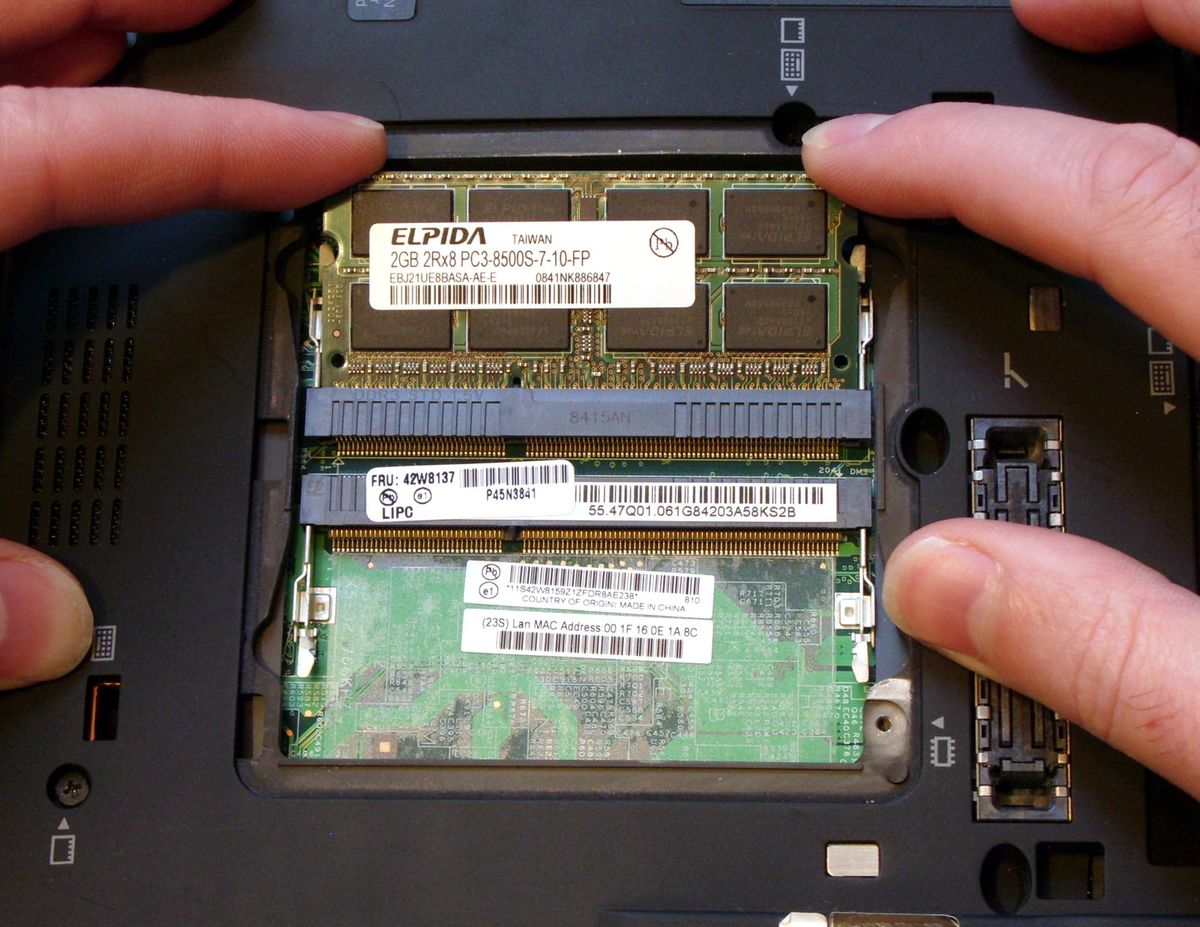
- Locate the RAM Module(s): They are typically rectangular sticks held in place by two small metal or plastic clips on either side.
- Unclip the Retention Clips: Gently push the two retention clips outwards simultaneously. The RAM module should pop up at a slight angle.
- Gently Pull Out the Module: Once angled, you can gently slide the module straight out of the slot. Avoid touching the gold contacts. Place the old RAM in an anti-static bag for safekeeping or future use.
Installing the New RAM Modules
This is the moment of truth:
- Open the Retention Clips: If a slot is empty, ensure the clips are open and ready.
- Align the Notch: Look at the gold contacts on your new RAM module. There will be a small notch off-center. Align this notch with the corresponding ridge in the RAM slot. This ensures you insert it correctly and prevents damage.
- Insert at an Angle: With the notch aligned, gently slide the RAM module into the slot at a 30-45 degree angle. It should go in smoothly. Do not force it.
- Push Down Until Clips Engage: Once fully seated at the angle, push the module down firmly and evenly until the two side clips snap into place, securing the module horizontally. You should hear distinct clicks. Ensure the module is perfectly flat and securely seated.
- Repeat for Second Slot (if applicable): If you’re installing two modules, repeat the process for the second slot.
Reassembling Your Laptop
Once the new RAM is installed:
- Reconnect the Battery: If you disconnected the internal battery, carefully reconnect its cable, ensuring it’s fully seated.
- Replace the Access Panel/Case: Carefully align the back panel or bottom case. Ensure all clips align correctly. Gently press down around the edges to snap plastic clips back into place.
- Screw Everything Back In: Replace all the screws you removed earlier. Do not over-tighten them.
- Reconnect Peripherals and Power: Plug back in your power adapter and any external devices.
Post-Installation Checks and Troubleshooting
You’ve done the hard part! Now it’s time to verify your work and address any potential issues.
Verifying the New RAM
- Boot Up the Laptop: Turn on your laptop. The first boot might take slightly longer than usual as the system registers the new hardware.
- Check System Information/Task Manager: Once booted into your operating system, repeat the steps you took to check your current RAM (Task Manager in Windows, About This Mac in macOS). Confirm that the full, new amount of RAM is recognized and reported correctly.
- Run Memory Diagnostic Tools: For absolute peace of mind, consider running a memory diagnostic.
- Windows Memory Diagnostic: Search for “Windows Memory Diagnostic” in the Start menu. You can choose to restart immediately or run it on the next restart. This tool will check for errors in your new RAM.
- MemTest86: For a more thorough test, you can download and run MemTest86 from a bootable USB drive. This is an industry-standard tool for identifying subtle memory errors.
Common Issues and Solutions
Even with careful installation, sometimes things don’t go perfectly. Here are some common problems and their fixes:
- Laptop Won’t Boot / Black Screen: This is the most common issue.
- Solution: Power down immediately. Reopen the laptop and re-seat the RAM modules. Sometimes they aren’t fully clicked into place. Ensure the notch is correctly aligned. Also, double-check that the battery cable (if disconnected) is securely reconnected. If the problem persists, try removing one module (if two were installed) and booting with just one, then swap them to isolate a potentially faulty module or slot. If it still won’t boot, try reinstalling your old RAM to confirm the issue lies with the new modules.
- Incorrect RAM Capacity Detected: If you installed 16GB but only 8GB is showing.
- Solution: This usually means one of the modules isn’t properly seated or is faulty, or one of the slots isn’t working. Re-seat both modules. If it still persists, try testing each module individually in each slot to pinpoint the problem. Also, ensure your operating system is 64-bit, as 32-bit operating systems can only utilize around 4GB of RAM regardless of how much is installed.
- Random Crashes or Performance Issues Post-Upgrade:
- Solution: This might indicate a subtle incompatibility or a faulty RAM module. Run a thorough memory diagnostic (like MemTest86). If errors are found, the RAM module might be defective and need to be replaced under warranty. Ensure the RAM speed and type are fully compatible with your laptop’s specifications.
- Laptop is Slower Than Before:
- Solution: This is rare but could happen if the new RAM is significantly slower than what your system can handle or if there’s a compatibility conflict. Double-check the RAM specifications (speed, latency) against your laptop’s recommendations.
Optimizing Your System After Upgrade
With your new RAM successfully installed and verified, consider a few final steps to get the most out of your upgraded system:
- Update Drivers: While generally not strictly necessary for RAM, ensuring your system drivers (especially chipset drivers) are up-to-date can help the system fully utilize new hardware.
- Software Adjustments: Some software might have performance settings that can be tweaked to take advantage of the increased RAM. For example, in Photoshop, you can allocate more RAM in the performance preferences.
- Enjoy! Experience the difference in speed and responsiveness.
Conclusion
Upgrading your laptop’s RAM is one of the most impactful and accessible DIY tech projects you can undertake. It’s a fantastic way to revitalize an aging machine, significantly boost its performance, and extend its functional lifespan without the considerable expense of a new purchase. By carefully following the preparation steps, executing the installation with precision, and verifying your work, you can transform your computing experience.
This process not only enhances your laptop’s capabilities but also empowers you with a practical understanding of your device’s internal workings. In an era where technological literacy is increasingly valuable, performing such an upgrade gives you confidence and a tangible return on your investment, making your everyday interactions with technology smoother and more productive. So, embrace the upgrade, enjoy the speed, and make your laptop work harder and smarter for you.
aViewFromTheCave is a participant in the Amazon Services LLC Associates Program, an affiliate advertising program designed to provide a means for sites to earn advertising fees by advertising and linking to Amazon.com. Amazon, the Amazon logo, AmazonSupply, and the AmazonSupply logo are trademarks of Amazon.com, Inc. or its affiliates. As an Amazon Associate we earn affiliate commissions from qualifying purchases.