In the ever-evolving landscape of technology, where speed and efficiency are paramount, upgrading your PC’s Random Access Memory (RAM) is one of the most impactful and accessible ways to boost its performance. Whether you’re a gamer seeking smoother frame rates, a creative professional tackling demanding software, or simply a user frustrated by slow load times and a laggy system, more RAM can be the solution. This guide will walk you through the entire process of installing RAM in your PC, demystifying the technical jargon and providing clear, actionable steps. We’ll cover everything from understanding RAM types to safely installing new modules, ensuring you can confidently enhance your computer’s capabilities.

Understanding RAM: The Brain’s Short-Term Memory
Before diving into the installation process, it’s crucial to understand what RAM is and why it matters. RAM, or Random Access Memory, is your computer’s short-term memory. It’s where your operating system, applications, and data currently in use are stored for quick access by the CPU (Central Processing Unit). Think of it as your desk space: the more space you have, the more documents and tools you can have out and readily available.
Why More RAM Matters for Your PC’s Performance
The amount of RAM your PC has directly influences its ability to multitask and handle resource-intensive tasks.
- Multitasking: Each application you open consumes a portion of your RAM. If you frequently switch between many programs, browse numerous browser tabs, or run background processes, a limited amount of RAM can lead to slowdowns as your system struggles to keep up. With more RAM, your PC can hold more of these active applications and their data in memory, allowing for seamless transitions and snappier performance.
- Resource-Intensive Applications: Modern software, especially in fields like video editing, 3D rendering, graphic design, and gaming, requires significant amounts of RAM to operate smoothly. Insufficient RAM can cause these applications to stutter, freeze, or even crash, drastically hindering your productivity and enjoyment.
- Overall System Responsiveness: Even for everyday tasks, ample RAM contributes to a more fluid user experience. Boot times, application launch times, and general system responsiveness are all positively impacted by having enough memory.
- Gaming: For gamers, RAM is a critical component. Many modern games recommend or even require a specific amount of RAM to run at optimal settings. Insufficient RAM can lead to stuttering, frame drops, and longer loading screens, detracting from the immersive gaming experience.
Types of RAM: DDR3, DDR4, and DDR5 Explained
RAM technology has evolved significantly over the years, with different generations offering improved performance, efficiency, and capacity. The most common types you’ll encounter today are DDR3, DDR4, and the latest DDR5. It’s vital to identify which type your motherboard supports, as they are not interchangeable.
- DDR3: One of the older standards, DDR3 is still found in some older PCs. It offers lower speeds and bandwidth compared to newer generations.
- DDR4: The dominant standard for many years, DDR4 provides a significant improvement in speed, efficiency, and capacity over DDR3. It’s compatible with a wide range of modern motherboards.
- DDR5: The newest generation, DDR5, offers even higher speeds, increased bandwidth, and improved power efficiency. It’s designed for future-proofing and is found in the latest PC builds and high-end motherboards.
Key Differences to Note:
- Physical Notch: Each DDR generation has a slightly different physical notch placement on the module. This prevents you from accidentally inserting the wrong type of RAM into a motherboard slot.
- Speed (MHz): Higher megahertz (MHz) ratings indicate faster data transfer speeds.
- Voltage: Newer generations generally operate at lower voltages, contributing to better power efficiency.
- Capacity: While not exclusive to a generation, newer DDR modules often support higher individual capacities.
Preparing for the Upgrade: What You Need to Know
Before you even open your PC case, a bit of preparation is essential to ensure a smooth and successful RAM installation. This involves identifying your current RAM, determining your motherboard’s compatibility, and gathering the necessary tools.
Identifying Your Current RAM and Motherboard Compatibility
This is arguably the most critical step. Installing incompatible RAM can prevent your PC from booting, or in rare cases, even damage your components.
- Check Your System Information:
- Windows: Right-click on the “This PC” or “Computer” icon and select “Properties.” This will give you a general overview of your system, including installed RAM. For more detailed information, press
Ctrl + Shift + Escto open Task Manager, go to the “Performance” tab, and click on “Memory.” This will show you the total amount of RAM, its speed, and the number of slots in use. To find out the exact type of RAM (DDR3, DDR4, etc.) and its speed, you might need to use third-party tools. - Third-Party Tools: Software like CPU-Z (free to download) provides extensive details about your CPU, motherboard, and RAM, including the exact DDR type, speed, timings, and even the manufacturer of your current modules.
- Windows: Right-click on the “This PC” or “Computer” icon and select “Properties.” This will give you a general overview of your system, including installed RAM. For more detailed information, press
- Consult Your Motherboard Manual: The most definitive source of information about your motherboard’s RAM compatibility is its manual. This document will specify:
- The maximum amount of RAM supported.
- The types of RAM (DDR generation) it accepts.
- The supported speeds (MHz).
- The number of RAM slots available.
- Whether it supports dual-channel, quad-channel, or other memory configurations.
- Motherboard Manufacturer’s Website: If you don’t have the physical manual, you can usually find it on the motherboard manufacturer’s website by searching for your specific model. Look for the “Specifications” or “Support” section.
Choosing the Right RAM Modules
Once you know your motherboard’s specifications, you can confidently select new RAM.
- DDR Generation: Ensure the new RAM matches the DDR generation supported by your motherboard (DDR4 for a DDR4 motherboard, etc.).
- Capacity: Consider how much RAM you need. For basic use, 8GB is often sufficient. For gaming and moderate multitasking, 16GB is a good sweet spot. For professional creative work or heavy multitasking, 32GB or more might be necessary. It’s generally better to buy more RAM than you currently need if your budget allows, for future-proofing.
- Speed (MHz): Aim for RAM speeds that are supported by your motherboard. While faster RAM can offer a performance boost, ensure it’s compatible. Sometimes, very high-speed RAM may require specific motherboard BIOS settings or overclocking to reach its advertised speeds.
- Latency (CL): RAM timings, often referred to as CAS Latency (CL), indicate how quickly the RAM can respond to requests. Lower CL numbers are generally better, but speed (MHz) often plays a more significant role in overall performance.
- Kits: RAM is often sold in kits of two or four modules. Buying a matched kit ensures that the modules are tested to work together and can often take advantage of dual-channel or quad-channel configurations, which significantly improve memory bandwidth and performance.
Tools You’ll Need
- Phillips Head Screwdriver: To open your PC case.
- Anti-Static Wrist Strap (Recommended): To prevent electrostatic discharge (ESD), which can damage your computer components.
- A Clean, Well-Lit Workspace: Ensure you have enough space to work and that the area is free of clutter.
- A Container for Screws: To keep track of any screws you remove from your case.
The Installation Process: Step-by-Step
With your new RAM and tools ready, it’s time to perform the upgrade. Follow these steps carefully to ensure a safe and successful installation.
Step 1: Power Down and Disconnect
- Save Your Work: Close all open applications and save any important data.
- Shut Down Your PC: Go to the Start Menu, click the Power icon, and select “Shut down.”
- Disconnect Power: Unplug the power cable from the back of your PC.
- Disconnect Peripherals: Unplug all other cables connected to your PC, including monitor, keyboard, mouse, USB devices, and Ethernet cable.
Step 2: Ground Yourself and Open the Case
- Anti-Static Precautions: Before touching any internal components, it’s crucial to discharge any static electricity from your body. The best way to do this is to wear an anti-static wrist strap. Connect the strap to a grounded metal object, such as an unpainted metal part of your PC case. If you don’t have a wrist strap, touch a grounded metal object (like the metal frame of your PC case) before and periodically during the installation process.
- Open the PC Case: Most desktop PC cases have side panels that can be removed by unscrewing a few screws at the back. Refer to your case manual if you’re unsure. Once the screws are removed, slide the panel off.
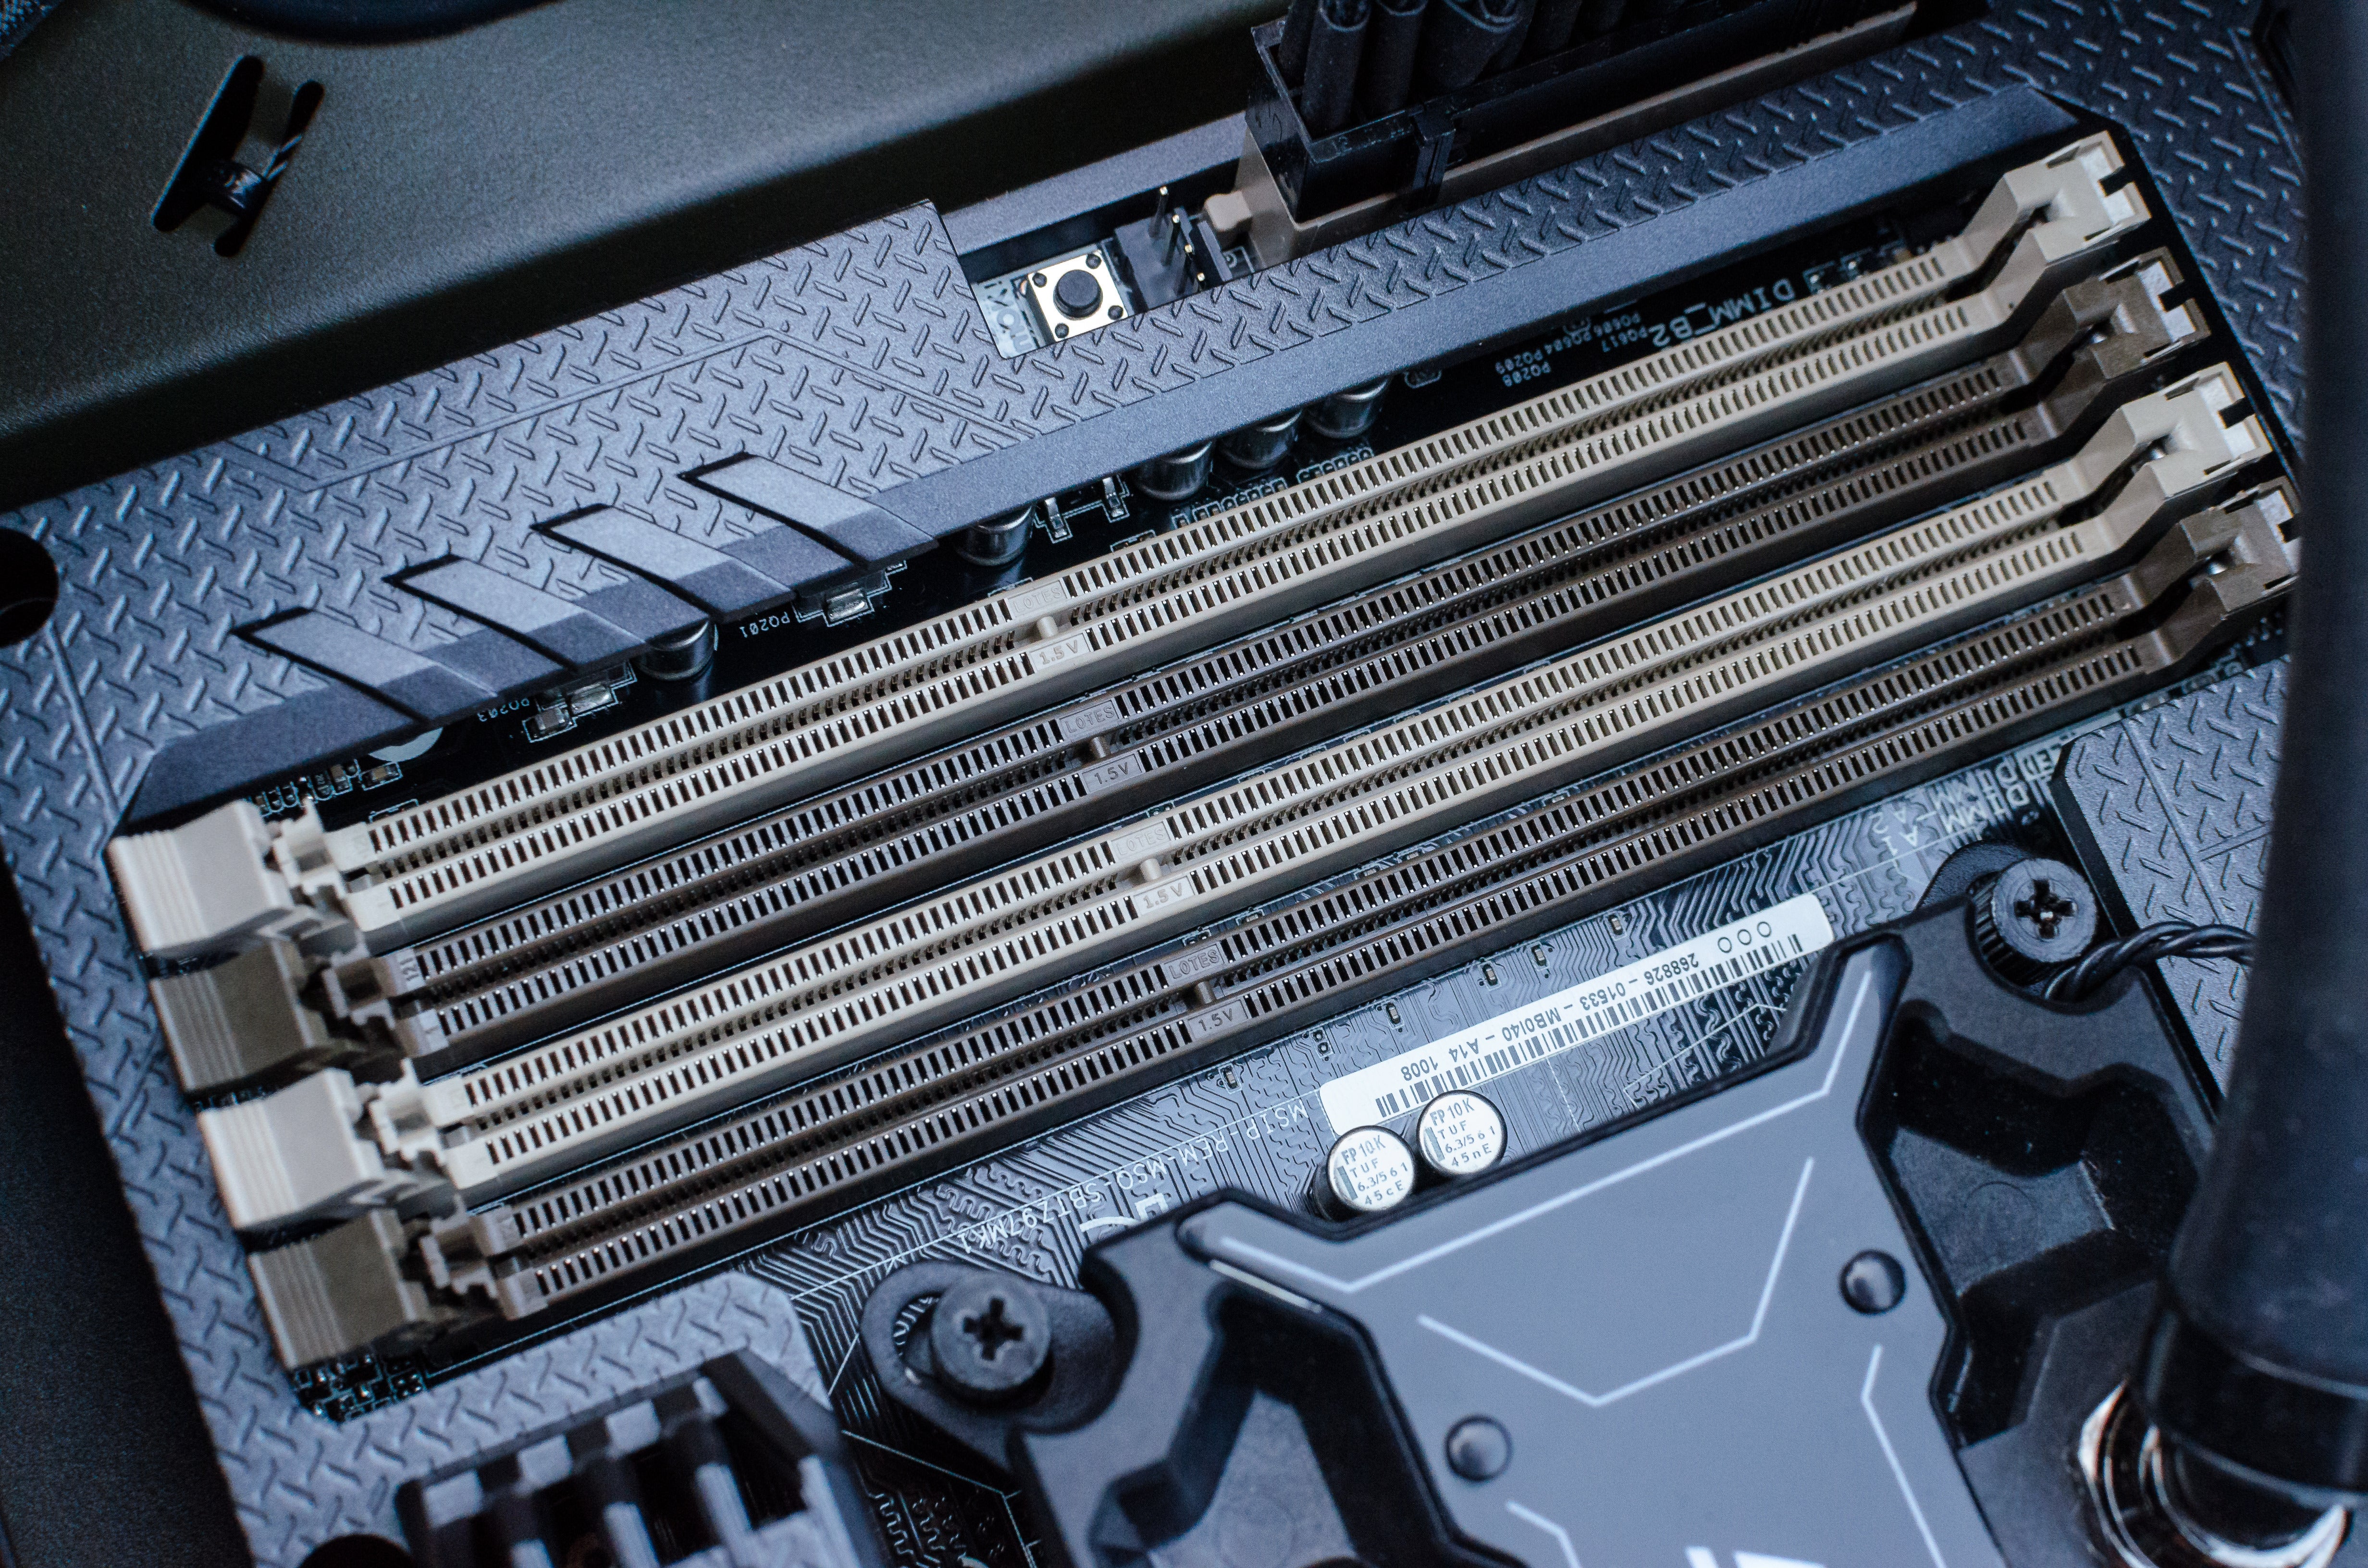
Step 3: Locate the RAM Slots
- Find the Motherboard: Inside your PC, you’ll see the motherboard – a large circuit board with many components.
- Identify RAM Slots: The RAM slots are long, narrow slots, usually located near the CPU socket. They are typically color-coded in pairs to indicate dual-channel configurations. You’ll likely see two or four of these slots. They will have clips on either end.
Step 4: Remove Existing RAM (If Necessary)
If you are upgrading and replacing old RAM, you’ll need to remove it first.
- Release the Clips: On each side of the RAM module, you’ll find small plastic clips. Gently push these clips outwards.
- Lift the Module: Once the clips are open, the RAM module should pop up slightly. Carefully lift the module straight out of the slot. Avoid forcing it.
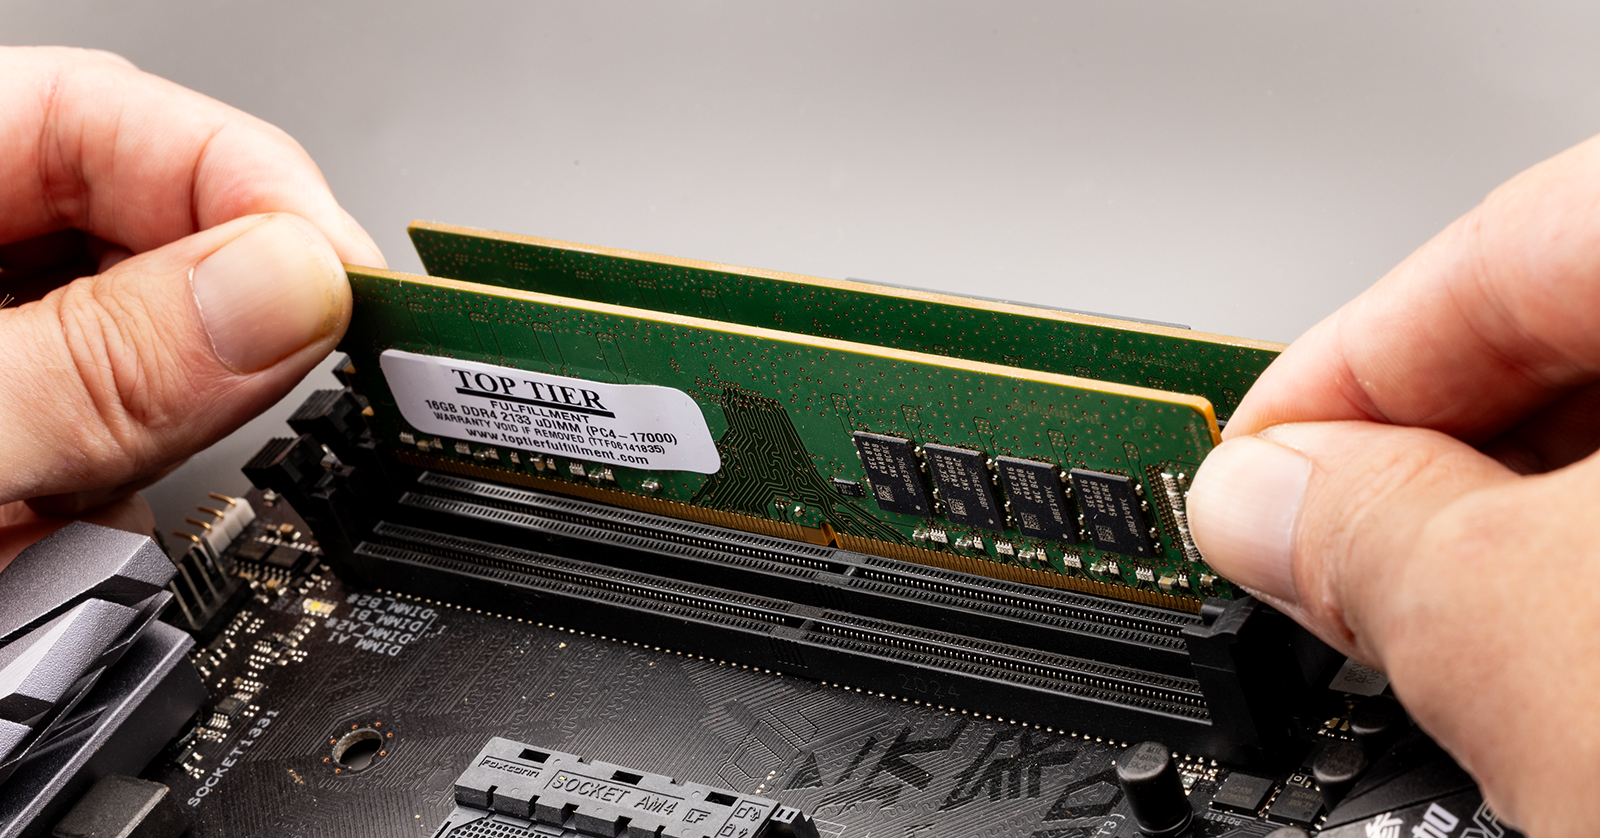
Step 5: Install the New RAM Modules
This is where the new RAM goes in. Pay close attention to the orientation.
- Align the Notch: Examine the new RAM module and the RAM slot on the motherboard. You’ll notice a small notch in the gold connector of the RAM module. This notch is not centered and corresponds to a raised key in the RAM slot. This ensures the RAM can only be inserted in the correct orientation.
- Position the Module: Align the notch on the RAM module with the key in the RAM slot.
- Apply Even Pressure: Once aligned, place the RAM module into the slot. Apply firm, even pressure downwards on both ends of the module simultaneously. You should hear a click as the clips on the sides of the slot snap into place, securing the module.
- Check the Clips: Ensure that both clips on either side of the RAM module are fully engaged and holding the module securely.
Step 6: Configure Dual-Channel or Quad-Channel (If Applicable)
If your motherboard supports dual-channel or quad-channel memory, installing RAM in specific slot configurations can significantly boost performance.
- Consult Your Manual: Refer to your motherboard manual for the correct slot configuration for dual-channel or quad-channel operation. Typically, the slots will be color-coded, and you’ll install modules in the matching colored slots (e.g., slots 1 and 3, or slots 2 and 4) for dual-channel.
- Matched Kits: If you purchased a matched kit of RAM (e.g., two modules), they are designed to be installed in these configurations to work together efficiently.
Step 7: Reassemble and Boot Up
- Replace the Side Panel: Carefully slide the side panel back onto your PC case and secure it with the screws you removed earlier.
- Reconnect Peripherals: Plug all the cables back into your PC.
- Power On: Press the power button to turn on your computer.
Step 8: Verify the Installation
- Check BIOS/UEFI: When your PC boots up, you might briefly see a message about memory changes or be prompted to enter the BIOS/UEFI setup. This is normal. The BIOS/UEFI will typically display the total amount of RAM installed.
- Check in Windows: Once your operating system has booted, verify the installed RAM:
- Right-click on “This PC” or “Computer” and select “Properties.”
- Alternatively, open Task Manager (
Ctrl + Shift + Esc), go to the “Performance” tab, and click on “Memory.” - You should see the total amount of RAM you installed reflected correctly.
If your PC doesn’t boot, or if the RAM is not recognized, don’t panic. Power off the PC, disconnect the power, and re-seat the RAM modules, ensuring they are firmly clicked into place and correctly oriented. If the issue persists, try installing one module at a time to isolate a potentially faulty module.
Troubleshooting Common Issues
While RAM installation is usually straightforward, you might encounter a few snags. Here are some common problems and their solutions:
- PC Won’t Boot (Black Screen):
- RAM Not Seated Properly: The most common cause. Power off, disconnect power, and carefully re-seat each RAM module, ensuring the clips click into place.
- Incorrect RAM Type: Double-check that the installed RAM is the correct DDR generation for your motherboard.
- Faulty RAM Module: Try installing the RAM modules one at a time to identify if a specific module is defective.
- Motherboard Compatibility: While rare if you followed compatibility checks, ensure your motherboard fully supports the amount and speed of RAM you’ve installed.
- RAM Not Fully Recognized:
- Incorrect Slot Configuration: If you have multiple RAM sticks, ensure they are in the correct slots for dual-channel or quad-channel operation, as specified by your motherboard manual.
- BIOS/UEFI Update: In some cases, older motherboards might require a BIOS/UEFI update to recognize newer or higher-capacity RAM modules. Check your motherboard manufacturer’s website for updates.
- Operating System 32-bit Limit: 32-bit versions of Windows can only address a maximum of around 4GB of RAM. Ensure you are running a 64-bit operating system if you have more than 4GB installed.
- System Instability or Crashes:
- RAM Overclocking: If you’ve manually set RAM speeds higher than recommended, it might cause instability. Revert to default settings or a slightly lower speed.
- Heat Issues: Ensure your PC has adequate cooling, as overheating can lead to system instability, even with correctly installed RAM.
Conclusion: A Boost for Your Digital Life
Upgrading your PC’s RAM is a tangible and rewarding way to improve its performance and longevity. By understanding the basics of RAM, meticulously checking compatibility, and following the installation steps carefully, you can confidently give your computer a significant boost. Whether you’re looking to accelerate your workflow, immerse yourself deeper into gaming, or simply enjoy a smoother, more responsive computing experience, installing more RAM is a smart and effective investment in your digital life. Remember to always prioritize safety by grounding yourself and handling components with care. Happy upgrading!
aViewFromTheCave is a participant in the Amazon Services LLC Associates Program, an affiliate advertising program designed to provide a means for sites to earn advertising fees by advertising and linking to Amazon.com. Amazon, the Amazon logo, AmazonSupply, and the AmazonSupply logo are trademarks of Amazon.com, Inc. or its affiliates. As an Amazon Associate we earn affiliate commissions from qualifying purchases.