In the rapidly evolving landscape of technology, programming languages serve as the bedrock upon which innovation is built. Among these, Python stands out as a true titan, consistently ranked as one of the most popular and versatile languages in the world. Whether you’re an aspiring developer, a data scientist, a cybersecurity professional, a web developer, or simply looking to automate mundane tasks to boost your productivity, mastering Python is an invaluable skill. From powering the sophisticated algorithms behind artificial intelligence and machine learning to driving robust web applications and enabling critical data analysis, Python 3 is at the heart of countless technological advancements. This comprehensive guide will walk you through the essential steps to install Python 3 on various operating systems, ensuring you have the foundational tools to embark on your coding journey and unlock a world of possibilities in tech.
Why Python 3 Matters: Powering the Digital Future
Python’s rise to prominence isn’t accidental; it’s a testament to its elegant syntax, extensive libraries, and incredibly supportive community. Designed with readability in mind, Python minimizes the cost of program maintenance and makes it easier for newcomers to grasp fundamental programming concepts quickly. This “beginner-friendliness” doesn’t detract from its power; rather, it amplifies its utility across a dizzying array of applications.
For individuals and businesses navigating the modern digital era, Python offers significant advantages. In the realm of Technology Trends, Python is the de facto language for Artificial Intelligence and Machine Learning, with frameworks like TensorFlow and PyTorch dominating the field. Data Science relies heavily on Python’s robust libraries such as NumPy, Pandas, and Matplotlib for data manipulation, analysis, and visualization. Web development thrives on Python with popular frameworks like Django and Flask, enabling developers to build scalable and secure web applications. Even in areas like Digital Security, Python is used for scripting tools and automating security tasks. Its application in AI Tools, Software development, and even creating sophisticated Apps is widespread, making it a critical skill for anyone looking to stay relevant in the tech world.
Beyond its technical prowess, Python is also a tremendous asset for Productivity. Its scripting capabilities allow users to automate repetitive tasks, saving countless hours and reducing human error. This efficiency translates directly into value, whether you’re a freelancer looking to optimize your workflow for online income or a corporate professional aiming to streamline operations. For those interested in the “Money” aspect, Python skills are highly sought after, opening doors to high-paying careers in tech, enabling sophisticated financial modeling, and even powering algorithmic trading strategies. Moreover, learning Python can be a cornerstone for developing a personal brand in the tech space, demonstrating a commitment to cutting-edge tools and a practical approach to problem-solving. By installing Python 3, you are not just setting up a program; you are equipping yourself with a powerful instrument to innovate, create, and succeed in the digital economy.
Step-by-Step Installation Guides for Major Operating Systems
Installing Python 3 is the first crucial step to leveraging its power. While the process is generally straightforward, it varies slightly depending on your operating system. Below, we provide detailed instructions for Windows, macOS, and Linux, covering the most common and recommended methods.
Installing Python 3 on Windows
Windows users have a very user-friendly installation process, primarily involving a downloadable installer from the official Python website. It’s crucial to pay attention to one specific step during the installation to ensure Python is correctly configured for your system.
Direct Download and Installer Walkthrough
- Download the Installer: Open your web browser and navigate to the official Python website:
python.org/downloads/windows/. You’ll see various releases. Always choose the latest stable Python 3 release (e.g., Python 3.10.x or 3.11.x). Look for the “Windows installer (64-bit)” for most modern systems. If you have an older 32-bit system, choose the “Windows installer (32-bit)”. - Run the Installer: Once the download is complete, locate the
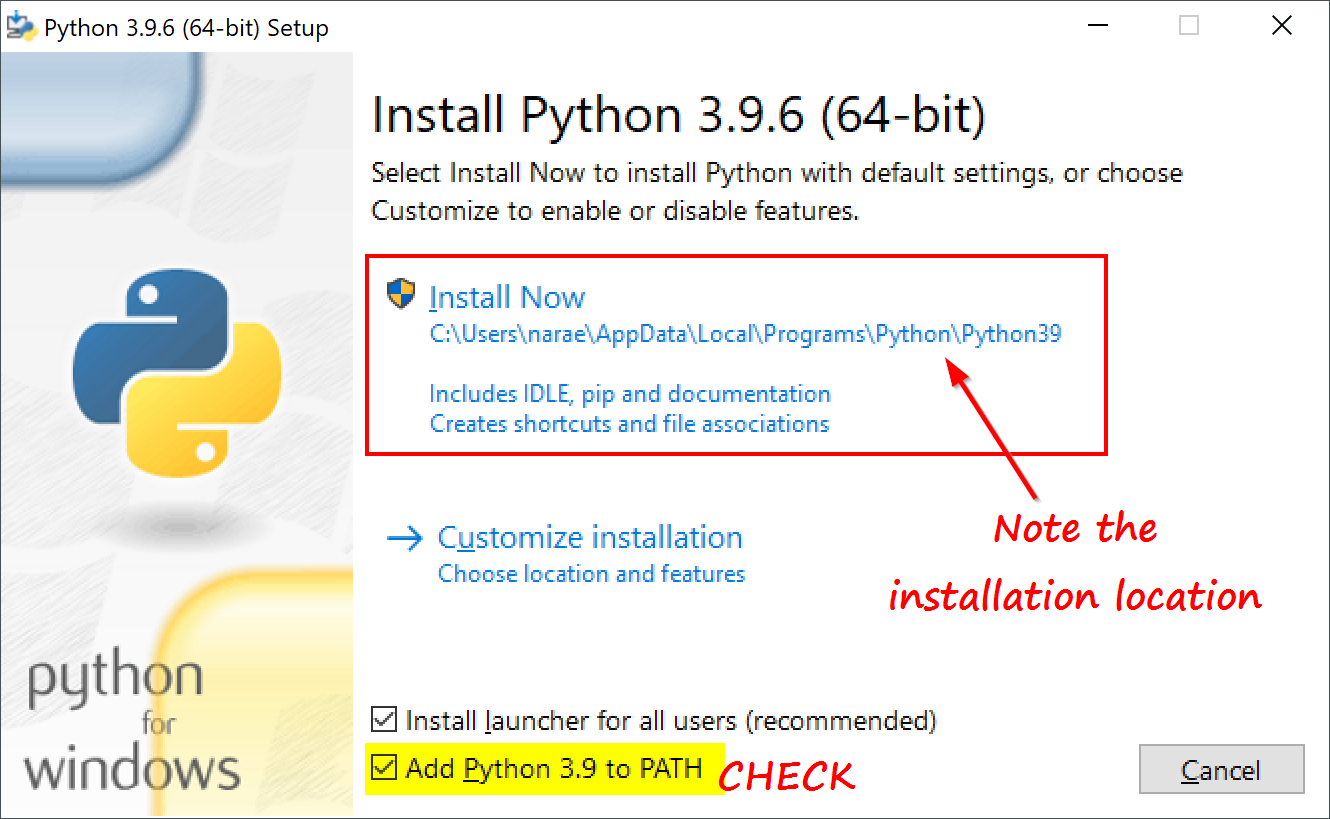
.exefile (it will typically be named something likepython-3.x.x-amd64.exe) and double-click it to start the installation process. - Crucial Step: Add Python to PATH: In the very first installation window, you will see a checkbox at the bottom that says “Add Python 3.x to PATH”. It is absolutely essential that you check this box. Adding Python to your system’s PATH environment variable allows you to run Python commands from any directory in your Command Prompt or PowerShell without having to specify the full path to the Python executable. Skipping this step often leads to frustration for new users.
- Choose Installation Type: You will then have two options: “Install Now” or “Customize installation.” For most users, “Install Now” is sufficient as it performs a default installation with recommended features. If you’re an advanced user or have specific requirements (e.g., changing the installation directory), you can choose “Customize installation.”
- Complete the Installation: Click “Install Now” (or proceed with your custom choices). The installer will then copy the necessary files and set up Python on your system. This process usually takes a few minutes. You might see a progress bar indicating the installation status.
- Disable PATH Length Limit (Optional): After the installation is complete, you might see an option to “Disable path length limit.” This is generally recommended for Windows users as it allows Python to use longer path names, which can be useful for certain projects or deep directory structures. Click it if it appears.
- Finish: Once completed, you’ll see a “Setup was successful” message. Click “Close.”
Verifying the Installation
To confirm that Python 3 was installed correctly and is accessible from your command line:
- Open the Command Prompt or PowerShell. You can do this by typing “cmd” or “powershell” into the Windows search bar and pressing Enter.
- Type the following command and press Enter:
bash

python --version
or, especially if you also have Python 2 installed:
bash

python3 --version
You should see output similar toPython 3.10.x(or whatever version you installed). If you receive an error like ” ‘python’ is not recognized as an internal or external command,” it likely means you did not check the “Add Python to PATH” box. In this case, you might need to re-run the installer or manually add Python to your PATH environment variables (a more advanced process). - Also verify
pip, Python’s package installer, which should have been installed alongside Python:
bash

pip --version
You should see output indicating thepipversion and its location.
(Optional) Using Chocolatey for Windows
For users who prefer command-line package managers, Chocolatey is an excellent option for Windows. It simplifies software installation and updates.
- Install Chocolatey: If you don’t have it, open an administrative PowerShell and follow the instructions on
chocolatey.org/install. - Install Python 3: Once Chocolatey is installed, you can install Python with a single command:
bash

choco install python --pre
The--preflag ensures you get the latest stable version, including pre-releases if available and stable. This method automatically adds Python to your PATH.
Installing Python 3 on macOS
macOS typically comes with Python pre-installed, but this is usually an older version of Python 2.x. For modern development, you’ll want to install Python 3. The recommended method for macOS is to use Homebrew, a popular package manager that simplifies software installation.
Leveraging Homebrew: The Recommended Path
- Install Homebrew (if not already installed): Open your Terminal application (you can find it in
Applications/Utilitiesor by searching with Spotlight). Then, paste and run the following command:
bash

/bin/bash -c "$(curl -fsSL https://raw.githubusercontent.com/Homebrew/install/HEAD/install.sh)"
Follow the on-screen instructions, which may include entering your password and installing Apple’s Command Line Developer Tools. - Install Python 3 using Homebrew: Once Homebrew is installed, you can install Python 3 with a simple command:
bash

brew install python
Homebrew will download and install the latest stable version of Python 3. It will also manage symlinks and ensure Python 3 is prioritized over any pre-installed Python 2. - Ensure Python 3 is in your PATH: Homebrew usually handles this automatically by symlinking
python3to/usr/local/bin. However, it’s good practice to ensure your shell’s configuration file (.bash_profile,.zshrc, or.profiledepending on your shell) includes/usr/local/binat the beginning of your PATH. If you’re using zsh (the default for macOS Catalina and later), you might need to add:
bash

echo 'export PATH="/usr/local/bin:$PATH"' >> ~/.zshrc

source ~/.zshrc
If using bash (older macOS or custom setup):
bash

echo 'export PATH="/usr/local/bin:$PATH"' >> ~/.bash_profile

source ~/.bash_profile
Verifying the Installation and PATH Configuration
After installation, verify that Python 3 is correctly installed and accessible:
- Open your Terminal.
- Type the following command and press Enter:
bash

python3 --version
You should see output similar toPython 3.x.x. - Check
pipas well:
bash

pip3 --version
You should see thepipversion corresponding to your Python 3 installation.
If python --version still shows Python 2.x, that’s expected. On macOS, python typically refers to the system’s Python 2, while python3 refers to your newly installed Python 3. Always use python3 to explicitly invoke Python 3.
(Optional) Direct Download from Python.org
While Homebrew is generally preferred for its ease of management, you can also download a macOS installer directly from python.org/downloads/mac-osx/. This method functions similarly to the Windows installer. Download the .pkg file, run it, and follow the on-screen prompts. Just like Windows, ensure you allow the installer to modify your system PATH during the process if prompted, or be prepared to do it manually.
Installing Python 3 on Linux Distributions
Most modern Linux distributions come with Python 3 pre-installed. However, you might need to install development headers or ensure you have the absolute latest version.
Checking for Pre-installed Python 3
- Open your terminal.
- Type:
bash

python3 --version
If Python 3 is installed, you’ll see its version number. If it’s not installed or an older version, you can proceed with the installation steps below.
Using System Package Managers (APT, DNF, Pacman)
The easiest and most recommended way to install Python 3 on Linux is through your distribution’s package manager.
-
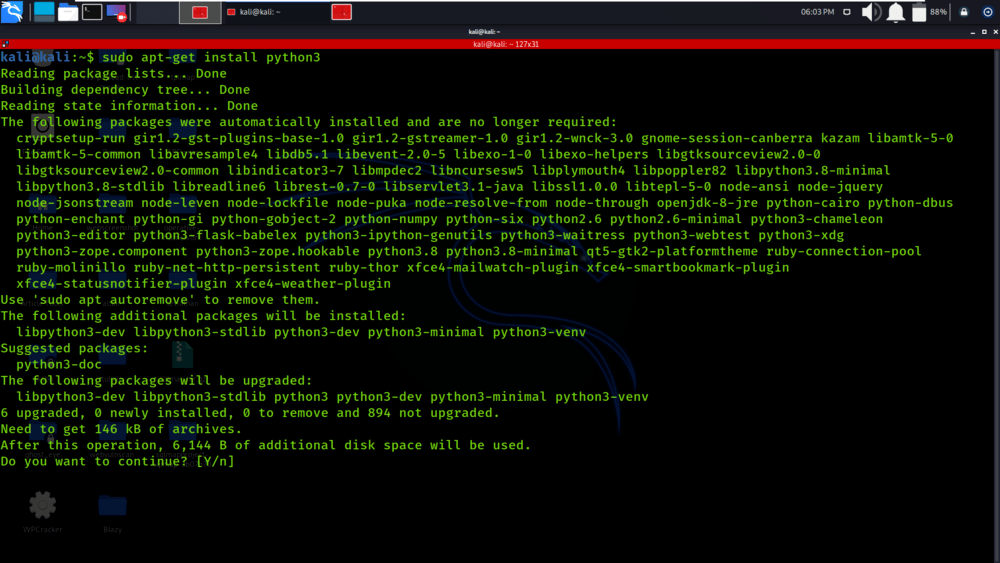
For Debian/Ubuntu and derivatives (using
apt):sudo apt update sudo apt install python3 python3-pipYou might also want to install development headers, which are often needed for compiling certain Python packages:
sudo apt install python3-dev -
For Fedora/RHEL and derivatives (using
dnforyum):sudo dnf install python3 python3-pip # Or for older versions of RHEL/CentOS: # sudo yum install python3 python3-pipAnd for development headers:
sudo dnf install python3-devel # Or: # sudo yum install python3-devel -
For Arch Linux and derivatives (using
pacman):
bash

sudo pacman -S python python-pip
Arch Linux typically bundles development files with the main Python package.
Verifying the Installation
After running the installation commands, verify Python 3 and Pip:
bash

python3 --version
bash

pip3 --version
Both should return their respective version numbers. If you encounter issues, ensure your package lists are updated (sudo apt updateorsudo dnf update) and retry the installation.
Essential Post-Installation Setup and Best Practices
Once Python 3 is successfully installed, there are a few crucial steps and best practices that will significantly enhance your development workflow, prevent conflicts, and promote productivity.
Mastering Virtual Environments: Isolation for Your Projects
One of the most important concepts in modern Python development is the use of virtual environments. A virtual environment is an isolated Python environment that allows you to install project-specific packages without interfering with other projects or the global Python installation. This is critical for several reasons:
- Dependency Management: Different projects often require different versions of the same library. Without virtual environments, installing a new version for one project could break another.
- Cleanliness: Your global Python installation remains clean and untouched.
- Portability: Virtual environments make it easier to share your projects, as you can simply list the required packages in a
requirements.txtfile, and others can recreate the exact environment.
Python 3 includes the venv module for creating virtual environments. Here’s how to use it:
- Navigate to your Project Directory: Open your terminal or command prompt and
cdinto the folder where you want to start your project. For example:
bash

mkdir my_python_project

cd my_python_project
- Create a Virtual Environment: Inside your project directory, run:
bash

python3 -m venv venv
This command creates a directory namedvenv(a common convention, but you can name it anything) inside your project folder. This directory will contain a copy of the Python interpreter and pip, along with directories for installing packages. - Activate the Virtual Environment:
- On Windows:
bash

.venvScriptsactivate
- On macOS/Linux:
bash

source venv/bin/activate
You’ll know the virtual environment is active because your terminal prompt will change to include the name of your environment (e.g.,(venv) your_user@your_computer:~/my_python_project$).
- On Windows:
- Install Packages: Now, when your virtual environment is active, any packages you install using
pipwill be installed only within this environment:
bash

pip install requests beautifulsoup4
- Deactivate the Virtual Environment: When you’re done working on your project, simply type:
bash

deactivate
Your terminal prompt will revert to normal, indicating you’ve exited the virtual environment.
Always activate your virtual environment before starting work on a project. This simple practice will save you from numerous headaches related to dependency conflicts and significantly improve your productivity.
Understanding and Using Pip: Python’s Package Installer
Pip is the standard package manager for Python. It allows you to easily install, manage, and uninstall Python packages (libraries) from the Python Package Index (PyPI) and other sources. When you installed Python 3 using the recommended methods, pip (or pip3) was installed alongside it.
- Installing a Package:
bash

pip install package_name
Example:pip install numpy(for numerical computing) - Installing a Specific Version:
bash

pip install package_name==1.2.3
- Upgrading a Package:
bash

pip install --upgrade package_name
- Uninstalling a Package:
bash

pip uninstall package_name
- Listing Installed Packages:
bash

pip list
- Generating a
requirements.txtfile: This file lists all packages and their versions required for your project. It’s crucial for sharing your projects and ensuring reproducibility.
bash

pip freeze > requirements.txt
To install packages from arequirements.txtfile in a new (or cloned) project:
bash

pip install -r requirements.txt
Mastering pip within virtual environments is a cornerstone of efficient Python development and greatly enhances your ability to leverage the vast ecosystem of Python libraries, from AI Tools to Web development frameworks.
Your First Python Script: “Hello, World!”
To truly confirm your installation and get a taste of Python, let’s create and run a simple “Hello, World!” script.
- Create a File: Open a text editor (like Notepad on Windows, TextEdit on macOS, or
nano/vimon Linux, or even better, a code editor like VS Code or Sublime Text). - Enter the Code: Type the following single line into the file:
python

print("Hello, World! Welcome to Python 3.")
- Save the File: Save the file as
hello.pyin yourmy_python_projectdirectory (or any directory you prefer). Ensure the file extension is.py. - Run the Script: Open your terminal or command prompt, navigate to the directory where you saved
hello.py(e.g.,cd my_python_project), and then run the script using the Python interpreter:
bash

python3 hello.py
You should see the output:
Hello, World! Welcome to Python 3.
Congratulations! You’ve successfully installed Python 3, set up your development environment, and run your first Python program. This small step is the beginning of a powerful journey.
Beyond Installation: Unlocking Python’s Potential
With Python 3 now successfully installed and configured on your system, you’ve laid the groundwork for an incredibly exciting and rewarding journey into programming. This initial setup is far more than just installing a piece of software; it’s an investment in your technical capabilities, your personal productivity, and potentially, your financial future.
Python’s unparalleled versatility means your newly acquired environment is ready for almost any challenge. You can dive into building sophisticated AI Tools, develop dynamic web applications, analyze complex datasets to uncover hidden insights, automate tedious tasks, or even venture into game development. Each of these paths represents a significant contribution to the Tech domain and can be a powerful driver for career growth and innovation.
Beyond technical proficiency, the ability to code in Python also bolsters your Personal Branding. Demonstrating expertise in such a high-demand language showcases your adaptability and forward-thinking mindset. For those focused on the “Money” aspect, Python skills are directly transferable into numerous income streams, whether through a career in software engineering, data science, freelancing for Side Hustles, or even developing your own online businesses or financial tools. The automation capabilities alone can significantly boost your overall productivity, allowing you to achieve more with less effort, freeing up time for other valuable pursuits.
The “Hello, World!” script was just the first keystroke. The real adventure begins now. We encourage you to explore the vast Python ecosystem, experiment with libraries, and build projects that resonate with your interests. The Python community is incredibly vibrant and supportive, offering a wealth of resources from official documentation to online tutorials and forums. Keep learning, keep building, and continue to leverage this powerful language to shape your digital future and contribute to the ever-evolving world of technology.
aViewFromTheCave is a participant in the Amazon Services LLC Associates Program, an affiliate advertising program designed to provide a means for sites to earn advertising fees by advertising and linking to Amazon.com. Amazon, the Amazon logo, AmazonSupply, and the AmazonSupply logo are trademarks of Amazon.com, Inc. or its affiliates. As an Amazon Associate we earn affiliate commissions from qualifying purchases.