
Python. The name itself evokes a sense of power and possibility in the tech world. Whether you’re a budding developer eager to build your first application, a data scientist diving into complex analyses, an AI enthusiast experimenting with cutting-edge models, or simply someone looking to boost your productivity with powerful scripting capabilities, Python is an indispensable tool. And for Mac users, integrating this versatile language into your workflow is a straightforward process. This guide will walk you through everything you need to know to get Python up and running on your macOS machine, catering to a broad audience interested in technology, from the fundamental installations to understanding its place in your broader tech ecosystem.
The modern digital landscape is characterized by rapid innovation and a constant influx of new tools and technologies. Python, with its clear syntax, extensive libraries, and a massive, supportive community, sits at the heart of many of these advancements. From web development frameworks like Django and Flask to machine learning libraries such as TensorFlow and PyTorch, Python empowers creators and problem-solvers across various domains. This article is designed to demystify the installation process, making it accessible even if you’re new to command-line interfaces or software development. We’ll cover the most common and recommended methods, ensuring you have a solid foundation for your Python journey.
Understanding Python on macOS: Pre-installed vs. Separate Installation
Before we dive into the installation steps, it’s crucial to understand the context of Python on macOS. Historically, macOS has shipped with a version of Python pre-installed. This was often Python 2.x, a version that has since reached its end-of-life and is no longer supported. While newer versions of macOS might include a Python 3 stub, relying on the system’s pre-installed Python is generally not recommended for active development.
Why You Should Install Your Own Python Version
There are several compelling reasons why installing your own, separate version of Python is the preferred approach for most users:
- Access to Latest Features and Security Updates: Python 2 is outdated and lacks the features and security patches found in Python 3. Installing Python 3 ensures you’re working with the most current, secure, and feature-rich version of the language.
- Version Control for Projects: Different projects may require different Python versions or specific library dependencies. Installing Python yourself allows you to manage these versions effectively using tools like
pyenvor virtual environments, preventing conflicts and ensuring project stability. - Greater Control and Flexibility: When you install Python yourself, you have complete control over its location, how it’s managed, and which packages you install. This is essential for serious development and experimentation.
- Avoiding System Interference: Modifying or updating the system’s pre-installed Python could potentially disrupt the functioning of macOS itself, as some internal tools might rely on it. Installing separately keeps your development environment isolated from the system’s core.
- Enabling Modern Development Practices: Modern Python development heavily relies on tools and libraries that are optimized for and often only available with Python 3.
In essence, while you might see a python command in your Terminal, it’s often pointing to an older, unsupported version. For any serious development, learning, or experimentation with Python, installing a fresh, modern version is the way to go.
Method 1: Installing Python via Homebrew – The Developer’s Choice
For Mac users, Homebrew is the de facto package manager for open-source software. It simplifies the installation and management of a vast array of tools, and Python is no exception. Installing Python with Homebrew is widely considered the most convenient and recommended method for developers and tech enthusiasts.
Step 1: Installing Homebrew (If You Haven’t Already)
If you don’t have Homebrew installed, you’ll need to do that first. Open your Terminal application (you can find it in Applications > Utilities or by searching with Spotlight). Then, paste the following command and press Enter:
/bin/bash -c "$(curl -fsSL https://raw.githubusercontent.com/Homebrew/install/HEAD/install.sh)"
Follow the on-screen instructions. Homebrew will download and install itself, and you might be prompted to install Xcode Command Line Tools if they are not already present, which is a common requirement for many development tools. Once Homebrew is installed, it’s good practice to run:
brew doctor
This command checks your Homebrew installation for any potential issues and provides guidance on how to resolve them.
Step 2: Updating Homebrew and Installing Python 3
With Homebrew set up, updating it to ensure you have the latest package information is a good first step:
brew update
Now, you can install the latest stable version of Python 3 with a single command:
brew install python
Homebrew will download the Python 3 package, along with its essential dependencies, and install it in a managed location on your system (typically /usr/local/opt/python@3.x or a similar path within Homebrew’s prefix). Homebrew also takes care of linking the python3 executable to your system’s PATH, making it easily accessible from your Terminal.
Step 3: Verifying Your Python Installation
After the installation completes, you can verify that Python 3 is installed correctly and is accessible from your Terminal. Close and reopen your Terminal window (or run source ~/.zshrc or source ~/.bash_profile depending on your shell to refresh your PATH). Then, run:
python3 --version
This command should output the version of Python 3 that Homebrew installed, for example: Python 3.11.4.
You can also start an interactive Python 3 session by typing:
python3
You’ll see the Python interpreter prompt (>>>), where you can type and execute Python code. To exit the interpreter, type exit() and press Enter.
The Advantages of Using Homebrew for Python
- Simplicity: Homebrew automates the download, compilation (if necessary), and installation process.
- Dependency Management: It handles dependencies, ensuring that all required libraries for Python to function are also installed.
- Easy Updates: Keeping Python updated is as simple as running
brew upgrade python. - Multiple Versions: While
brew install pythontypically installs the latest stable, Homebrew also allows you to install specific older versions (e.g.,brew install python@3.9) and manage them.
Method 2: Using the Official Python Installer – A Direct Approach
While Homebrew is highly recommended for its ease of use and integration, you can also download and install Python directly from the official Python website. This method is straightforward and gives you a clean installation, though it doesn’t offer the same package management benefits as Homebrew.
Step 1: Downloading the Installer
Navigate to the official Python downloads page for macOS: https://www.python.org/downloads/macos/.
You’ll see a list of available Python releases. It’s generally recommended to download the latest stable release of Python 3. Look for the “Latest Python 3 Release” and click on the “macOS 64-bit universal2 installer” link for the latest version. This will download a .pkg file to your computer.
Step 2: Running the Installer
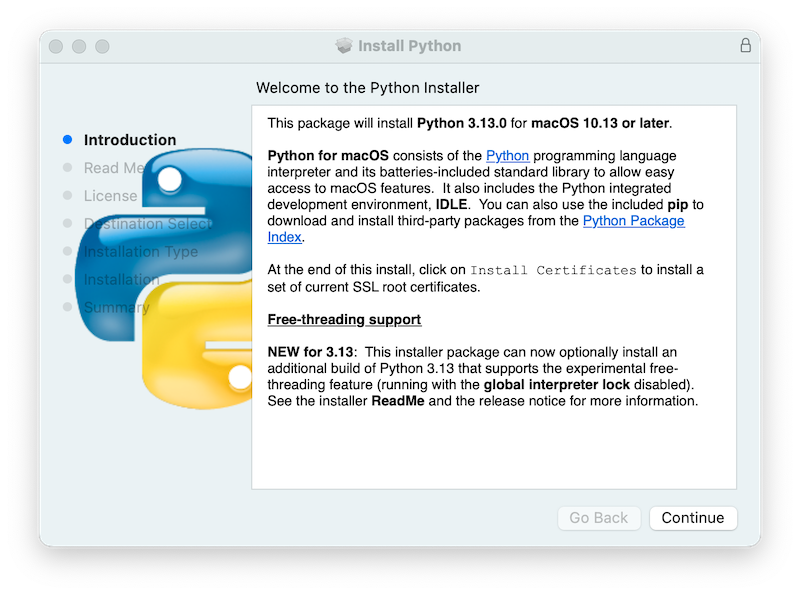
Locate the downloaded .pkg file (usually in your Downloads folder) and double-click it to launch the installer.
The Python installer will guide you through a standard macOS installation process. You’ll need to agree to the license agreement and choose an installation location. The default location is usually fine for most users. The installer will place the Python executables and libraries in a location that is automatically added to your system’s PATH.
Step 3: Verifying Your Python Installation
After the installation is complete, close and reopen your Terminal. As with the Homebrew installation, it’s crucial to refresh your shell’s environment. Then, verify the installation by running:
python3 --version
This should display the version of Python you just installed. You can also launch the interactive interpreter:
python3
Considerations for the Official Installer
- Manual Updates: When you use the official installer, you’ll need to manually download and run new installer packages for future Python updates.
- No Central Management: It doesn’t integrate with a package manager like Homebrew, so managing multiple Python versions or uninstalling can be less streamlined.
- Clean Installation: This method provides a pure, unadulterated Python installation directly from the source.
Managing Python Versions and Environments: Essential for Serious Development
Once you have Python installed, you’ll quickly realize the importance of managing different Python versions and isolating project dependencies. This is where tools like pyenv and virtual environments become invaluable. They are not just for experienced developers; they are fundamental for any serious engagement with Python.
Introducing pyenv: Effortless Python Version Management
pyenv is a brilliant tool that allows you to easily switch between multiple Python versions on a single machine. It works by intercepting Python commands and directing them to the version you’ve currently selected. This is especially useful if you work on projects that require different Python versions.
Installing pyenv
The easiest way to install pyenv is again via Homebrew:
brew install pyenv
After installation, you’ll need to configure your shell to use pyenv. The installation instructions will usually provide the necessary lines to add to your shell configuration file (e.g., ~/.zshrc for Zsh or ~/.bash_profile for Bash). It typically looks like this:
# Add these lines to your ~/.zshrc or ~/.bash_profile
export PYENV_ROOT="$HOME/.pyenv"
[[ -d $PYENV_ROOT/bin ]] && export PATH="$PYENV_ROOT/bin:$PATH"
eval "$(pyenv init -)"
Remember to restart your Terminal or source your configuration file after making these changes.
Using pyenv
-
Install a Python version:
pyenv install 3.11.4 # Replace with your desired versionThis command downloads and compiles the specified Python version. It might take some time.
-
Set a global Python version:
pyenv global 3.11.4This sets the default Python version for your entire system.
-
Set a local Python version for a project:
Navigate to your project directory and run:cd my_project_directory pyenv local 3.10.9This creates a
.python-versionfile in your project directory, tellingpyenvto use Python 3.10.9 whenever you’re in this directory. -
Check current version:
bash

python --version
This will now reflect the version set bypyenv.
Understanding Virtual Environments: Isolating Project Dependencies
Even with a specific Python version installed, managing the libraries (packages) for different projects can be a headache. You might need requests version 2.25 for one project and version 2.28 for another. Virtual environments solve this by creating isolated Python installations for each project.
Python 3 comes with a built-in module called venv for creating virtual environments.
Creating a Virtual Environment
-
Navigate to your project directory:
cd my_project_directory -
Create the virtual environment:
bash

python3 -m venv venv
This command creates a directory namedvenv(you can choose any name, butvenvis conventional) within your project folder. This directory contains a copy of the Python interpreter and a place to install packages specific to this environment.
Activating and Deactivating a Virtual Environment
-
Activate:
source venv/bin/activateYour Terminal prompt will change to indicate that you are inside the virtual environment, usually by prepending
(venv)to the prompt. -
Deactivate:
Once you’re done working in the environment, you can deactivate it:
bash

deactivate
Benefits of Virtual Environments
- Dependency Isolation: Packages installed within a virtual environment do not affect your global Python installation or other projects.
- Reproducibility: You can easily share a
requirements.txtfile (generated usingpip freeze > requirements.txt) with others, allowing them to recreate your project’s exact environment. - Cleanliness: Keeps your global Python installation clean and organized.
Conclusion: Embarking on Your Python Journey
Installing Python on your Mac is the gateway to a world of exciting possibilities in technology. Whether you’re interested in data science, web development, automation, AI, or simply enhancing your digital productivity, Python is a skill that pays dividends.
We’ve explored the recommended methods for installation, emphasizing the ease and benefits of using Homebrew. We’ve also highlighted the critical importance of managing Python versions with tools like pyenv and isolating project dependencies with virtual environments. These practices are not just good habits; they are foundational for efficient, stable, and scalable Python development.
As you install Python and begin experimenting, remember that the Python community is vast and incredibly supportive. Online forums, documentation, and countless tutorials are available to help you at every step. So, dive in, explore, and start building. The journey of a thousand lines of code begins with a single installation. Happy coding!
aViewFromTheCave is a participant in the Amazon Services LLC Associates Program, an affiliate advertising program designed to provide a means for sites to earn advertising fees by advertising and linking to Amazon.com. Amazon, the Amazon logo, AmazonSupply, and the AmazonSupply logo are trademarks of Amazon.com, Inc. or its affiliates. As an Amazon Associate we earn affiliate commissions from qualifying purchases.