
In the ever-evolving landscape of technology, particularly within the realm of home entertainment and media management, setting up a robust and accessible media server is a common aspiration for many enthusiasts. Plex, a leading media server software, allows users to organize their personal media libraries (movies, TV shows, music, photos) and stream them across a vast array of devices, from smart TVs and smartphones to gaming consoles and web browsers. For those who leverage Proxmox Virtual Environment for their home lab or virtualization needs, installing Plex Media Server within an Ubuntu Virtual Machine (VM) offers a flexible, isolated, and highly configurable solution.
This comprehensive guide will walk you through the process of installing and configuring Plex Media Server on an Ubuntu VM hosted within Proxmox. We will delve into the prerequisites, the step-by-step installation process, essential post-installation configurations, and best practices to ensure a smooth and enjoyable media streaming experience. Whether you’re a seasoned Proxmox user or new to virtualizing your services, this tutorial aims to provide clear, actionable steps to bring your personal media server to life.
Setting the Stage: Prerequisites for a Proxmox Ubuntu Plex VM
Before embarking on the installation journey, it’s crucial to ensure you have the necessary components and knowledge in place. This foundational step will prevent potential roadblocks and streamline the entire process.
Proxmox VE Environment
At the core of this setup is a functioning Proxmox Virtual Environment. This means you should have Proxmox VE installed and accessible on your server hardware. Proxmox offers a powerful yet user-friendly web interface for managing your virtual machines and containers. Ensure your Proxmox host has sufficient resources (CPU, RAM, and storage) to accommodate the Ubuntu VM and the Plex Media Server, especially if you plan to transcode media on the fly.
Ubuntu Server VM
You’ll need a dedicated Ubuntu Server VM within your Proxmox environment. The specific version of Ubuntu Server is less critical, but it’s always recommended to use a recent, Long-Term Support (LTS) release for stability and continued updates. During VM creation, allocate adequate resources:
- CPU: A minimum of 2 cores is recommended. More cores will be beneficial for transcoding.
- RAM: Allocate at least 4GB of RAM. Plex can be memory-intensive, especially with large libraries or multiple concurrent streams.
- Storage: This is a critical consideration.
- Operating System Disk: A standard virtual disk for Ubuntu Server (e.g., 20-30GB) is usually sufficient.
- Media Storage: This is where your actual media files will reside. You have several options here:
- Dedicated VM Disk: Create a separate, larger virtual disk specifically for your Plex media. This offers good isolation.
- Bind Mount from Host Storage: A more advanced and often preferred method for Proxmox users. You can dedicate a physical drive or a large partition on your Proxmox host to store your media and then “bind mount” this storage into the Ubuntu VM. This bypasses the overhead of virtual disks for media and allows for easier management of large media libraries. We will cover how to configure this later.
- Network Attached Storage (NAS): If you have a NAS, you can mount its shares (e.g., via NFS or SMB/CIFS) within your Ubuntu VM.
Network Configuration for the VM:
- Static IP Address: It is highly recommended to assign a static IP address to your Ubuntu VM. This ensures that Plex remains consistently accessible on your local network without needing to update client configurations if the VM’s IP changes. You can configure this within Proxmox during VM creation or after the OS installation via Ubuntu’s network configuration tools.
- Internet Access: The VM will need internet access to download Plex Media Server and its updates, as well as to handle metadata lookups and remote access features.
SSH Access
You’ll need a way to connect to your Ubuntu VM remotely to perform the installation and configuration. SSH (Secure Shell) is the standard and secure method for this. Ensure you have an SSH client installed on your local machine (e.g., PuTTY on Windows, or the built-in ssh command on macOS and Linux).
Basic Linux Command-Line Familiarity
While this guide will provide specific commands, a basic understanding of navigating the Linux command line, using text editors (like nano or vim), and executing commands with sudo will be beneficial.
Step-by-Step Installation of Plex Media Server on Ubuntu VM
With the prerequisites in place, let’s dive into the actual installation of Plex Media Server on your Ubuntu VM.
1. Updating Your Ubuntu VM
The first and most crucial step after installing Ubuntu Server is to update its package lists and upgrade any installed packages to their latest versions. This ensures you’re working with a secure and up-to-date system.
Log in to your Ubuntu VM via SSH and run the following commands:
sudo apt update
sudo apt upgrade -y
The -y flag automatically confirms any prompts during the upgrade process.
2. Adding the Plex Media Server Repository
Plex Media Server is not typically available in the default Ubuntu repositories. Therefore, you need to add the official Plex repository to your system. This allows apt to find and install Plex and receive future updates.
First, install the apt-transport-https package, which is necessary for apt to work with repositories over HTTPS:
sudo apt install apt-transport-https curl -y
Next, import the Plex GPG key to verify the authenticity of the packages:
curl https://downloads.plex.tv/plex-keys/PlexSign.key | sudo apt-key add -
Now, add the Plex repository to your sources list:
echo deb https://downloads.plex.tv/repo/deb public main | sudo tee /etc/apt/sources.list.d/plexmediaserver.list
After adding the repository, update your apt package lists again to include the Plex repository:
sudo apt update
3. Installing Plex Media Server
With the repository added and package lists refreshed, you can now install Plex Media Server:
sudo apt install plexmediaserver -y
This command will download and install the latest stable version of Plex Media Server along with any necessary dependencies.
4. Verifying the Plex Service Status
Once the installation is complete, Plex Media Server should automatically start as a system service. You can verify its status using systemctl:
sudo systemctl status plexmediaserver
You should see output indicating that the service is active (running). If it’s not running, you can start it with sudo systemctl start plexmediaserver and enable it to start on boot with sudo systemctl enable plexmediaserver.
Post-Installation Configuration: Making Your Plex Server Accessible
After the successful installation of Plex Media Server, there are essential configuration steps to make it functional and accessible to your media clients.
1. Accessing the Plex Web Interface
The primary way to manage your Plex Media Server is through its web interface. You’ll access this using your VM’s IP address followed by the Plex port, which is 32400.
Open your web browser on a computer connected to the same network as your Proxmox host and VM, and navigate to:
http://YOUR_VM_IP_ADDRESS:32400/web
Replace YOUR_VM_IP_ADDRESS with the static IP address you assigned to your Ubuntu VM.
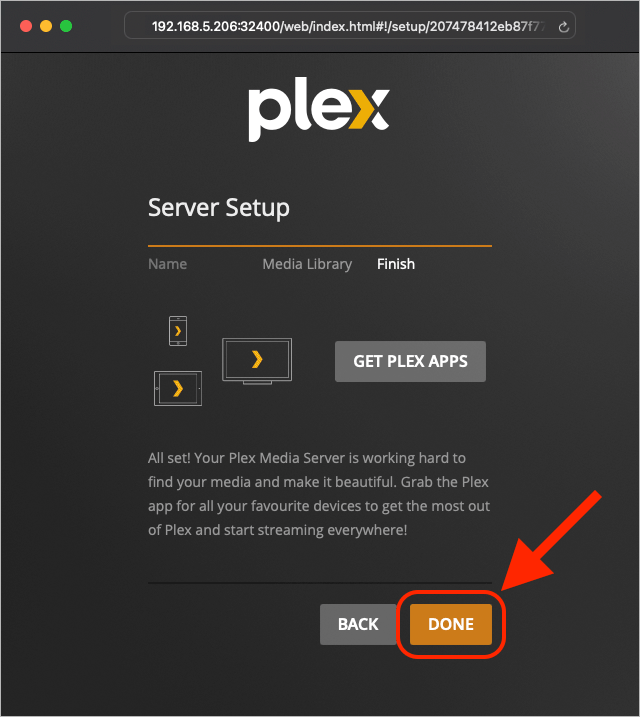
When you first access the web interface, you will be prompted to sign in or create a Plex account. This account is free and essential for managing your server and accessing it remotely. After signing in, you will be presented with the Plex setup wizard.
2. Initial Plex Setup Wizard
The setup wizard will guide you through the initial configuration:
- Server Name: Give your Plex Media Server a descriptive name (e.g., “My Home Plex Server”).
- Library Setup: This is where you’ll tell Plex where to find your media.
- Click “Add Library”.
- Choose the type of media (Movies, TV Shows, Music, Photos, etc.).
- Click “Browse for Media Folder”. This is where you’ll specify the path to your media files.
3. Configuring Media Storage (Crucial Step)
This is arguably the most critical part of the post-installation configuration, especially when using Proxmox.
Option A: Using Bind Mounts for Host Storage
This method involves dedicating storage on your Proxmox host for media and then making it accessible within the Ubuntu VM. This is highly recommended for performance and ease of management.
On the Proxmox Host:
- Prepare Host Storage: Ensure your media files are on a drive or partition accessible by the Proxmox host. Let’s assume your media is located at
/mnt/media/moviesand/mnt/media/tvshowson the Proxmox host. - Create Mount Points in VM: You need to create corresponding directories within your Ubuntu VM that will serve as the mount points for your host’s media directories.
Inside the Ubuntu VM:
- Create Mount Directories:
bash

sudo mkdir -p /mnt/media/movies

sudo mkdir -p /mnt/media/tvshows
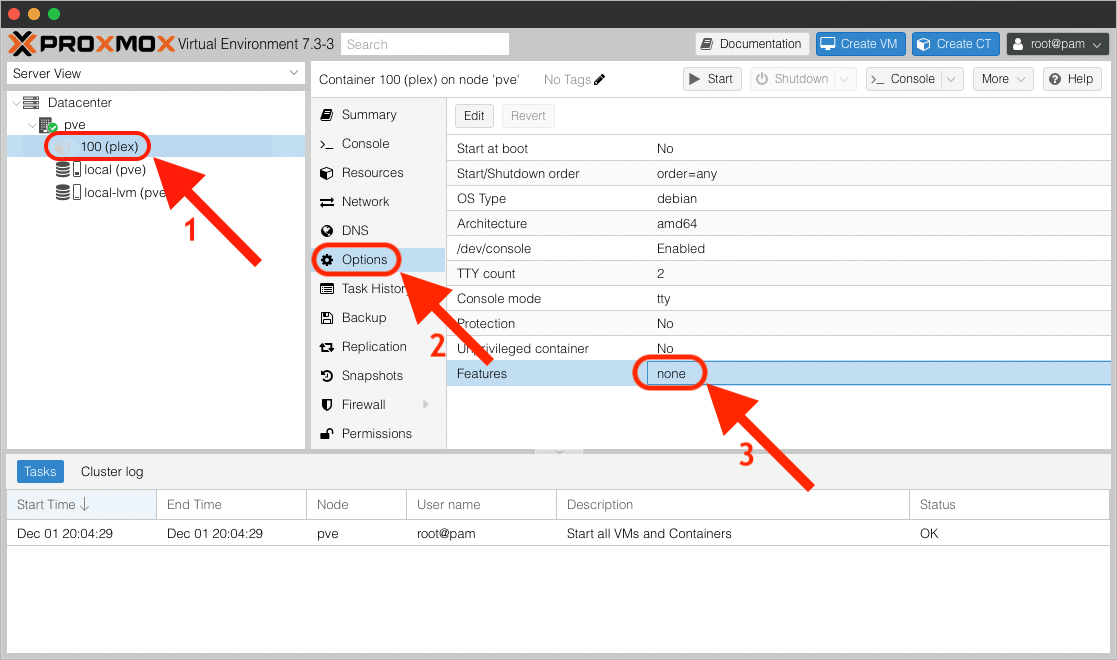
- Configure Bind Mount: You can achieve this using Proxmox’s “Bind Mount” feature.
- Shut down your Ubuntu VM in Proxmox.
- Navigate to your VM’s hardware settings in the Proxmox web interface.
- Click “Add” -> “Bind Mount”.
- For each media directory:
- VM Path: Enter the path you created in the VM (e.g.,
/mnt/media/movies). - Host Path: Enter the corresponding path on your Proxmox host (e.g.,
/mnt/media/movies).
- VM Path: Enter the path you created in the VM (e.g.,
- Start your Ubuntu VM.
Now, when you browse for media folders in the Plex setup wizard (or later in settings), you’ll select the paths within your VM (e.g., /mnt/media/movies). Plex will then be reading directly from the host’s storage.
Permissions: Ensure that the plex user (the user Plex Media Server runs as) has read and execute permissions on these mounted directories. You might need to adjust permissions on the Proxmox host’s storage or within the VM after the bind mount is active. A common approach is to ensure the directories on the host are world-readable or owned by a user/group that the plex user can access.
Option B: Using a Dedicated VM Disk for Media
If you opted to create a separate virtual disk for media during VM creation:
- Format and Mount the Disk: You’ll need to format this new disk (e.g., with
ext4) and mount it to a specific location within your Ubuntu VM.- Identify the new disk (e.g.,
/dev/sdb). - Format it:
sudo mkfs.ext4 /dev/sdb(use caution, this will erase data). - Create a mount point:
sudo mkdir -p /mnt/plexmedia - Mount it:
sudo mount /dev/sdb /mnt/plexmedia - Make it persistent across reboots by adding an entry to
/etc/fstab. Get the UUID of the disk:sudo blkidand then add a line like:
UUID="YOUR_DISK_UUID" /mnt/plexmedia ext4 defaults 0 2
- Identify the new disk (e.g.,
- Add Media to the Disk: Transfer your media files to
/mnt/plexmediaor its subdirectories. - Plex Library Setup: In the Plex web interface, browse to
/mnt/plexmedia(or its subdirectories) when adding your media libraries.
Option C: Mounting NAS Shares
If you are mounting NAS shares (e.g., via NFS or SMB):
- Install Client Packages:
- For NFS:
sudo apt install nfs-common -y - For SMB:
sudo apt install cifs-utils -y
- For NFS:
- Create Mount Points:
bash

sudo mkdir -p /mnt/nas/movies

sudo mkdir -p /mnt/nas/tvshows
- Mount the Shares:
- NFS Example:
sudo mount -t nfs YOUR_NAS_IP:/path/to/nfs/share /mnt/nas/movies - SMB Example:
sudo mount -t cifs //YOUR_NAS_IP/ShareName /mnt/nas/movies -o username=YOUR_NAS_USER,password=YOUR_NAS_PASSWORD
- NFS Example:
- Make Persistent: Add entries to
/etc/fstabfor automatic mounting on boot. - Plex Library Setup: In Plex, browse to
/mnt/nas/movies(or similar) when adding libraries.
2. Configuring Remote Access
For seamless streaming outside your home network, you’ll need to configure Plex’s Remote Access.
- Plex Web Interface: Go to Settings (wrench icon) -> Remote Access.
- Enable Remote Access: Ensure the checkbox is ticked. Plex will attempt to automatically configure your router using UPnP.
- Manual Port Forwarding (If Automatic Fails): If automatic configuration fails, you’ll need to manually forward port
32400(TCP) on your router to the static IP address of your Ubuntu VM. Consult your router’s manual for specific instructions. - Public IP Address: Plex needs to know your public IP address. If you have a dynamic IP, consider using a Dynamic DNS (DDNS) service.
3. Optimizing Library Scanning
- Scan Interval: In Plex settings, under “Library,” you can configure how often Plex scans for new media. For large libraries, a manual scan might be preferred, or setting a longer interval to reduce server load.
- Background Transcoding: If you anticipate frequent transcoding (converting media on-the-fly for compatibility or bandwidth), ensure your VM has sufficient CPU power. You can adjust transcoding quality settings in Plex’s Transcoder settings.
Advanced Considerations and Best Practices
Beyond the basic installation and configuration, several advanced considerations can enhance your Plex server experience.
1. Media Organization
Proper naming and organization of your media files are paramount for Plex to correctly identify and match your content with metadata (posters, descriptions, cast information).
- Movies:
Movie Title (Year).ext(e.g.,The Matrix (1999).mkv) - TV Shows:
Show Name/Season XX/Show Name - sXXeYY - Episode Title.ext(e.g.,Game of Thrones/Season 01/Game of Thrones - s01e01 - Winter Is Coming.mkv)
Plex’s documentation provides detailed guidelines for naming conventions.
2. Containerization with Docker (Alternative Approach)
While installing Plex directly on an Ubuntu VM is effective, some users prefer to run Plex within a Docker container. This offers even greater isolation and easier management of dependencies. You could install Docker on your Ubuntu VM and then run Plex as a Docker container, mapping your media volumes appropriately. This is an advanced topic but worth considering for future setups.
3. Backups
It’s essential to back up your Plex configuration and potentially your media library. Your Plex configuration includes library settings, watch history, and user data. You can find Plex’s data directory on Linux at /var/lib/plexmediaserver/Library/Application Support/Plex Media Server/. Regularly backing up this directory will allow you to restore your Plex setup if something goes wrong.
4. Monitoring and Maintenance
Regularly check the Plex Media Server logs for any errors. Ensure your Ubuntu VM and Plex Media Server are kept up-to-date with the latest security patches and software versions. Monitor your Proxmox host’s resource utilization to ensure the Plex VM isn’t impacting other services.
Conclusion
Installing Plex Media Server on a Proxmox Ubuntu VM provides a powerful, flexible, and centralized solution for managing and streaming your personal media. By following the steps outlined in this guide, you can successfully set up your media server, configure it for optimal performance, and begin enjoying your content across all your devices. Remember to pay close attention to media storage configuration, network settings, and the initial setup wizard. With a little effort, your Proxmox-powered Plex server will become the heart of your home entertainment system, offering a personalized and high-quality media experience.
aViewFromTheCave is a participant in the Amazon Services LLC Associates Program, an affiliate advertising program designed to provide a means for sites to earn advertising fees by advertising and linking to Amazon.com. Amazon, the Amazon logo, AmazonSupply, and the AmazonSupply logo are trademarks of Amazon.com, Inc. or its affiliates. As an Amazon Associate we earn affiliate commissions from qualifying purchases.