Installing macOS, whether you’re setting up a new drive, refreshing an old system, or troubleshooting persistent issues, is a fundamental skill for any Mac user. While the process can seem daunting at first, breaking it down into manageable steps makes it straightforward and empowers you to take full control of your Apple hardware. This comprehensive guide will walk you through every stage, from crucial preparations to the final touches, ensuring a smooth and successful macOS installation. By doing it yourself, you not only save potential service costs but also gain a deeper understanding of your device, optimizing it for peak performance, digital security, and ultimately, enhanced productivity in today’s tech-driven world.

1. Preparing for a Seamless macOS Installation
Before you dive into the installation process, thorough preparation is paramount. Skipping these initial steps can lead to data loss, compatibility issues, or a frustratingly incomplete setup. Think of this stage as laying a solid foundation – it ensures stability and success for everything that follows.
Understanding Your Installation Needs: Fresh Start vs. Upgrade
The first decision you need to make is whether you’re performing a “clean install” (also known as a fresh install) or simply upgrading your existing macOS version.
- Clean Install: This involves erasing your Mac’s primary drive completely and installing a fresh copy of macOS. This is often recommended for resolving persistent performance issues, removing stubborn malware, or when preparing a Mac for sale or transfer. A clean install provides the purest form of macOS, free from accumulated junk files, old app data, and potential system conflicts. It’s like buying a brand new computer, offering optimal performance and system responsiveness. This is the primary focus of this guide.
- Upgrade: An upgrade installs a newer version of macOS over your existing one, preserving your apps, settings, and user data. This is simpler and quicker, typically done through the Mac App Store or System Settings. While convenient, it doesn’t offer the same performance refresh as a clean install and might carry over existing system quirks.
For the purpose of this guide, we will focus on the clean install method, which is more involved but offers superior benefits in terms of system health and performance.
Essential Pre-Installation Checklist: Safeguarding Your Data and Device
Once you’ve decided on a clean install, it’s time to gather your tools and ensure everything is in order. This checklist is non-negotiable for a hassle-free experience.
a. Comprehensive Data Backup: Your Digital Lifeline
This is arguably the single most critical step. A clean install will erase everything on your target drive. Do not proceed without a complete and verified backup of all important files, documents, photos, videos, applications, and settings.
- Time Machine: Apple’s built-in backup solution is the simplest and most robust option. Connect an external hard drive (at least as large as your Mac’s internal drive) and enable Time Machine in System Settings/System Preferences. Let it complete a full backup. This allows you to restore your entire system or specific files after the new macOS is installed.
- Cloud Services: For specific files, cloud services like iCloud Drive, Google Drive, or Dropbox can supplement your Time Machine backup.
- Manual Copy: Dragging and dropping critical folders to an external drive is a rudimentary but effective way to save individual files, especially if you’re only interested in specific data.
Why this matters (Tech & Money): Data loss can be catastrophic, impacting productivity, personal memories, and even professional standing. Investing time in a solid backup strategy is a wise decision that protects your digital assets and avoids costly data recovery services or the irreplaceable loss of information.
b. System Compatibility Check
Not all Macs can run the latest macOS versions. Before you commit, verify that your specific Mac model is compatible with the macOS version you intend to install.
- Apple’s Official Documentation: A quick search on Apple’s support website for “macOS [version name] compatibility” will provide a definitive list of supported models.
- Identify Your Mac: Go to Apple Menu > About This Mac to find your Mac’s model year.
Why this matters (Tech): Attempting to install an incompatible macOS version will either fail or lead to an unstable, unoptimised system.
c. Stable Internet Connection & Ample Power
- Internet: A reliable internet connection is crucial for downloading the macOS installer and for the installation process itself, as some components might need to be fetched online. Wi-Fi is generally fine, but an Ethernet connection offers greater stability.
- Power: Ensure your Mac is connected to a power source throughout the entire process. A power interruption during installation can corrupt your drive and lead to significant headaches.
d. A Reliable USB Drive (Minimum 16GB)
To perform a clean install, you’ll need to create a “bootable installer.” This requires a USB flash drive (or other external drive) with at least 16GB of free space. It will be erased during the process, so ensure it contains no important data. USB 3.0 or higher is recommended for faster creation and booting.
e. Your Apple ID Credentials
You’ll need your Apple ID and password during the initial setup of your new macOS installation to sign into iCloud, App Store, and other Apple services. Make sure you remember them, along with any two-factor authentication details.
2. Creating Your macOS Bootable Installer
With all preparations complete, the next major step is to create a bootable USB installer. This allows your Mac to boot directly from the USB drive and install macOS onto your internal drive. This method bypasses the recovery partition and is essential for clean installs.
Downloading the macOS Installer Application
First, you need to download the full macOS installer application from the Apple App Store.
- Open the App Store: Launch the App Store on your current Mac.
- Search for macOS: Search for the desired macOS version (e.g., “macOS Ventura,” “macOS Monterey,” “macOS Sonoma”).
- Download: Click the “Get” or “Download” button. The installer is several gigabytes, so this may take some time depending on your internet speed.
- Do Not Install: Once the download is complete, the installer application will typically open automatically. Do not proceed with the installation yet. Quit the installer application (Command-Q) and ensure it remains in your Applications folder. Its file name will be something like “Install macOS Ventura.app”.
The Terminal Method: Crafting Your Bootable USB Drive
Creating the bootable installer is done through the Terminal application, which uses a specific command to transfer the downloaded installer to your USB drive.
-
Connect Your USB Drive: Insert your 16GB (or larger) USB flash drive into your Mac.
-
Rename Your USB Drive: For simplicity and to avoid errors with the Terminal command, rename your USB drive to something simple like “MyVolume” (no spaces) or “Untitled”. You can do this by clicking on the drive icon on your desktop or in Finder and pressing Return.
-
Open Terminal: Go to Applications > Utilities > Terminal.
-
Locating the
createinstallmediaCommand: The command to create the installer iscreateinstallmedia. It’s located within the macOS installer application itself. The exact command varies slightly depending on the macOS version. Here are common examples:- For macOS Sonoma:
sudo /Applications/Install macOS Sonoma.app/Contents/Resources/createinstallmedia --volume /Volumes/MyVolume - For macOS Ventura:
sudo /Applications/Install macOS Ventura.app/Contents/Resources/createinstallmedia --volume /Volumes/MyVolume - For macOS Monterey:
sudo /Applications/Install macOS Monterey.app/Contents/Resources/createinstallmedia --volume /Volumes/MyVolume - For macOS Big Sur:
sudo /Applications/Install macOS Big Sur.app/Contents/Resources/createinstallmedia --volume /Volumes/MyVolume - For macOS Catalina:
sudo /Applications/Install macOS Catalina.app/Contents/Resources/createinstallmedia --volume /Volumes/MyVolume - (Replace
MyVolumewith the actual name of your USB drive if you chose a different one.)
- For macOS Sonoma:
-
Executing the Command:
- Copy and paste the appropriate command into the Terminal window.
- Press Return.
- The Terminal will ask for your administrator password. Type it in (you won’t see characters appear, which is normal) and press Return.
- Terminal will then ask if you want to erase the volume. Type
y(for yes) and press Return. - The process will begin, first erasing the disk, then copying the installer files. This can take anywhere from 15 to 45 minutes, or even longer depending on the speed of your USB drive and Mac. You’ll see progress updates in the Terminal window.
- When it’s finished, you’ll see “Install media now available” and the Terminal will return to a new prompt.
-
Verification and Safely Ejecting:
- Once the Terminal command completes, your USB drive will be renamed to “Install macOS [Version Name]”.
- You can now quit Terminal.
- Safely eject the USB drive from your Mac.
Why this matters (Tech & Digital Security): Creating a bootable installer ensures you have a clean, authenticated source for your macOS installation. It circumvents potential issues with network recovery and provides a reliable offline method for system restoration, which can be critical for maintaining digital security even in compromised environments.
3. The Core Installation Process
With your bootable installer ready, it’s time for the main event: installing macOS onto your Mac’s internal drive. This section guides you through booting from the USB, preparing your disk, and initiating the installation.
Booting from the Installer Drive
This is the step where your Mac recognizes the USB drive as the source for the operating system.
- Connect the USB Drive: Plug your newly created bootable macOS installer USB drive into your Mac.
- Restart Your Mac: Go to the Apple menu and select “Restart…”.
- Hold Option Key: Immediately after your Mac restarts and you hear the startup chime (or see the screen light up on newer Macs), press and hold down the Option (⌥) key. Keep holding it until you see the Startup Manager screen.
- Select the Bootable Volume: On the Startup Manager screen, you will see icons for your internal hard drive and the bootable USB installer (often named “Install macOS [Version Name]”). Use your mouse or trackpad to select the USB drive, then click the arrow or press Return.
- Mac Boots from USB: Your Mac will now boot from the USB drive, which might take a few minutes. Eventually, you will be presented with the macOS Utilities window.
Disk Utility: Preparing Your Mac’s Storage
Before installing macOS, you usually need to erase and format the target drive, especially for a clean install. This is done using Disk Utility.
- Open Disk Utility: In the macOS Utilities window, select “Disk Utility” and click “Continue.”
- Show All Devices: In Disk Utility, go to the “View” menu (top left) and select “Show All Devices.” This is crucial as it allows you to see the physical drive, not just its volumes.
- Select the Physical Drive: In the sidebar, select the top-level entry for your Mac’s internal drive (e.g., “APPLE SSD SM0256F Media” or similar). Be extremely careful here to select the correct drive, as erasing the wrong one will lead to irreversible data loss.
- Erase the Drive:
- Click the “Erase” button in the Disk Utility toolbar.
- A dialog box will appear. Fill in the following details:
- Name: Give your drive a name (e.g., “Macintosh HD”).
- Format: Choose APFS for macOS High Sierra and newer, or Mac OS Extended (Journaled) for macOS Sierra and older.
- Scheme: Choose GUID Partition Map.
- Click “Erase” again to confirm. This process will completely wipe the selected drive.
- Once erasing is complete, click “Done.”
- Quit Disk Utility: Close the Disk Utility window to return to the macOS Utilities.
Why this matters (Tech & Productivity): Properly formatting your drive ensures that macOS is installed on an optimized file system, maximizing performance and compatibility. An unformatted or incorrectly formatted drive can lead to installation failures or sluggish system performance.
Initiating the macOS Installation
With your drive prepared, you can now start the actual macOS installation.
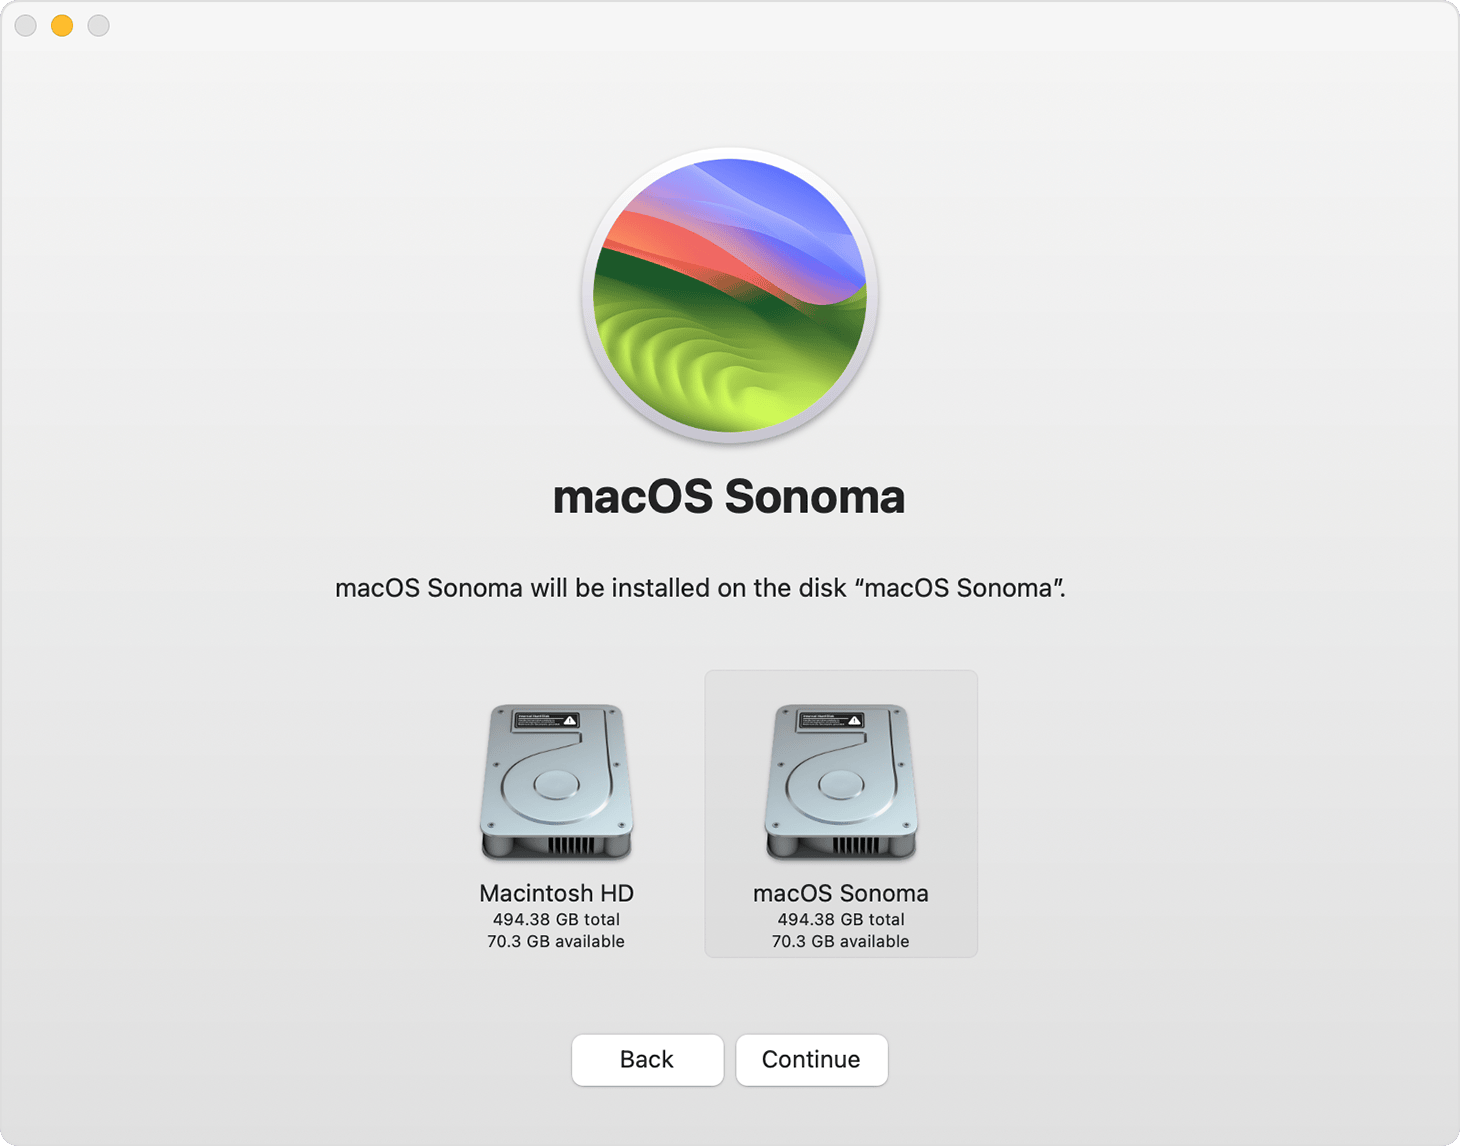
- Select “Install macOS”: Back in the macOS Utilities window, choose “Install macOS [Version Name]” and click “Continue.”
- Follow On-Screen Prompts:
- Click “Continue” on the “Install macOS” welcome screen.
- Agree to the software license agreement.
- Select the destination drive. This should be the drive you just erased and named (e.g., “Macintosh HD”).
- Click “Continue.”
- Installation Begins: The installation process will now begin. This is a lengthy step, often taking 30 minutes to over an hour, depending on your Mac’s speed and the macOS version. Your Mac may restart multiple times during this phase. Do not close the lid, unplug the power, or force a shutdown.
4. Post-Installation and Optimization
Congratulations! Your Mac now has a fresh installation of macOS. The final steps involve personalizing your system and ensuring it’s optimized for your use.
Initial Setup: Personalizing Your New macOS Experience
After the installation completes and your Mac reboots, you’ll be greeted by the macOS Setup Assistant. This guides you through the essential initial configurations.
- Region and Keyboard: Select your country/region and preferred keyboard layout.
- Wi-Fi Network: Connect to your Wi-Fi network (if not already connected).
- Data & Privacy: Review Apple’s Data & Privacy information.
- Migration Assistant (Optional but Recommended): This is where your Time Machine backup comes in handy. If you performed a Time Machine backup, you can use Migration Assistant to transfer your user accounts, applications, and files from your backup to your new macOS installation. This saves significant time compared to reinstalling everything manually. If you want a truly “fresh” start, you can skip this and manually install apps later.
- Apple ID and iCloud Setup: Sign in with your Apple ID. This will enable iCloud services, App Store access, and other Apple ecosystem features. You may be prompted for two-factor authentication.
- Terms and Conditions: Agree to Apple’s Terms and Conditions.
- Create a Computer Account: Set up your primary user account with a full name, account name, and a strong password. Remember this password, as it’s vital for system changes.
- Location Services, Analytics, Screen Time: Configure these privacy and usage settings to your preference.
- Siri and Touch ID/Face ID: Set up Siri and your biometric authentication if your Mac supports it.
- Choose Your Look: Select your preferred light or dark appearance for macOS.
After these steps, your Mac will present you with the macOS desktop, signifying the completion of the basic setup.
Essential Post-Installation Steps for a Robust System
A successful installation is just the beginning. To ensure your Mac operates optimally, securely, and efficiently, these follow-up actions are crucial.
a. Run Software Updates (App Store)
Even if you installed the latest macOS version, there might be minor updates or security patches released since the installer was created.
- Go to System Settings (or System Preferences for older macOS versions) > General > Software Update.
- Install any available updates to ensure your system is fully patched and secure.
Why this matters (Tech & Digital Security): Keeping your OS updated is paramount for digital security. Updates often include critical security fixes that protect your system from vulnerabilities, an essential aspect of maintaining a robust digital presence.
b. Reinstall Applications and Peripherals
If you skipped Migration Assistant for a cleaner slate, now is the time to reinstall your essential applications.
- App Store: Download apps you previously purchased or use from the Mac App Store.
- Developer Websites: For third-party software not available on the App Store, download the installers directly from the official developer websites.
- Peripherals: Reinstall drivers for printers, scanners, or other external devices as needed.
Why this matters (Productivity): A functional system requires the right tools. Reinstalling applications efficiently restores your workflow and productivity.
c. Review Security & Privacy Settings
Take a moment to review the security and privacy settings in System Settings/Preferences.
- Firewall: Ensure your firewall is enabled.
- Privacy: Review which applications have access to your camera, microphone, location, and other personal data.
- Login Items: Check for any unwanted applications launching at startup that might slow down your system.
Why this matters (Tech & Brand/Digital Security): Proactive management of security and privacy settings safeguards your personal information and maintains the integrity of your digital brand.
d. Optimize Performance (Briefly)
While a clean install already boosts performance, a few ongoing habits can maintain it.
- Disk Space: Monitor your storage. Avoid filling your drive completely.
- Startup Items: Limit the number of applications that launch automatically at startup.
- Browser Extensions: Manage browser extensions, as many can consume significant resources.
5. Troubleshooting Common Installation Issues and Expert Tips
Even with careful preparation, issues can sometimes arise. Knowing how to address them quickly can save you time and frustration.
Addressing Installation Glitches
- “Cannot install macOS on Macintosh HD”: This often indicates an issue with disk formatting or permissions. Revisit Disk Utility, ensure you’ve selected “Show All Devices,” and try erasing the physical drive again with the correct APFS/GUID Partition Map settings. Also, ensure your Mac’s date and time are correct via Terminal if you’re experiencing certificate errors (
datecommand). - Download Issues: If the macOS installer download repeatedly fails, check your internet connection, try downloading it on a different network, or clear the App Store’s cache.
- Boot Issues: If your Mac won’t boot from the USB installer, try a different USB port, a different USB drive, or re-create the bootable installer, ensuring the Terminal command was executed perfectly. For newer Macs with T2 chips or Apple Silicon, you might need to adjust Secure Boot settings in Startup Security Utility (accessible from macOS Recovery) to allow booting from external media.
Maximizing Your Mac’s Potential: Beyond the Install
A successful macOS installation is a gateway to a productive and secure computing experience. Here are some final tips to truly leverage your Apple device.
- Regular Backups: Reiterate the importance of consistent Time Machine backups. This isn’t just for installations; it’s for everyday peace of mind, protecting your work and personal memories.
- Staying Updated: Beyond major OS updates, regularly check for app updates and security patches. A well-maintained system is a secure system.
- Exploring macOS Features: Take time to explore the built-in productivity tools (e.g., Spaces, Mission Control, Quick Look), digital security features (e.g., Gatekeeper, FileVault, built-in antivirus), and continuity features within the Apple ecosystem. These tools are designed to enhance your workflow and make your digital life easier and safer.
- Hardware Maintenance: Keep your Mac physically clean, ensure good ventilation, and consider battery health, especially for laptops. A healthy machine performs better and lasts longer.
By mastering the art of macOS installation, you gain a valuable technical skill that not only keeps your personal tech running smoothly but also contributes to a more secure and efficient digital lifestyle. This DIY approach embodies the spirit of taking control of your technology, ensuring it serves your productivity needs while protecting your digital assets.
aViewFromTheCave is a participant in the Amazon Services LLC Associates Program, an affiliate advertising program designed to provide a means for sites to earn advertising fees by advertising and linking to Amazon.com. Amazon, the Amazon logo, AmazonSupply, and the AmazonSupply logo are trademarks of Amazon.com, Inc. or its affiliates. As an Amazon Associate we earn affiliate commissions from qualifying purchases.