
In the rapidly evolving landscape of personal computing, Windows 10 remains a cornerstone of productivity, gaming, and software development. Despite the emergence of Windows 11, millions of users and professionals worldwide prefer Windows 10 for its proven stability, extensive hardware compatibility, and familiar interface. Whether you are building a new PC from scratch, upgrading an aging hard drive to a high-speed Solid State Drive (SSD), or simply looking to refresh a cluttered system, performing a clean installation is the most effective way to ensure peak performance.
Installing an operating system can seem daunting to the uninitiated, but the process has become significantly more streamlined and user-friendly over the last decade. This guide provides an in-depth, technical walkthrough of the installation process, from pre-installation requirements to post-setup optimization.

1. Pre-Installation: System Requirements and Preparation
Before touching any software, it is vital to ensure that your hardware is capable of running Windows 10 and that your existing data is secure. A clean installation wipes the target drive, meaning preparation is the most critical phase of the project.
Assessing Hardware Compatibility
While Microsoft provides “minimum” requirements, the “recommended” specs are what truly define a usable experience.
- Processor: 1 GHz or faster compatible processor or System on a Chip (SoC). For modern tasks, a multi-core processor is highly recommended.
- RAM: 1 GB for 32-bit or 2 GB for 64-bit. In a professional context, 8 GB is the functional baseline, with 16 GB preferred for multitasking.
- Hard Drive Space: 32 GB or larger. However, installing on a 120 GB or larger SSD is strongly advised to prevent immediate storage bottlenecks.
- Graphics Card: Compatible with DirectX 9 or later with WDDM 1.0 driver.
- Display: 800×600 resolution, though 1080p (Full HD) is the standard for modern applications.
Data Backup and License Keys
A clean install involves formatting your primary partition. You must back up all essential documents, photos, and project files to an external drive or cloud storage service like OneDrive or Google Drive. Furthermore, ensure you have your Windows 10 Product Key. If you are reinstalling on a machine that previously had Windows 10, the “Digital License” is usually tied to your motherboard’s UEFI (BIOS) and will activate automatically once you connect to the internet.
Choosing the Right Version
Windows 10 comes in several editions, primarily Home and Pro. Windows 10 Pro offers advanced features such as BitLocker encryption, Remote Desktop, and Group Policy Management. Ensure your installation media matches the license you own.
2. Creating Bootable Installation Media
To install Windows 10, you need a physical medium—typically a USB flash drive—that contains the installation files and is configured to be “bootable” by the computer’s BIOS.
Using the Windows Media Creation Tool
The most reliable method is using the official Microsoft Media Creation Tool.
- Insert a USB flash drive with at least 8 GB of space (note: the drive will be formatted, erasing all existing data).
- Visit the Microsoft software download page and download the tool.
- Run the
.exeand select “Create installation media (USB flash drive, DVD, or ISO file) for another PC.” - Choose your language, edition (Windows 10), and architecture (64-bit is standard for almost all modern systems).
- Select “USB flash drive” and wait for the tool to download the files and prepare the drive.
Alternative: ISO and Rufus
For advanced users or those installing on older systems requiring specific partition schemes (MBR vs. GPT), downloading the ISO file and using a utility like Rufus provides more control. Rufus allows you to toggle settings for UEFI or Legacy BIOS modes, which is essential when dealing with hardware transitions from the mid-2010s.
3. The Installation Process: Step-by-Step
With your bootable USB ready, it is time to perform the actual installation. This phase involves interacting with the computer’s firmware to prioritize the USB drive over the internal hard disk.
Configuring Boot Order in BIOS/UEFI
- Insert the USB drive into the target PC.
- Power on the machine and immediately press the BIOS entry key (usually F2, F12, Del, or Esc).
- Navigate to the “Boot” tab and move the “USB Storage Device” or “Removable Devices” to the top of the priority list.
- Save and Exit (usually F10). The computer will now reboot into the Windows 10 installer.

The Initial Setup Windows
When the purple Windows Setup screen appears:
- Select your language, time and currency format, and keyboard method.
- Click “Install Now.”
- You will be prompted for a product key. If you are reinstalling, click “I don’t have a product key” to proceed with digital activation later.
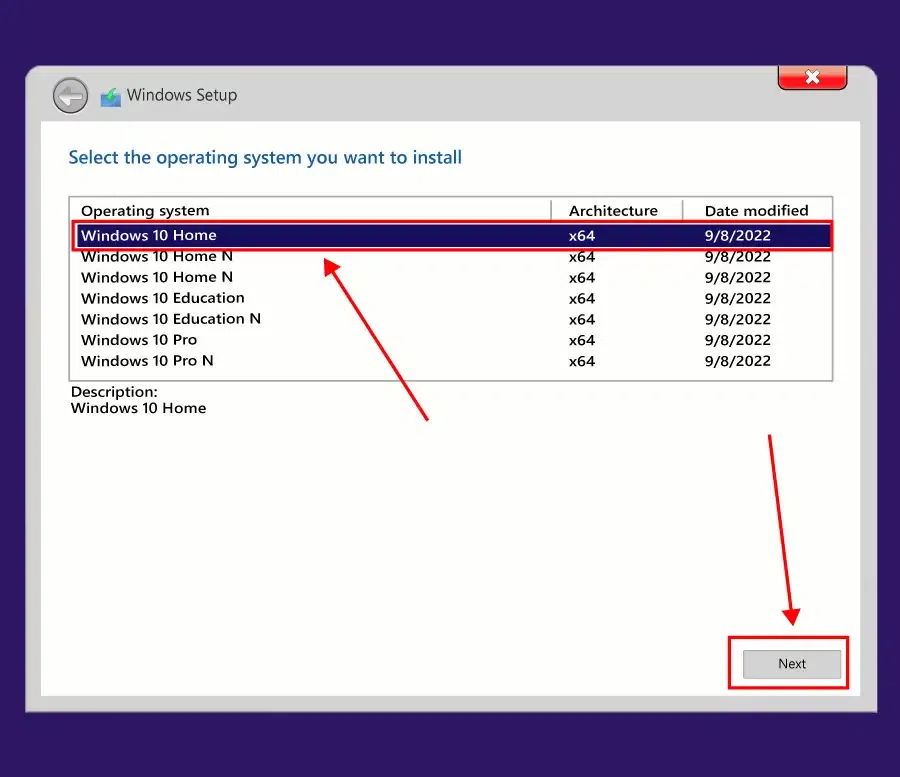
- Select the operating system version that matches your license.
Partitioning: The “Custom” Install
This is the most technical part of the process. You will be asked “Which type of installation do you want?”
- Upgrade: This keeps files but often carries over system bugs.
- Custom: Install Windows only (advanced): This is the choice for a clean install.
You will see a list of drives and partitions. For a truly clean install on a single-drive system, delete every partition until you see “Drive 0 Unallocated Space.” Select this space and click “Next.” Windows will automatically create the necessary System, MSR (Microsoft Reserved), and Recovery partitions while formatting the rest as your C: drive.
4. The Out-of-Box Experience (OOBE) and Configuration
Once the installer finishes copying files, the computer will restart. You can now remove the USB drive. You will be greeted by “Cortana” (the setup assistant) to finalize your personal configurations.
Regional and Account Settings
- Region and Keyboard: Confirm your location to ensure correct time zones and keyboard layouts.
- Network: Connect to your Wi-Fi or Ethernet. If you prefer a “Local Account” instead of a Microsoft Account, some versions of Windows 10 require you to stay disconnected from the internet during this step.
- Account Setup: Enter your name and password. Using a Microsoft account allows for easy synchronization of settings and cloud files across devices.
Privacy and Services
Windows 10 will present a series of privacy toggles (Location, Diagnostic data, Tailored experiences). For maximum performance and privacy, many professionals choose to toggle these to “Off.” You can then choose whether to enable features like “Find My Device” or the “Activity History” timeline.
5. Post-Installation Optimization and Security
The desktop has loaded, but the work is not yet complete. To ensure your system is secure and running at full potential, you must perform several post-installation tasks.
Windows Update and Drivers
The first thing you should do is go to Settings > Update & Security > Windows Update and click “Check for updates.” Windows 10 is excellent at fetching generic drivers for your motherboard, Wi-Fi, and Bluetooth. However, for specialized hardware like dedicated NVIDIA or AMD graphics cards, visit the manufacturer’s website to download the latest “Game Ready” or “Studio” drivers.
Verifying Device Manager
Right-click the Start button and select Device Manager. Look for any yellow exclamation marks. These indicate hardware components that do not have functional drivers. If found, identify the hardware (often a chipset or card reader) and download the driver from the laptop or motherboard manufacturer’s support page.
Essential Software and Security
While Windows 10 includes “Windows Security” (formerly Windows Defender), which provides robust real-time protection, you should consider your software ecosystem:
- Browser: While Microsoft Edge is now Chromium-based and very efficient, you may want to install Chrome or Firefox.
- Runtimes: Many apps and games require .NET Framework, DirectX End-User Runtimes, and Visual C++ Redistributables.
- Optimization: Check the “Startup” tab in Task Manager (Ctrl+Shift+Esc) to disable any unnecessary programs that might slow down your boot time.
System Imaging
Now that your system is clean, updated, and configured, it is the perfect time to create a “System Image.” Using the built-in “Backup and Restore (Windows 7)” tool in the Control Panel, you can create a snapshot of your current state. If you ever encounter a virus or system failure in the future, you can restore this image in minutes rather than spending hours reinstalling everything from scratch.
Conclusion
Installing Windows 10 is a foundational skill in the tech world. It empowers users to take full control of their hardware, free from the “bloatware” often pre-installed by manufacturers. By following a structured approach—meticulous preparation, proper media creation, careful partitioning, and thorough post-install updating—you ensure a stable, fast, and secure computing environment. Whether for a high-end gaming rig or a professional workstation, a clean Windows 10 installation remains the gold standard for starting your digital journey on the right foot.
aViewFromTheCave is a participant in the Amazon Services LLC Associates Program, an affiliate advertising program designed to provide a means for sites to earn advertising fees by advertising and linking to Amazon.com. Amazon, the Amazon logo, AmazonSupply, and the AmazonSupply logo are trademarks of Amazon.com, Inc. or its affiliates. As an Amazon Associate we earn affiliate commissions from qualifying purchases.