In the fast-paced world of technology, the performance of your computer can often be the bottleneck in your productivity, creativity, or even just your enjoyment of digital experiences. While many components contribute to a computer’s speed, Random Access Memory (RAM) plays a crucial role. Think of RAM as your computer’s short-term memory – the faster and more plentiful it is, the more tasks your computer can juggle simultaneously without slowing down. Upgrading your RAM is one of the most accessible and impactful ways to breathe new life into an aging system or to ensure your new build is future-proofed. This guide will walk you through the entire process, from understanding what RAM is to physically installing it, ensuring a smooth and successful upgrade.
The decision to upgrade your RAM often stems from noticeable performance issues. Do you find yourself waiting for applications to load? Does your computer stutter when you have multiple browser tabs open or when running demanding software like video editors or games? These are classic signs that your current RAM capacity might be insufficient. Beyond just increasing speed, more RAM can significantly improve multitasking capabilities, allowing for seamless switching between applications and processes. For professionals, this translates to smoother workflows; for gamers, it means higher frame rates and less lag; and for everyday users, it means a generally snappier and more responsive computing experience.
Understanding RAM: The Foundation of Your Upgrade
Before diving into the physical installation, it’s essential to understand what RAM is and why it’s so vital for your computer’s operation.
What is RAM and How Does It Work?
RAM, or Random Access Memory, is a type of volatile computer memory that stores data and machine code currently being used. Unlike your hard drive or Solid State Drive (SSD), which provide long-term storage, RAM is temporary. When you open a program or a file, the data required for that task is loaded from your storage device into RAM. The CPU (Central Processing Unit) then accesses this data directly from RAM, which is significantly faster than accessing it from your storage. This speed is why having enough RAM is crucial; if your computer runs out of available RAM, it has to start using your storage drive as a temporary overflow, a process known as “paging” or “swapping,” which is drastically slower and leads to the sluggish performance you might be experiencing.
Types of RAM and Compatibility
The world of RAM can seem complex due to different generations and form factors. The most common type of RAM for desktop computers today is DDR (Double Data Rate) SDRAM (Synchronous Dynamic Random-Access Memory). DDR RAM has gone through several iterations, with DDR3, DDR4, and DDR5 being the most prevalent in recent years.
- DDR3: An older standard, still found in some older systems.
- DDR4: The dominant standard for many years, offering good performance and capacity.
- DDR5: The latest generation, providing higher speeds, increased bandwidth, and better power efficiency.
It’s critical to understand that DDR generations are not backward or forward compatible. You cannot install DDR4 RAM into a motherboard that only supports DDR3, nor can you install DDR5 into a DDR4 slot. The notches on DDR modules are physically different to prevent incorrect installation.
Beyond the DDR generation, you also need to consider the form factor. For desktop computers, you’ll be working with DIMM (Dual In-line Memory Module) sticks. For laptops, the smaller SO-DIMM (Small Outline Dual In-line Memory Module) is used.
Motherboard Compatibility is Key: The most important factor in choosing new RAM is ensuring it’s compatible with your motherboard. Your motherboard has specific slots designed for a particular DDR generation. It also has a maximum RAM capacity it can support and a maximum speed (measured in MHz) for RAM modules. You can typically find this information in your motherboard’s manual, on the manufacturer’s website (by searching for your motherboard model), or by using system information tools within your operating system.
Speed and Latency: RAM speed is measured in MHz, indicating how many cycles per second it can perform. Higher MHz generally means faster data transfer. Latency, often represented by “CL” (CAS Latency) followed by a number (e.g., CL16), refers to the delay between the memory controller requesting data and the data becoming available. Lower latency is better. While speed and latency are important, ensure your RAM is compatible with the maximum speeds your motherboard supports. Often, RAM will run at a speed set by the motherboard if it’s higher than what the motherboard officially supports.
Capacity: This refers to the amount of RAM, measured in Gigabytes (GB). For most users today, 8GB is the minimum for basic tasks, 16GB is ideal for general use and moderate multitasking, and 32GB or more is recommended for heavy gaming, video editing, and professional workloads.
Preparing for the RAM Installation
Before you even think about opening your computer, proper preparation is crucial for a safe and successful RAM upgrade. This involves gathering the necessary tools and taking precautions to avoid damaging your computer’s components.
Gathering Your Tools and Workspace
You don’t need a specialized toolkit for RAM installation, but a few items will make the process smoother and safer.
- Your New RAM Modules: Ensure you’ve purchased the correct type, speed, and capacity compatible with your system.
- Phillips Head Screwdriver: This is usually the only tool you’ll need to open your computer case. Some cases might have thumbscrews that can be removed by hand.
- Anti-Static Wrist Strap (Highly Recommended): Static electricity is the enemy of delicate computer components. A wrist strap connects you to the metal chassis of your computer, safely discharging any static buildup. If you don’t have one, touch a grounded metal object (like an unpainted part of your computer case or a metal desk leg) frequently before and during the installation process.
- Well-Lit Workspace: Working in a brightly lit area will help you see clearly and avoid dropping small screws or misaligning components.
- A Clean Surface: Choose a flat, clean surface to place your computer and its components. Avoid working on carpet, as it can generate static electricity.
- Your Motherboard Manual (Optional but helpful): If you’re unsure about the RAM slot configuration on your motherboard, your manual will be invaluable.
Safety Precautions and Static Discharge
This is arguably the most critical step. Static electricity, even a small jolt you can’t feel, can permanently damage your RAM or other sensitive computer components.
- Power Down Completely: Shut down your computer through the operating system. Then, unplug the power cord from the back of the computer.
- Drain Residual Power: Press and hold the power button on your computer for about 15-30 seconds after unplugging it. This will discharge any remaining electricity stored in the system’s capacitors.
- Ground Yourself: If you have an anti-static wrist strap, put it on and connect the clip to an unpainted metal part of your computer’s chassis. If you don’t have a strap, touch a grounded metal object frequently throughout the process.
- Handle Components Carefully: Always hold RAM modules by their edges. Avoid touching the gold contacts or the chips on the module.
The Physical Installation Process: Step-by-Step
With your workspace prepared and safety precautions in place, it’s time to get hands-on with your computer.
Opening Your Computer Case
The process of opening a computer case varies depending on the model. Most desktop computer cases are secured with screws on the back panel.
- Locate the Side Panel: Identify the side panel that gives you access to the motherboard and internal components. This is usually the left side panel when viewed from the front.
- Remove Securing Screws: On the back of the case, you’ll find screws holding the side panel in place. These can be standard Phillips head screws or thumbscrews. Unscrew them completely and keep them in a safe place.
- Slide or Remove the Panel: Once the screws are removed, the side panel usually slides backward a short distance and then can be lifted off. Some cases might have hinges or other locking mechanisms; refer to your case manual if unsure.
Locating and Removing Old RAM (If Applicable)
If you are upgrading existing RAM, you’ll need to remove the old modules first.
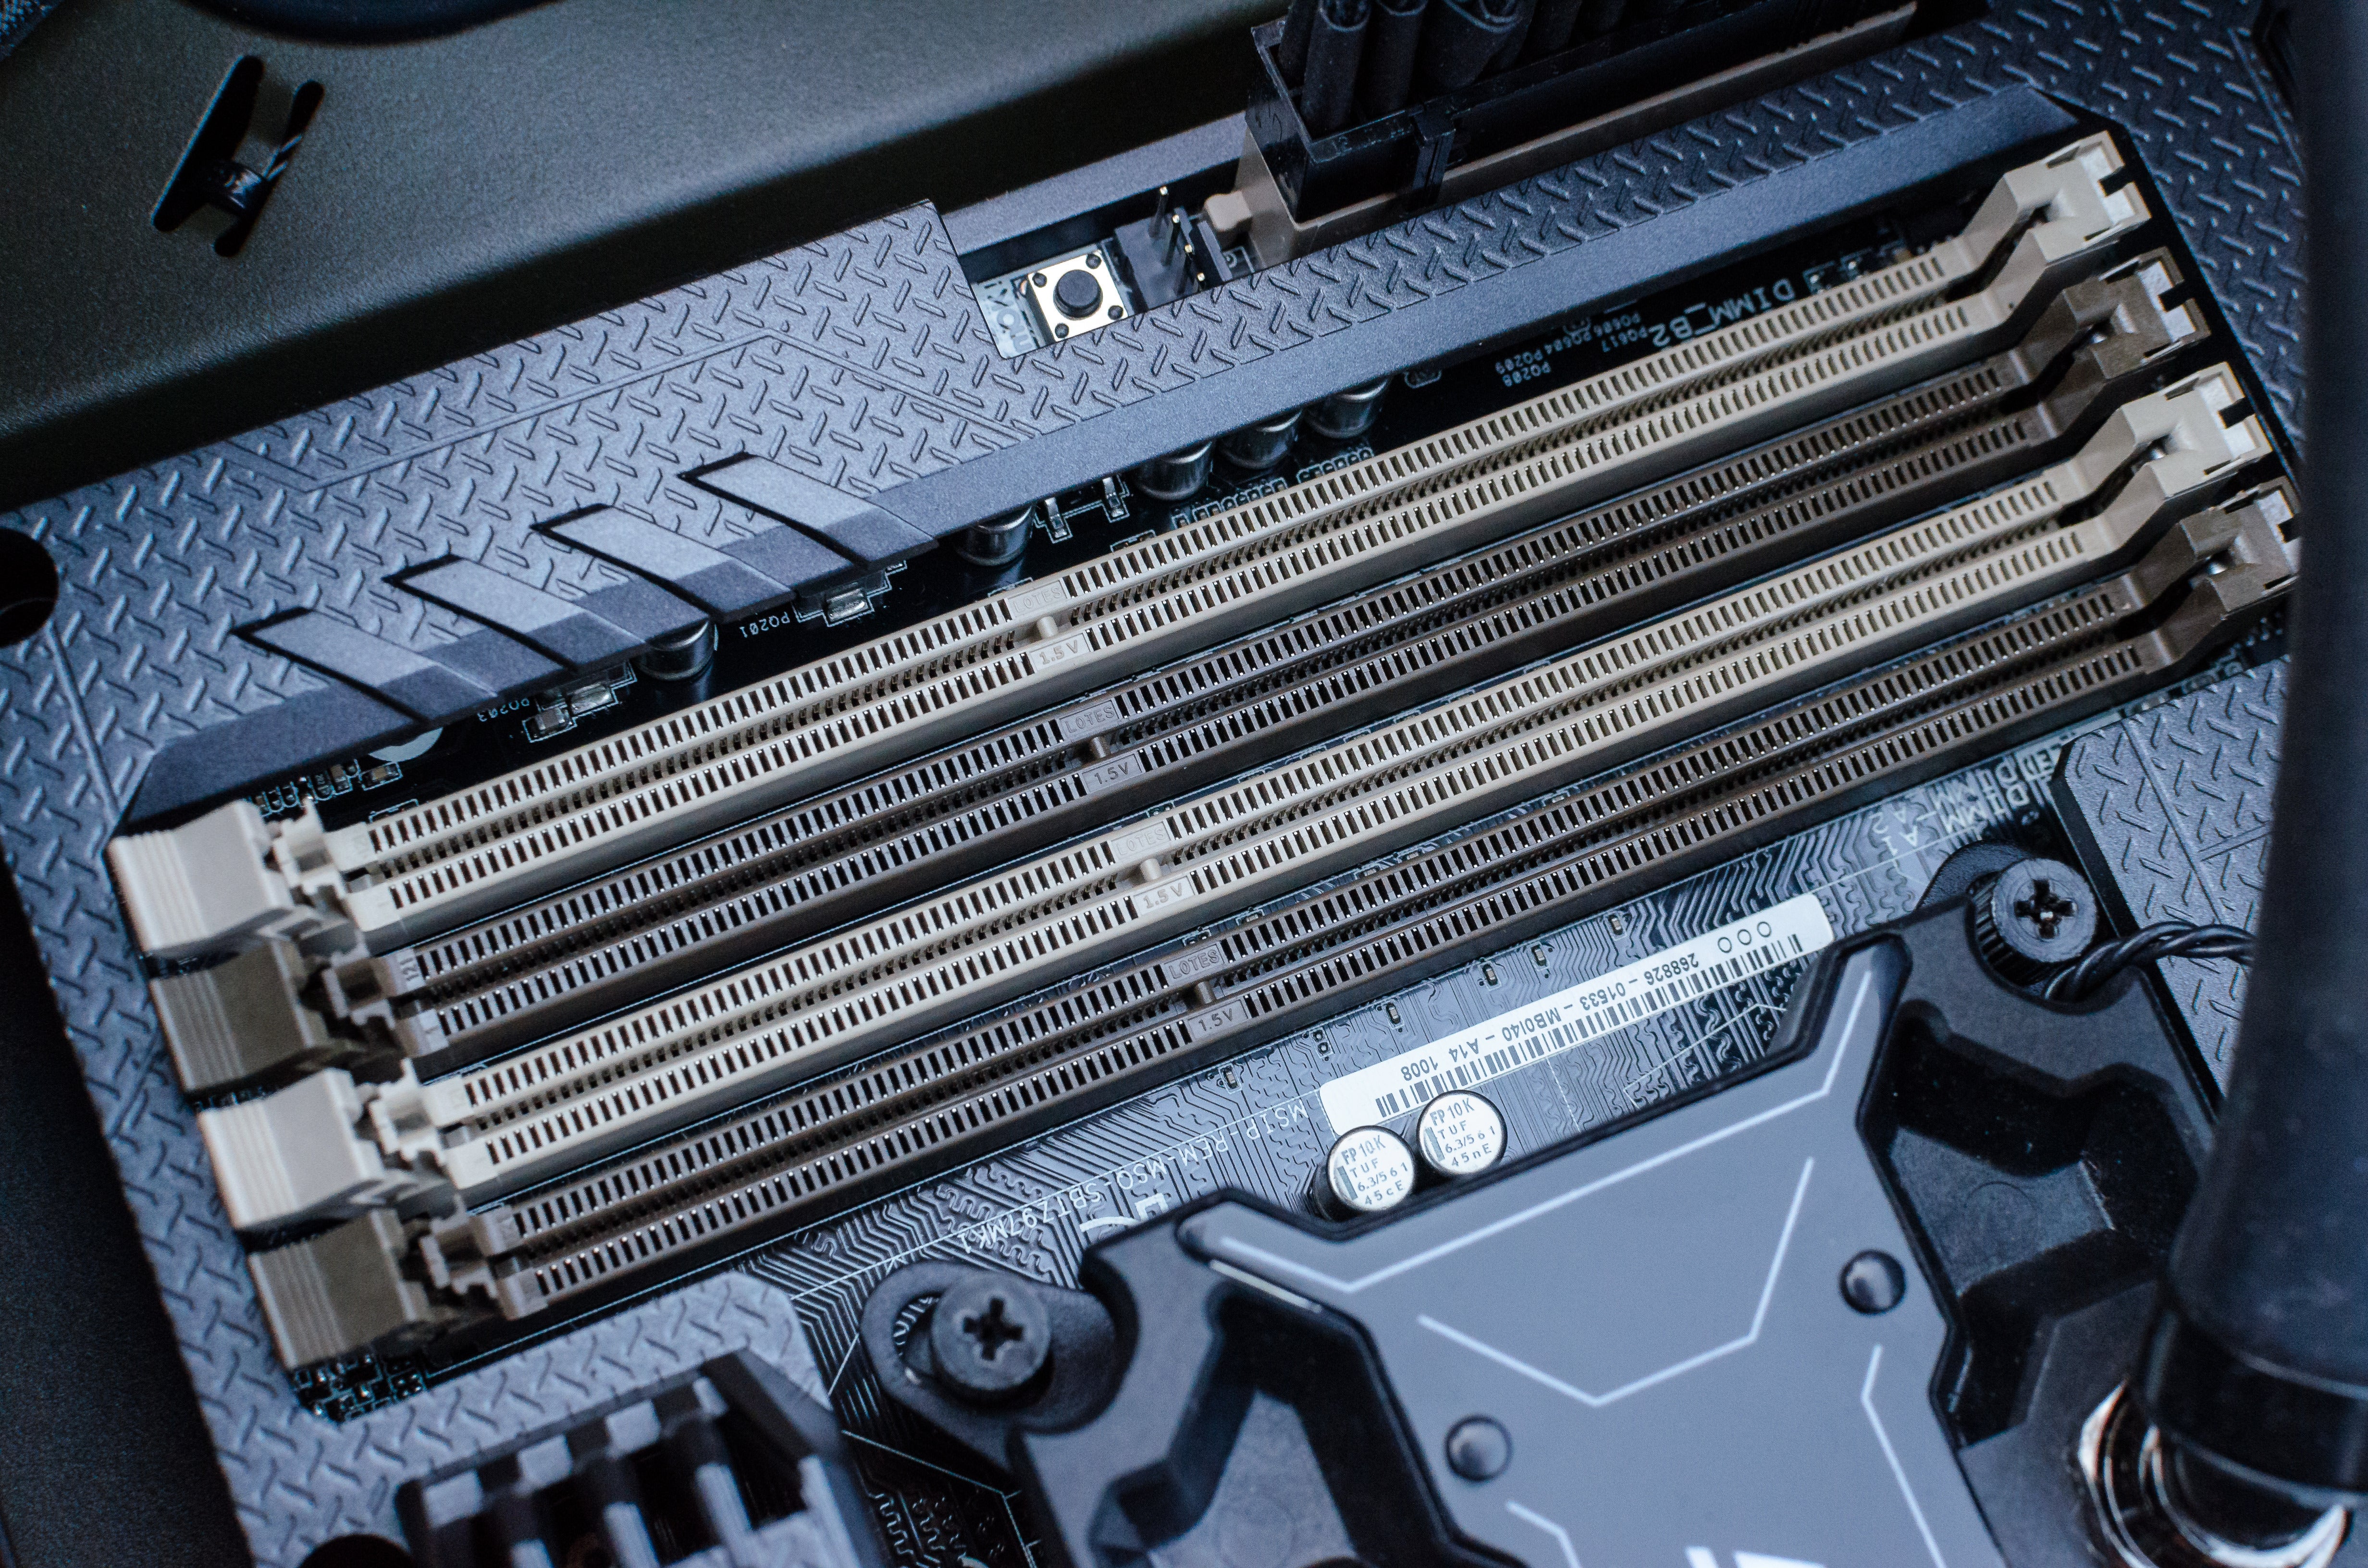
- Identify the RAM Slots: RAM modules are installed in long, narrow slots on the motherboard. They are typically located near the CPU.
- Release the Retaining Clips: Each RAM slot has small plastic clips on one or both ends. Gently push these clips outward. This will release the tension on the RAM module, allowing it to pop up slightly.
- Gently Remove the Module: Once the clips are released, grasp the RAM module by its edges and pull it straight up and out of the slot. Do not force it. If it’s stuck, recheck the clips.
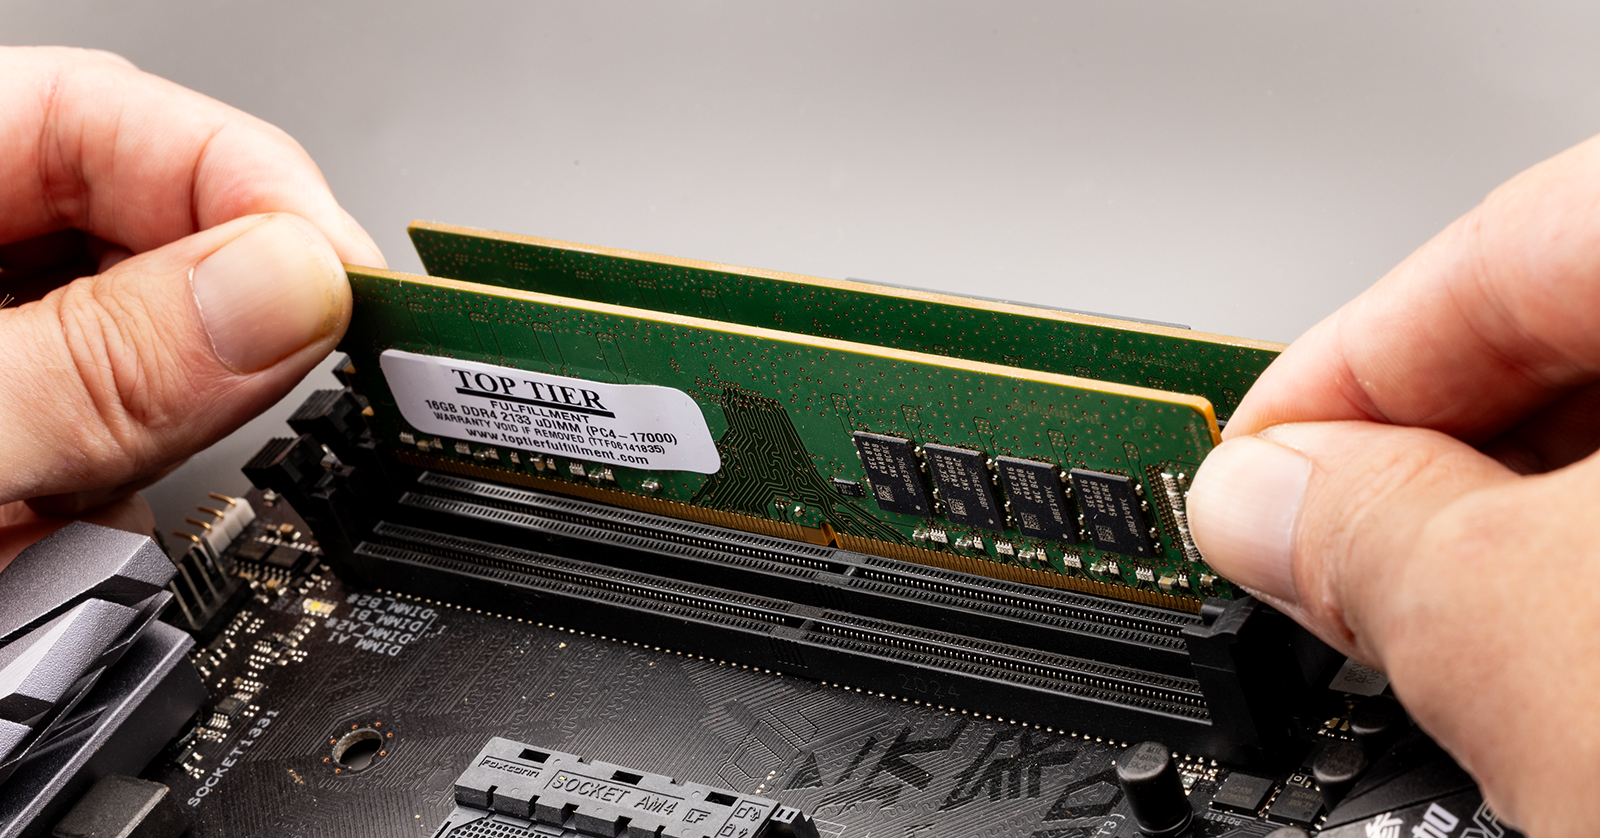
Installing the New RAM Modules
This is the core of the upgrade process. Precision is key here.
- Align the RAM Module: Examine your new RAM module. You’ll notice a notch in the gold connector pins. This notch is a keyway and will only align with a corresponding notch in the RAM slot on the motherboard. Do not force the RAM module if it doesn’t align. Trying to install it incorrectly can damage both the RAM and the motherboard slot.
- Position the Module: With the notch aligned correctly, place the RAM module into the slot. Ensure it’s seated firmly and evenly at both ends.
- Press Down Firmly and Evenly: Apply gentle but firm pressure to the top of the RAM module with your thumbs, pressing down on both ends simultaneously. You should hear a “click” as the retaining clips on the sides of the slot snap into place, securing the module. If the clips don’t engage automatically, gently push them inwards to lock the module.
- Verify Installation: Double-check that the RAM module is seated flush with the slot and that the retaining clips are fully engaged.
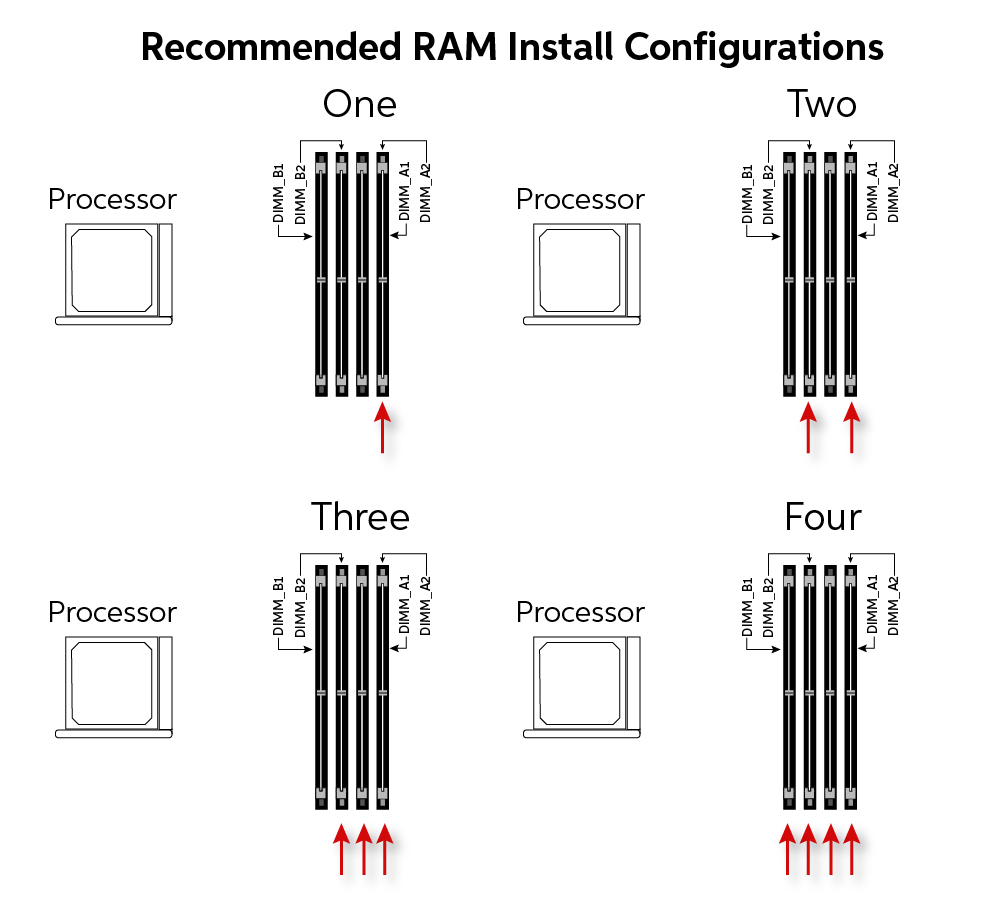
Dual-Channel and Quad-Channel Configurations: Many motherboards support dual-channel or quad-channel memory configurations, which can significantly boost performance by allowing the CPU to access RAM more efficiently. To take advantage of this, you need to install RAM modules in specific pairs or sets, as indicated by color-coded slots or your motherboard manual. If you’re installing two modules, place them in slots 1 and 3, or 2 and 4, depending on your motherboard’s layout for dual-channel operation. If you’re unsure, consult your motherboard manual.
Closing Up Your Computer
Once the RAM is installed, it’s time to reassemble your computer.
- Replace the Side Panel: Carefully slide the side panel back into place. Ensure it aligns correctly with the chassis.
- Secure the Panel: Reinstall the screws you removed earlier to secure the side panel.
- Reconnect Peripherals: Plug in your power cord, monitor cable, keyboard, mouse, and any other peripherals.
Post-Installation: Verification and Troubleshooting
After reassembling your computer, the final steps involve verifying the installation and addressing any potential issues.
Booting Up and Checking System Information
- Power On Your Computer: Press the power button. Your computer should boot up as usual. It might take a little longer on the first boot after a hardware change as the system recognizes the new components.
- Enter BIOS/UEFI (Optional but Recommended): You can often access your system’s BIOS or UEFI settings by pressing a specific key (like DEL, F2, F10, or F12) repeatedly during the initial startup screen. In the BIOS/UEFI, you should see a section that displays system information, including the amount of installed RAM. This is a good initial confirmation.
- Check in Your Operating System: Once your operating system loads, you can verify the installed RAM through its system information tools.
- Windows: Right-click on “This PC” (or “Computer”) and select “Properties.” The amount of installed RAM will be listed. Alternatively, open Task Manager (Ctrl+Shift+Esc), go to the “Performance” tab, and select “Memory.”
- macOS: Click the Apple menu, then “About This Mac.” The RAM capacity will be displayed.
Troubleshooting Common Issues
If your computer doesn’t boot, shows errors, or doesn’t recognize the new RAM, don’t panic. Here are some common troubleshooting steps:
- Reseat the RAM: The most common issue is that the RAM modules aren’t fully seated. Power down, unplug, ground yourself, open the case, and carefully remove and reinsert the RAM modules, ensuring they click securely into place.
- Check Slot Configuration: Ensure you’ve installed the RAM in the correct slots for dual-channel or quad-channel operation if applicable, referring to your motherboard manual.
- Test One Module at a Time: If you installed multiple RAM modules, try booting with only one module installed at a time in each slot. This can help identify if a specific module is faulty or if a slot is causing issues.
- Check RAM Compatibility Again: Double-check that the RAM you purchased is indeed compatible with your motherboard’s specifications (DDR generation, speed, and maximum capacity).
- Ensure Correct Orientation: Verify that the RAM module was inserted with the notch aligned correctly. Forcing it in the wrong orientation can damage the module or the slot.
- Clear CMOS: In some cases, clearing the CMOS (Complementary Metal-Oxide-Semiconductor) settings on your motherboard can resolve boot issues after a hardware change. This usually involves removing a small battery from the motherboard or using a jumper. Consult your motherboard manual for specific instructions.
By following these steps, you should be able to successfully install new RAM and experience a noticeable improvement in your computer’s performance. This upgrade is a cost-effective way to extend the life of your existing hardware and unlock its full potential.
aViewFromTheCave is a participant in the Amazon Services LLC Associates Program, an affiliate advertising program designed to provide a means for sites to earn advertising fees by advertising and linking to Amazon.com. Amazon, the Amazon logo, AmazonSupply, and the AmazonSupply logo are trademarks of Amazon.com, Inc. or its affiliates. As an Amazon Associate we earn affiliate commissions from qualifying purchases.