In our increasingly connected world, a reliable and fast internet connection isn’t just a luxury; it’s a fundamental necessity for work, education, entertainment, and communication. At the heart of this connection for any desktop or laptop computer lies the network adapter – often referred to as a Network Interface Card (NIC). This essential piece of hardware is responsible for allowing your computer to connect to a network, whether that’s wirelessly via Wi-Fi or physically through an Ethernet cable.
While most modern computers come with integrated network capabilities, there are numerous reasons why you might need to install a new network adapter. Perhaps you’re building a new PC from scratch, upgrading an older system to support faster Wi-Fi standards like Wi-Fi 6E or Wi-Fi 7, replacing a faulty adapter, or adding an Ethernet port to a laptop that lacks one. Whatever your motivation, understanding the process of installing a network adapter is a valuable skill that empowers you to enhance your digital experience. This comprehensive guide will walk you through every step, from selecting the right adapter to troubleshooting common issues, ensuring you can establish a robust and efficient network connection.
Understanding Your Network Adapter Needs
Before you even think about opening your computer case or plugging in a new device, it’s crucial to understand the different types of network adapters available and how to choose the one that best suits your specific requirements. A well-informed decision at this stage can save you time, effort, and potential compatibility headaches down the line.
Types of Network Adapters
Network adapters come in several forms, each designed for different types of computers and usage scenarios:
- Internal PCIe Network Adapters (Desktop PCs): These are expansion cards that plug into a PCI Express (PCIe) slot on your computer’s motherboard. They are generally preferred for desktop PCs because they offer the most stable connection, highest speeds, and often feature external antennas for superior wireless range and signal quality. PCIe cards are available for both Wi-Fi and Ethernet connections, with high-end models supporting multi-gigabit Ethernet or the latest Wi-Fi standards. Their internal nature means a cleaner setup with no external dongles.
- External USB Network Adapters (Desktops & Laptops): USB adapters are perhaps the simplest to install, making them an excellent choice for both desktop and laptop users who need an immediate upgrade or a quick replacement. They simply plug into an available USB port. While convenient, their performance can sometimes be limited by the USB standard (USB 2.0, 3.0, 3.1, etc.) and their smaller form factor might result in less powerful antennas compared to PCIe cards. They are highly portable and an excellent solution for adding Wi-Fi to a desktop without internal slots or an Ethernet port to an ultrabook.
- M.2 or Mini-PCIe Adapters (Laptops): These smaller, internal cards are typically found in laptops and compact desktops. Replacing them is generally more involved than a PCIe card in a desktop, often requiring significant disassembly of the laptop. While this guide will primarily focus on PCIe and USB installations due to their prevalence and user-friendliness, it’s worth noting that M.2 adapters are common for internal Wi-Fi/Bluetooth combos in modern laptops. If you’re considering replacing one of these, consult your laptop’s specific service manual or a professional, as the process can be delicate.
Compatibility Considerations
Choosing the right adapter isn’t just about its type; it’s also about ensuring it’s compatible with your existing hardware and network infrastructure.
- Operating System Compatibility: Always check that the network adapter supports your operating system (Windows, macOS, Linux). Most manufacturers list supported OS versions on their product packaging or website. Newer adapters might not have drivers for older OS versions, and vice versa.
- Motherboard Slots (for PCIe): If you’re opting for a PCIe card, your motherboard must have a free PCIe slot. Modern motherboards typically have PCIe x1, x4, x8, and x16 slots. A Wi-Fi or Ethernet card will usually fit into a PCIe x1 slot, but can also work in larger slots (e.g., a PCIe x1 card in an x16 slot), though it won’t utilize all the lanes. Ensure there’s a physical slot available and accessible within your PC case.
- USB Standards (for USB adapters): For USB adapters, plugging a USB 3.0 adapter into a USB 2.0 port will work, but you won’t get the full speed benefits of USB 3.0. For optimal performance, match the adapter’s USB standard with your computer’s fastest available USB port.
- Router and Wi-Fi Standards: For Wi-Fi adapters, ensure it supports the same or newer Wi-Fi standards as your router.
- 802.11ac (Wi-Fi 5): Still common, operates on the 5GHz band, offering good speeds.
- 802.11ax (Wi-Fi 6/6E): The current standard, offering significantly faster speeds, better performance in crowded networks, and support for the 6GHz band (Wi-Fi 6E) for even less interference.
- 802.11be (Wi-Fi 7): The emerging standard, promising even greater speeds and lower latency.
Upgrading to a Wi-Fi 6E adapter when you only have a Wi-Fi 5 router won’t give you Wi-Fi 6E speeds, but the adapter will still be backward compatible. However, to leverage the latest technology, ensure both your adapter and router support it.
- Ethernet Speed: For wired adapters, consider the speed you need: Gigabit Ethernet (1Gbps) is standard, but 2.5 Gigabit (2.5Gbps), 5 Gigabit (5Gbps), or even 10 Gigabit (10Gbps) adapters are available for high-speed local networks or ultra-fast internet connections. Your router/switch must also support these speeds.
Gathering Your Tools and Drivers
Once you’ve selected your network adapter, prepare for the installation by gathering a few essential items:
- Screwdriver: A Phillips head screwdriver is typically needed for opening desktop PC cases and securing PCIe cards.
- Anti-static Wrist Strap (Recommended): This prevents static electricity from damaging sensitive internal components. If you don’t have one, regularly touch a grounded metal object (like your PC case’s bare metal) to discharge any static before touching internal parts.
- Your New Network Adapter: Of course!
- Driver Software: Crucially, download the latest drivers for your specific network adapter model from the manufacturer’s official website before you start the installation. Save them to a USB drive or your computer’s hard drive. This is vital because you won’t have an internet connection immediately after installing the adapter if your old one is removed or non-functional. Many adapters come with a driver CD, but online drivers are usually more up-to-date.
Step-by-Step Installation Guide
With your preparations complete, you’re ready to proceed with the physical installation. The process differs slightly depending on whether you’re installing an internal PCIe card or an external USB adapter.
Installing an Internal PCIe Network Adapter (Desktop PCs)
This method provides the most robust connection for desktop users. Take your time and follow these steps carefully.
- Power Down and Disconnect: Completely shut down your computer. Unplug the power cable from the wall outlet and from the back of your PC. It’s also a good idea to disconnect all other peripherals (monitor, keyboard, mouse) for easier access.
- Discharge Static Electricity: Put on your anti-static wrist strap and attach it to a grounded metal part of your PC case. If you don’t have a strap, frequently touch the bare metal frame of the case.
- Open the PC Case: Locate the screws holding the side panel of your PC case (usually the left side when viewed from the front). Unscrew them and gently slide or pivot the panel off.
- Locate a Vacant PCIe Slot: Inside your PC, look for available PCIe slots on your motherboard. These are typically long, narrow slots. Wi-Fi and Ethernet cards usually use a PCIe x1 slot, which is the shortest type. Ensure there are no components or cables obstructing the slot you intend to use. You might need to remove a metal bracket cover from the back of the case adjacent to the chosen slot.
- Insert the Network Adapter: Carefully align the gold connectors on the bottom of the network adapter with the chosen PCIe slot. Apply firm, even pressure to both ends of the adapter until it seats fully into the slot. You should hear a slight click, and the adapter’s bracket should be flush with the back of the PC case.
- Secure the Adapter: Use a screw (often provided with the adapter or found in your PC case accessories) to secure the adapter’s bracket to the PC case. This prevents it from coming loose.
- Attach Antennas (if applicable): If your Wi-Fi adapter came with external antennas, screw them onto the corresponding connectors on the adapter’s bracket at the back of your PC. Position them for optimal signal reception.
- Close the PC Case: Carefully replace the side panel of your PC case and secure it with the screws you removed earlier.
- Reconnect and Power On: Plug all cables back into your computer, including the power cable. Power on your PC.
Installing an External USB Network Adapter (Desktops & Laptops)
This is a much simpler process, ideal for quick upgrades or adding functionality to devices lacking internal expansion options.
- Identify a Suitable USB Port: Find an available USB port on your desktop or laptop. For optimal performance, use a USB 3.0 or higher port if your adapter supports it (these are often blue).
- Plug in the Adapter: Simply insert the USB network adapter into the chosen USB port. It should fit snugly.
- Position for Optimal Signal (for Wi-Fi adapters): If it’s a Wi-Fi adapter, try to position it away from large metal objects or other electronic devices that might cause interference. Some USB adapters come with extension cables, allowing you to place the adapter in a more open area for better reception.

Software Configuration and Driver Installation
Once the hardware is physically installed, the next crucial step is to get the software side configured. Your operating system needs the correct drivers to communicate with the new network adapter.
Automatic Driver Installation (Plug-and-Play)
Many modern network adapters are “plug-and-play,” especially USB ones. When you first boot your computer with the new adapter installed:
- Windows Detection: Windows (or your OS) will often automatically detect the new hardware and attempt to install a generic driver or download the correct one via Windows Update.
- Check Device Manager: To verify, press
Windows Key + Xand selectDevice Manager. Expand the “Network adapters” section. Your new adapter should be listed there, ideally without any yellow exclamation marks or question marks, indicating it’s working correctly. - Test Connection: If it appears correctly, try connecting to your Wi-Fi network or plugging in an Ethernet cable.
Manual Driver Installation
Even with plug-and-play, it’s always best practice to install the latest drivers from the manufacturer’s website, as these often include performance enhancements and bug fixes not found in generic drivers. This is especially important if your OS doesn’t automatically detect the adapter or if you encounter issues.
- Locate Downloaded Drivers: Navigate to the folder where you saved the drivers you downloaded earlier.
- Run Installer: Double-click the driver setup file (usually an
.exefile). Follow the on-screen prompts to complete the installation. You might need to restart your computer afterward. - Install from CD (if applicable): If you’re using the driver CD, insert it into your optical drive, and the setup program should launch automatically. Follow the instructions.
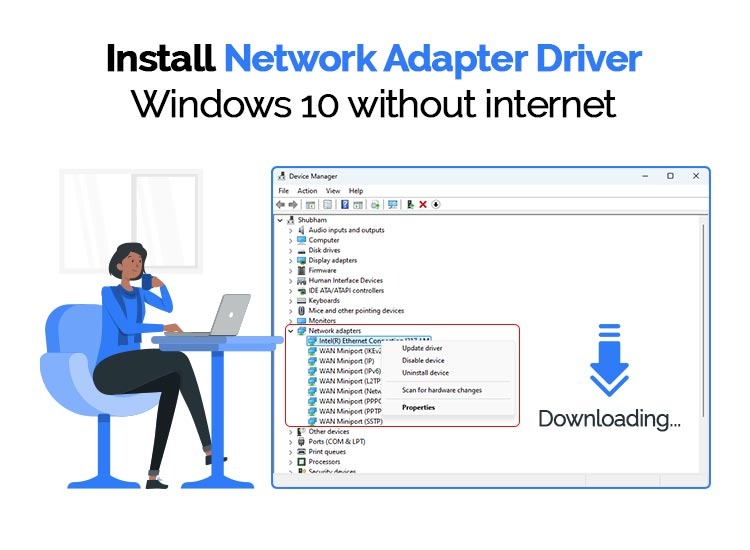
- Manual Update via Device Manager: If the installer fails or you want to force a driver update:
- Open
Device Manager. - Right-click on your network adapter (it might be listed under “Other devices” with a yellow exclamation mark if drivers aren’t installed).
- Select “Update driver.”
- Choose “Browse my computer for drivers” and navigate to the folder where you saved the driver files. Follow the prompts.
- Open
Verifying the Installation
After installing the drivers, confirm that your network adapter is functioning correctly.
- Device Manager Check: Revisit
Device Manager. Ensure your network adapter is listed under “Network adapters” and shows no error icons. - Network Connections:
- Windows: Right-click the network icon in your system tray (bottom-right corner) and select “Open Network & Internet settings” or “Network and Sharing Center.” You should see your new adapter listed as an active connection.
- Wi-Fi: If it’s a Wi-Fi adapter, click the network icon in the system tray, and you should see a list of available Wi-Fi networks. Select yours and enter the password.
- Ethernet: If it’s an Ethernet adapter, plug in an Ethernet cable from your router/modem. The network icon should change to indicate a wired connection.
- Internet Test: Open a web browser and try to visit a website (e.g., Google.com). Run a speed test (e.g., Speedtest.net) to ensure you’re getting the expected performance.
Troubleshooting Common Issues
Even with careful installation, you might encounter some bumps in the road. Here are solutions to common problems:
Adapter Not Detected or Not Working
- Check Physical Connection:
- PCIe: Ensure the card is fully seated in the PCIe slot. Gently push down on it again. Check that it’s secured with a screw.
- USB: Try plugging the adapter into a different USB port. Make sure the port itself is functional by testing it with another USB device.
- Driver Issues:
- Go to
Device Manager. If the adapter has a yellow exclamation mark, its drivers are either missing or corrupted. Reinstall the drivers from the manufacturer’s website. - Try uninstalling the device from Device Manager (right-click, “Uninstall device”) and then restarting your PC. Windows will try to re-detect and install drivers.
- Go to
- BIOS/UEFI Settings: In rare cases, a PCIe slot might be disabled in your motherboard’s BIOS/UEFI settings. Consult your motherboard manual on how to access and check these settings.
- Hardware Fault: If all else fails, the adapter itself might be faulty. If possible, test it on another computer or consider returning it for a replacement.
No Internet Connection After Installation
- Check Cable/Wi-Fi Password:
- Ethernet: Ensure the Ethernet cable is securely plugged into both your PC and your router/modem. Check for activity lights on both the adapter and the router.
- Wi-Fi: Double-check that you’ve entered the correct Wi-Fi password. Passwords are case-sensitive.
- Router/Modem Reboot: Sometimes your network equipment needs a refresh. Power cycle your router and modem (unplug them for 30 seconds, then plug them back in).
- IP Address Issues:
- Open
Command Prompt(search “cmd”). - Type
ipconfig /releaseand press Enter. - Then type
ipconfig /renewand press Enter. This forces your PC to request a new IP address from the router.
- Open
- Windows Network Troubleshooter: Use Windows’ built-in troubleshooter. Right-click the network icon in the system tray and select “Troubleshoot problems.”
Slow Speeds or Intermittent Connectivity
- Driver Update: Always ensure you have the absolute latest drivers from the manufacturer’s website. Outdated drivers are a common cause of performance issues.
- Signal Strength (Wi-Fi):
- Distance: The further you are from your router, the weaker the signal.
- Obstacles: Walls, floors, and large appliances (microwaves, cordless phones) can interfere with Wi-Fi signals.
- Interference: Other Wi-Fi networks in your area, Bluetooth devices, and even some smart home gadgets can cause interference. Try changing your router’s Wi-Fi channel settings (consult your router manual).
- Antenna Positioning: Adjust your Wi-Fi adapter’s antennas for better reception.
- Router Overload/Old Router: An old or overtaxed router might be the bottleneck. Consider upgrading your router if you have many devices or an older model.
- Bandwidth Hogs: Other devices on your network might be consuming a lot of bandwidth (e.g., large downloads, 4K streaming).
- Duplex Settings (Ethernet): In rare cases, the network adapter’s duplex setting might be mismatched with the router/switch. You can usually find this in the adapter’s advanced properties in Device Manager (e.g., set to “Auto Negotiation”).
By systematically working through these troubleshooting steps, you can resolve most common network adapter issues and get your connection running smoothly.

Conclusion
Installing a network adapter, whether it’s an internal PCIe card for a desktop or a convenient external USB dongle, is a straightforward process that significantly impacts your computer’s ability to connect to the digital world. By carefully choosing the right adapter, following the installation steps, and ensuring proper driver configuration, you can unlock faster speeds, greater reliability, and enhanced connectivity.
In an era where technology trends dictate the pace of innovation, having a robust and high-performing network connection is paramount for productivity, communication, and entertainment. Whether you’re a professional leveraging AI tools for complex tasks, a gamer seeking low-latency connections, or simply someone who enjoys seamless streaming, a properly installed and configured network adapter is your gateway to an optimized online experience. Don’t let a weak or outdated connection hold you back; empower your system with the right hardware, and enjoy the full potential of your digital life.
aViewFromTheCave is a participant in the Amazon Services LLC Associates Program, an affiliate advertising program designed to provide a means for sites to earn advertising fees by advertising and linking to Amazon.com. Amazon, the Amazon logo, AmazonSupply, and the AmazonSupply logo are trademarks of Amazon.com, Inc. or its affiliates. As an Amazon Associate we earn affiliate commissions from qualifying purchases.