In the vast and ever-evolving landscape of digital creativity, typography stands as an unsung hero. More than just decorative elements, fonts are fundamental building blocks of communication, design, and brand identity. From the sleek readability of a professional business report to the artistic flair of a marketing campaign, the right typeface can significantly impact how your message is perceived, how users interact with your software, or how your brand resonates with its audience. For anyone involved in content creation, graphic design, digital marketing, or even just personalizing their computer experience, understanding how to install and manage fonts is a crucial skill.

This comprehensive guide delves into the practical steps of installing fonts on both Windows and macOS operating systems, while also exploring the broader context of font selection, management, and licensing. We’ll equip you with the knowledge to expand your typographic toolkit, ensuring your digital projects always look their best and communicate effectively. Whether you’re a burgeoning designer, a seasoned marketer, a developer crafting intuitive interfaces, or simply someone looking to enhance their digital workspace, mastering font installation is an essential step in your tech journey.
Understanding Fonts: The Foundation of Digital Expression
Before we dive into the “how-to,” it’s vital to grasp the significance of fonts in our digital world and familiarize ourselves with the various formats they come in. This foundational knowledge empowers you to make informed decisions about your typographic choices, ensuring compatibility, quality, and legal compliance.
Why Fonts Matter in a Digital World
Fonts are far more than mere stylistic choices; they are powerful tools that influence perception, readability, and overall user experience.
- Readability and Accessibility (Tech): The primary function of any font is to present text clearly and legibly. A well-chosen font enhances readability, making documents, websites, and applications easier to consume. Conversely, a poorly chosen or unreadable font can lead to user frustration, reduced engagement, and even accessibility barriers for individuals with visual impairments. For software developers and app designers, selecting fonts that prioritize clarity is paramount for a positive user experience.
- Aesthetics and Design (Tech & Brand): Fonts contribute significantly to the visual appeal of any design. They set the tone and mood, evoking emotions and conveying specific messages. A sophisticated serif font might suggest tradition and trustworthiness, while a minimalist sans-serif could imply modernity and efficiency. For gadget reviewers and tech bloggers, a consistent and appealing font choice in their graphics and articles reinforces their brand’s aesthetic.
- Branding and Identity (Brand): For businesses, personal brands, and corporate identities, fonts are integral to visual branding. A unique and consistent typeface can become instantly recognizable, differentiating a brand from its competitors. Think of iconic logos and their accompanying typefaces—they are inseparable from the brand’s identity. Marketing professionals understand that typography is a silent brand ambassador, influencing how a company is perceived and remembered.
- Professionalism and Impact (Brand & Money): In professional contexts, typography communicates credibility and attention to detail. Documents, presentations, and marketing materials adorned with high-quality, thoughtfully selected fonts project an image of professionalism and competence. For freelancers, consultants, or anyone running a side hustle, investing in good typography (even free options) can elevate the perceived value of their work, helping them attract and retain clients and, ultimately, impact their online income.
A Lexicon of Font Formats
Fonts come in several digital formats, each with its own characteristics and use cases. Understanding these formats is crucial for successful installation and deployment across different platforms and applications.
- TTF (TrueType Font): Developed by Apple and later adopted by Microsoft, TrueType is one of the oldest and most common font formats. TTF fonts are widely compatible across operating systems and applications, making them a safe and popular choice for desktop publishing and general use. They contain all the necessary data for displaying characters, including hinting information for optimal rendering at various sizes.
- OTF (OpenType Font): Co-developed by Microsoft and Adobe, OpenType is an extension of TrueType that offers greater versatility and advanced typographic features. OTF fonts can contain up to 65,536 glyphs, supporting extended character sets, ligatures, small caps, alternate characters, and other sophisticated design elements. This makes them the preferred format for professional designers and typographers. OTF fonts are cross-platform compatible, meaning they work seamlessly on both Windows and macOS.
- WOFF/WOFF2 (Web Open Font Format): These formats are specifically optimized for web use. WOFF and WOFF2 fonts are essentially OpenType or TrueType fonts with metadata and compression, making them load faster on websites. They are essential for web developers who want to use custom fonts on their sites without sacrificing performance. WOFF2 offers even better compression than WOFF.
- EOT (Embedded OpenType): An older format developed by Microsoft, EOT was designed for embedding fonts on web pages, primarily for Internet Explorer. Its usage has declined with broader browser support for WOFF.
- SVG (Scalable Vector Graphics) Fonts: SVG fonts represent characters as vector shapes, similar to vector graphics. While they offer scalability without loss of quality, they are generally less efficient than WOFF for web use and have limited browser support for general text rendering. They might be used in specific graphic contexts or for icon fonts.
For most desktop users, you’ll primarily be dealing with TTF and OTF files when installing fonts on your computer. WOFF/WOFF2 are more relevant if you’re a web developer or integrating fonts into online platforms.
Sourcing Your Typography: Where to Find Fonts
The digital world offers an abundance of font resources, ranging from free collections to premium marketplaces. Your choice will often depend on your budget, project requirements, and licensing needs.
- Free Font Repositories:
- Google Fonts: An excellent starting point, Google Fonts offers a vast library of high-quality, open-source fonts. They are all licensed under open-source licenses, making them free for both personal and commercial use. This platform is also popular for web embedding.
- Font Squirrel: Specializing in commercial-use free fonts, Font Squirrel carefully curates its collection to ensure all fonts are legally free for commercial projects. They also offer a useful “Webfont Generator.”
- DaFont and 1001 Free Fonts: These sites host a massive collection of fonts uploaded by various designers. While many are free for personal use, it’s crucial to always check the license for each font, as commercial use often requires purchasing a license or contacting the designer.
- Premium Font Marketplaces:
- MyFonts, Adobe Fonts, Fontspring, Creative Market: These platforms offer professional-grade fonts, often designed by established type foundries. Premium fonts typically come with robust licensing options for various uses (desktop, web, app, e-book) and offer superior design quality, comprehensive character sets, and dedicated support. While an investment, high-quality fonts can significantly elevate your brand’s aesthetics and professionalism, providing a strong ROI for businesses and freelancers.
- Adobe Creative Cloud/Microsoft 365 Subscriptions: If you subscribe to services like Adobe Creative Cloud, you often gain access to a substantial library of fonts (Adobe Fonts) that can be easily activated and used across your Adobe applications. Similarly, Microsoft 365 might include premium fonts for its suite of applications. This can be a cost-effective way to access a diverse range of professional typefaces.
- Custom Fonts: For truly unique brand identities, some businesses commission custom typefaces. This bespoke approach ensures exclusivity and perfectly aligns the typography with the brand’s specific values and messaging, though it represents a significant financial investment.
When acquiring fonts, always pay close attention to the End-User License Agreement (EULA). Licenses dictate how and where you can use a font (personal projects, commercial work, web embedding, app development). Misusing a font outside its license terms can lead to legal issues.
Installing Fonts on Windows: A Step-by-Step Guide
Installing fonts on a Windows computer is a straightforward process, offering a couple of methods depending on your preference and Windows version.
Preparing Your Font Files
Before installation, you’ll need to acquire your font files.
- Download: Download the font package from your chosen source. These are often compressed into a
.zipfile. - Unzip: Locate the downloaded
.zipfile, right-click it, and select “Extract All…” Choose a destination folder (e.g., your Downloads folder or a dedicated “Fonts” folder) and click “Extract.” - Identify Font Files: Inside the unzipped folder, you’ll find the actual font files, typically ending with
.ttf(TrueType Font) or.otf(OpenType Font) extensions. Some packages might include various weights (e.g., Light, Regular, Bold) and styles (e.g., Italic) within separate files.
The Classic Method: Using Windows File Explorer
This method is quick and effective for installing individual or a small number of fonts.
- Locate Font File(s): Navigate to the folder where you extracted your
.ttfor.otffiles using File Explorer. - Right-Click and Install:
- Single Font: Right-click on the specific font file you wish to install. From the context menu, select “Install” or “Install for all users.”
- Multiple Fonts: Select multiple font files (Ctrl+click to select individual files, or Shift+click to select a range), then right-click on any of the selected files and choose “Install” or “Install for all users.”
- “Install”: This option installs the font for the current user profile only. It will be available to you when you log in.
- “Install for all users”: This option installs the font system-wide, making it available to all user accounts on the computer. This usually requires administrator privileges. For shared computers or professional environments, “Install for all users” is often preferred.
- Confirmation: A small installation dialog box may briefly appear, indicating the process is complete.
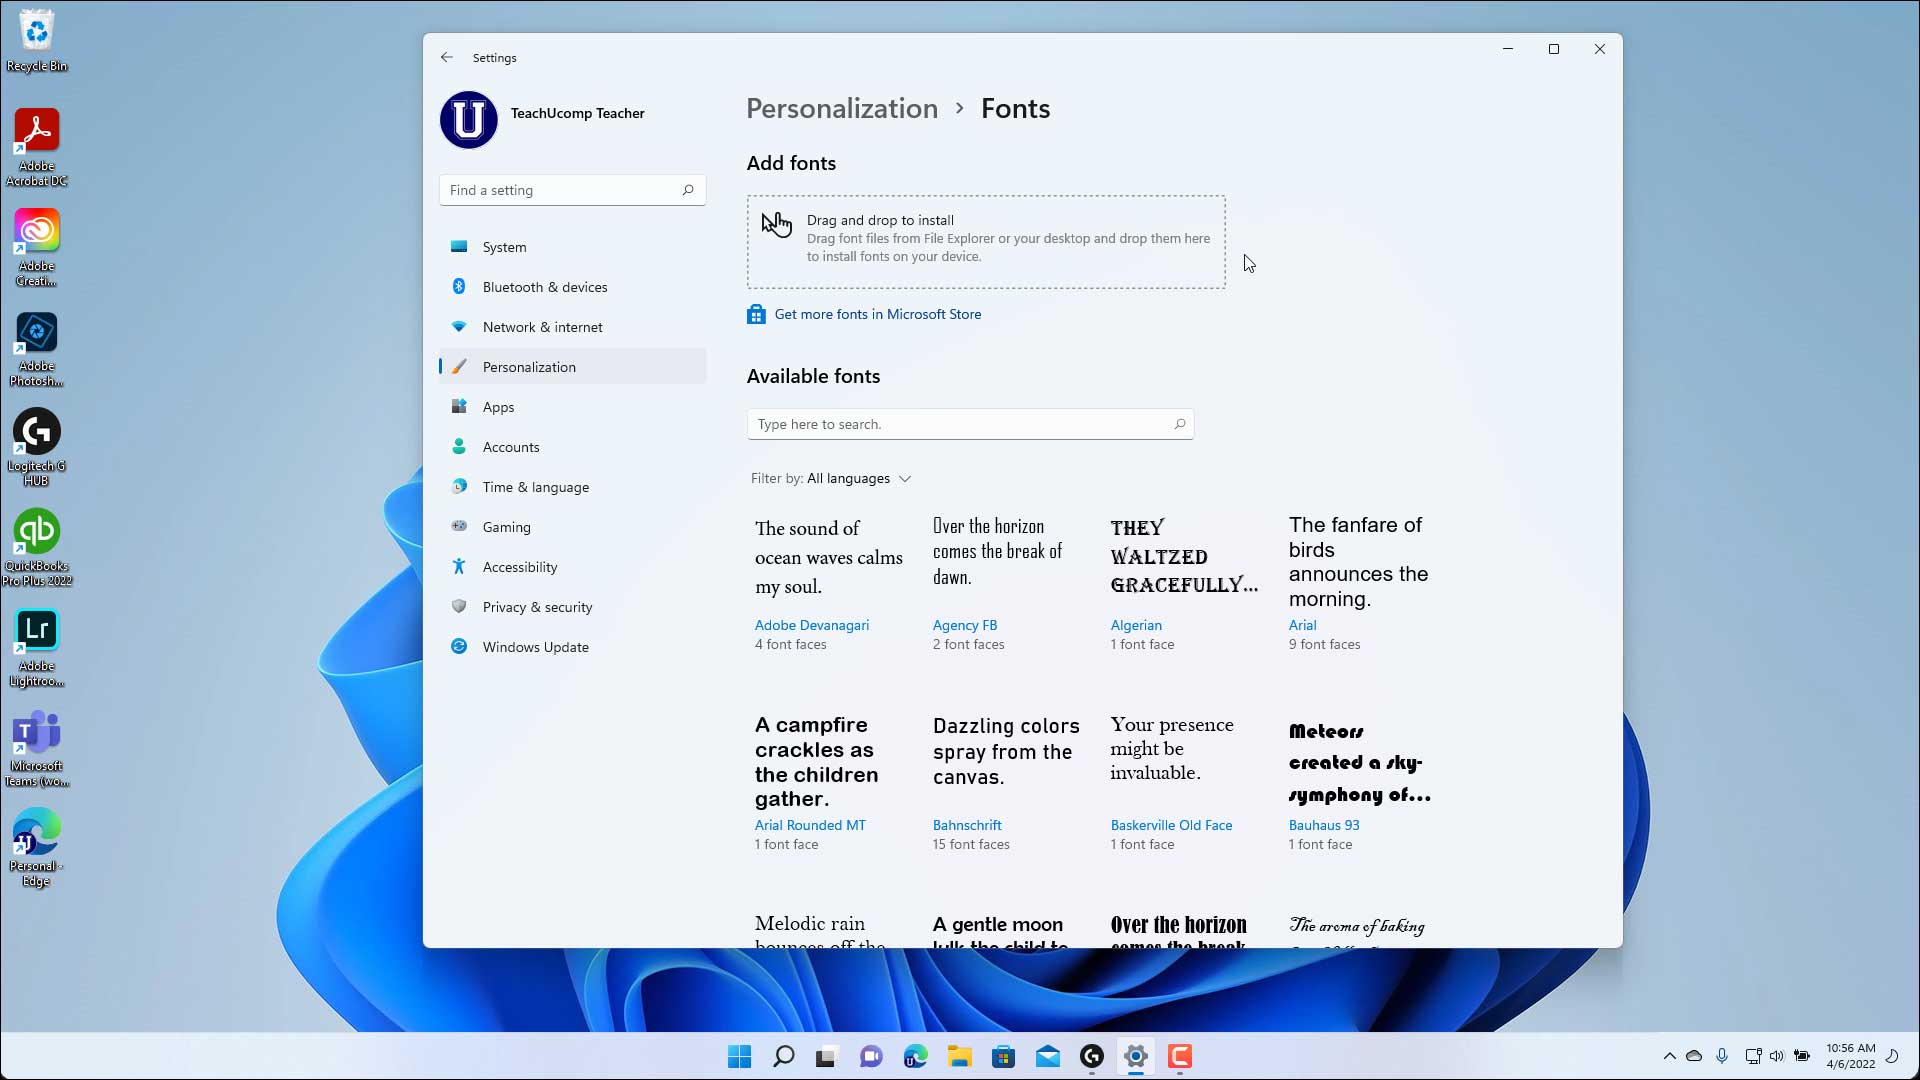
The Modern Approach: Through Windows Settings (Windows 10/11)
Windows 10 and 11 introduced a more visual and integrated way to manage fonts through the Settings app.
- Open Settings: Click on the Start button, then click the gear icon to open “Settings.” Alternatively, press
Windows key + I. - Navigate to Fonts: Go to “Personalization” > “Fonts.”
- Drag and Drop Installation: In the “Add fonts” section at the top, you’ll see a gray box that says “Drag and drop to install fonts.” Simply drag your
.ttfor.otffont files from File Explorer directly into this box. Windows will automatically install them. - Manage Existing Fonts: This Fonts settings page also allows you to view all your installed fonts, preview them, and uninstall them. You can search for specific fonts, adjust the preview text, and see details about each typeface.
Verifying Installation
After installation, it’s a good practice to verify that your new fonts are accessible.
- Restart Applications: If you had any applications open (e.g., Microsoft Word, Adobe Photoshop, a web browser) during the font installation, close and restart them. Applications often load their font lists when they launch.
- Check in an Application: Open a text-editing or design application (like Word, Notepad, Photoshop, GIMP, etc.). Create a new document or text box, then look for your newly installed font in the font selection dropdown menu. You should see it listed by its full name.
Installing Fonts on macOS: Unleashing Your Creative Toolkit
Apple’s macOS provides an intuitive and robust system for managing fonts through its built-in utility, Font Book. The installation process is straightforward, mirroring the user-friendly design philosophy of the operating system.
Acquiring and Unpacking Your Font Files
The initial steps are identical to Windows:
- Download: Obtain your font package, which will likely be a
.ziparchive. - Unzip: Double-click the
.zipfile in Finder; macOS will automatically decompress it, creating a new folder with the font files. - Locate Font Files: Inside the folder, identify the
.ttfor.otffiles.
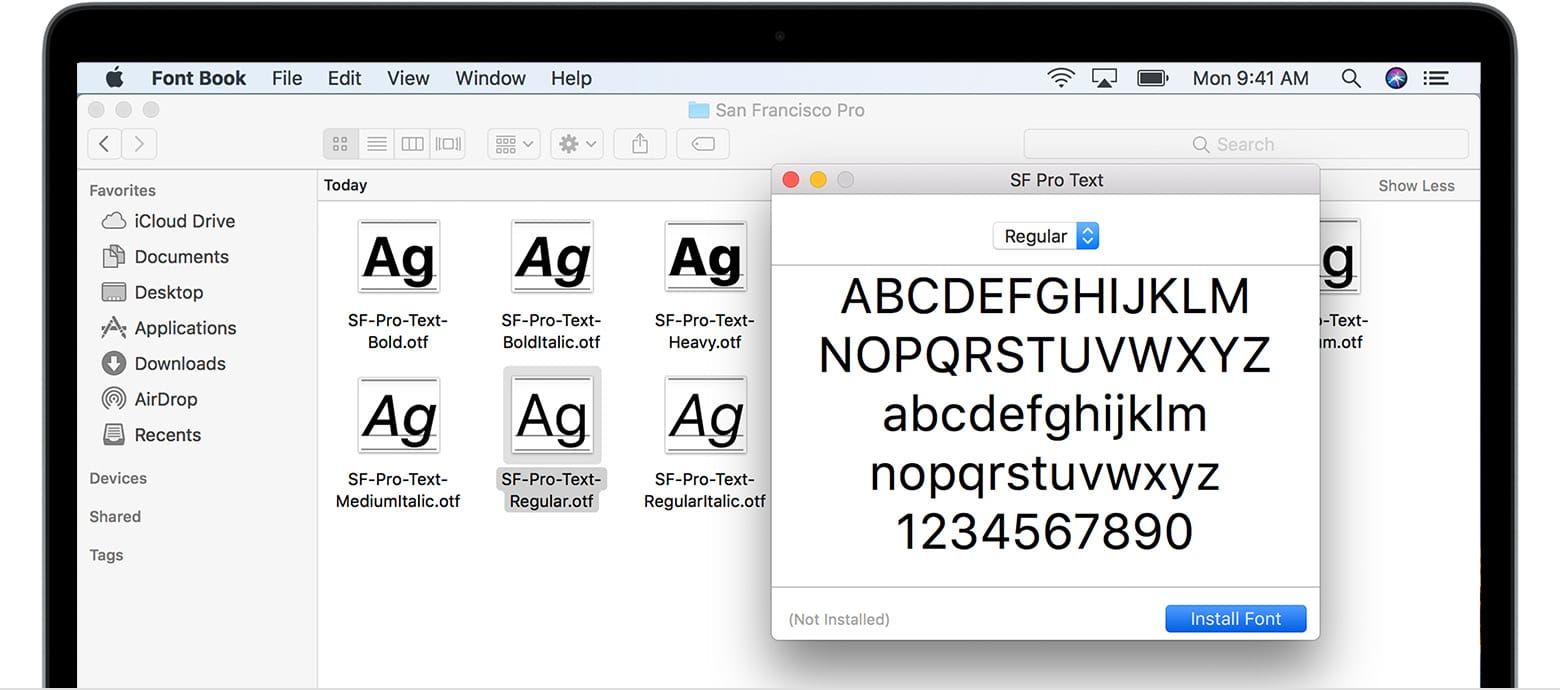
The macOS Way: Using Font Book
Font Book is the dedicated application on macOS for previewing, installing, and organizing your font collection.
- Double-Click the Font File: The simplest method is to locate your
.ttfor.otffile in Finder and double-click it. - Font Book Preview: This action will automatically open the Font Book application, displaying a preview of the font. You’ll see sample text in various sizes and styles, allowing you to examine the typeface before committing to installation.
- Install Font: At the bottom right of the Font Book window, click the “Install Font” button.
- Font Validation: Font Book will then perform a quick validation check to ensure the font file is not corrupted or experiencing major issues. If any problems are detected, it will alert you.
- Installation Complete: Once installed, the font will appear in your “All Fonts” list within Font Book and become available in all your macOS applications.
- Multiple Fonts: If you have multiple font files to install, you can select them all in Finder and then double-click any one of them. Font Book will open and ask if you want to install all selected fonts.
Manual Installation for Advanced Users
While Font Book is generally the preferred method, advanced users or those needing specific control might opt for manual installation.
- Locate Font Folders: macOS has two primary locations for font files:
~/Library/Fonts: This is your user-specific Fonts folder. Fonts placed here are only available to your user account. To access it, open Finder, click “Go” in the menu bar, then hold down theOptionkey to reveal “Library,” and then navigate to the “Fonts” folder./Library/Fonts: This is the system-wide Fonts folder. Fonts placed here are available to all user accounts on the Mac. You typically need administrator privileges to modify this folder.
- Drag and Drop: Drag your
.ttfor.otffiles directly into either of these folders. - Restart Applications: Just like with Windows, restart any applications that were open during the manual installation to ensure they recognize the new fonts.
Confirmation and Application
To ensure your newly installed fonts are ready for use:
- Open an Application: Launch any macOS application that uses fonts, such as Pages, Keynote, Mail, Safari, or an Adobe Creative Suite application (Photoshop, Illustrator, InDesign).
- Check Font Menu: In the application’s font selection menu (often found under “Format” > “Font” > “Show Fonts” or directly in a formatting toolbar), search for the name of your installed font. It should now be listed and available for use.
Beyond Installation: Managing and Troubleshooting Your Font Library
Installing fonts is only one part of the equation. To maintain an efficient and robust creative workflow, it’s equally important to know how to manage your font library, troubleshoot common issues, and understand the crucial aspects of font licensing. This is where productivity, digital security, and financial considerations intersect with your typographic endeavors.
Deactivating or Uninstalling Fonts
An overflowing font library can sometimes lead to system slowdowns or difficulty finding the right typeface. Regularly managing your fonts is a good practice.
- Windows:
- Settings (Windows 10/11): Go to Settings > Personalization > Fonts. Click on a font family, then click the “Uninstall” button.
- Control Panel (Older Windows/Alternative): Open Control Panel > Appearance and Personalization > Fonts. Right-click on the font you wish to remove and select “Delete.”
- macOS:
- Font Book: Open Font Book. Select the font(s) you wish to manage in the “All Fonts” column. To disable a font without removing it, right-click and choose “Disable [Font Name].” To uninstall, select the font, then go to “File” > “Remove [Font Name].” You will be prompted to confirm.
Deactivating fonts can be useful for troubleshooting, temporarily removing fonts you rarely use, or optimizing system performance by reducing the number of active fonts that applications need to load.
Common Font Installation Hurdles and Solutions
Even with straightforward installation processes, you might occasionally encounter issues. Here are some common problems and their fixes:
- Font Not Appearing in Applications:
- Solution: Close and restart the application. Many programs only scan for new fonts at launch. If that doesn’t work, try restarting your entire computer. Sometimes, clearing the font cache (a hidden system file that stores font information) can resolve stubborn issues (requires more advanced steps, often specific to OS versions).
- Corrupted Font Files:
- Solution: If a font fails to install or displays incorrectly (e.g., jagged edges, missing characters), the file might be corrupted. Try re-downloading the font from the original source. If the issue persists, try a different source or consider that the font file itself may be flawed.
- Permissions Issues:
- Solution (Windows): If “Install for all users” fails, ensure you have administrator privileges. Right-click the font file and choose “Run as administrator” before installing, or log in as an administrator.
- Solution (macOS): Font Book usually handles permissions, but if manually dragging to
/Library/Fontsfails, ensure you have admin rights and authenticate when prompted.
- Duplicate Fonts:
- Solution (macOS): Font Book has a built-in feature to detect and resolve duplicate fonts. Go to “File” > “Validate Fonts” or “Resolve Duplicates.” This can prevent conflicts and unexpected behavior in applications.
- System Slowdown:
- Solution: While modern operating systems handle many fonts well, an excessive number of active fonts can sometimes impact system performance, especially during application launches. If you notice a slowdown, consider deactivating fonts you don’t frequently use. Font management tools can help with this.
Font Management Tools for Power Users
For design professionals, agencies, or those with extensive font libraries, dedicated font management software can become an invaluable productivity tool.
- Adobe Fonts Integration: If you’re an Adobe Creative Cloud subscriber, Adobe Fonts is seamlessly integrated. You can browse, activate, and deactivate fonts directly within Creative Cloud apps or the Creative Cloud desktop application, making management effortless for projects within the Adobe ecosystem.
- Dedicated Font Managers: Tools like Universal Type Client (Extensis), RightFont, FontBase, or Suitcase Fusion offer advanced features beyond basic OS capabilities. These include:
- Centralized Library: Organize thousands of fonts into custom collections.
- Auto-Activation: Fonts automatically activate when you open a document that requires them, and deactivate when the document is closed.
- Advanced Previews: Compare fonts side-by-side with custom text.
- Tagging and Search: Efficiently find fonts based on various attributes.
- Cloud Sync: Sync your font library across multiple devices.
These tools are an investment but can dramatically improve workflow efficiency for graphic designers, agencies, and anyone managing a vast font collection, directly impacting productivity and potentially contributing to more profitable client work.
Licensing Considerations: Protecting Your Brand and Your Wallet
Understanding font licenses is critical for legal compliance, protecting your brand’s reputation, and avoiding potential financial penalties. This is particularly relevant for those generating online income or building a corporate identity.
- End-User License Agreements (EULAs): Every font comes with an EULA. Always read it. It specifies exactly how you’re allowed to use the font.
- Personal Use vs. Commercial Use: Many free fonts are “free for personal use only.” This means you can use them for hobbies, school projects, or non-profit work, but not for anything that generates revenue (e.g., client work, company logos, marketing materials, products for sale).
- Commercial Licenses: If you’re using a font for any commercial purpose (branding, advertising, website design for a client, product packaging), you must purchase a commercial license. These licenses vary in scope:
- Desktop License: For use in desktop applications (Word, Photoshop) to create static images or print documents.
- Web Font License: Required for embedding fonts on websites using
@font-face. Licenses are often based on website traffic or page views. - App License: For embedding fonts within mobile or desktop applications.
- E-book/Publishing License: For use in digital books or publications.
- Consequences of Misuse: Using a font commercially without the proper license can lead to cease-and-desist letters, legal action, and significant fines. This can damage your brand’s reputation and lead to unexpected financial costs, underscoring the importance of digital security (legal compliance) and careful financial planning.
- Open-Source Fonts: Fonts from platforms like Google Fonts are generally open-source and free for both personal and commercial use, making them a safe choice. However, even with open-source licenses, it’s good practice to understand the specific terms (e.g., Apache License, SIL Open Font License).
By diligently managing your font library and adhering to licensing agreements, you protect yourself, your clients, and your brand, ensuring your creative endeavors remain compliant and professional.
Conclusion
The ability to install and manage fonts on your computer is more than just a technical skill; it’s a gateway to enhanced creativity, clearer communication, and stronger brand identity. From selecting the perfect typeface to understanding the nuances of different formats and ensuring legal compliance, every step in this process contributes to a more polished and professional digital presence.
Whether you’re a designer meticulously crafting a visual masterpiece, a marketer fine-tuning a campaign, a developer building an intuitive app interface, or simply an individual seeking to personalize their digital workspace, fonts are powerful tools at your disposal. By following the simple steps outlined for Windows and macOS, and by embracing responsible font management and licensing practices, you unlock a world of typographic possibilities. So go ahead, explore the vast libraries of typefaces, experiment with new styles, and empower your digital projects with the perfect font. Your computer, your brand, and your audience will thank you for it.
aViewFromTheCave is a participant in the Amazon Services LLC Associates Program, an affiliate advertising program designed to provide a means for sites to earn advertising fees by advertising and linking to Amazon.com. Amazon, the Amazon logo, AmazonSupply, and the AmazonSupply logo are trademarks of Amazon.com, Inc. or its affiliates. As an Amazon Associate we earn affiliate commissions from qualifying purchases.