In the ever-evolving landscape of technology, the desire for a faster, more responsive computing experience is constant. Whether you’re a student juggling multiple research tabs, a creative professional rendering complex designs, a gamer seeking seamless gameplay, or simply someone who finds their laptop struggling to keep up with everyday tasks, upgrading your laptop’s RAM (Random Access Memory) is often the most impactful and cost-effective solution. This guide will walk you through the entire process, from understanding what RAM is and why it matters, to selecting the right modules and performing the installation itself. We’ll also touch upon related considerations that will help you make the most of your laptop’s performance.

Understanding RAM and Its Impact on Laptop Performance
Before we delve into the physical installation, it’s crucial to grasp the fundamental role of RAM in your laptop’s operation. Think of RAM as your laptop’s short-term memory or its workspace. When you open an application, load a webpage, or work on a document, your laptop transfers the necessary data from its slower storage (like an SSD or HDD) into RAM. The more RAM you have, the more data your laptop can hold in this readily accessible workspace, allowing it to switch between tasks and run applications more efficiently.
Why More RAM Matters
The impact of insufficient RAM can manifest in several frustrating ways:
- Slowdowns and Lag: When your RAM is full, your laptop has to constantly swap data between RAM and your storage drive. This process, known as “paging,” is significantly slower than accessing data directly from RAM, leading to noticeable lag, stuttering, and unresponsiveness, especially when multitasking.
- Application Crashes: Insufficient RAM can cause applications to crash unexpectedly. If an application requires more memory than is available, it may not be able to function correctly, leading to errors and forced closures.
- Reduced Multitasking Capabilities: If you frequently find yourself closing applications to free up memory or struggling to switch between open programs, it’s a clear sign that your RAM capacity is a bottleneck.
- Slower Boot Times and Application Loading: While storage speed plays a significant role, RAM also contributes to how quickly your operating system and applications load. More RAM can mean quicker access to the data needed for these processes.
- Impact on Performance-Intensive Tasks: For demanding applications like video editing software, CAD programs, virtual machines, or modern video games, ample RAM is not just beneficial; it’s essential for smooth and efficient operation.
The good news is that for many laptops, RAM is an upgradable component, offering a tangible boost in performance without the need for a complete system overhaul.
Assessing Your Current RAM Needs and Compatibility
Before you even think about purchasing new RAM, it’s vital to understand your laptop’s current RAM configuration and what type of RAM it supports. This is where the “Tech” aspect of our website’s focus truly shines, as understanding hardware specifications is key to successful upgrades.
Determining Your Current RAM Capacity and Type
There are several ways to check how much RAM your laptop currently has and what type it is:
-
Through System Information (Windows):
- Right-click on the “Start” button and select “System.”
- Under the “Device specifications” section, you’ll find “Installed RAM.”
- For more detailed information, search for “Task Manager” in the Windows search bar and open it. Navigate to the “Performance” tab, then select “Memory.” Here, you’ll see the total installed RAM, the speed, and the number of slots used.
-
Through System Information (macOS):
- Click the Apple menu in the top-left corner of your screen.
- Select “About This Mac.”
- The “Overview” tab will display your current RAM amount. Click “More Info…” and then navigate to the “Memory” section for further details on speed and slots.
-
Using Third-Party Software:
- Tools like CPU-Z (Windows) or MacTracker (macOS) can provide incredibly detailed information about your system’s hardware, including RAM type, speed, timings, and manufacturer.
Understanding RAM Types and Specifications
RAM comes in various types, and your laptop is designed to work with specific ones. The most common types you’ll encounter are:
- DDR3, DDR4, DDR5: These are generations of Synchronous Dynamic Random-Access Memory. Newer generations (like DDR4 and DDR5) are faster, more power-efficient, and offer higher capacities than older ones (like DDR3). Crucially, you cannot mix RAM generations. A laptop designed for DDR4 cannot use DDR3 or DDR5 modules, and vice-versa.
- SODIMM vs. DIMM: Laptops almost exclusively use SODIMM (Small Outline Dual In-line Memory Module), which are smaller than the standard DIMMs found in desktop computers.
- Speed (MHz): RAM operates at a specific clock speed, measured in Megahertz (MHz). Higher speeds generally mean faster data transfer. Your motherboard will support a maximum RAM speed, and while you can often install RAM with a higher speed, it will typically run at the maximum supported by your laptop.
- Latency (CL): This refers to the delay between the RAM module receiving a request and sending the data. Lower latency is better.
- Capacity (GB): This is the amount of data the RAM module can store, measured in Gigabytes (GB). Common capacities for individual modules are 4GB, 8GB, 16GB, and 32GB.
Checking Your Laptop’s Maximum RAM Capacity and Supported Speeds
This is a critical step to avoid purchasing incompatible RAM.
- Consult Your Laptop’s Manual or Manufacturer’s Website: The most reliable source of information is your laptop’s user manual or the support section of the manufacturer’s official website. Search for your specific laptop model to find its specifications.
- Use Online Tools: Websites like Crucial’s “System Scanner” or Kingston’s “Memory Finder” are excellent resources. You can either download a small scanner program that analyzes your system or manually enter your laptop’s make and model to see compatible RAM options. These tools often provide information on the maximum RAM capacity your laptop supports, the number of RAM slots available, and the types of RAM modules that will work.
Why is this important? Installing RAM that is too fast, too slow, or of the wrong type can lead to system instability, boot failures, or the RAM simply not being recognized at all. It’s also essential to know the maximum capacity your laptop’s motherboard can handle. For example, if your laptop officially supports a maximum of 16GB, installing 32GB might not yield any benefits or could even cause issues.
Purchasing and Installing Your New RAM Modules
With a clear understanding of your laptop’s RAM requirements, you’re ready to make a purchase and perform the physical upgrade. This section will leverage both “Tech” and “Money” aspects, as choosing the right components and finding good value are key.
Choosing the Right RAM for Your Laptop
When selecting new RAM modules, prioritize compatibility above all else.
- Match the Type: Ensure the RAM is the correct generation (DDR3, DDR4, DDR5) and form factor (SODIMM).
- Consider Capacity: If your laptop has two RAM slots and you currently have one 8GB module, you could upgrade to two 8GB modules for a total of 16GB, or two 16GB modules for 32GB, provided your laptop supports it. If you have one free slot, you can add a module of the same size and type as your existing one for increased capacity.
- Speed and Latency: While matching the exact speed and latency is ideal for optimal performance, if your laptop supports multiple speeds, it’s generally fine to install faster RAM; it will simply run at the highest speed your laptop’s chipset supports. However, ensure the speeds are within the supported range.
- Brand Reputation and Reviews: Stick to reputable RAM manufacturers like Crucial, Kingston, Corsair, G.Skill, and Samsung. Read reviews to gauge product quality and reliability.
Where to Buy RAM
- Online Retailers: Amazon, Newegg, B&H Photo, and dedicated memory retailers are great places to find a wide selection and competitive pricing.
- Manufacturer Websites: Direct from brands like Crucial or Kingston can sometimes offer specific bundles or direct support.
- Local Computer Stores: While selection might be limited, they can offer immediate purchase and sometimes installation services.
When considering “Money,” compare prices across different retailers. Look for deals, especially during major sales events. For older laptops, refurbished RAM can be a budget-friendly option, but ensure it comes with a warranty.
The Step-by-Step Installation Process
Disclaimer: Opening your laptop can void your warranty in some cases. If you are uncomfortable with any part of this process, consider seeking professional assistance. Always proceed with caution and ensure you have a static-free environment.
What You’ll Need:
- New RAM Modules: The ones you’ve carefully selected.
- Small Phillips Head Screwdriver: Usually a #0 or #1 size.
- Anti-Static Wrist Strap (Recommended): To prevent static discharge from damaging components.
- Small Container: To keep track of screws.
- Plastic Spudger or Opening Tool (Optional): To help pry open the laptop casing gently.
Steps:
- Power Down Completely and Unplug: Shut down your laptop entirely (not just sleep or hibernate). Disconnect the AC adapter.
- Remove the Battery (If Removable): If your laptop has an external, removable battery, detach it. For internal batteries, you’ll need to disconnect it from the motherboard after opening the casing (see step 6).
- Ground Yourself: Wear your anti-static wrist strap and attach the clip to a metal, unpainted part of your laptop’s chassis before touching any internal components. If you don’t have a strap, touch a grounded metal object (like a metal desk leg) frequently to discharge static electricity.
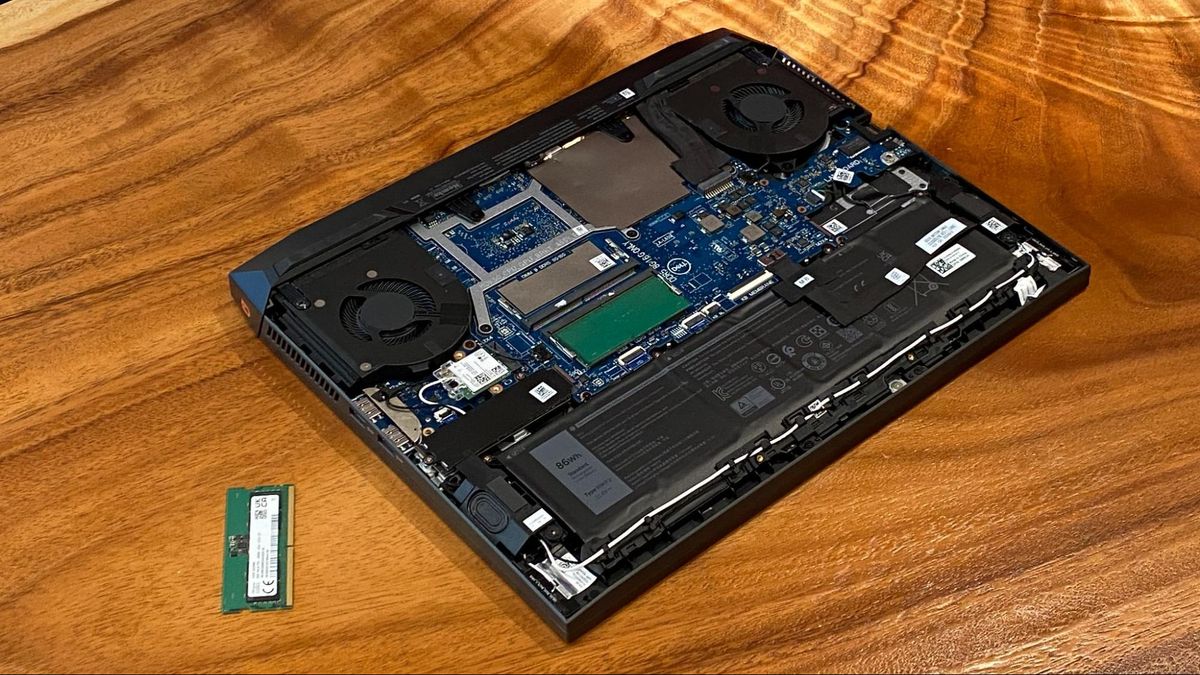
- Locate the RAM Access Panel: Most laptops have a dedicated panel on the bottom designed for RAM and/or storage upgrades. It’s usually secured by one or two screws. Some laptops require you to remove the entire bottom cover. Consult your laptop’s manual or search online for “[Your Laptop Model] RAM upgrade” to find specific instructions.
- Unscrew and Remove the Panel: Use your screwdriver to remove the screws holding the RAM access panel in place. Carefully lift or slide the panel off. If you need to remove the entire bottom cover, you’ll likely need to unscrew numerous screws, potentially of different sizes, and then gently pry around the edges with a plastic tool.
- Disconnect Internal Battery (If Applicable): If your battery is internal, you’ll see a connector cable linking it to the motherboard. Carefully disconnect this cable. It usually pulls straight out or has a small latch.
- Locate the RAM Slots: You’ll see one or two small, horizontal slots, each holding a RAM module. The modules are held in place by small metal clips on either side.
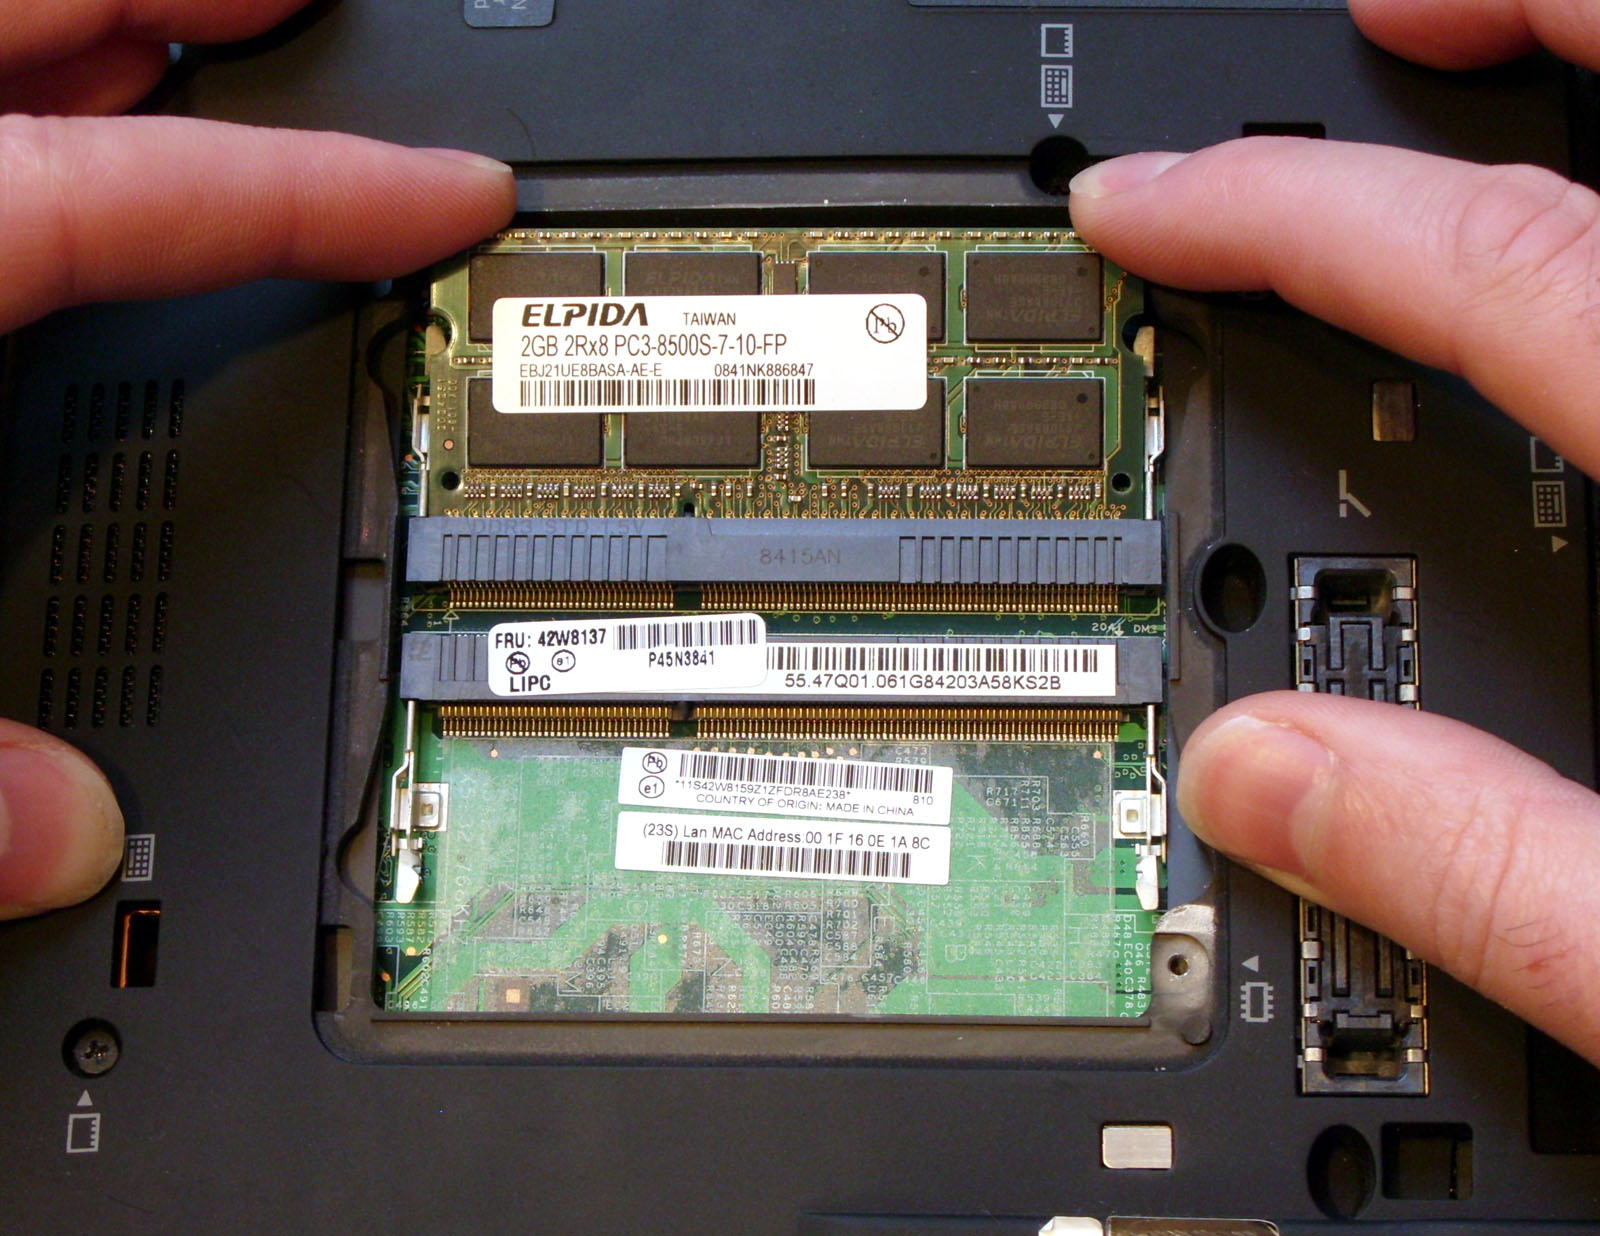
- Remove Existing RAM (If Necessary): Gently push outwards on the metal clips on both sides of the RAM module. The module should then pop up at an angle. Carefully pull the module out of the slot.
- Insert the New RAM Module:
- Align the notch on the bottom edge of the new RAM module with the corresponding key in the RAM slot. This ensures you insert it the correct way.
- Insert the module into the slot at approximately a 45-degree angle.
- Gently push down on the top edge of the module until it clicks into place and the metal clips on the sides secure it. It should lie flat.
- Reinstall Existing RAM (If Upgrading One Slot): If you’re adding a second module, repeat the insertion process for the new module in the adjacent slot. If you’re replacing a module, ensure the old one is safely stored.
- Reconnect Internal Battery (If Applicable): Carefully reinsert the battery connector cable.
- Replace the Panel/Bottom Cover: Reattach the RAM access panel or the bottom cover, making sure all clips and edges are properly seated. Screw it back into place.
- Reinsert Removable Battery (If Applicable): If you removed an external battery, put it back.
- Power On and Verify: Connect the AC adapter and power on your laptop. Your system should boot up normally.
- Check RAM in System Information: Once the OS has loaded, go back to System Information (as described in section 2.1) to verify that the new total RAM capacity is recognized correctly.
Maximizing Performance and Troubleshooting Common Issues
After successfully installing your new RAM, you’ll want to ensure everything is running optimally and be prepared for any potential hiccups. This involves understanding how to leverage the upgrade and what to do if something goes wrong, drawing on both “Tech” and “Brand” (reliability and support) aspects.
Verifying the Upgrade and Enjoying the Performance Boost
- System Performance Check: You should immediately notice a difference. Applications will load faster, multitasking will be smoother, and the system will feel more responsive.
- Task Manager/Activity Monitor: Keep an eye on your RAM usage in Task Manager (Windows) or Activity Monitor (macOS). You’ll likely see that your available RAM is significantly higher, and your system won’t be hitting its limits as quickly.
- Benchmarking (Optional): For the tech-savvy, you can use benchmarking software before and after the upgrade to quantify the performance improvement, especially for tasks like memory-intensive application tests.
Troubleshooting Common RAM Installation Issues
While RAM upgrades are generally straightforward, occasional problems can arise.
-
Laptop Won’t Boot / Black Screen:
- Reseat the RAM: The most common cause is the RAM not being seated correctly. Power off, unplug, ground yourself, and carefully remove and reinsert both modules.
- Incompatible RAM: Double-check that the RAM you purchased is compatible with your laptop model and its specifications.
- Faulty RAM Module: If you installed multiple new modules, try booting with just one at a time to isolate a potentially defective module.
- Static Discharge: Although rare, a significant static shock can damage components.
-
System Instability / Blue Screen of Death (BSOD) / Kernel Panics:
- RAM Timings/Speed: While less common, sometimes modules with significantly different timings or speeds might cause subtle conflicts. If possible, try to match specifications as closely as you can.
- Faulty RAM: Again, test modules individually.
- BIOS/UEFI Update: In rare cases, updating your laptop’s BIOS or UEFI firmware can improve hardware compatibility. Always follow manufacturer instructions carefully when updating firmware.
-
RAM Not Fully Recognized:
- Maximum Capacity Limit: Ensure you haven’t exceeded your laptop’s maximum supported RAM capacity.
- Operating System Limit (32-bit): Older 32-bit operating systems can only address around 4GB of RAM. If you’ve installed more, you’ll need to upgrade to a 64-bit OS to utilize the full capacity. Most modern laptops come with 64-bit Windows or macOS.
- Incorrect Slot Usage: If your laptop has specific dual-channel configurations, ensure you’re using the correct slots for optimal performance, though this usually affects speed more than recognition.
Seeking Support and Considering Future Upgrades
- Manufacturer Support: If you encounter persistent issues and are confident in your installation, contact your laptop manufacturer’s support. They can offer guidance specific to your model.
- Online Communities: Forums like Reddit (e.g., r/techsupport, r/laptops) or dedicated hardware forums are invaluable resources where experienced users can offer advice.
- Professional Help: If you’re not comfortable troubleshooting or performing the installation, many local computer repair shops offer RAM upgrade services.
- Future-Proofing: While this guide focuses on RAM, consider other components like your storage drive (SSD). If your laptop still has a traditional Hard Disk Drive (HDD), upgrading to an SSD is often an even more significant performance boost than adding RAM.
Upgrading your laptop’s RAM is a rewarding endeavor that can breathe new life into an aging machine or unlock the full potential of a newer one. By carefully assessing your needs, understanding compatibility, and following these steps, you can enjoy a faster, smoother, and more productive computing experience.
aViewFromTheCave is a participant in the Amazon Services LLC Associates Program, an affiliate advertising program designed to provide a means for sites to earn advertising fees by advertising and linking to Amazon.com. Amazon, the Amazon logo, AmazonSupply, and the AmazonSupply logo are trademarks of Amazon.com, Inc. or its affiliates. As an Amazon Associate we earn affiliate commissions from qualifying purchases.