Minecraft, the sandbox phenomenon that has captivated millions, is more than just a game; it’s a canvas for creativity. While the vanilla experience offers immense depth, the true magic of Minecraft often lies in its vibrant modding community. These user-created modifications can transform your game in countless ways, from adding intricate new mechanics and creatures to completely overhauling the visual landscape. To harness this power, most Minecraft modders rely on a foundational tool: Forge. This comprehensive guide will walk you through the process of installing mods with Forge, ensuring you can seamlessly enhance your digital adventures.
Understanding Forge: The Modding Foundation
Before diving into the installation process, it’s crucial to understand what Forge is and why it’s an indispensable tool for Minecraft modding. At its core, Forge is an Application Programming Interface (API) and a modding tool that makes it significantly easier for mod developers to create and for players to install modifications for Minecraft.
The Role of Forge in Modding
Think of Forge as a universal translator and enabler for Minecraft mods. Without Forge, each mod would need to be individually coded to interact directly with Minecraft’s core files, a complex and error-prone process. Forge provides a standardized framework, a set of rules and functions, that mods can adhere to. This not only simplifies mod development but also ensures compatibility between multiple mods, a critical factor for players who want to run several modifications simultaneously.
Forge essentially “hooks” into Minecraft’s game code, creating specific points where mods can inject their own code and functionality. This allows mods to:
- Add new items, blocks, and enchantments: Imagine weapons with unique properties, decorative blocks for elaborate builds, or enchantments that offer entirely new gameplay advantages.
- Introduce new mobs and creatures: From friendly companions to formidable foes, mods can populate your world with exciting new inhabitants.
- Alter game mechanics: This can range from subtle changes like improved farming mechanics to drastic overhauls that redefine survival, exploration, or combat.
- Enhance graphical fidelity: Mods can introduce advanced shaders, improved textures, and lighting effects that dramatically enhance the visual appeal of your game.
- Create entirely new dimensions and biomes: Explore worlds beyond the familiar Overworld, Nether, and End, each with its own unique challenges and discoveries.
The brilliance of Forge lies in its ability to manage these diverse modifications, allowing players to enjoy a customized Minecraft experience without needing to be programming experts.
Preparing for Installation: Essential Prerequisites
Successfully installing mods with Forge requires a few preparatory steps. Ensuring these are in order will prevent common issues and make the entire process smoother.
Installing a Clean Minecraft Instance
The most important prerequisite is to have a clean, unmodded installation of Minecraft. Installing mods on a pre-existing modded instance can lead to conflicts and errors that are difficult to troubleshoot.
Steps to ensure a clean instance:
- Locate your Minecraft installation folder: The default location varies by operating system:
- Windows:
%appdata%.minecraft - macOS:
~/Library/Application Support/minecraft - Linux:
~/.minecraft
- Windows:
- Backup existing worlds and resource packs: If you have important worlds or custom resource packs, it’s always wise to back them up to a safe location outside of the
.minecraftfolder before proceeding. - Uninstall existing mods and mod loaders: If you have previously installed other mod loaders like Fabric or even older Forge versions, it’s best to remove them. This typically involves deleting specific folders within your
.minecraftdirectory (e.g.,modsfolder, Forge-specific installation files). - Run Minecraft once: After ensuring a clean state, launch the vanilla version of Minecraft. This helps create the necessary default files and folders that Forge will interact with.
Identifying Your Minecraft Version
Forge is version-specific. A mod designed for Minecraft 1.16.5 will not work with a Forge installation for Minecraft 1.19.3, and vice-versa. Therefore, it’s crucial to know which version of Minecraft you intend to mod.
How to determine your Minecraft version:
- Through the Minecraft Launcher: When you open the Minecraft Launcher, before clicking “Play,” you’ll see a dropdown menu near the “Play” button. This menu displays the currently selected version profile. Ensure it’s set to the desired version. If not, you can create a new profile for that specific version.
- Consider mod availability: Often, the mods you want to install will dictate the Minecraft version you should use. Check the download pages for your desired mods to see which Minecraft versions they support.
Installing Minecraft Forge: The Core Process
With your Minecraft environment prepared, it’s time to install Forge itself. This process is generally straightforward and involves downloading the Forge installer and running it.
Downloading the Correct Forge Installer
The official Forge website is the only legitimate source for downloading Forge installers. Downloading from unofficial sources can expose you to malware and outdated versions.
Steps to download Forge:
- Navigate to the official Forge website: Go to
files.minecraftforge.net. - Select your Minecraft version: On the left-hand side of the Forge website, you’ll find a list of Minecraft versions. Click on the version you wish to install Forge for.
- Choose between “Recommended” and “Latest”:
- Recommended: This is generally the most stable and thoroughly tested version of Forge for that specific Minecraft version. It’s recommended for most users.
- Latest: This version includes the newest features and bug fixes but might be less stable than the recommended build. It’s often used by mod developers for testing.
- Click “Installer”: On the download page for your chosen version, look for the “Installer” button.
- Wait for the ad: You will be redirected to an ad page. Do not click anywhere on this page except the “SKIP” button in the top right corner after the countdown finishes. Clicking anywhere else may lead you to malicious websites.
- Save the installer file: Once you click “SKIP,” a
.jarfile will download. Save this file to a convenient location on your computer, such as your Desktop or Downloads folder.
Running the Forge Installer
The downloaded .jar file is an executable installer. Running it will set up Forge for your chosen Minecraft version.

Steps to run the Forge installer:
- Locate the downloaded
.jarfile. - Ensure you have Java installed and updated: Forge installers are Java applications. If you don’t have Java installed or if it’s outdated, you can download the latest version from
java.com. - Double-click the
.jarfile: This will launch the Forge installer window. - Select “Install client” and choose the installation directory: The installer will usually auto-detect your Minecraft installation directory. Ensure it’s correct. The “Install client” option is what you want for playing with mods.
- Click “OK”: The installer will begin processing. You’ll see a progress bar.
- Confirmation: Once complete, you’ll receive a message indicating that Forge has been successfully installed.
Installing Mods with Forge: The Final Step
With Forge successfully installed, the final and most exciting step is adding your desired mods. This involves placing the mod files into the correct folder within your Minecraft directory.
Locating the “Mods” Folder
The Forge installer automatically creates a dedicated folder within your Minecraft directory for storing mods.
How to find the “mods” folder:
- Open your Minecraft Launcher.
- Navigate to the “Installations” tab.
- Find the Forge installation: You should see a new profile listed, usually named something like “forge-” followed by the Minecraft version and Forge version.
- Hover over the Forge installation and click the folder icon: This icon will appear to the right of the “Play” button for that profile.
- This will open your Minecraft installation directory. Inside this directory, you will find a folder named “mods.” If it doesn’t exist, you can create it manually.
Downloading and Placing Mod Files
Mod files are typically distributed as .jar files. You can find mods from various reputable sources.
Where to find mods:
- CurseForge: This is the largest and most popular platform for Minecraft mods. It offers a vast library of mods for various Minecraft versions, along with user ratings and reviews.
- Planet Minecraft: Another excellent resource for mods, skins, maps, and more.
- Mod developer websites: Some mod developers host their mods directly on their own websites.
Important considerations when downloading mods:
- Minecraft Version Compatibility: This is paramount. Always check that the mod is designed for the exact version of Minecraft and Forge you are using.
- Forge Dependency: Ensure the mod explicitly states it requires Forge. Some mods are designed for other mod loaders.
- Dependencies: Some complex mods require other mods to function. The mod’s download page should clearly list any dependencies. Download and install these as well.
- Reputable Sources: Stick to well-known and trusted websites to avoid downloading malicious files.
Steps to install a mod:
- Download the mod’s
.jarfile. - Locate the downloaded
.jarfile. - Cut or copy the
.jarfile. - Navigate to your Minecraft “mods” folder (as described above).
- Paste the
.jarfile into the “mods” folder.
You can place multiple mod .jar files into the “mods” folder. Forge will automatically load them when you launch the game using the Forge profile.
Launching Minecraft with Mods
Once Forge is installed and your mods are in the correct folder, you’re ready to experience your customized Minecraft world.
Selecting the Forge Profile
To load your mods, you must launch Minecraft using the Forge installation profile.
Steps to launch with mods:
- Open your Minecraft Launcher.
- Go to the “Installations” tab.
- Find your Forge installation profile (e.g., “forge-1.19.2” or similar).
- Click the “Play” button next to the Forge profile.
- Allow Forge to load: Minecraft might take a bit longer to load the first time after installing mods. You will see a Forge splash screen indicating that it’s loading mods.
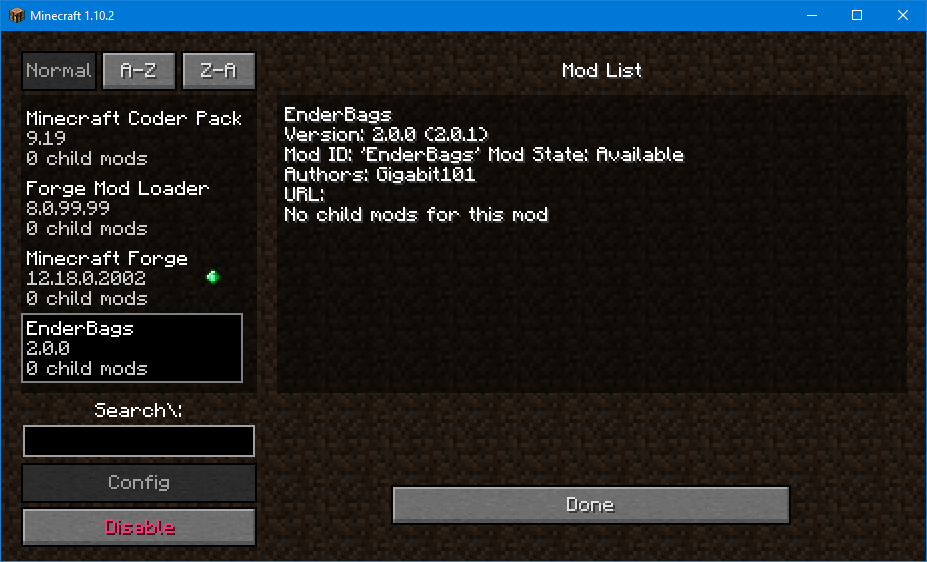
- Check the main menu: Once Minecraft fully loads, you should see a “Mods” button on the main menu. Clicking this button will show you a list of all the mods that Forge has detected and loaded.
Troubleshooting Common Issues
Even with careful installation, issues can sometimes arise. Here are some common problems and their solutions:
- Game crashes on startup: This is often due to mod conflicts, incorrect mod versions, or missing dependencies.
- Solution: Remove half of your mods and try launching again. If it works, the problem lies within the removed half. Continue this process of elimination to pinpoint the problematic mod. Ensure all mods are for the correct Minecraft and Forge version. Check for any listed dependencies.
- Mods not appearing in-game:
- Solution: Double-check that the mod
.jarfile is in the correct “mods” folder and that it’s not corrupted. Ensure the mod is compatible with your Forge version.
- Solution: Double-check that the mod
- “Unsupported or outdated launcher profile” error:
- Solution: This usually means you need to run the Forge installer again for your chosen Minecraft version.
- Performance issues (lag):
- Solution: Some mods can be resource-intensive. Consider which mods you are running and if your system can handle them. Opting for performance-enhancing mods or reducing the number of graphics-heavy mods can help.
By following these steps and understanding the underlying principles, you can confidently install mods with Forge and unlock a universe of new possibilities within Minecraft. Happy modding!
aViewFromTheCave is a participant in the Amazon Services LLC Associates Program, an affiliate advertising program designed to provide a means for sites to earn advertising fees by advertising and linking to Amazon.com. Amazon, the Amazon logo, AmazonSupply, and the AmazonSupply logo are trademarks of Amazon.com, Inc. or its affiliates. As an Amazon Associate we earn affiliate commissions from qualifying purchases.