Linux Mint is a popular, user-friendly operating system that offers a stable and familiar computing experience, often seen as an excellent alternative to Windows and macOS. Its emphasis on ease of use, pre-installed software, and a polished desktop environment makes it a prime choice for newcomers to the Linux world. Whether you’re looking to revive an older computer, seeking a more secure and private online environment, or simply curious about exploring a different operating system, installing Linux Mint is a rewarding endeavor. This comprehensive guide will walk you through the entire process, from preparation to the final setup, ensuring a smooth and successful installation.
Understanding Linux Mint and Its Appeal
Before diving into the installation process, it’s beneficial to understand what makes Linux Mint stand out. At its core, Linux Mint is a Debian-based distribution, inheriting its stability and vast software repositories from its parent. However, Mint adds its own layer of polish, focusing on providing a complete out-of-the-box experience. This means it comes with essential multimedia codecs, popular applications like LibreOffice, Firefox, and Thunderbird, and a choice of intuitive desktop environments.
The two most popular desktop environments offered by Linux Mint are Cinnamon and MATE. Cinnamon is a more modern and visually appealing environment, offering a layout that’s very similar to Windows, making the transition for Windows users particularly seamless. MATE, on the other hand, is a continuation of the GNOME 2 desktop, known for its lightness, speed, and stability, appealing to users who prefer a more classic and resource-efficient interface. Linux Mint also offers a XFCE edition, which is even lighter and ideal for older or less powerful hardware.
The appeal of Linux Mint extends beyond its user-friendliness. It’s renowned for its:
- Stability: Built on Debian’s solid foundation, Mint is exceptionally stable, minimizing crashes and unexpected issues.
- Ease of Use: The intuitive interface and readily available software make it easy to navigate and perform everyday tasks.
- Comprehensive Software Selection: A vast repository of free and open-source software is easily accessible through the Software Manager.
- Community Support: A large and active community provides extensive documentation, forums, and tutorials, making it easy to find help when needed.
- Security and Privacy: Linux generally offers a more secure environment than other operating systems, with fewer malware threats and greater user control over data.
Preparation: Getting Ready for Installation
Successful software installation, especially an operating system, hinges on proper preparation. This stage ensures you don’t lose any important data and have everything you need readily available.
1. Back Up Your Data
This is arguably the most crucial step. While the installation process is generally safe, there’s always a small risk of data loss if something goes wrong. Always back up your important files, documents, photos, videos, and any other personal data to an external hard drive, a cloud storage service, or another safe location. This ensures that even if the worst happens, your memories and crucial information remain intact.
2. Download Linux Mint
Your journey begins with downloading the Linux Mint ISO image.
- Visit the Official Website: Navigate to the official Linux Mint website (linuxmint.com).
- Choose Your Edition: On the “Download” page, you’ll find different editions based on desktop environments (Cinnamon, MATE, XFCE) and system architecture (64-bit is standard for modern computers). For most users, the Cinnamon edition is recommended due to its familiar interface.
- Select a Download Mirror: You’ll be presented with a list of download mirrors. Choose a mirror geographically close to you for faster download speeds.
- Download the ISO File: Click the download link for your chosen edition and architecture. This will download a large file (typically around 2-3 GB) with a
.isoextension. This file is a disk image that contains the entire operating system.
3. Create a Bootable USB Drive
Once you have the ISO file, you need to transfer it to a bootable USB drive. This USB drive will act as the installation media, allowing your computer to boot into the Linux Mint installer.
-
What You’ll Need:
- A USB flash drive with at least 4GB of storage (8GB or more is recommended). Note: All data on the USB drive will be erased during this process.
- A tool to create the bootable USB. Popular and reliable options include:
- Rufus (Windows): A lightweight and powerful utility.
- balenaEtcher (Windows, macOS, Linux): A simple, cross-platform tool.
- UNetbootin (Windows, macOS, Linux): Another widely used option.
-
Creating the Bootable USB with Rufus (Example for Windows):
- Download and run Rufus.
- In the “Device” dropdown, select your USB drive.
- Click the “SELECT” button and navigate to the downloaded Linux Mint ISO file.
- Leave other settings at their defaults unless you have specific needs.
- Click “START.”
- Rufus will warn you that all data on the USB drive will be destroyed. Click “OK” to proceed.
- Wait for the process to complete. You’ll see a “READY” status when it’s done.
-
Creating the Bootable USB with balenaEtcher (Cross-Platform Example):
- Download and install balenaEtcher.
- Open balenaEtcher.
- Click “Flash from file” and select your Linux Mint ISO.
- Click “Select target” and choose your USB drive.
- Click “Flash!”
- balenaEtcher will perform the flashing and validation. Wait for it to finish.
4. Verify Your System’s Boot Mode (UEFI vs. BIOS)
Modern computers typically use UEFI (Unified Extensible Firmware Interface) for booting, while older ones use BIOS (Basic Input/Output System). It’s important to know which one your system uses, as it can affect the boot order and installation process.
- How to Check:
- Windows: Press
Windows Key + R, typemsinfo32, and press Enter. Look for “BIOS Mode” in the System Information window. It will say “UEFI” or “Legacy” (which corresponds to BIOS). - During Boot: Restart your computer and watch for prompts to enter BIOS/UEFI settings (often by pressing
F2,Delete,F10, orF12). Within the BIOS/UEFI settings, you can usually find information about the boot mode.
- Windows: Press
This information becomes relevant when you need to adjust boot order in the next step.
Installing Linux Mint: Step-by-Step Guide
With your bootable USB drive ready, you can now proceed with the installation. This involves booting from the USB, launching the installer, and configuring your system.
1. Booting from the USB Drive
This is where you instruct your computer to start from the Linux Mint installation media instead of its internal hard drive.
- Insert the Bootable USB: Plug the USB drive you created into your computer.
- Restart Your Computer: If your computer is on, restart it. If it’s off, turn it on.
- Enter the Boot Menu or BIOS/UEFI Settings: As your computer starts up, you’ll need to press a specific key to access the boot menu or BIOS/UEFI settings. This key varies depending on your computer’s manufacturer. Common keys include
F2,Delete,F10,F12, orEsc. Watch the screen carefully for prompts like “Press [Key] to enter Setup” or “Press [Key] for Boot Menu.” - Select Your USB Drive:
- Boot Menu: If you accessed the boot menu, select your USB drive from the list of bootable devices. It might be listed by its brand name or as “USB HDD,” “Removable Device,” or similar.
- BIOS/UEFI Settings: If you entered the BIOS/UEFI settings, navigate to the “Boot Order” or “Boot Priority” section. Change the order so that your USB drive is the first boot device.
- Save and Exit: Once you’ve selected the USB drive, save your changes and exit the BIOS/UEFI settings. Your computer will restart.
If done correctly, your computer will now boot into the Linux Mint live environment. You’ll see a welcome screen.
2. Exploring the Live Environment and Launching the Installer
The “live environment” allows you to try out Linux Mint without making any changes to your computer’s hard drive. This is a great way to get a feel for the operating system and ensure your hardware is recognized.
- Select “Start Linux Mint”: From the boot menu, choose the default option, usually “Start Linux Mint.”
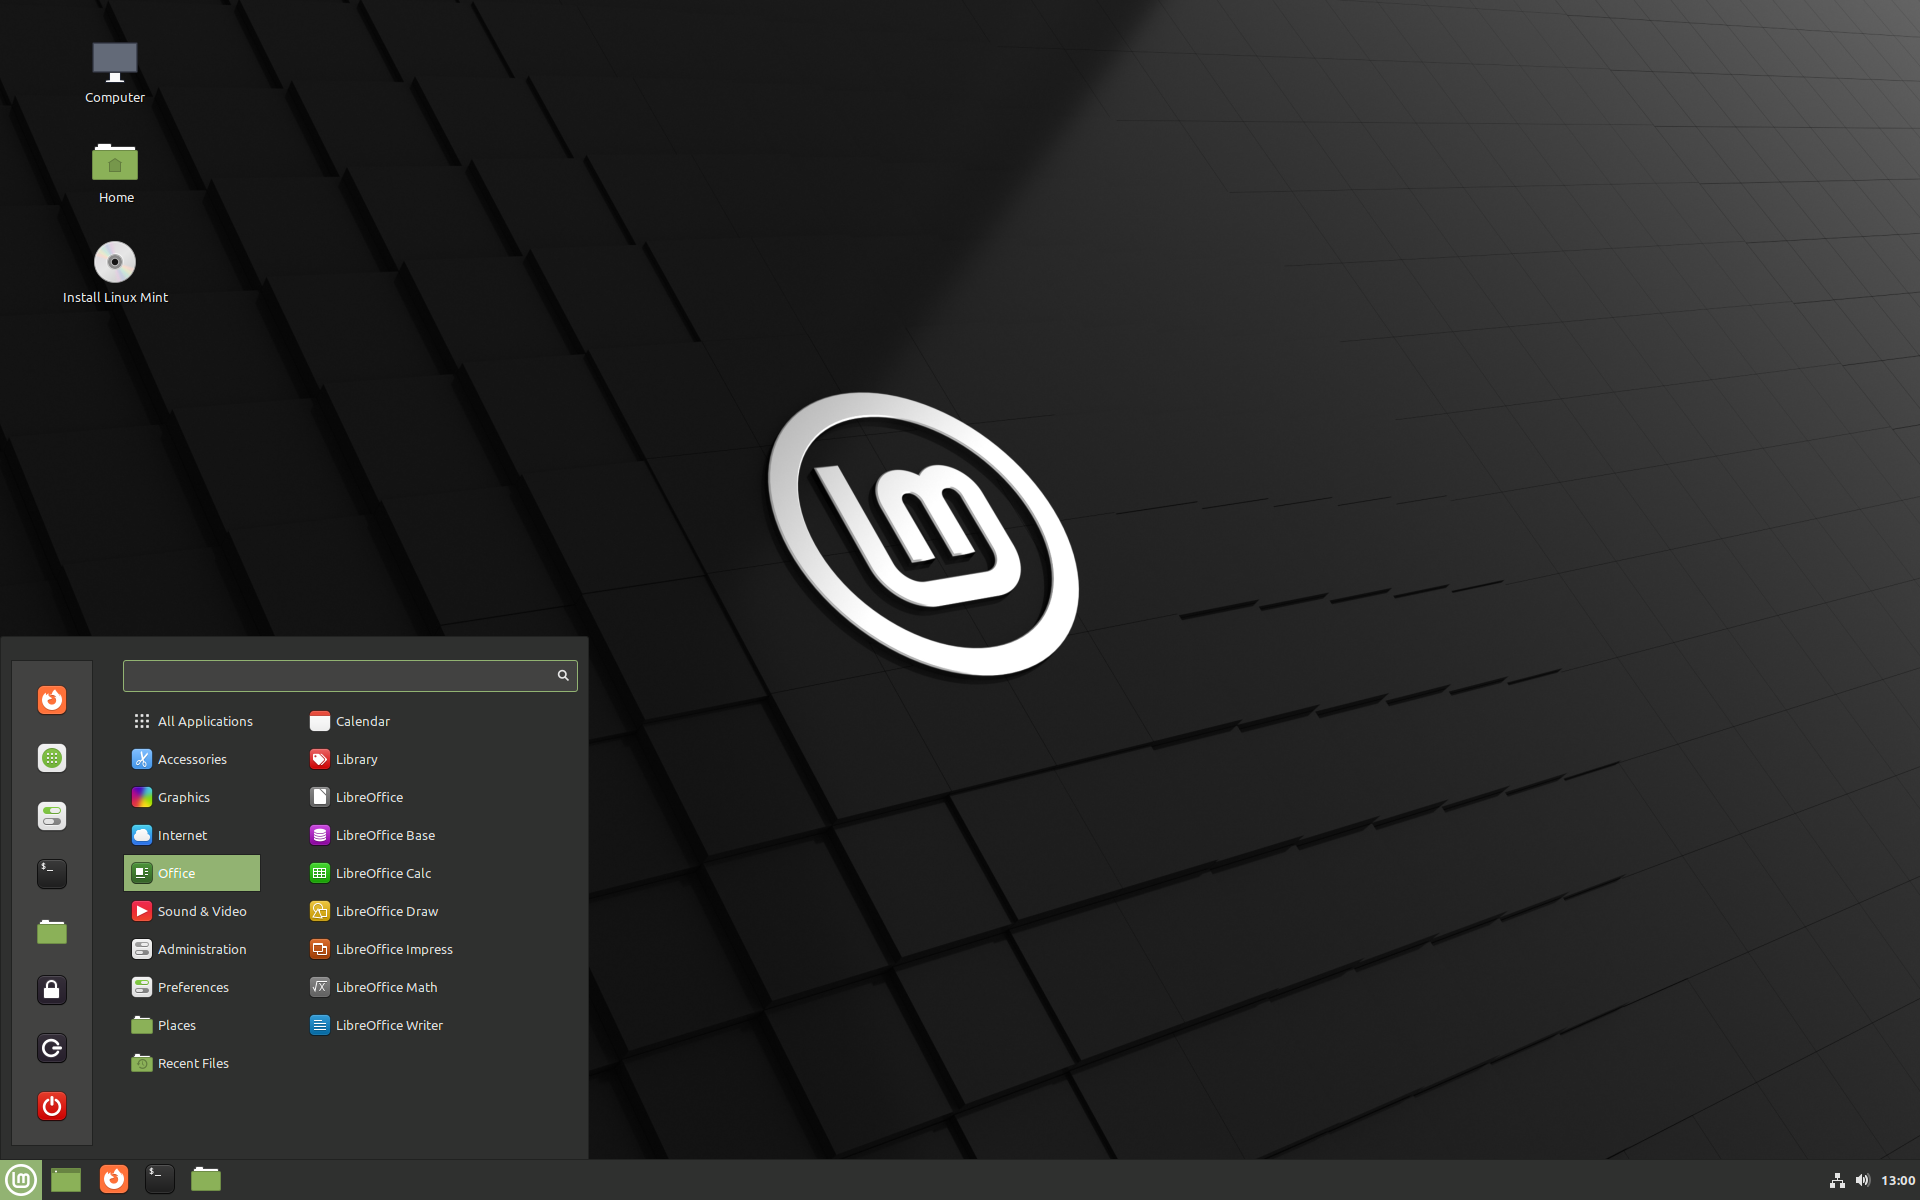
- Desktop Appears: After a few moments, you’ll be greeted by the Linux Mint desktop. You can browse the internet, open applications, and test your hardware (Wi-Fi, sound, etc.).
- Launch the Installer: On the desktop, you’ll find an icon labeled “Install Linux Mint.” Double-click this icon to begin the installation process.
3. The Installation Wizard: Step-by-Step Configuration
The installer is designed to be intuitive and guides you through each step.
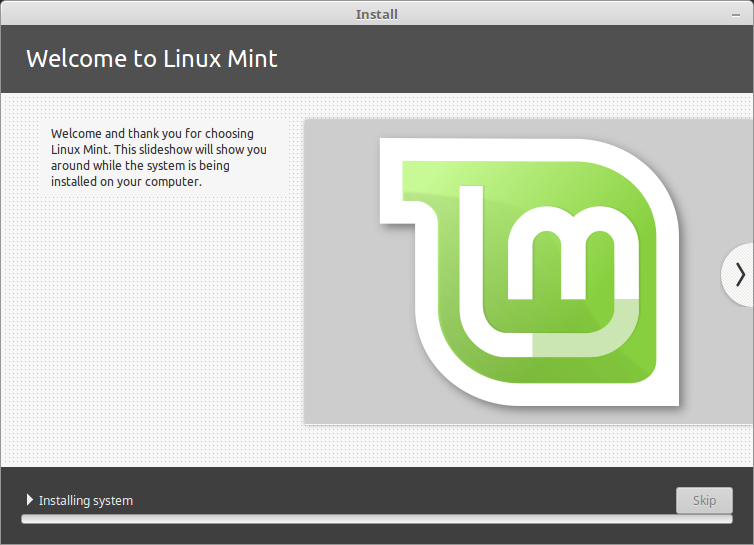
3.1. Welcome and Language Selection
- Choose your language: Select your preferred language for the installation process and the installed system. Click “Continue.”
3.2. Keyboard Layout
- Select your keyboard layout: Choose the layout that matches your physical keyboard. You can test your typing in the provided text box. Click “Continue.”
3.3. Multimedia Codecs
- Install third-party software: You’ll likely see an option to “Install third-party software for graphics and Wi-Fi hardware, Flash, MP3 and other media.” It is highly recommended to check this box. This will install proprietary drivers and codecs that are essential for smooth multimedia playback and Wi-Fi functionality. Click “Continue.”
3.4. Installation Type
This is a crucial step where you decide how Linux Mint will be installed on your hard drive.
- Erase disk and install Linux Mint: This is the simplest option. It will wipe your entire hard drive and install Linux Mint. Use this option if you are dedicating the entire drive to Linux Mint or if the drive is empty. Be absolutely sure you have backed up all your data if you choose this.
- Install Linux Mint alongside [Your Current OS]: If you have Windows or another operating system installed, this option will shrink your existing partition to make space for Linux Mint, allowing you to dual-boot. You’ll be presented with a slider to allocate space to each operating system.
- Something else: This option provides advanced partitioning control. You can create, delete, and resize partitions manually. This is for experienced users only.
For most beginners, “Install Linux Mint alongside [Your Current OS]” is the recommended choice if they wish to keep their existing operating system, or “Erase disk and install Linux Mint” if they want a clean install of only Linux Mint.
- Proceed with caution: Carefully read the descriptions and choose the option that best suits your needs. Click “Install Now.”
3.5. Confirming Changes (Partitioning)
- Review Partitioning Scheme: The installer will show you a summary of the disk operations it’s about to perform. Double-check that it aligns with your chosen installation type.
- Click “Continue” to proceed.
3.6. Location and Time Zone
- Select your location: Click on the world map to set your time zone. This ensures your system clock is accurate. Click “Continue.”
3.7. User Account Creation
-
Create your user:
- Your name: Enter your full name.
- Your computer’s name: This is the network name for your computer (e.g., “my-mint-pc”).
- Pick a username: This will be your login name (e.g., “john_doe”).
- Choose a password: Create a strong, memorable password.
- Confirm your password: Re-enter your password.
- Login Options: You can choose to “Log in automatically” (convenient but less secure) or “Require my password to log in” (recommended for security).
-
Click “Continue.”
4. The Installation Process
The installer will now begin copying files and configuring your system. This process can take anywhere from 10 to 30 minutes, depending on your computer’s speed and the installation type. You can relax, perhaps grab a coffee, or read through the slideshow that often appears, which highlights Linux Mint’s features.
5. Restarting Your Computer
Once the installation is complete, you’ll see a message prompting you to restart your computer.
- Click “Restart Now.”
- Remove the Installation Media: The installer will prompt you to remove the USB drive and press Enter. This is a critical step. If you don’t remove the USB drive and press Enter, your computer might boot back into the installer instead of your newly installed Linux Mint.
Post-Installation: First Steps and Configuration
Congratulations! You’ve successfully installed Linux Mint. Now it’s time to get acquainted with your new operating system and make it work best for you.
1. First Boot and Login
- Boot into Linux Mint: Your computer will now boot into your installed Linux Mint system.
- Login: Enter the username and password you created during installation.
2. System Updates
The first thing you should always do after installing any operating system is to check for and install updates. This ensures you have the latest security patches, bug fixes, and software improvements.
- Open the Update Manager: You’ll likely find an “Update Manager” icon on your desktop or in the application menu. Click on it.
- Check for Updates: The Update Manager will scan your system for available updates.
- Install Updates: Select all available updates and click “Install Updates.” You may be prompted for your password.
- Restart if Necessary: Some updates, particularly kernel updates, may require a system restart.
3. Installing Additional Software
Linux Mint comes with a good selection of pre-installed software, but you’ll likely want to add more applications to suit your needs.
-
Software Manager: Linux Mint’s Software Manager is your go-to place for discovering and installing new applications. It’s user-friendly and categorizes software for easy browsing.
- Open the Software Manager from your application menu.
- Browse categories (e.g., Internet, Office, Games, Graphics) or use the search bar to find specific applications.
- Click on an application to view its description and reviews, then click “Install.”
-
Synaptic Package Manager: For more advanced users, Synaptic provides a powerful graphical interface to the APT package management system. It offers more granular control over installed packages.
4. Exploring Your New System
Take some time to explore your new Linux Mint environment.
- Application Menu: Familiarize yourself with the application menu (often at the bottom-left corner, similar to the Windows Start menu).
- System Settings: Explore the “System Settings” to customize your desktop, manage users, configure network settings, and much more.
- File Manager: Learn to navigate your file system using the file manager.
- Terminal (Optional): For those curious about command-line interfaces, the Terminal is a powerful tool. You can access it by searching for “Terminal” in the application menu.
5. Customization and Personalization
Linux Mint offers a high degree of customization. You can change your desktop theme, icons, wallpaper, panel settings, and more to make your system feel truly your own.
- Themes and Appearance: Look for “Themes” or “Appearance” in System Settings to change the look and feel of your desktop.
- Desktop Background: Right-click on the desktop and select “Change Desktop Background” to choose a new wallpaper.

Conclusion
Installing Linux Mint is a straightforward process that unlocks a world of computing freedom, stability, and flexibility. By following these steps, you can confidently install Linux Mint and begin enjoying its many benefits. Whether you’re a seasoned Linux user or embarking on your first OS installation, Linux Mint offers an accessible and rewarding experience, empowering you to take control of your digital life with a robust and user-friendly operating system.
aViewFromTheCave is a participant in the Amazon Services LLC Associates Program, an affiliate advertising program designed to provide a means for sites to earn advertising fees by advertising and linking to Amazon.com. Amazon, the Amazon logo, AmazonSupply, and the AmazonSupply logo are trademarks of Amazon.com, Inc. or its affiliates. As an Amazon Associate we earn affiliate commissions from qualifying purchases.