
In the ever-evolving landscape of technology, staying ahead often means leveraging the right tools and streamlining your workflow. For Mac users, especially those deeply invested in development, data science, or simply seeking more control over their system, Homebrew is an indispensable utility. Often referred to as the “missing package manager for macOS,” Homebrew simplifies the installation and management of software that Apple doesn’t officially provide. This guide will walk you through the process of installing Homebrew on your Mac, offering insights relevant to our broader themes of technology, productivity, and even how efficient tool management can indirectly impact your financial goals by saving you time and frustration.
Understanding Homebrew: The Package Manager for Your Mac
Before we dive into the installation process, it’s crucial to understand what Homebrew is and why it’s so valuable. At its core, Homebrew is a free and open-source software package management system that simplifies the installation of software on Apple’s macOS operating system. Think of it as an app store, but for command-line tools, programming languages, and other software that you typically wouldn’t find in the Mac App Store.
Why Homebrew is Essential for Mac Users
The Mac operating system, while powerful and user-friendly, comes with a curated set of pre-installed software. For developers, researchers, or anyone who needs specific libraries, tools, or programming languages that aren’t native to macOS, installing them manually can be a complex and time-consuming ordeal. This often involves downloading source code, compiling it, and manually configuring dependencies – a process ripe for errors and frustration.
Homebrew elegantly solves this problem. It automates the entire process. When you want to install a new piece of software, you simply tell Homebrew its name, and it handles:
- Downloading the latest stable version: No more hunting for the right download link.
- Compiling the software: If the software needs to be built from source, Homebrew does it for you.
- Managing dependencies: Most software relies on other libraries or tools to function. Homebrew automatically identifies and installs these dependencies, ensuring everything works seamlessly.
- Installation and linking: Homebrew places the software in an organized location and ensures your system can find and run it.
- Updating and uninstalling: Keeping your software up-to-date or removing it when you no longer need it is just as easy as installing.
This efficiency directly ties into our focus on Productivity. By reducing the time and mental overhead associated with software management, Homebrew allows you to focus on what truly matters – building, creating, or analyzing. For those looking to maximize their online income or develop side hustles, time is a critical resource. A well-managed development environment, powered by Homebrew, can significantly boost your output and thus, your earning potential.
Homebrew and the Tech Ecosystem
Homebrew is deeply integrated into the broader Tech landscape. It’s the de facto standard for installing many popular development tools, including:
- Programming Languages: Python, Node.js, Ruby, Go, Rust, and many more.
- Databases: PostgreSQL, MySQL, MongoDB, Redis.
- Development Tools: Git, Docker, Kubernetes, Vim, Emacs, Visual Studio Code (via extensions).
- Command-Line Utilities:
wget,curl(more advanced options),htop,jq, and countless others.
For anyone working with AI Tools or exploring new Apps and Gadgets, Homebrew can often provide the underlying software or libraries needed to interact with them or develop new solutions. It empowers users to experiment and customize their environment, fostering a deeper understanding of the underlying technology.
Preparing for Homebrew Installation
Before you embark on the Homebrew installation journey, a couple of prerequisites will ensure a smooth experience. These are standard for most command-line operations on macOS.
1. Accessing the Terminal
The primary interface for interacting with Homebrew is the macOS Terminal application. You can find it by:
- Opening Finder.
- Navigating to Applications > Utilities.
- Double-clicking on Terminal.
Alternatively, you can use Spotlight Search: press Command + Space, type “Terminal,” and press Enter.
2. Installing Command Line Tools (CLT) for Xcode
Homebrew relies on certain command-line utilities that are part of Apple’s developer tools. While you don’t need to install the full Xcode IDE (which can be very large), you do need the Command Line Tools.
To check if you already have them installed, open your Terminal and type:
xcode-select -p
If the Command Line Tools are installed, you’ll see a path printed in the Terminal (e.g., /Library/Developer/CommandLineTools).
If you receive an error message like:
xcode-select: error: unable to get active developer directory, use `sudo xcode-select --switch path/to/Xcode.app` to set one (or see `man xcode-select`)
or simply no output, it means they are not installed. To install them, run the following command in your Terminal:
xcode-select --install
A dialog box will appear. Click “Install” and agree to the terms and conditions. This process might take a few minutes to download and install the necessary components. Once complete, you can verify the installation again using xcode-select -p.
This step is fundamental to setting up a robust Tech environment on your Mac, enabling you to utilize a wider range of software and development frameworks.
Installing Homebrew: The Step-by-Step Process
With your Terminal ready and the Command Line Tools installed, you’re all set to install Homebrew. The installation process is straightforward and largely automated.
The Official Installation Command
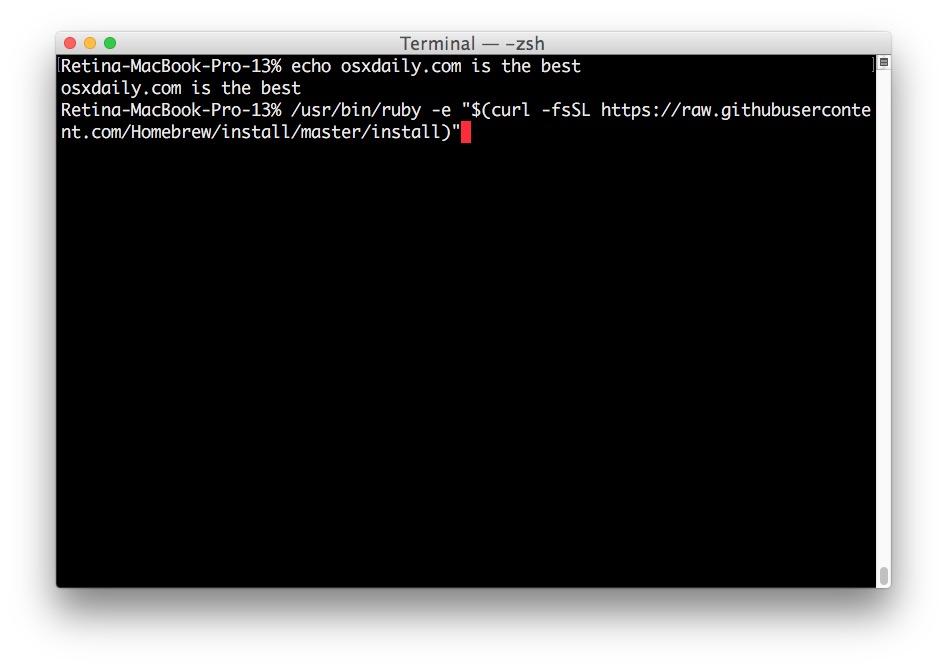
Homebrew’s installation is handled by a single, simple script. You can find the latest version of this script on the official Homebrew website (brew.sh). However, the most convenient way to install it is by copying and pasting the command directly from their site into your Terminal.
Here’s the general process:
-
Open your Terminal application.
-
Visit the official Homebrew website: Go to https://brew.sh/.
-
Copy the installation command: On the homepage, you’ll see a prominent command that looks something like this (note: this command is updated regularly by Homebrew developers, so always get the latest from the official site):
/bin/bash -c "$(curl -fsSL https://raw.githubusercontent.com/Homebrew/install/HEAD/install.sh)" -
Paste the command into your Terminal: Right-click in your Terminal window and select “Paste,” or use the keyboard shortcut
Command + V. -
Press Enter: The script will begin to run.
What Happens During Installation
When you execute the command, the script will perform several actions:
- Check for prerequisites: It will verify that you have the Command Line Tools installed and a working internet connection.
- Download Homebrew: It downloads the necessary files for Homebrew from its GitHub repository.
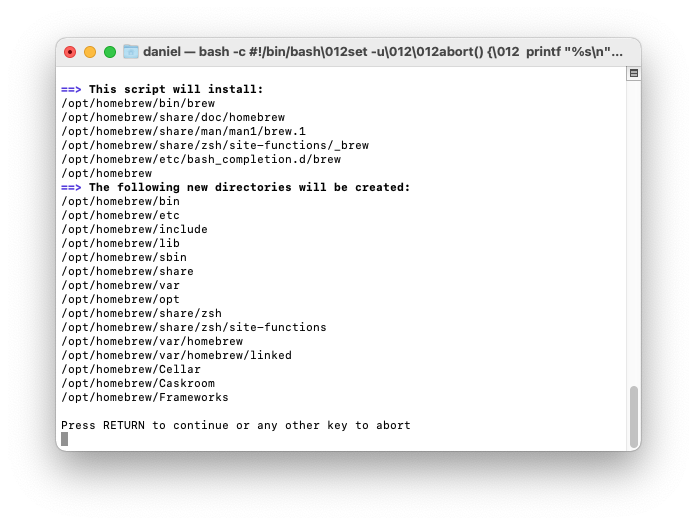
- Explain what it will do: Before making any changes to your system, the script will inform you about the directories it will create and the permissions it will require.
- Prompt for confirmation: You will be asked to press
Enter(orReturn) to proceed with the installation. - Execute installation: The script will download and install Homebrew and its core components into the
/usr/local/(on Intel Macs) or/opt/homebrew/(on Apple Silicon Macs) directory. - Set up your PATH: Crucially, the installer will configure your system’s
PATHenvironment variable to include Homebrew’s executable location. This allows you to runbrewcommands from anywhere in your Terminal. - Final instructions: Upon successful installation, the script will usually display a message with any next steps, such as adding Homebrew to your shell’s configuration file if it didn’t happen automatically.
Post-Installation Steps: Ensuring Homebrew is Accessible
Sometimes, the installer might instruct you to run a couple of additional commands to ensure Homebrew is correctly integrated into your shell’s environment. This is particularly common on newer macOS versions or when using specific shells like Zsh.
The installer will typically guide you with messages like:
==> Next steps:
- Run these three commands in your *same* terminal window:
    echo 'eval "$(/opt/homebrew/bin/brew shellenv)"' >> ~/.zprofile
    eval "$(/opt/homebrew/bin/brew shellenv)"
If you see these messages, follow them precisely.
- The first command (
echo 'eval "$(/opt/homebrew/bin/brew shellenv)"' >> ~/.zprofile) adds a line to your shell’s profile configuration file. This ensures that Homebrew’s environment variables are set correctly every time you open a new Terminal window.~/.zprofileis commonly used for Zsh (the default shell on recent macOS versions). If you use Bash, the file might be~/.bash_profileor~/.bashrc. The Homebrew installer is usually smart enough to detect your shell. - The second command (
eval "$(/opt/homebrew/bin/brew shellenv)") immediately applies these changes to your current Terminal session, so you don’t have to close and reopen it to start using Homebrew.
Verifying the Installation:
To confirm that Homebrew is installed and accessible, close your current Terminal window and open a new one. Then, type the following command and press Enter:
brew --version
If Homebrew is installed correctly, you should see the installed version number printed (e.g., Homebrew 3.6.18).
This meticulous setup ensures a smooth Digital Security and Productivity experience, as you won’t encounter path issues or permission errors when trying to use Homebrew or the software it manages. For individuals focused on building their Personal Branding as skilled tech professionals, having a well-configured development environment is a silent but powerful indicator of competence.
Managing Software with Homebrew: Basic Commands
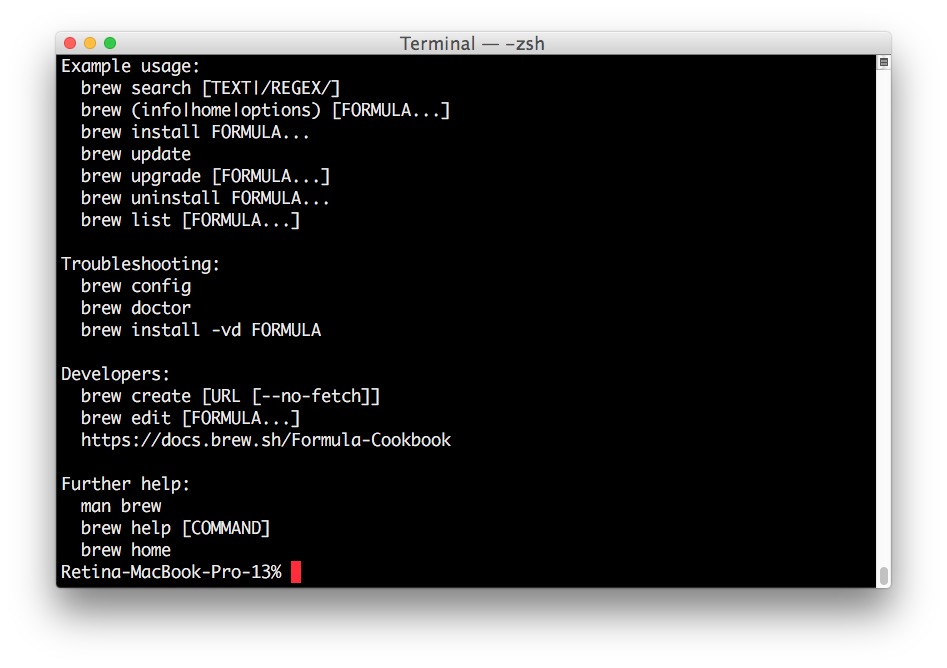
Now that Homebrew is installed, you can begin to leverage its power to manage your software. Here are some of the most fundamental commands you’ll use regularly.
Installing Packages
The most common use of Homebrew is to install new software. The command format is straightforward:
brew install <package_name>
For example, to install Git (a popular version control system):
brew install git
Homebrew will download, compile (if necessary), and install Git and any of its dependencies.
Updating Homebrew and Packages
It’s good practice to keep Homebrew itself and all your installed packages up-to-date.
-
Update Homebrew’s formula list: This fetches the latest information about available packages from the Homebrew repositories.
brew update -
Upgrade all installed packages: This will upgrade any packages that have newer versions available.
brew upgradeYou can also upgrade specific packages:
brew upgrade <package_name>
Searching for Packages
If you’re not sure of the exact name of a package or want to see if a particular tool is available through Homebrew, you can use the search command:
brew search <keyword>
For example, to find packages related to “python”:
brew search python
Uninstalling Packages
When you no longer need a piece of software installed via Homebrew, you can easily remove it:
brew uninstall <package_name>
Listing Installed Packages
To see a list of all the software you’ve installed using Homebrew:
brew list
Cleaning Up
Over time, Homebrew can accumulate outdated downloaded files (cache) and old versions of installed packages. You can clean these up to save disk space:
brew cleanup
This command removes outdated downloads and old versions of installed formulae.
Mastering these basic Homebrew commands is key to efficiently managing your software library. It directly contributes to a more organized and productive Tech workflow. For businesses and individuals alike, efficient resource management, whether it’s disk space or development tools, can indirectly impact Money by reducing operational overhead and enabling faster project completion.
Beyond the Basics: Advanced Homebrew Usage
While the commands above cover the essentials, Homebrew offers more advanced features for sophisticated users and developers.
Homebrew Cask: GUI Applications
Homebrew primarily manages command-line tools and libraries. For graphical applications (like VS Code, VLC, Google Chrome), you would typically use Homebrew Cask. Cask extends Homebrew’s functionality to easily install macOS applications.
To install a Cask application, you first need to ensure Cask is enabled (it usually is by default with modern Homebrew installations). Then, you use the brew install --cask command:
brew install --cask <application_name>
For example, to install Visual Studio Code:
brew install --cask visual-studio-code
Homebrew Cask is a powerful tool for setting up a complete development environment or a feature-rich desktop experience without manually downloading installers from various websites. This streamlines the process, aligning perfectly with the Productivity theme.
Taps: Adding Third-Party Repositories
Homebrew uses “taps” to manage its formula repositories. The official Homebrew repository is tapped by default. However, there are many third-party repositories maintained by individuals or communities that offer additional software. You can “tap” these repositories to gain access to their formulas.
To tap a repository:
brew tap <username>/<repository_name>
For example, a hypothetical tap might look like:
brew tap homebrew/bundle
Once tapped, you can install formulas from that repository as usual. This extensibility is a cornerstone of Homebrew’s flexibility and its ability to serve a wide range of Tech needs.
Formulae vs. Casks
It’s important to distinguish between “formulae” (managed by brew install) and “casks” (managed by brew install --cask).
- Formulae: Typically command-line tools, libraries, or programming languages. They are usually installed in a structured way within the Homebrew prefix (
/usr/localor/opt/homebrew). - Casks: Graphical applications that are typically installed in the
/Applicationsfolder, with their dependencies managed by Homebrew.
Understanding this distinction helps you search for and install the right type of software.
Troubleshooting
While Homebrew is robust, occasional issues can arise. The brew doctor command is your first line of defense for diagnosing common problems:
brew doctor
This command checks your system for potential issues and provides advice on how to fix them. If you encounter persistent problems, the Homebrew documentation and community forums are excellent resources for finding solutions. A well-maintained and trouble-free Tech setup is crucial for uninterrupted work, which directly impacts Productivity and can help avoid costly delays in personal or professional projects.
In conclusion, installing and mastering Homebrew on your Mac is a significant step towards a more efficient, organized, and powerful computing experience. It empowers you to take control of your software environment, allowing you to focus on innovation and productivity, whether you’re a seasoned developer, a budding data scientist, or simply a tech enthusiast looking to get the most out of your macOS machine.
aViewFromTheCave is a participant in the Amazon Services LLC Associates Program, an affiliate advertising program designed to provide a means for sites to earn advertising fees by advertising and linking to Amazon.com. Amazon, the Amazon logo, AmazonSupply, and the AmazonSupply logo are trademarks of Amazon.com, Inc. or its affiliates. As an Amazon Associate we earn affiliate commissions from qualifying purchases.