Running out of storage space on your PlayStation 4 is an all too common predicament for avid gamers. As game sizes continue to swell with breathtaking graphics, sprawling open worlds, and endless updates, the PS4’s original hard drive, often a meager 500GB or 1TB, quickly becomes a bottleneck. The choice between deleting cherished games to make room for new releases or constantly juggling your digital library can be frustrating. Beyond just space, a slow hard drive can contribute to longer loading times and a less responsive system, detracting from the immersive gaming experience that the PS4 is designed to deliver.
Fortunately, upgrading your PS4’s internal hard drive is not only possible but also a remarkably straightforward process that can significantly enhance your console’s capabilities. This comprehensive guide will walk you through every step, from selecting the right replacement drive to backing up your precious data and reinstalling the system software. By the end, you’ll be equipped with the knowledge and confidence to transform your PS4 into a storage powerhouse, ready to house an ever-expanding collection of games and applications, and potentially even boost its performance. Dive in, and prepare to revitalize your gaming console.
Why Upgrade Your PS4 Hard Drive?
The decision to upgrade your PlayStation 4’s hard drive goes beyond mere convenience; it’s a strategic move to future-proof your gaming experience and unlock its full potential. While the console itself has proven to be a stalwart companion for millions of players, its internal storage often becomes the Achilles’ heel. Understanding the core benefits of this upgrade can help solidify your decision and highlight the value it brings.
Overcoming Storage Limitations
The most immediate and obvious benefit of upgrading your PS4 hard drive is a dramatic increase in available storage space. Modern AAA titles frequently demand upwards of 50GB, sometimes even over 100GB, after all patches and DLCs are accounted for. When you factor in multiple games, digital purchases, system updates, game saves, screenshots, and video clips, the standard 500GB or even 1TB hard drive can feel cramped surprisingly quickly.
An upgrade allows you to install more games simultaneously, eliminating the tedious cycle of deleting and re-downloading titles just to make room. This is particularly beneficial for players who enjoy a diverse library or frequently revisit older games. Imagine having your entire backlog ready to play at a moment’s notice, without the need for lengthy downloads or difficult decisions about what to uninstall. With options for 2TB, 4TB, or even 8TB drives, you can effectively multiply your PS4’s storage capacity several times over, ensuring you’re well-prepared for years of gaming to come. This expansive digital playground means less time managing storage and more time actually playing.
Enhancing Performance with an SSD or Faster HDD
While the primary motivation for most users is increased storage, an upgrade can also bring noticeable performance improvements, especially if you opt for a Solid State Drive (SSD). The original hard drives in PS4 consoles are typically 5400 RPM (revolutions per minute) HDDs, which are relatively slow by today’s standards.
Replacing this with a faster 7200 RPM HDD can offer a modest boost in loading times and overall system responsiveness. However, the most significant performance leap comes from installing an SSD. SSDs have no moving parts and access data electronically, resulting in vastly superior read and write speeds compared to traditional HDDs. While the PS4’s SATA II interface (SATA III in PS4 Pro for the primary drive, but it doesn’t fully utilize modern SSD speeds) might bottleneck the ultimate potential of the fastest SSDs, you will still experience tangible benefits.
These benefits include:
- Faster Game Loading: Games will boot up quicker, and loading screens between levels or areas will be significantly reduced. For games with frequent loading, this can dramatically improve the flow and immersion.
- Quicker System Boot-Up: Your PS4 will power on and get to the main menu much faster.
- Improved Menu Navigation: The PS4’s user interface will feel snappier and more responsive, with less lag when browsing menus, libraries, or the PlayStation Store.
- Reduced Texture Pop-in: In some open-world games, faster data retrieval from an SSD can help textures load more quickly, potentially reducing instances of texture pop-in or stuttering.
While an SSD upgrade is generally more expensive per gigabyte than an HDD, the performance gains often justify the investment for those who prioritize speed and responsiveness. It transforms the console’s feel, making every interaction smoother and more instantaneous.
Essential Preparations Before You Begin
Embarking on a hardware upgrade like replacing your PS4’s hard drive requires careful planning and preparation. Rushing into the process without the right tools, components, or a backup strategy can lead to frustrating delays or, worse, data loss. This section outlines the crucial steps you need to take before you even think about opening your console.
Choosing the Right Hard Drive
The first and most critical step is selecting a suitable replacement hard drive. Not just any hard drive will do; the PS4 has specific requirements.
- Form Factor: The PS4 exclusively uses 2.5-inch SATA hard drives. These are the smaller drives typically found in laptops, not the larger 3.5-inch drives used in desktop PCs.
- Thickness: The drive’s thickness is also important. The PS4 can accommodate drives up to 9.5mm in height. Most standard 2.5-inch drives, including SSDs, fit within this specification. Some very high-capacity HDDs (e.g., 4TB+) might be thicker (e.g., 15mm), and these will not fit in the PS4. Always check the drive’s specifications.
- Interface: The PS4 uses a SATA interface. All modern 2.5-inch HDDs and SSDs use SATA, so this is generally not an issue, but it’s good to be aware.
- Capacity: While the original PS4 firmware limited drives to 2TB, later updates removed this restriction, meaning you can now install drives up to 8TB. However, the largest 2.5-inch drives often exceed the 9.5mm thickness limit. For most users, a 2TB or 4TB drive offers a substantial upgrade in capacity while remaining within the physical constraints and often providing a good balance of cost and storage.
- Type (HDD vs. SSD):
- HDD (Hard Disk Drive): These are traditional drives with spinning platters. They offer the best value for capacity, meaning you get more gigabytes per dollar. A 7200 RPM HDD will be faster than the stock 5400 RPM drive, but still slower than an SSD.
- SSD (Solid State Drive): These drives use flash memory and have no moving parts. They are significantly faster than HDDs, leading to quicker loading times and a more responsive system. However, they are more expensive per gigabyte. If performance is a top priority and budget allows, an SSD is the superior choice.
Consider your budget, storage needs, and performance expectations carefully when making your selection.
Backing Up Your PS4 Data
This is arguably the most important preparatory step. Replacing your hard drive means wiping the old one clean and installing a fresh operating system on the new drive. Any data not backed up will be lost permanently. This includes game save data, captured screenshots and video clips, and even your game installations.
-
What to Back Up:
- Saved Data: Crucial for continuing your progress in games.
- Screenshots and Video Clips: Your precious gaming memories.
- Settings: While not strictly necessary, backing up system settings can save you time reconfiguring your console.
- Installed Games/Applications: While technically you can re-download them, backing them up can save a lot of time, especially if you have a slow internet connection. Note: Backing up installed games can take a very large amount of space and time. Many users opt to just re-download games after the upgrade, but ensure your save data is always backed up.
-
Methods of Backup:
- USB Storage Device: The most common method. You’ll need a USB drive or external hard drive formatted to FAT32 or exFAT, with enough space to hold your data. For game saves and captures, a 16GB or 32GB USB stick is often sufficient. For full game backups, you’ll need an external drive that can match or exceed your current PS4 storage.
- To back up: Go to
Settings > System > Back Up and Restore > Back Up PS4. Follow the on-screen instructions, selecting what you wish to back up.
- To back up: Go to
- PlayStation Plus Cloud Storage: If you have an active PlayStation Plus subscription, your game save data is automatically uploaded to the cloud for most games. This is an excellent failsafe, but it doesn’t cover screenshots, videos, or full game installations. Ensure your cloud saves are up to date by checking
Settings > Application Saved Data Management > Saved Data in System Storage > Upload to Online Storage.
- USB Storage Device: The most common method. You’ll need a USB drive or external hard drive formatted to FAT32 or exFAT, with enough space to hold your data. For game saves and captures, a 16GB or 32GB USB stick is often sufficient. For full game backups, you’ll need an external drive that can match or exceed your current PS4 storage.
Always double-check that your backup is complete and accessible before proceeding with the physical swap.
Gathering Your Tools
With your new hard drive selected and your data safely backed up, you’re almost ready. Gather the necessary tools to ensure a smooth and hassle-free installation process.
- Phillips-Head Screwdriver: A standard Phillips-head screwdriver (usually PH1 size) is all you need to remove the screws securing the hard drive caddy.
- USB Drive for System Software: You’ll need a separate USB flash drive (minimum 1GB capacity, 8GB recommended for peace of mind) to install the PS4’s operating system (firmware) onto your new hard drive. This drive must be formatted to FAT32 or exFAT.
- Internet Connection: Required to download the latest PS4 system software file from the official PlayStation website. Make sure you download the full installation file, not just the update file. The full installation file is significantly larger (around 1GB) and is specifically for new hard drives or complete system reinstalls.
- A Computer: To download the system software file and prepare the USB drive.
- Optional: Static-Free Environment: While not strictly mandatory, working in a clean, static-free environment can minimize the risk of damaging sensitive electronics. Avoid working on carpets, and consider touching a grounded metal object beforehand to discharge any static electricity.
Having all these items ready before you start will prevent interruptions and make the process much more efficient.
Step-by-Step Guide: Replacing Your PS4 Hard Drive
Now that you have your new hard drive, your data backed up, and all your tools at hand, it’s time for the main event: physically replacing the hard drive and reinstalling the PS4’s operating system. Follow these steps carefully to ensure a successful upgrade.
Powering Down and Disconnecting
Before you open your console, it’s crucial to ensure it’s completely powered off to prevent any electrical damage or injury.
- Proper Shutdown: Do not just put your PS4 into Rest Mode. Go to the Power Options on the PS4 menu and select
Turn Off PS4. Wait for the console’s light indicator to turn off completely. - Disconnect Cables: Once the console is fully off, unplug all cables: the power cable, HDMI cable, Ethernet cable (if applicable), and any USB accessories.
- Position the PS4: Place your PS4 on a clean, flat, and stable surface with good lighting. Ensure you have enough space to work comfortably.
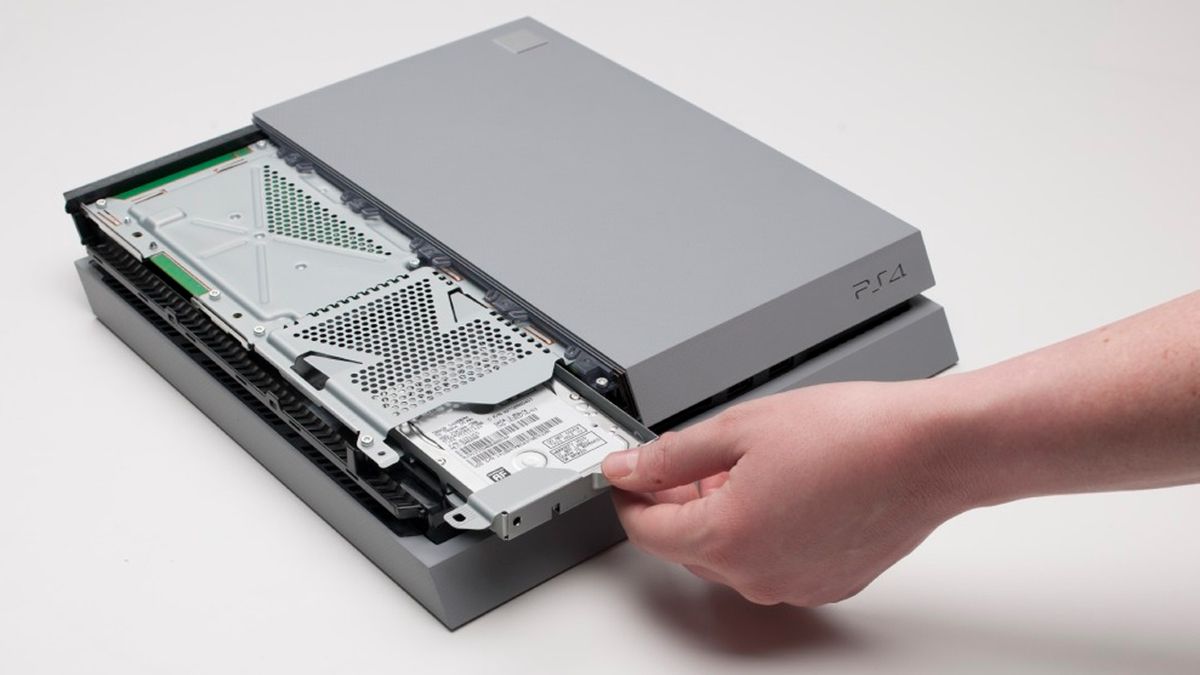
Locating and Removing the Original Hard Drive
The process varies slightly depending on your PS4 model (original PS4, PS4 Slim, or PS4 Pro), but the general principle is the same.
For Original PS4 (Fat Model):
- Slide Off the Top Cover: Locate the glossy top panel on your PS4 (it’s the half with the PlayStation logo). Gently push it sideways towards the back of the console. It should slide off with a click, revealing the hard drive bay.
- Unscrew the Caddy Screw: You’ll see a single screw with the PlayStation symbols (circle, square, triangle, cross) holding the hard drive caddy in place. Use your Phillips-head screwdriver to remove this screw.
- Pull Out the Caddy: Gently pull the metal hard drive caddy towards you, away from the console. It should slide out easily.
- Remove Original Drive from Caddy: The original hard drive is secured within the metal caddy by four screws (two on each side). Unscrew these four screws and carefully lift the old hard drive out of the caddy.
For PS4 Slim and PS4 Pro:
- Locate the Hard Drive Bay Cover: These models have a dedicated small cover over the hard drive bay, usually on the back or side. The PS4 Slim’s cover is typically on the rear, near the power port, while the PS4 Pro’s is on the side, near the front.
- Remove the Cover: For PS4 Slim, it’s a small plastic flap you can unclip. For PS4 Pro, it’s a small, textured plastic cover that you can slide off after pushing a small tab. Refer to your console’s manual or online guides for the exact location and removal method if unsure.
- Unscrew the Caddy Screw: Similar to the original PS4, there will be one larger screw securing the hard drive caddy. Remove this screw.
- Pull Out the Caddy: Gently pull the hard drive caddy out of the bay.
- Remove Original Drive from Caddy: Unscrew the four screws holding the old hard drive within the caddy and remove it.
Installing the New Hard Drive
With the old drive removed, installing the new one is simply reversing the process.
- Place New Drive into Caddy: Carefully place your new 2.5-inch SATA hard drive or SSD into the hard drive caddy. Ensure the SATA connector pins face the same direction as the original drive for correct alignment when inserted back into the console.
- Secure with Screws: Reinsert and tighten the four screws (two on each side) to secure the new drive firmly within the caddy. Do not overtighten.
- Slide Caddy Back into PS4: Gently slide the hard drive caddy with the new drive back into the PS4’s hard drive bay until it’s fully seated.
- Secure the Caddy: Reinsert and tighten the single screw (with the PlayStation symbols or the relevant caddy screw) that holds the caddy in place.
- Replace Cover:
- For Original PS4: Slide the glossy top cover back onto the console until it clicks into place.
- For PS4 Slim/Pro: Replace the small hard drive bay cover.
Reinstalling the PS4 System Software
With the new hardware in place, your PS4 is essentially a blank slate. It needs its operating system reinstalled.
- Download System Software: On your computer, go to the official PlayStation website (usually playstation.com/support/system-updates/ps4) and locate the “Reinstall System Software” section. Download the full installation file (which will be around 1GB or more, not the smaller update file).
- Prepare USB Drive:
- Ensure your USB drive is formatted to FAT32 or exFAT.
- Create a folder on the root of the USB drive named
PS4(all caps). - Inside the
PS4folder, create another folder namedUPDATE(all caps). - Copy the downloaded system software file (usually named
PS4UPDATE.PUP) into theUPDATEfolder. - The final path should look like
USB_DRIVE:PS4UPDATEPS4UPDATE.PUP.
- Boot PS4 into Safe Mode:
- Connect the prepared USB drive to one of the PS4’s USB ports.
- Reconnect the power cable and HDMI cable to your PS4.
- Connect your DualShock 4 controller to the PS4 using its USB cable (this is crucial for Safe Mode navigation).
- Press and hold the PS4’s power button until you hear a second beep (about 7 seconds). This will boot the console into Safe Mode.
- Initialize PS4:
- In Safe Mode, select
Option 7: Initialize PS4 (Reinstall System Software). - Follow the on-screen prompts. The system will detect the USB drive and install the firmware. This process will take some time.
- In Safe Mode, select
- Initial Setup: Once the software is installed, the PS4 will restart and guide you through the initial setup process, just like when you first bought the console (language, time zone, internet connection, etc.).
Restoring Your Backed-Up Data
With the system software installed and basic setup complete, you can now restore your game saves, settings, and other data from your backup.
- Connect Backup USB Drive: Connect the USB drive or external hard drive containing your backup data to the PS4.
- Navigate to Restore: Go to
Settings > System > Back Up and Restore > Restore PS4. - Select Backup File: The PS4 will detect your backup file(s). Select the one you wish to restore.
- Confirm Restore: Follow the on-screen instructions to start the restoration process. This can take a significant amount of time depending on the size of your backup.
Once the restoration is complete, your PS4 will restart, and all your saved data and settings should be back in place. You will then need to re-download or re-install your digital and disc-based games if you chose not to back up full installations.
Post-Installation Tips and Optimization
Congratulations! You’ve successfully upgraded your PS4’s hard drive. But the journey doesn’t end there. A few final steps and optimization tips can help you make the most of your expanded storage and potentially improved performance.
Verifying the New Storage
First things first, confirm that your PS4 recognizes the new drive and its full capacity.
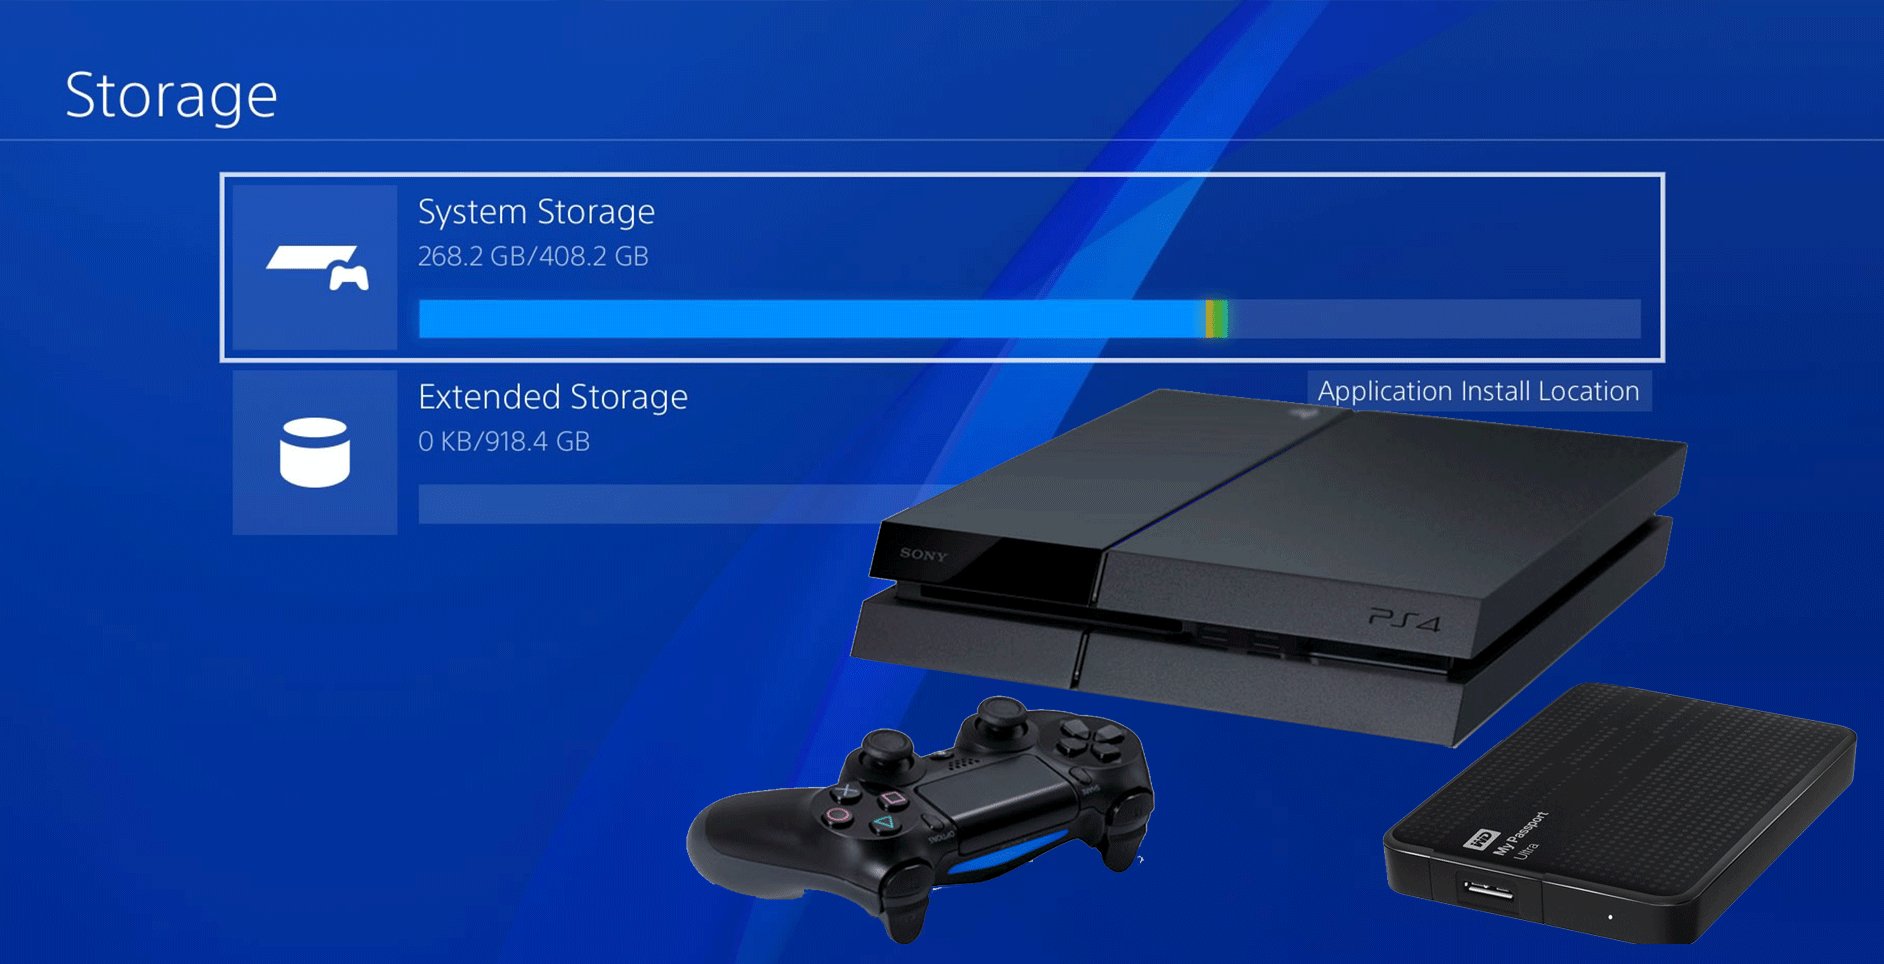
- Check Storage Space: Go to
Settings > Storage. Here, you should see your new, much larger internal storage capacity reflected. You’ll see how much space is used by applications, capture gallery, saved data, and themes. This confirms your upgrade was successful. - Run a Test Game: Launch one of your installed games (or download a small one) to ensure everything is functioning correctly. Play for a few minutes to confirm stability.
Re-downloading Digital Games and Apps
If you didn’t back up your full game installations (which is common due to their large size), you’ll now need to re-download your digital library.
- Access Your Library: Go to
Libraryon the PS4 main menu. - Download Games: Navigate to the “Purchased” section. All your previously bought digital games will be listed here. You can select them one by one to begin downloading. Prioritize your most played games first.
- Update Disc Games: For physical disc games, simply insert the disc, and the PS4 will install the base game. However, you’ll still need to download any patches, updates, and DLCs.
This process can be time-consuming depending on your internet speed and the size of your game library. Consider leaving your PS4 in Rest Mode overnight for large downloads.
Managing Your Storage Effectively
With your new, larger drive, you have significantly more breathing room, but good storage management habits are still beneficial.
- Regularly Delete Unused Games: Even with ample space, it’s good practice to uninstall games you’ve completed and are unlikely to revisit soon. You can always re-download them later.
- Manage Saved Data: While important, sometimes save data can accumulate, especially if you play many games or create multiple save files. You can manage individual game saves in
Settings > Application Saved Data Management. - Clean Up Capture Gallery: Screenshots and video clips, especially high-resolution ones, can quickly fill up space. Regularly review your Capture Gallery (
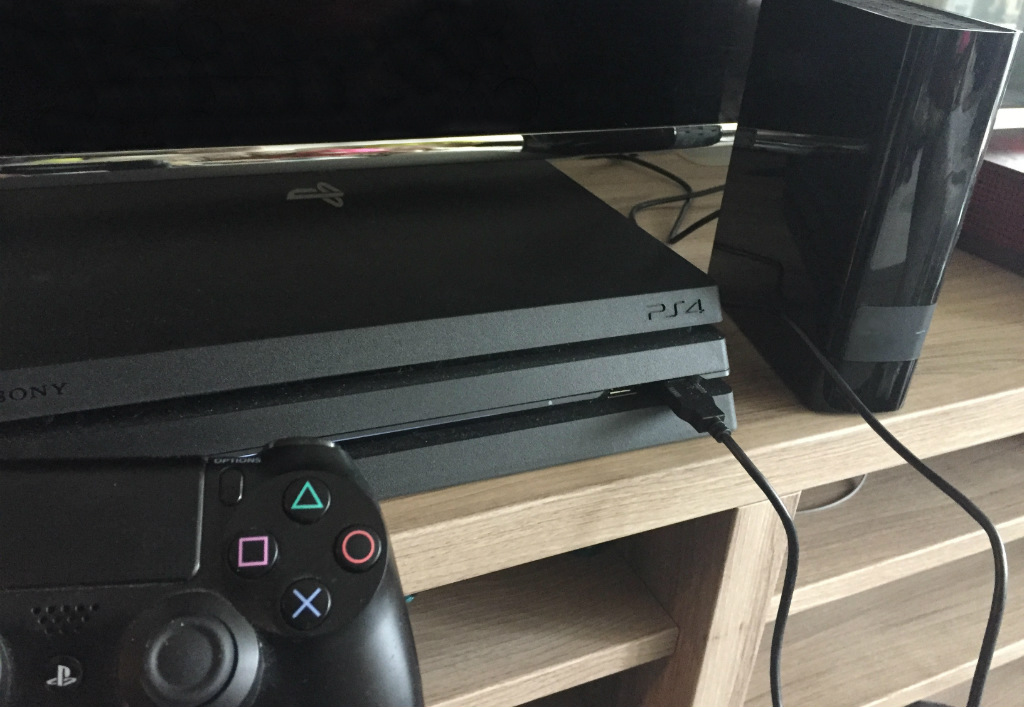
Share Button > Capture Gallery) and delete unwanted items or offload them to a USB drive or social media. - Utilize External Storage (Optional): If you still find yourself needing more space, or want to offload PS4 games to make room for PS5 games on a newer console, the PS4 supports external USB 3.0 hard drives as extended storage. This is a great way to add even more capacity without opening the console again. Simply plug in a compatible external drive, and the PS4 will prompt you to format it for extended storage.
Troubleshooting Common Issues
While the hard drive upgrade process is generally reliable, you might encounter a few common issues.
- “Cannot start PS4” Error (CE-34335-8): This often indicates that the PS4 cannot detect a hard drive, or the installed drive is faulty/incompatible. Double-check that the new hard drive is properly seated in the caddy, and the caddy is fully inserted into the PS4 bay. Ensure the drive meets the 2.5-inch, 9.5mm thickness, and SATA requirements.
- Safe Mode Loop / “Connect USB storage device”: If your PS4 keeps booting into Safe Mode asking for a USB storage device, it usually means the system software was not correctly installed.
- Verify USB Drive: Ensure the USB drive is FAT32/exFAT formatted.
- Folder Structure: Double-check that the
PS4andUPDATEfolders are correctly named and capitalized. - Correct Firmware File: Make absolutely certain you downloaded the full installation file for your PS4 model, not the smaller update file. This is the most frequent cause of this issue. Re-download and re-copy the file if in doubt.
- USB Port: Try a different USB port on your PS4.
- Backup/Restore Fails: If your backup or restore process isn’t working:
- USB Drive Health: Ensure your backup USB drive is healthy and not corrupted.
- Format: The backup drive also needs to be FAT32 or exFAT.
- PS Plus Saves: If local backup fails, remember your PS Plus cloud saves are a good fallback for critical game data.
By meticulously following the steps and being prepared for potential issues, you can ensure a successful and rewarding hard drive upgrade experience.
Conclusion
Upgrading your PlayStation 4’s hard drive is one of the most impactful enhancements you can make to extend the life and improve the usability of your console. What might seem like a daunting technical task is, in reality, a straightforward process that empowers you to overcome persistent storage limitations and, depending on your choice of drive, even boost loading times and system responsiveness. No longer will you face the agonizing choice of which beloved game to uninstall, nor will you have to endure prolonged loading screens that break immersion.
By carefully selecting a compatible drive, diligently backing up your invaluable data, and following our step-by-step guide for installation and system software reinstallation, you’ve transformed your PS4 into a more robust and future-ready gaming machine. You now have the freedom to curate an extensive library of digital titles, capture countless gaming highlights, and keep all your progress safe and sound.
Embrace your newly expanded digital playground. Dive back into your favorite sagas, explore new worlds without hesitation, and experience the seamless gaming that your upgraded PS4 now offers. Enjoy the peace of mind that comes with ample storage, knowing your console is perfectly equipped for whatever gaming adventures lie ahead. Happy gaming!
aViewFromTheCave is a participant in the Amazon Services LLC Associates Program, an affiliate advertising program designed to provide a means for sites to earn advertising fees by advertising and linking to Amazon.com. Amazon, the Amazon logo, AmazonSupply, and the AmazonSupply logo are trademarks of Amazon.com, Inc. or its affiliates. As an Amazon Associate we earn affiliate commissions from qualifying purchases.