In the rapidly evolving landscape of technology, the demand for high-performance computing has never been greater. From groundbreaking artificial intelligence research and complex machine learning models to advanced scientific simulations and stunning visual rendering, the ability to process vast amounts of data at incredible speeds is paramount. At the heart of much of this acceleration lies NVIDIA’s CUDA (Compute Unified Device Architecture), a parallel computing platform and programming model that harnesses the immense power of NVIDIA GPUs. If you’re looking to unlock the full potential of your NVIDIA graphics card for intensive computational tasks on your Windows system, installing the CUDA Toolkit is your essential first step.
This comprehensive guide is designed to walk you through the entire process of installing CUDA GPU on Windows, ensuring a smooth setup whether you’re a budding data scientist, a seasoned developer, or an enthusiast keen on exploring the frontiers of GPU-accelerated computing. We’ll cover everything from crucial prerequisites and step-by-step installation instructions to post-installation verification and common troubleshooting tips. By the end of this tutorial, your Windows machine will be fully equipped to leverage the extraordinary capabilities of CUDA, paving the way for faster computations, more efficient workflows, and the ability to tackle complex problems that were previously out of reach.
Preparing Your System for CUDA Installation
Before diving into the installation process, it’s crucial to ensure your system meets the necessary requirements and is properly configured. A well-prepared system minimizes potential roadblocks and ensures a seamless CUDA setup. This section outlines the fundamental aspects you need to understand and verify.
Understanding CUDA and Its Requirements
CUDA is not just a piece of software; it’s an entire ecosystem that allows developers to use NVIDIA GPUs for general-purpose computing. Unlike traditional CPUs, which are optimized for sequential task processing, GPUs excel at parallel processing, making them ideal for tasks that can be broken down into thousands of smaller, simultaneous operations.
- What is CUDA? At its core, CUDA is a software layer that provides direct access to the GPU’s virtual instruction set and parallel computation elements. It enables developers to write programs in familiar languages like C, C++, and Fortran, extending them with CUDA C/C++ to offload computationally intensive parts of their applications to the GPU. This massively parallel architecture dramatically speeds up calculations in various domains, from deep learning and image processing to financial modeling and cryptographic hashing.
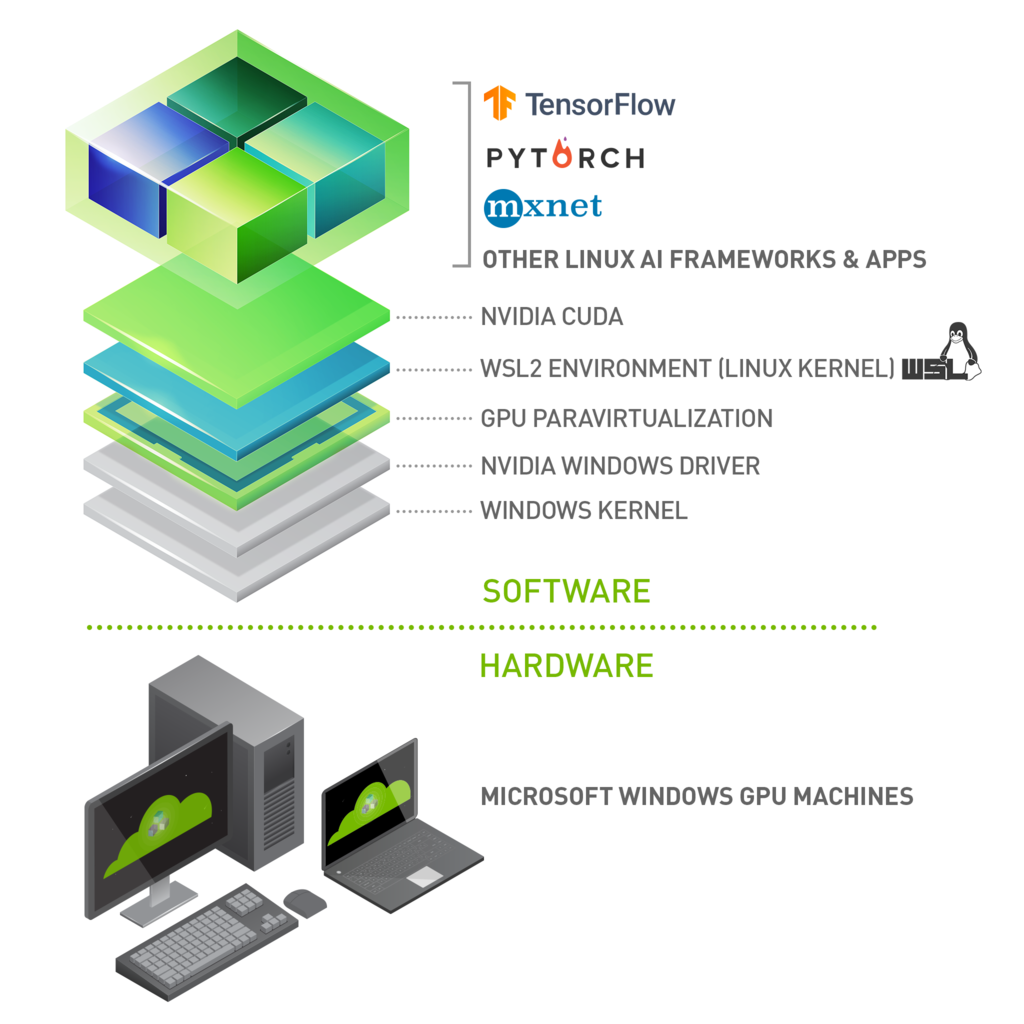
- Why is it essential? For anyone working with demanding computational workloads, CUDA is often indispensable. Deep learning frameworks like TensorFlow and PyTorch rely heavily on CUDA and its accompanying libraries (like cuDNN) to achieve their impressive training speeds. Data scientists leverage CUDA for faster data manipulation and model training. Engineers use it for complex simulations, while researchers apply it to accelerate scientific discovery. Without CUDA, many modern AI and HPC applications would simply not be viable on consumer-grade hardware.
- Hardware Prerequisites:
- NVIDIA GPU with Compute Capability: Not all NVIDIA GPUs support CUDA. You need a graphics card with a sufficiently high “compute capability.” This is a version number that indicates the features supported by the GPU hardware. Generally, newer NVIDIA GPUs (GeForce GTX/RTX, Quadro, Tesla series) released in the last decade will be compatible. You can find your GPU’s compute capability on NVIDIA’s official documentation. Integrated Intel or AMD graphics cards will not work with CUDA.
- Sufficient System Memory (RAM): While CUDA uses GPU memory, your system still needs adequate RAM for the operating system and other applications.
- Software Prerequisites:
- Windows Operating System: CUDA supports various versions of Windows, typically Windows 10 and 11 for modern toolkits. Ensure your OS is up to date with the latest service packs and security patches.
- Compatible NVIDIA GPU Driver: This is perhaps the most critical prerequisite. The CUDA Toolkit must be installed with a driver version that is compatible with the specific CUDA version you intend to install. NVIDIA provides a “CUDA Toolkit and Corresponding Driver Versions” table on their developer website, which is essential to consult. An outdated or incompatible driver can lead to installation failures or runtime issues.
- Visual Studio (or equivalent C/C++ compiler): The CUDA Toolkit requires a C/C++ compiler to build CUDA applications. On Windows, this typically means Microsoft Visual Studio (Community, Professional, or Enterprise editions). The CUDA installer will check for its presence and may even prompt you to install it if missing. Ensure you have the C++ desktop development workload installed within Visual Studio.
Verifying Your NVIDIA GPU and Driver Status
Before downloading anything, let’s confirm your current setup. This step ensures you select the correct CUDA Toolkit version and avoid compatibility issues.
- Checking Your NVIDIA GPU Model:
- Right-click on your Windows desktop and select “NVIDIA Control Panel” or “Display settings” -> “Advanced display settings” -> “Display adapter properties” (then look for the Adapter tab).
- Alternatively, open Task Manager (Ctrl+Shift+Esc), go to the “Performance” tab, and select “GPU.” Your GPU model will be displayed.
- Once you know your GPU model (e.g., GeForce RTX 3080), you can look up its compute capability on the NVIDIA developer website if you’re unsure.
- Confirming Driver Version and Updating if Necessary:
- Open the NVIDIA Control Panel. In the bottom-left corner, click “System Information.”
- Look for “Driver Version.” Note this number down.
- Now, visit the NVIDIA CUDA Toolkit Archive or the main CUDA download page. Cross-reference your current driver version with the “CUDA Toolkit and Corresponding Driver Versions” table.
- Important: If your driver is too old for the desired CUDA Toolkit version, you must update it before installing CUDA. Go to the official NVIDIA Drivers download page (www.nvidia.com/drivers), select your GPU model, and download the latest “Game Ready Driver” or “Studio Driver.” Perform a clean installation of the new driver.
- Windows OS Compatibility: Simply ensure your Windows 10 or 11 installation is up-to-date. You can check for updates via
Settings > Windows Update.
Step-by-Step CUDA Toolkit Installation Process
With your system prepped and verified, you’re ready to proceed with the core installation. This section breaks down the process into clear, manageable steps.
Downloading the NVIDIA CUDA Toolkit
The first crucial step is obtaining the correct CUDA Toolkit installer. Choosing the right version is paramount for compatibility with your drivers and any deep learning frameworks you plan to use.
- Choosing the Right Version:
- Driver Compatibility First: As mentioned, consult the NVIDIA CUDA Toolkit Archive (developer.nvidia.com/cuda-toolkit-archive) to find the CUDA Toolkit versions compatible with your currently installed NVIDIA driver. It’s generally best to use the latest driver for your GPU, then pick the latest CUDA Toolkit compatible with that driver.
- Framework Requirements: If you plan to use specific AI/ML frameworks like TensorFlow or PyTorch, they often have specific CUDA version requirements. Check their official documentation before downloading. For instance, TensorFlow 2.x might require CUDA 11.2 or 11.8. It’s often safer to align your CUDA version with your framework’s recommendation.
- Stability vs. Latest: For production environments, sometimes opting for a slightly older, more stable CUDA release might be preferable over the absolute latest version if compatibility is a concern.
- Navigating the NVIDIA Developer Website:
- Go to the NVIDIA CUDA Toolkit download page (developer.nvidia.com/cuda-downloads).
- Select your operating system (Windows).
- Choose the architecture (x86_64).
- Select your Windows version.
- Pick the desired CUDA Toolkit version based on your compatibility checks.
- Choose the “exe (network)” or “exe (local)” installer. The “local” version is a larger download but contains all necessary files, making it suitable for offline installation or unreliable internet connections. The “network” version downloads components during installation. For simplicity and reliability, the “exe (local)” is often recommended.
- Click the download link and save the installer to a convenient location on your system.
Executing the CUDA Toolkit Installer
Once downloaded, running the installer is straightforward, but pay attention to the options presented.
- Run as Administrator: Locate the downloaded
.exefile (e.g.,cuda_12.x.x_535.xx_windows.exe), right-click it, and select “Run as administrator.” - Extraction Path: The installer will first ask for an extraction path. This is a temporary location where the installation files will be uncompressed. You can usually leave it as the default. Click “OK” and wait for the files to extract.
- System Check: The installer will perform a system check to ensure compatibility. If any critical issues are found (e.g., incompatible driver), it will notify you. Address these issues before proceeding.
- License Agreement: Read and accept the NVIDIA software license agreement.
- Installation Options: Express vs. Custom:
- Express Installation: This is the default and recommended for most users. It installs all components (CUDA Toolkit, Visual Studio Integration, documentation, samples, and the NVIDIA Display Driver if your current driver is older than the one bundled with CUDA). If you’ve just updated your driver to a compatible version, the express option might try to downgrade or reinstall it, which is generally fine if the bundled driver is newer.
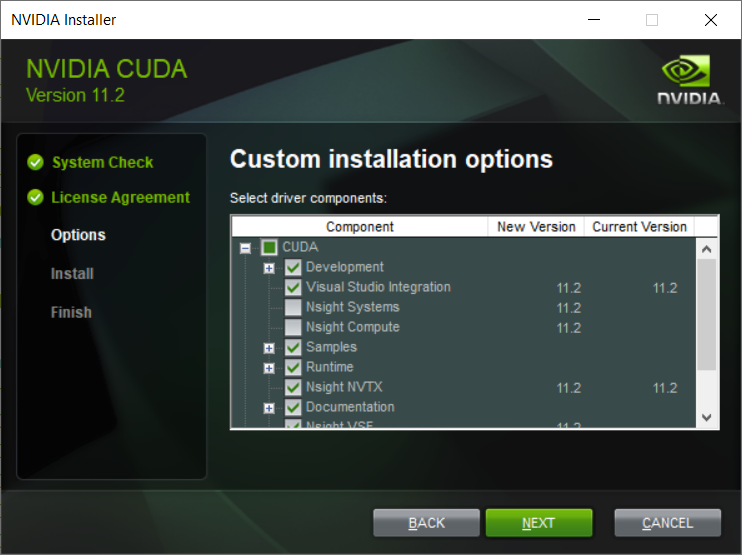
- Custom Installation: This option gives you granular control.
- Why Custom Might Be Preferred: If you recently updated your NVIDIA driver to a specific version not bundled with the CUDA Toolkit, and you want to keep that driver, then choose “Custom.”
- Deselecting the Driver: In the custom installation, you can deselect the “Display Driver” component if you want to retain your existing, compatible driver. Ensure you do not deselect “CUDA Development” or “Visual Studio Integration.”
- Installation Path: The custom option also allows you to change the installation path (default is usually
C:Program FilesNVIDIA GPU Computing ToolkitCUDAvX.Y). While generally fine to leave as default, some advanced users or specific enterprise environments might prefer a different location.
- Recommendation: For most users, “Express” is sufficient, especially if you’re starting fresh or don’t have a specific driver version you need to preserve beyond what the toolkit offers. If you carefully updated your driver to a specific version, then “Custom” with the driver deselected is safer.
- Proceed with Installation: Click “Next” (for Express) or “Install” (for Custom after component selection) and allow the installer to complete the process. This can take several minutes.
- Restart: After the installation finishes, you might be prompted to restart your computer. It’s highly recommended to do so to ensure all changes take effect.
Integrating cuDNN for Deep Learning Acceleration (Optional but Recommended)
For anyone involved in deep learning, cuDNN (CUDA Deep Neural Network library) is an absolutely vital component. While technically optional for core CUDA functionality, it’s virtually mandatory for using frameworks like TensorFlow and PyTorch efficiently.
- What is cuDNN and its role? cuDNN is a GPU-accelerated library of primitives for deep neural networks. It provides highly optimized implementations for standard routines such as forward and backward convolution, pooling, normalization, and activation layers. By using cuDNN, deep learning frameworks can achieve significantly faster training and inference times compared to relying solely on the base CUDA toolkit. Think of it as a specialized, super-fast engine for deep learning operations.
- Downloading cuDNN from NVIDIA Developer Zone:
- Register as an NVIDIA Developer: cuDNN downloads require registration with the NVIDIA Developer Program. Go to developer.nvidia.com/cudnn and sign up if you haven’t already. It’s free.
- Download the Correct Version: After logging in, you’ll see a list of cuDNN versions. You must download the version that corresponds to your newly installed CUDA Toolkit version. For example, if you installed CUDA 11.8, download cuDNN for CUDA 11.x.
- Select for Windows: Choose the appropriate “cuDNN Library for Windows (x86)” download. This will typically be a
.zipfile. - Save the
.zipfile to a temporary location.
- Manual Installation Steps: cuDNN doesn’t come with an installer; it’s a set of library files you manually integrate into your CUDA Toolkit directory.
- Extract the Archive: Unzip the downloaded cuDNN file. You will find three folders inside:
bin,include, andlib. - Locate Your CUDA Installation: Navigate to your CUDA Toolkit installation directory. By default, this is usually
C:Program FilesNVIDIA GPU Computing ToolkitCUDAvX.Y, wherevX.Yis your CUDA version (e.g.,v11.8). - Copy Files:
- Copy the contents of the extracted
binfolder (e.g.,cudnn*.dll) into your CUDAbindirectory (C:Program FilesNVIDIA GPU Computing ToolkitCUDAvX.Ybin). - Copy the contents of the extracted
includefolder (e.g.,cudnn.h) into your CUDAincludedirectory (C:Program FilesNVIDIA GPU Computing ToolkitCUDAvX.Yinclude). - Copy the contents of the extracted
libfolder (e.g.,cudnn*.lib) into your CUDAlibx64directory (C:Program FilesNVIDIA GPU Computing ToolkitCUDAvX.Ylibx64).
- Copy the contents of the extracted
- Confirm: Double-check that the files have been successfully copied to their respective locations. This manual step is critical for cuDNN to be recognized by your deep learning frameworks.
- Extract the Archive: Unzip the downloaded cuDNN file. You will find three folders inside:
Post-Installation Verification and Configuration
Once the CUDA Toolkit and cuDNN are installed, it’s essential to verify everything is working correctly. This step confirms that your system can now leverage the GPU for accelerated computing.
Confirming Successful CUDA Installation
A few checks will tell you if CUDA is ready to roll.
- Checking Environment Variables:
The CUDA installer typically sets the necessary environment variables automatically. However, it’s good practice to verify them:- Right-click “This PC” (or “My Computer”) -> “Properties” -> “Advanced system settings” -> “Environment Variables…”
- Under “System variables,” look for:
CUDA_PATH: Should point to your CUDA installation root (e.g.,C:Program FilesNVIDIA GPU Computing ToolkitCUDAv11.8).CUDA_PATH_VXX_Y: A version-specific path (e.g.,CUDA_PATH_V11_8).- In the
Pathvariable (also under System variables), ensure that entries like%CUDA_PATH%binand%CUDA_PATH%libnvvpare present. These allow the system to find CUDA executables and libraries.
- Running Sample Projects:
The CUDA Toolkit comes with many sample projects that are excellent for verifying the installation.- Navigate to the CUDA samples directory, typically
C:ProgramDataNVIDIA CorporationCUDA SamplesvX.Y. - Open the appropriate Visual Studio solution file (e.g.,
Samples_vs2022.slnif you have VS2022). - Find a basic sample like
deviceQueryorbandwidthTest. - Build the project (Build -> Build Solution).
- Run the executable (either from Visual Studio or directly from
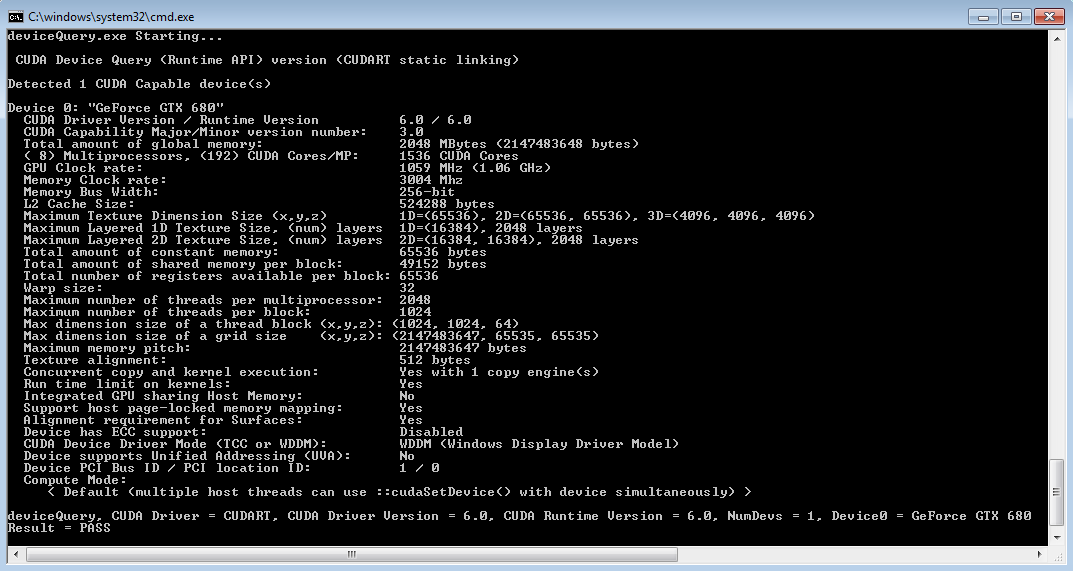
C:ProgramDataNVIDIA CorporationCUDA SamplesvX.Ybinwin64Debug). deviceQueryshould output detailed information about your NVIDIA GPU, including its compute capability. If it runs successfully and detects your GPU, CUDA is likely installed correctly.
- Navigate to the CUDA samples directory, typically
- Using
nvcc --version:
nvccis the NVIDIA CUDA Compiler. Its presence and correct version output indicate that your system can locate the CUDA development tools.- Open a Command Prompt or PowerShell window.
- Type
nvcc --versionand press Enter. - You should see output indicating the
nvccversion and associated CUDA Toolkit version. If you get an error like'nvcc' is not recognized..., it means yourPathenvironment variable isn’t correctly configured to include the CUDAbindirectory.
Addressing Common Installation Issues
Even with careful preparation, issues can arise. Here are some common problems and their solutions:
- Driver Incompatibility:
- Symptom: CUDA installation fails, or
deviceQueryreports no CUDA-capable device. - Solution: Re-verify your NVIDIA driver version against the CUDA Toolkit’s requirements. Use DDU (Display Driver Uninstaller) to completely remove all NVIDIA drivers, then perform a clean installation of the correct, compatible driver from NVIDIA’s website, and then retry the CUDA Toolkit installation (using Custom and deselecting the driver if needed).
- Symptom: CUDA installation fails, or
- Environment Variable Conflicts:
- Symptom:
nvcc --versionfails, or deep learning frameworks can’t find CUDA libraries. - Solution: Manually check and correct the
Path,CUDA_PATH, andCUDA_PATH_VXX_Yenvironment variables as described above. Ensure the CUDAbindirectory is in your system’sPath. Restart your PC after making changes.
- Symptom:
- Installation Failures and Log Files:
- Symptom: The CUDA installer crashes or reports an error during installation.
- Solution: The installer generates logs in a temporary directory (often
C:Users<YourUser>AppDataLocalTemp). Examine these log files for specific error messages that can point to the root cause (e.g., missing Visual Studio components, disk space issues).
- Visual Studio Integration Problems:
- Symptom: CUDA sample projects fail to build in Visual Studio, or
.cufiles are not recognized. - Solution: Ensure you installed the “Desktop development with C++” workload in Visual Studio before installing CUDA. If you installed Visual Studio after CUDA, or if the integration failed, you might need to run the CUDA installer again and select “Custom” to explicitly reinstall the “Visual Studio Integration” component. Also, make sure your Visual Studio version is supported by the specific CUDA Toolkit version.
- Symptom: CUDA sample projects fail to build in Visual Studio, or
Maximizing Your CUDA-Enabled Workflow
With CUDA successfully installed, you’ve opened the door to a world of accelerated computing. To truly harness this power, consider these best practices and explore the vast potential of GPU acceleration.
Best Practices for CUDA Management
Maintaining an optimal CUDA environment involves more than just the initial installation.
- Keeping Drivers and CUDA Toolkit Updated: Periodically check for new NVIDIA drivers and CUDA Toolkit releases. While it’s generally good to stay updated for performance improvements and bug fixes, always prioritize compatibility with your specific projects and frameworks. Never update blindly; always check release notes and framework requirements first.
- Managing Multiple CUDA Versions: In some development scenarios, you might need different CUDA versions for different projects (e.g., one framework requires CUDA 11.2, another 11.8). This is achievable by installing multiple CUDA Toolkits to different paths and then using environment variables (specifically adjusting the
Pathvariable) or symlinks to switch between them as needed. This is an advanced topic but very useful for complex development. - Integration with AI/ML Frameworks: Once CUDA and cuDNN are installed, frameworks like TensorFlow and PyTorch should automatically detect and utilize them. However, always refer to their official installation guides for any framework-specific configurations or environment variable settings that might be required.
Exploring the Potential of GPU Acceleration
The installation of CUDA is merely the beginning. The real power lies in its application across various domains.
- AI/ML Development: Dive into deep learning with TensorFlow, PyTorch, or Keras. Train neural networks significantly faster, enabling more experimentation and larger models.
- Data Science and Analytics: Leverage libraries like cuDF (GPU DataFrame) for rapid data manipulation, cuML for accelerated machine learning algorithms, and RAPIDS for end-to-end data science pipelines on the GPU.
- High-Performance Computing (HPC): Explore scientific computing with CUDA Fortran, OpenACC, or parallel programming paradigms using native CUDA C/C++. Simulate complex physical phenomena, process massive datasets, and accelerate computational research.
- Creative Design and Rendering: Many professional creative applications, including 3D rendering engines (like Blender Cycles, OctaneRender), video editing software, and CAD tools, offer CUDA acceleration for faster rendering, simulations, and real-time previews.
In conclusion, installing CUDA GPU on Windows is a fundamental step for anyone looking to tap into the formidable computational capabilities of modern NVIDIA graphics cards. While the process involves several steps and requires attention to detail, especially regarding compatibility, the rewards are immense. By following this comprehensive guide, you’ve successfully transformed your Windows machine into a powerful engine for accelerated computing, ready to tackle the most demanding tasks in AI, data science, scientific research, and beyond. Now, go forth and compute!
aViewFromTheCave is a participant in the Amazon Services LLC Associates Program, an affiliate advertising program designed to provide a means for sites to earn advertising fees by advertising and linking to Amazon.com. Amazon, the Amazon logo, AmazonSupply, and the AmazonSupply logo are trademarks of Amazon.com, Inc. or its affiliates. As an Amazon Associate we earn affiliate commissions from qualifying purchases.