In an increasingly digital world, where every photo, video, game, and application vies for space, running out of storage on your personal computer is a common and frustrating experience. Whether you’re a gamer needing more room for the latest titles, a creative professional dealing with large media files, a student managing extensive research, or simply a user looking to breathe new life into an aging system, installing a new hard drive is a highly effective solution. This comprehensive guide will walk you through every step of the process, transforming what might seem like a daunting technical task into a straightforward, empowering upgrade.
Why Upgrade or Add a Hard Drive?
Before diving into the mechanics, it’s worth understanding the compelling reasons behind a hard drive installation. This isn’t just about adding more space; it’s often a strategic move to enhance your PC’s overall performance and longevity, aligning perfectly with the productivity and efficiency themes often discussed in tech circles.
Expanding Your Digital Horizon: More Storage
The most immediate and obvious benefit of installing a new hard drive is the dramatic increase in available storage. Modern operating systems and applications consume significant space, and high-resolution media files quickly fill up even seemingly capacious drives. Adding a secondary drive or replacing your primary one with a larger model ensures you have ample room for your growing digital life. This expansion means less time spent meticulously managing files, deleting old programs, or offloading data to external drives, thereby boosting your digital productivity. It also enables you to keep more of your valuable data – from personal photos to critical work documents – readily accessible on your primary machine, a cornerstone of effective digital security.
Turbocharging Your System: Speed and Performance
Beyond sheer capacity, installing a new hard drive, particularly a Solid State Drive (SSD), can dramatically improve your PC’s speed and responsiveness. Traditional Hard Disk Drives (HDDs) rely on spinning platters and read/write heads, which are mechanical bottlenecks. SSDs, conversely, use flash memory, offering instantaneous data access and significantly faster boot times, application loading, and file transfers. If your current PC feels sluggish, upgrading from an HDD to an SSD, even as a secondary drive for frequently used applications, can make your system feel brand new, directly impacting your daily computing experience and productivity. This move aligns with current technology trends focusing on efficiency and speed, providing a substantial return on investment for your computing experience.
Choosing the Right Storage for Your Needs
The landscape of PC storage has evolved significantly, offering various technologies each with distinct advantages. Understanding these differences is crucial for making an informed decision that best suits your needs and budget.
The Classic Workhorse: Hard Disk Drives (HDDs)
Hard Disk Drives have been the standard for PC storage for decades. They offer the lowest cost per gigabyte, making them ideal for mass storage of large files like videos, photos, and game libraries where raw speed isn’t the absolute priority. HDDs typically come in 3.5-inch sizes for desktops and 2.5-inch for laptops, though desktop installations are more common for adding extra capacity. While slower than SSDs, their reliability and cost-effectiveness for bulk storage remain unmatched. For those on a budget or needing vast amounts of archival space, an HDD is an excellent secondary drive option.
The Speed Demon: Solid State Drives (SSDs)
Solid State Drives represent a significant leap in storage technology. Lacking any moving parts, SSDs are incredibly fast, quiet, and more durable than HDDs. They excel in scenarios where speed is paramount: housing your operating system for rapid boot times, running demanding applications, or reducing game loading screens. While historically more expensive than HDDs per gigabyte, SSD prices have steadily decreased, making them increasingly accessible. Their impact on overall system responsiveness is profound, making them a preferred choice for primary drives or for anyone looking to maximize their PC’s performance. They are a prime example of how advances in tech gadgets directly translate into enhanced user experience.
Interface Matters: SATA vs. NVMe M.2
Beyond the HDD vs. SSD distinction, the interface through which your drive connects to your motherboard also plays a critical role in performance.
- SATA (Serial ATA): This is the most common interface for both HDDs and traditional 2.5-inch SSDs. SATA 3.0 offers theoretical transfer speeds of up to 600 MB/s. While fast enough for most users, it can be a bottleneck for the fastest SSDs. SATA drives require two cables: one for data and one for power. Most modern motherboards have multiple SATA ports.
- NVMe (Non-Volatile Memory Express) M.2: This is the cutting-edge interface designed specifically for high-performance SSDs. NVMe drives, typically in a compact “M.2” stick form factor, connect directly to a dedicated slot on your motherboard, bypassing the SATA bottleneck entirely. They leverage the PCIe bus, offering significantly higher speeds, often reaching several gigabytes per second – many times faster than SATA SSDs. This technology is ideal for power users, content creators, and competitive gamers who demand the absolute fastest storage performance. You’ll need to check your motherboard’s specifications to ensure it has an M.2 slot and supports NVMe.
Carefully consider your primary use case, budget, and motherboard compatibility when making your choice. Often, a combination of an NVMe M.2 SSD for your operating system and primary applications, paired with a larger SATA HDD for bulk storage, offers the best balance of speed and capacity.
Preparation: Laying the Groundwork for a Smooth Installation
A successful hard drive installation begins with thorough preparation. Taking the necessary precautions and gathering the right tools will save you time, prevent potential damage, and ensure a smooth process.
Essential Tools and Safety Precautions
Before opening your PC case, gather the following:
- Screwdriver Set: A Phillips-head screwdriver is usually sufficient, but a set with various sizes and types (e.g., Torx for some M.2 screws) is always useful.
- Anti-Static Wrist Strap: This is highly recommended to prevent electrostatic discharge (ESD) from damaging sensitive internal components. Connect the strap to an unpainted metal part of your PC case. Alternatively, you can frequently touch an unpainted metal surface on the PC case before and during the installation to discharge static electricity.
- Flashlight or Headlamp: Internal PC spaces can be dark and cramped. A light source will help you see connections and components clearly.
- Cable Ties or Velcro Straps (Optional but Recommended): For neat cable management, which improves airflow and makes future maintenance easier.
- User Manual for Your Motherboard/PC Case: This can be invaluable for locating specific slots, connectors, and understanding mounting mechanisms.
Safety First: Always work in a clean, well-lit area. Avoid working on carpeted surfaces, which can generate static electricity. Handle components by their edges and avoid touching gold connectors or circuit boards directly.
Safeguarding Your Data: The Crucial Backup
This step cannot be overstressed, especially if you are replacing your primary drive or making significant changes to your system. Before you begin any hardware installation, back up your critical data. While the installation process itself is generally safe, unforeseen issues can occur. Use an external hard drive, cloud storage, or network-attached storage (NAS) to create copies of all important documents, photos, videos, and project files. This practice aligns perfectly with digital security best practices, ensuring your invaluable data remains safe regardless of what happens during the upgrade.
Powering Down and Opening Up Your PC
With your tools ready and data secured, it’s time to prepare your PC:
- Shut Down Your PC Completely: Do not just put it to sleep. Perform a full shutdown from your operating system.
- Unplug All Cables: Disconnect the power cable from the wall outlet and the PC, as well as any peripherals (monitor, keyboard, mouse, USB devices, Ethernet). This eliminates any risk of electrical shock and provides more room to work.
- Move to a Flat, Stable Surface: Place your PC tower on a sturdy desk or table where you have plenty of space to work comfortably.
- Open the PC Case: Most modern PC cases have thumbscrews or standard screws on the rear of the side panel (usually the left side when viewed from the front). Remove these screws and carefully slide or swing open the side panel. For some cases, you might need to remove both side panels to access drive bays or route cables effectively.
The Physical Installation: Bringing Your New Drive Online
Now that your PC is open and ready, it’s time for the physical installation of your new hard drive. This process varies slightly depending on whether you’re installing a traditional 2.5/3.5-inch SATA drive or a compact NVMe M.2 SSD.
Locating and Securing Your Drive
- For 3.5-inch HDDs and 2.5-inch SATA SSDs:
- Locate Drive Bays: Desktop PC cases typically have dedicated drive bays or cages. These can be tool-less (with levers or plastic clips) or require screws. Look for empty bays, usually near the front or bottom of the case.
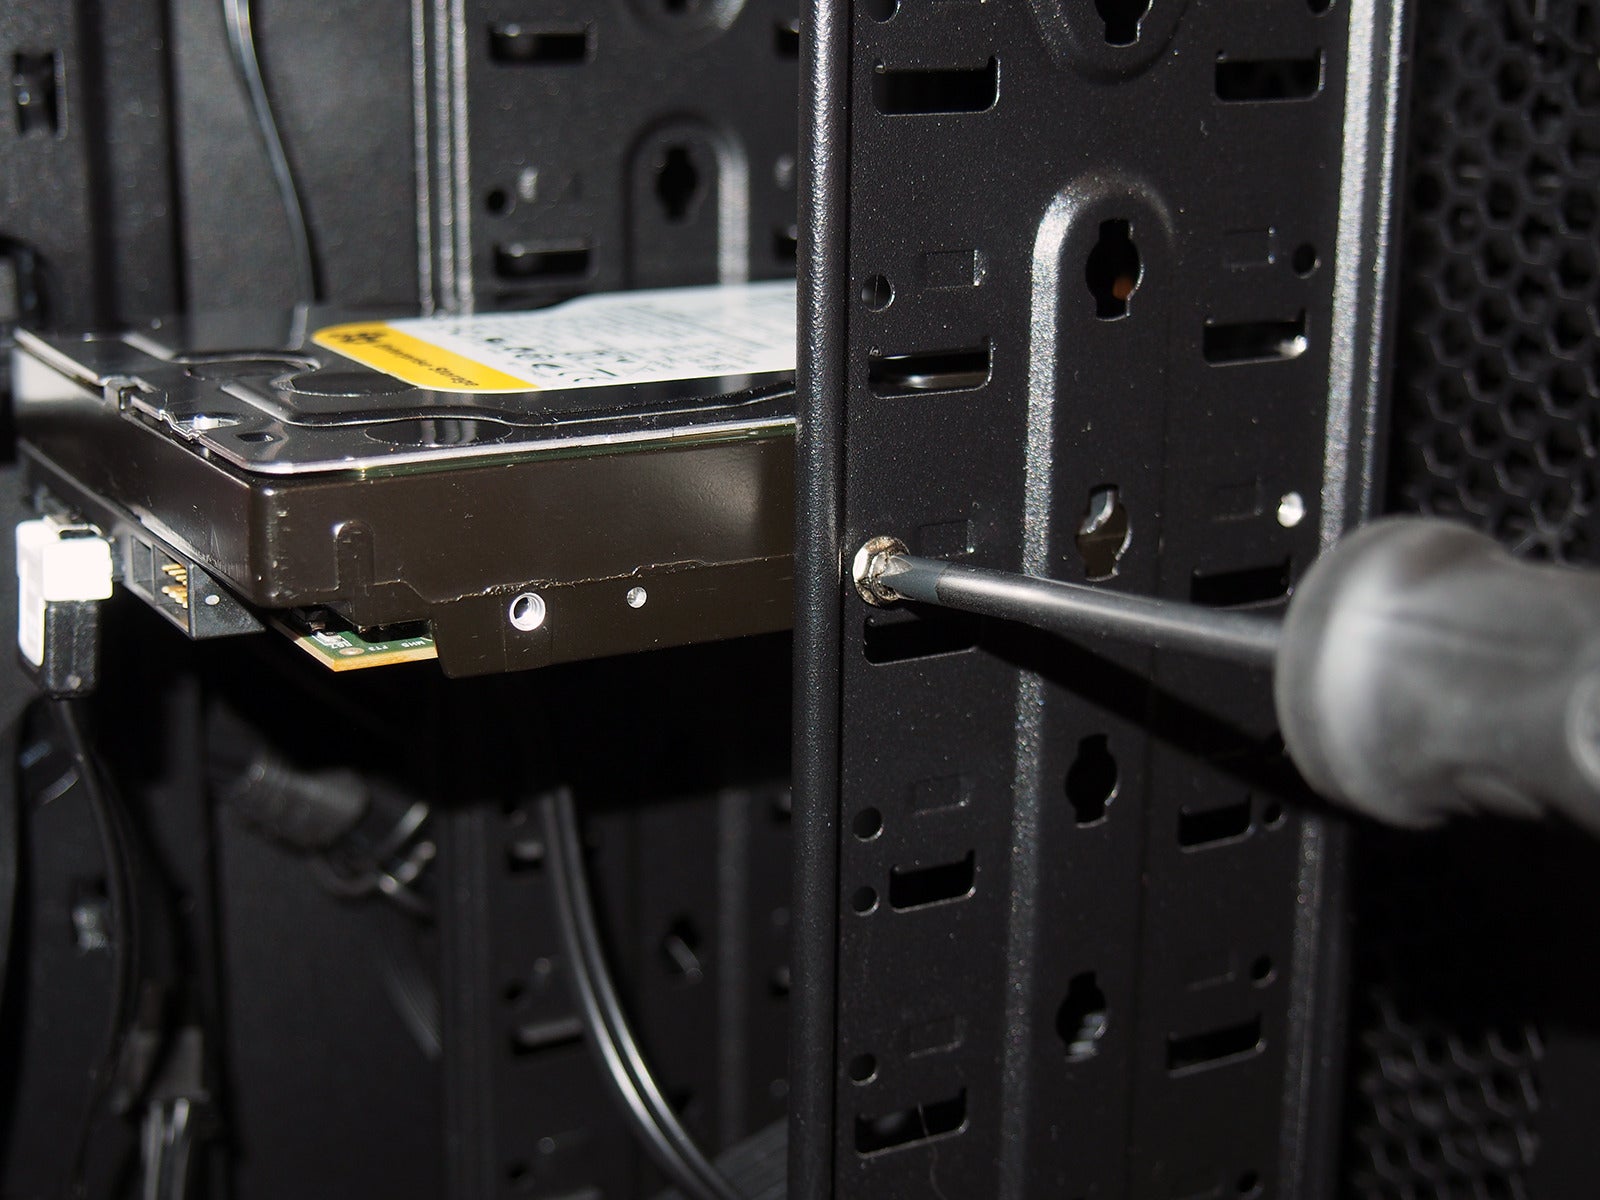
- Mount the Drive:
- 3.5-inch HDD: Slide the HDD into an available 3.5-inch bay until it clicks into place, or align it with the screw holes and secure it with screws (typically 2-4 screws per side, depending on the case design).
- 2.5-inch SSD: Many cases have dedicated 2.5-inch mounting points. If not, you might need a 3.5-inch to 2.5-inch adapter bracket to mount the SSD in a 3.5-inch bay. Secure the SSD to the bracket, then the bracket to the bay.
Connecting the Lifelines: Power and Data Cables
This step is for SATA drives only (HDDs and 2.5-inch SSDs).
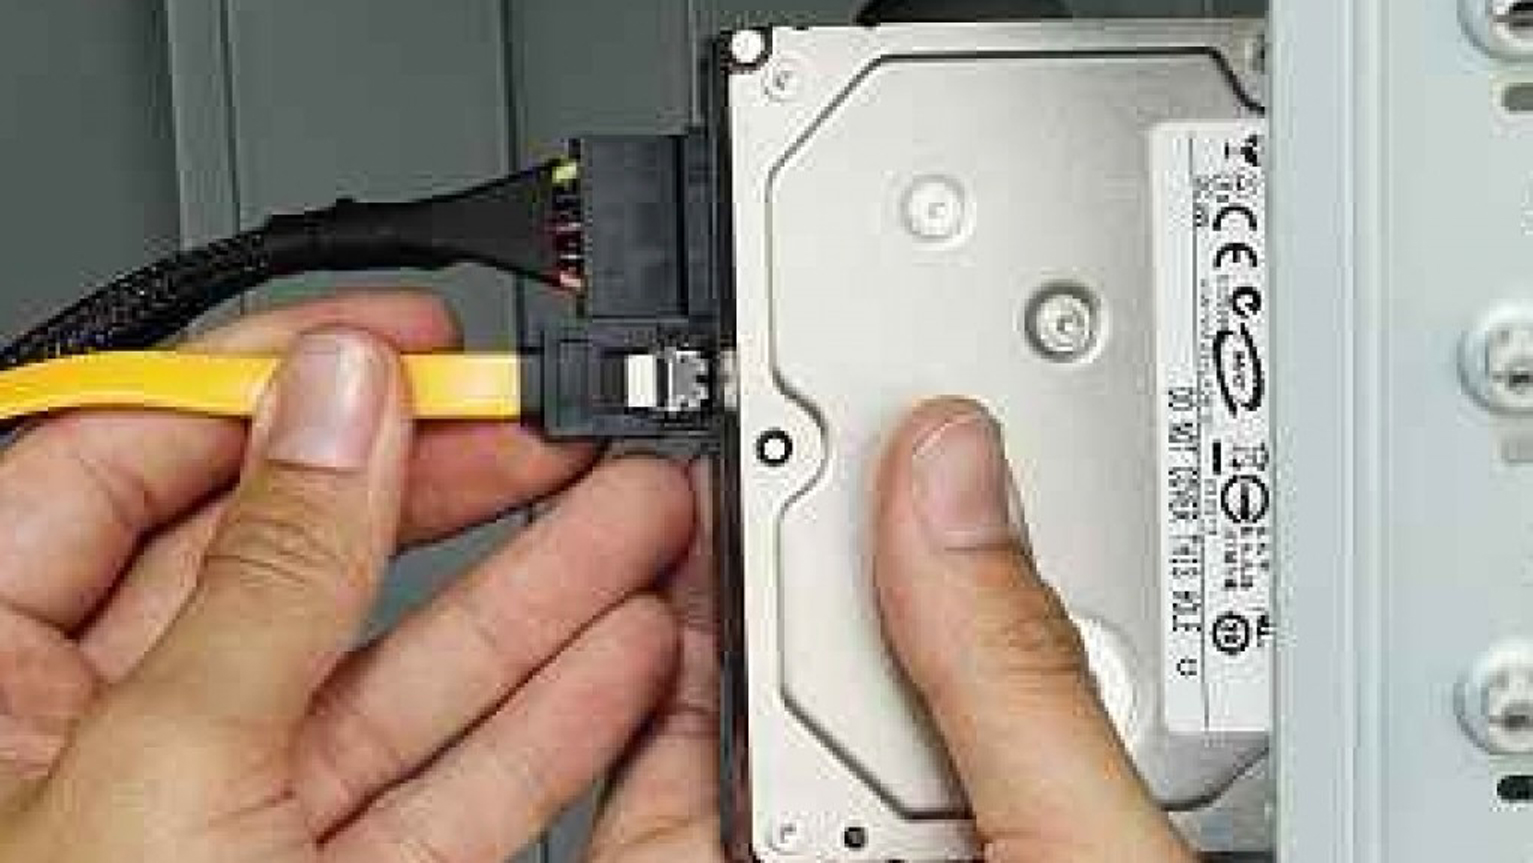
- SATA Power Cable: Locate an available SATA power connector from your power supply unit (PSU). These are flat, wide connectors with five or more pins. Plug one end firmly into the back of your new drive. Ensure it’s fully seated.
- SATA Data Cable: Connect one end of a SATA data cable (a thinner cable with L-shaped connectors) to the back of your new drive. Connect the other end to an available SATA port on your motherboard. Motherboard SATA ports are usually labeled (e.g., SATA0, SATA1, etc.) and are often found in groups. It’s generally good practice to use the lowest numbered available port for your primary boot drive, but for a secondary drive, any available port will do.
For NVMe M.2 Drives: A Simpler Connection
NVMe M.2 SSDs offer a much simpler installation process due to their compact form factor and direct motherboard connection.
- Locate the M.2 Slot: Find the M.2 slot on your motherboard. It looks like a short, horizontal slot, often with a small screw stand-off nearby. Your motherboard manual will confirm its location and type (some motherboards have multiple M.2 slots, some supporting SATA M.2 and others NVMe M.2; ensure compatibility).
- Remove the Standoff Screw: Gently remove the small screw from the M.2 standoff (this screw secures the drive once inserted).
- Insert the M.2 Drive: Hold the M.2 SSD by its edges and align the notch on the drive with the key in the M.2 slot. Insert the drive at approximately a 30-degree angle until it’s fully seated. It should slide in without excessive force.
- Secure the Drive: Gently push the drive down until it’s parallel with the motherboard. Replace the small screw into the standoff to secure the M.2 drive firmly in place. Some motherboards now feature tool-less M.2 clips or latches, simplifying this step further.
Finishing Up the Physical Install
Once your drive is physically installed and connected:
- Cable Management (Optional): If desired, use cable ties or Velcro straps to tidy up the power and data cables. Route them neatly along the case frame to improve airflow and aesthetics.
- Close the PC Case: Carefully slide or swing the side panel(s) back into place and secure them with the screws removed earlier.
- Reconnect Peripherals: Reconnect all your peripherals and the power cable.
Post-Installation Setup: Integrating Your Drive into Your System
With the physical installation complete, the final steps involve configuring your new drive within your PC’s software environment. This typically involves checking the BIOS/UEFI and then initializing and formatting the drive within your operating system.
Verifying Detection in BIOS/UEFI
Before booting into your operating system, it’s a good practice to confirm that your motherboard detects the new drive.
- Power On Your PC: As soon as you press the power button, repeatedly press the designated key to enter your BIOS/UEFI settings. Common keys include Del, F2, F10, or F12 (check your motherboard manual if unsure).
- Navigate to Storage/Boot Options: Once in the BIOS/UEFI, look for sections related to “Storage,” “SATA Configuration,” “NVMe Configuration,” or “Boot Devices.” You should see your newly installed drive listed there. If it’s not present, power down your PC and double-check all physical connections.
- Save and Exit: If detected, you can simply save your settings (even if you made no changes) and exit the BIOS/UEFI to boot into your operating system.
Initializing, Partitioning, and Formatting Your New Drive (Windows)
For a brand-new drive to be usable by Windows, it needs to be initialized, partitioned, and formatted.
- Open Disk Management: In Windows, right-click on the Start button and select “Disk Management.”
- Initialize Disk: A “Initialize Disk” window should automatically pop up for the new drive (if it doesn’t, locate the new drive, which will appear as “Disk X” with unallocated space, right-click it, and select “Initialize Disk”). Choose “GPT (GUID Partition Table)” for modern systems and drives larger than 2TB, or “MBR (Master Boot Record)” for older systems or drives smaller than 2TB. GPT is generally recommended. Click “OK.”
- Create New Simple Volume: After initialization, the drive will show as “Unallocated Space.” Right-click on the unallocated space and select “New Simple Volume.”
- Follow the Wizard:
- Click “Next.”
- Specify the volume size (usually leave it as the maximum to use the entire drive). Click “Next.”
- Assign a drive letter (Windows will suggest one, or you can choose another available letter). Click “Next.”
- Format Partition:
- File System: Choose “NTFS” for Windows drives.
- Allocation unit size: Leave as “Default.”
- Volume label: Give your new drive a descriptive name (e.g., “Games,” “Data,” “Storage”).
- Perform a quick format: Check this box.
- Click “Next” and then “Finish.”
Windows will now format your drive. Once complete, your new hard drive will appear in “This PC” (or “My Computer”) and be ready for use, allowing you to seamlessly expand your digital assets and enhance your productivity.
Installing the Operating System (If Applicable)
If you’re replacing your primary boot drive or setting up a new system, you’ll need to install Windows (or your chosen OS) onto the new drive. This process typically involves:
- Creating a Bootable USB Drive: Use the Media Creation Tool (for Windows) to create a bootable USB drive with the OS installer.
- Setting Boot Order in BIOS/UEFI: Boot from the USB drive by changing the boot order in your BIOS/UEFI settings.
- Following Installation Prompts: Follow the on-screen instructions to install the operating system onto your new drive. Ensure you select the correct drive during the installation process to avoid accidentally formatting your old drive.
- Cloning an Existing OS: Alternatively, if you’re upgrading your primary drive, you can use specialized cloning software (often provided by SSD manufacturers or third-party tools) to transfer your existing OS and data from your old drive to the new one. This saves you the hassle of a fresh OS installation and re-installing all your applications, a significant boost to productivity.
Common Issues and Troubleshooting Tips
Even with careful preparation, minor hiccups can occur. Here are solutions to common problems:
Drive Not Detected: What to Check
- Loose Cables: The most frequent culprit. Power down, unplug, and firmly re-seat both the power and data cables (for SATA drives) or the M.2 drive and its retaining screw.
- Incorrect SATA Port: Some older motherboards might disable certain SATA ports if an M.2 NVMe drive is in use. Check your motherboard manual. Try a different SATA port.
- Faulty Cables: Try swapping the SATA power and/or data cables with known working ones.
- BIOS/UEFI Settings: Ensure the SATA controller is enabled in your BIOS/UEFI (sometimes referred to as AHCI mode). For NVMe drives, ensure the M.2 slot is enabled and configured correctly.
- Driver Issues: For NVMe drives, sometimes specific drivers are required by your motherboard or the drive itself, though Windows generally has good native support. Check the drive manufacturer’s website.
- Damaged Drive: In rare cases, the new drive might be defective. If all else fails, consider testing it in another PC or contacting the retailer/manufacturer.
Boot Problems After Installation
- Incorrect Boot Order: If you installed an OS on the new drive, ensure your BIOS/UEFI is set to boot from that drive first. If you left your old boot drive connected, ensure it’s still the primary boot device if you haven’t transferred the OS.
- Operating System Not Found: If you replaced your primary drive and didn’t install an OS, or the OS installation failed, you’ll get this error. Proceed with OS installation or cloning.
- Corrupted MBR/GPT: If a bootable drive gets corrupted, you might need to use Windows recovery tools (from a bootable USB) to repair the boot sector.
Conclusion
Installing a new hard drive in your PC is a rewarding upgrade that can significantly enhance your system’s storage capacity, speed, and overall performance. By carefully selecting the right drive type, following the preparation steps, executing the physical installation with precision, and configuring the drive within your operating system, you can easily expand your digital horizon. This DIY upgrade not only saves money compared to buying a new PC but also deepens your understanding of your computer’s internal workings, contributing to your technical literacy. Embrace this opportunity to revitalize your PC, streamline your digital workflow, and ensure you have plenty of room for all your current and future digital endeavors. Enjoy the benefits of faster load times, more space, and a more responsive computing experience!
aViewFromTheCave is a participant in the Amazon Services LLC Associates Program, an affiliate advertising program designed to provide a means for sites to earn advertising fees by advertising and linking to Amazon.com. Amazon, the Amazon logo, AmazonSupply, and the AmazonSupply logo are trademarks of Amazon.com, Inc. or its affiliates. As an Amazon Associate we earn affiliate commissions from qualifying purchases.