In today’s rapidly evolving technological landscape, the integration of Artificial Intelligence (AI) into everyday applications is no longer a futuristic dream but a present-day reality. From enhanced user experiences to groundbreaking innovations, AI is reshaping industries and empowering developers to create more intelligent and interactive solutions. At the forefront of this revolution is Google’s MediaPipe, an open-source framework that simplifies the development of complex, real-time AI applications. Whether you’re a seasoned developer looking to incorporate sophisticated AI features into your existing projects or a budding enthusiast eager to explore the potential of machine learning, understanding how to install and utilize MediaPipe is a crucial first step.

This comprehensive guide will walk you through the entire process of installing Google MediaPipe, demystifying the technical jargon and providing clear, actionable steps. We’ll cover everything from understanding its core functionalities to preparing your development environment and finally, successfully setting up MediaPipe on your system. By the end of this article, you’ll be equipped with the knowledge to leverage MediaPipe’s impressive capabilities, opening doors to a world of innovative AI-powered applications.
Understanding Google MediaPipe: A Versatile AI Framework
Before diving into the installation process, it’s essential to grasp what Google MediaPipe is and why it’s such a valuable tool for developers. MediaPipe is a cross-platform framework designed for building AI-enabled perception pipelines. In simpler terms, it allows you to process various forms of sensory data, such as images and videos, and extract meaningful information from them using pre-trained machine learning models.
The true power of MediaPipe lies in its flexibility and ease of use. It provides a set of ready-to-use, highly optimized AI solutions for common tasks like:
- Pose Estimation: Detecting and tracking the 2D or 3D pose of human bodies in real-time. This is invaluable for applications in fitness tracking, augmented reality (AR), and gesture recognition.
- Face Detection and Landmark Tracking: Identifying faces in images or video streams and pinpointing key facial landmarks like eyes, nose, and mouth. This is the backbone of facial recognition, emotion detection, and AR face filters.
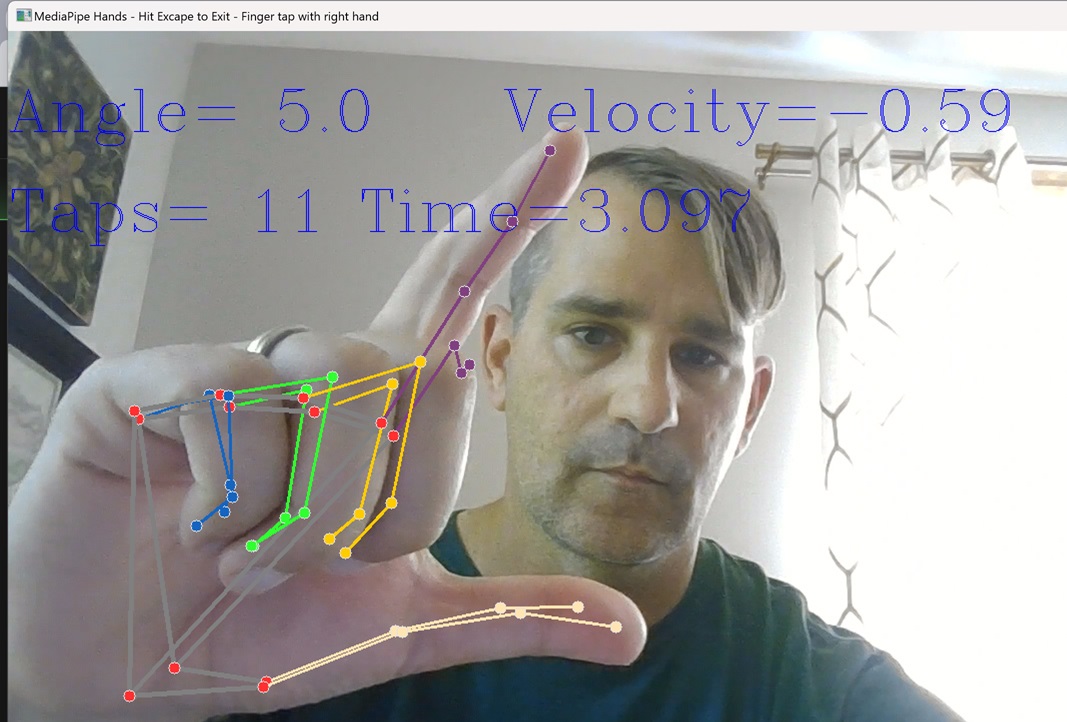
- Hand Tracking: Recognizing and tracking the position and gestures of human hands. This enables intuitive hand-based interactions in virtual environments and for accessibility features.
- Object Detection: Identifying and localizing specific objects within an image or video. This is fundamental for tasks like autonomous driving, surveillance, and visual search.
- Segmentation: Dividing an image into different regions based on their content, allowing for background removal or selective image manipulation.
What sets MediaPipe apart is its focus on real-time performance and cross-platform compatibility. It’s engineered to run efficiently on a wide range of devices, including desktops, mobile phones (Android and iOS), and even web browsers, without requiring extensive hardware resources. This makes it an ideal choice for applications that need to process data on the edge, minimizing latency and ensuring a smooth user experience.
Moreover, MediaPipe is built on a graph-based architecture. This means you can construct complex data processing pipelines by connecting various components (called “nodes”) that perform specific tasks. This modularity makes it easy to customize and extend MediaPipe to suit your unique project requirements.
The framework’s open-source nature further fuels its adoption. It’s actively maintained and improved by Google, with a vibrant community of developers contributing to its growth. This means you have access to a rich ecosystem of pre-built solutions, extensive documentation, and a supportive community to help you overcome any challenges.
Preparing Your Development Environment for MediaPipe Installation
Before you can embark on the exciting journey of integrating MediaPipe into your projects, it’s crucial to ensure your development environment is properly set up. This involves having the necessary software and tools installed and configured. The exact prerequisites can vary slightly depending on your operating system and the specific programming language you intend to use MediaPipe with (primarily Python and JavaScript are well-supported). However, the core requirements remain consistent.
System and Software Requirements
For most users, especially those working with Python, which is the most common and well-supported language for MediaPipe development, the primary requirements are:
-
Operating System: MediaPipe is designed to be cross-platform and works on Windows, macOS, and Linux. Ensure your operating system is up-to-date.
-
Python Installation: A recent version of Python is essential. MediaPipe officially supports Python 3.6 and later. It is highly recommended to use Python 3.7 or a newer version for optimal compatibility and access to the latest language features.
- Checking your Python version: Open your terminal or command prompt and type
python --versionorpython3 --version. If you don’t have Python installed, you can download it from the official Python website (https://www.python.org/). - Virtual Environments (Highly Recommended): It’s a best practice in Python development to use virtual environments. This isolates your project’s dependencies from your system’s global Python installation, preventing conflicts. Tools like
venv(built into Python 3.3+) orcondaare excellent choices.- Using
venv:- Navigate to your project directory in the terminal.
- Create a virtual environment:
python -m venv myenv(replacemyenvwith your desired environment name). - Activate the environment:
- On Windows:
.myenvScriptsactivate - On macOS/Linux:
source myenv/bin/activate
- On Windows:
- Once activated, you’ll see the environment name in your terminal prompt.
- Using
- Checking your Python version: Open your terminal or command prompt and type
-
Pip Package Manager: Pip is the standard package installer for Python. It should come bundled with your Python installation. Ensure it’s up-to-date by running:
pip install --upgrade pip -
Build Tools (for certain dependencies): Depending on your system and how you install certain libraries, you might need development tools like C++ compilers. On Linux, this often means installing the
build-essentialpackage. On macOS, you’ll need to install Xcode Command Line Tools. On Windows, you might need to install Microsoft Visual C++ Build Tools.
Installing Essential Libraries
Once your Python environment is ready, you’ll need to install a few key libraries that MediaPipe relies on. The most crucial one is MediaPipe itself.
Installing Google MediaPipe
The installation of MediaPipe is typically done using pip. With your virtual environment activated, execute the following command in your terminal:
pip install mediapipe
This command will download and install the MediaPipe Python package and its dependencies. The installation process might take a few moments as it fetches the necessary files from the Python Package Index (PyPI).
Installing Supporting Libraries
Beyond MediaPipe itself, you’ll likely need other libraries to interact with your camera, display images, and process data. The most common ones include:
-
OpenCV (
opencv-python): This is a powerful library for computer vision tasks, including capturing video from your webcam, manipulating images, and displaying visual output.pip install opencv-python -
NumPy (
numpy): A fundamental library for numerical operations in Python, often used for handling array data generated by MediaPipe and OpenCV.pip install numpy -
Matplotlib (
matplotlib): Useful for plotting and visualizing data, which can be helpful for debugging or analyzing results.pip install matplotlib -
Webcam Support (Platform-Specific): For applications that directly access webcams, ensure you have the necessary drivers installed for your operating system.
By following these steps to prepare your environment and install the required libraries, you’ll be well on your way to harnessing the power of MediaPipe. The next section will guide you through the actual process of running your first MediaPipe example.
Getting Started with MediaPipe: Your First AI Pipeline
With MediaPipe successfully installed and your development environment configured, it’s time to put it to the test. This section will guide you through running a basic example to confirm your installation and illustrate how MediaPipe works in practice. We’ll focus on a common use case: real-time pose estimation.
Running a Simple Pose Estimation Example
MediaPipe provides readily available example code that you can adapt. This is an excellent starting point for understanding how to initialize MediaPipe, process input frames, and visualize the results.
1. Obtain Example Code:
You can find example scripts within the MediaPipe documentation or its GitHub repository. A common starting point is a Python script that captures video from your webcam, processes each frame using a MediaPipe pose estimation model, and then draws the detected pose landmarks onto the frame before displaying it.
2. Understanding the Code Structure:
A typical MediaPipe Python script will involve the following key components:
- Importing Libraries: You’ll import
mediapipeandcv2(OpenCV). - Initializing MediaPipe Solutions: You’ll create an instance of the desired MediaPipe solution, such as
mp_pose.Pose(). This object will contain the pre-trained model and configuration for pose estimation. - Setting Up Image Processing: You’ll typically initialize a
mp_drawing.DrawingSpecto define how the landmarks and connections are drawn. - Video Capture: Using OpenCV (
cv2.VideoCapture(0)) to access your default webcam. - Processing Frames:
- The script enters a loop to continuously read frames from the video feed.
- Each frame is converted from BGR (OpenCV’s default color format) to RGB, as MediaPipe models typically expect RGB input.
- The frame is then passed to the MediaPipe pose model using
results = pose.process(image_rgb).
- Visualizing Results:
- If pose landmarks are detected (
results.pose_landmarks), the script usesmp_drawing.draw_landmarks()to overlay the landmarks and connections onto the original image. - The processed frame (with landmarks drawn) is then displayed using
cv2.imshow().
- If pose landmarks are detected (
- Exiting the Loop: The loop typically breaks when the user presses a specific key (e.g., ‘q’).
- Releasing Resources: Finally, the video capture and display windows are released using
cap.release()andcv2.destroyAllWindows().
3. Executing the Script:
Save the example code as a Python file (e.g., pose_estimation.py) in your project directory. Ensure your virtual environment is activated. Then, run the script from your terminal:
python pose_estimation.py
If everything is set up correctly, a window should appear showing a live feed from your webcam with detected pose landmarks and connections drawn on your body. This visual confirmation indicates that your MediaPipe installation is successful and functional.
Exploring Other MediaPipe Solutions
The pose estimation example is just a glimpse into the capabilities of MediaPipe. Once you’ve confirmed your installation, you can easily explore other MediaPipe solutions by modifying the initialization and processing steps in your script.
For instance, to experiment with face detection and landmark tracking, you would replace:
mp_pose = mp.solutions.pose
pose = mp_pose.Pose(static_image_mode=False, min_detection_confidence=0.5)
with:
mp_face_detection = mp.solutions.face_detection
face_detection = mp_face_detection.FaceDetection(min_detection_confidence=0.5)
And adjust how you process and draw the results based on the results.detections object. Similarly, for hand tracking, you would use mp_hands.Hands() and process results.multi_hand_landmarks.
The MediaPipe documentation is your best friend here, providing detailed examples and explanations for each of its solutions. Experimenting with these different pipelines will help you understand their specific parameters and how to best integrate them into your own AI applications.
Integrating MediaPipe into Your Projects: Beyond Installation
Successfully installing MediaPipe is the first crucial step, but the real excitement begins when you start integrating its powerful AI capabilities into your own custom applications. This section delves into how you can leverage your MediaPipe installation to build innovative solutions across various domains, from enhancing productivity to exploring new creative possibilities.
Developing Custom AI Applications
The true value of MediaPipe lies in its extensibility and the ability to build bespoke AI solutions. Whether you’re looking to improve your personal productivity, create engaging user experiences for your brand, or even develop new income streams, MediaPipe provides the foundational technology.
For Tech Enthusiasts:
- Smart Productivity Tools: Imagine an application that tracks your posture during long work sessions and sends reminders to adjust your position, reducing strain and improving focus. Or a tool that can automatically identify and tag objects in your personal photo library, making organization effortless.
- Interactive Gaming and AR/VR: Develop games where your body movements control characters in real-time, or create augmented reality experiences that seamlessly blend digital elements with the physical world, reacting to hand gestures or facial expressions.
- Educational Software: Build interactive learning platforms where students can learn anatomy by seeing their own skeletal structure projected, or practice sign language with real-time feedback on their gestures.
- Digital Security Enhancements: Explore using facial recognition for enhanced device authentication or implement gesture-based controls for secure access to sensitive information.
For Brands and Marketers:
- Enhanced User Engagement: Design interactive marketing campaigns where users can try on virtual clothing with realistic body tracking, or use facial filters that align with your brand’s aesthetic.
- Personalized Experiences: Create applications that adapt content or recommendations based on detected user emotions or engagement levels, fostering a deeper connection with your audience.
- Interactive Product Demos: Allow potential customers to virtually interact with your products using hand gestures, providing a more immersive and informative pre-purchase experience.
- Brand Reputation Monitoring: While not directly a MediaPipe function, the underlying ability to process visual data could be part of a larger system for analyzing public reactions or sentiment expressed through visual cues in media.
For Monetization and Side Hustles:
- Developing Niche AI Apps: Identify a specific problem that can be solved with AI perception (e.g., a tool for analyzing golf swings, a fitness app with real-time form correction, or a gesture-controlled drawing app) and sell it on app stores.
- Offering AI Development Services: If you become proficient in MediaPipe, you can offer your services to businesses looking to integrate AI features into their existing products or develop new AI-powered solutions. This could include custom model development, pipeline integration, and deployment.
- Creating Educational Content: Develop and sell online courses or tutorials on how to use MediaPipe, capitalizing on the growing demand for AI development skills.
- Building AI-Powered SaaS Products: Develop a Software-as-a-Service (SaaS) product that leverages MediaPipe for a specific industry, such as a real-time customer analytics platform that uses facial expression analysis, or an automated quality control system for manufacturing.
Best Practices and Further Learning
As you move beyond installation and start building, adopting best practices will significantly improve the efficiency, performance, and robustness of your MediaPipe applications.
- Optimize Performance: MediaPipe is already optimized, but understanding parameters like
min_detection_confidenceandmin_tracking_confidencecan help tune performance for your specific use case. Experiment with different values to find the best balance between accuracy and speed. - Efficient Data Handling: Process only the necessary frames, and ensure your image preprocessing steps are as efficient as possible. For real-time applications, consider techniques like frame skipping if processing every frame becomes a bottleneck.
- Error Handling: Implement robust error handling in your code to gracefully manage situations where detection fails or unexpected inputs are encountered.
- Model Customization (Advanced): For highly specialized tasks, MediaPipe allows for the integration of custom machine learning models. This is an advanced topic but offers immense flexibility for unique AI challenges.
- Consult the Documentation and Community: The official MediaPipe documentation is an invaluable resource, offering detailed API references, guides, and tutorials. The MediaPipe community forums and GitHub repository are also excellent places to seek help, share your projects, and stay updated on the latest developments.
By embracing these principles and continuing to explore the vast potential of Google MediaPipe, you’re not just installing a library; you’re unlocking a powerful toolkit to innovate, create, and contribute to the ever-expanding world of AI.
aViewFromTheCave is a participant in the Amazon Services LLC Associates Program, an affiliate advertising program designed to provide a means for sites to earn advertising fees by advertising and linking to Amazon.com. Amazon, the Amazon logo, AmazonSupply, and the AmazonSupply logo are trademarks of Amazon.com, Inc. or its affiliates. As an Amazon Associate we earn affiliate commissions from qualifying purchases.