In today’s fast-paced digital landscape, effective version control is not just a luxury; it’s a fundamental necessity for anyone involved in software development, content creation, or managing complex digital projects. At the heart of modern version control lies Git, a free and open-source distributed version control system designed to handle everything from small to very large projects with speed and efficiency. Whether you’re a seasoned developer, a budding coder, a designer collaborating on web projects, or simply someone who needs to keep track of changes in documents, installing Git is the critical first step towards unlocking unparalleled productivity and collaboration.
This comprehensive guide will walk you through the process of installing Git on various operating systems – Windows, macOS, and Linux – ensuring you’re equipped with the essential tools to manage your projects effectively. We’ll delve into the ‘why’ behind Git’s importance, provide detailed step-by-step installation instructions, cover post-installation configuration, and offer solutions to common troubleshooting issues. By the end of this article, you’ll not only have Git successfully installed but also a foundational understanding of how to get started with this powerful tool, ready to elevate your technical workflow and contribute to the vibrant ecosystem of modern technology.
Understanding Git: The Foundation of Modern Version Control
Before diving into the mechanics of installation, it’s crucial to grasp what Git is and why it has become an indispensable tool in the tech world. Its widespread adoption is a testament to its power, flexibility, and the robust foundation it provides for collaborative and individual project management.
What is Git and Why is it Indispensable?
Git, created by Linus Torvalds in 2005 for the development of the Linux kernel, is a distributed version control system (DVCS). Unlike older centralized systems that rely on a single server, every Git user has a full copy of the repository, including its entire history. This distributed nature offers several significant advantages:
- Offline Work: Developers can work on their projects and commit changes even without an internet connection, synchronizing later.
- Speed: Operations like committing, branching, and merging are incredibly fast because they primarily involve local operations.
- Redundancy: If the central server (or a shared remote repository like GitHub) goes down, every user’s local repository acts as a full backup, preventing data loss.
- Collaboration: Git excels at facilitating collaboration among multiple team members. It allows for seamless merging of different contributions and provides clear mechanisms to resolve conflicts.
- History Tracking and Reversion: Git meticulously tracks every change made to your files, allowing you to view the complete history of a project. This means you can revert to any previous state, compare versions, and understand exactly when and by whom changes were introduced. This feature alone is invaluable for debugging, auditing, and recovering from mistakes.
- Branching and Merging: One of Git’s most powerful features is its lightweight branching model. Branches allow developers to create independent lines of development to experiment with new features, fix bugs, or work on different aspects of a project without affecting the main codebase. Once work on a branch is complete and stable, it can be easily merged back into the main branch. This enables parallel development, reduces conflicts, and promotes a cleaner, more organized workflow.
In an era where technology trends dictate rapid iteration and continuous integration, Git provides the backbone for agile development methodologies. For individuals, it’s a personal safety net for their code and files. For teams, it’s the glue that holds collaborative efforts together, ensuring consistency, accountability, and the ability to scale complex projects.
Who Needs Git? Broadening Its Reach Beyond Code
While Git is synonymous with software development, its utility extends far beyond just code. Anyone who deals with evolving digital content can benefit immensely from its version control capabilities.
- Software Developers: From front-end web developers using JavaScript frameworks to back-end engineers working with Python or Java, Git is a daily tool for managing source code, collaborating with teams, and deploying applications.
- Data Scientists and Analysts: Managing different versions of scripts (Python, R), datasets, and analysis notebooks is critical for reproducibility and collaboration. Git helps track changes in models and experiments.
- Technical Writers and Content Creators: Version control for documentation, articles, and website content (especially with static site generators like Hugo, which often integrate with Git) ensures that changes are tracked, and previous versions are recoverable.
- Designers: While less common for purely visual assets, designers working with design systems, UI/UX code, or even collaborating on iterative design documents can use Git to manage different versions of their project files or the code that implements their designs.
- Academics and Researchers: Managing research papers, experimental data, and analytical scripts can be streamlined with Git, ensuring proper attribution and versioning of scientific work.
In essence, if your work involves creating, modifying, and collaborating on digital files that evolve over time, Git offers a robust, reliable, and efficient way to manage that evolution. It fosters better organizational habits and provides a historical audit trail, which can be invaluable for personal productivity and team dynamics alike.
Preparing for Installation: Essential Steps Before You Begin
Before you embark on the installation process, a few preliminary considerations will ensure a smooth and successful setup. Understanding your system and the available installation methods can save you time and potential headaches down the line.
System Requirements and Compatibility
Git is designed to be highly portable and runs efficiently on most modern operating systems. There are no stringent hardware requirements; if your computer can run its operating system comfortably, it can run Git. The primary concern is ensuring you have a compatible operating system version.
- Windows: Git supports Windows 7, 8, 10, and 11. The official installer provides a seamless experience for these versions.
- macOS: Git is generally compatible with macOS Mavericks (10.9) and newer versions. For older versions, manual installation might be required.
- Linux: Git is widely available across virtually all Linux distributions, from Ubuntu and Fedora to Arch Linux and beyond.
Ensure your operating system is up to date, as this can sometimes resolve underlying dependencies that Git might require. A stable internet connection will also be necessary to download the installer or package dependencies.
Choosing the Right Installation Method
The method you choose for installing Git largely depends on your operating system and your preference for managing software. Each method has its advantages.
- Official Installers: For Windows and macOS, downloading the official installer from the Git website (
git-scm.com) is often the most straightforward approach. These installers are bundled with all necessary components and provide a graphical user interface (GUI) for the installation process. They ensure you get the latest stable version of Git. - Package Managers:
- Linux: Package managers like
apt(Debian/Ubuntu),dnf(Fedora),yum(CentOS/RHEL), andpacman(Arch Linux) are the standard and recommended way to install software. They handle dependencies automatically, make updates easy, and integrate Git seamlessly into your system. - macOS (Homebrew): Homebrew is an immensely popular package manager for macOS that simplifies the installation of command-line tools, including Git. It’s often preferred by developers for its ease of use and ability to keep software updated.
- Linux: Package managers like
- Xcode Command Line Tools (macOS): On macOS, simply trying to run
gitin the terminal for the first time will often prompt you to install the Xcode Command Line Tools. This package includes Git and other development utilities. It’s a quick way to get Git, though Homebrew often provides a more up-to-date version. - Building from Source: While possible and offers the most control, compiling Git from its source code is generally recommended only for advanced users or specific development scenarios. It’s usually unnecessary for everyday use.
For the majority of users, opting for the official installer on Windows and either Homebrew or Xcode Command Line Tools on macOS, and their distribution’s package manager on Linux, will provide the best balance of ease, stability, and up-to-dateness.
Step-by-Step Git Installation Across Platforms
Now, let’s get down to the practical steps of installing Git on your chosen operating system. Follow the instructions carefully for your specific environment.
Installing Git on Windows
The easiest and most recommended way to install Git on Windows is by using the official installer, often referred to as “Git for Windows.”
-
Download the Installer:
- Open your web browser and navigate to the official Git website: git-scm.com/download/win
- The website should automatically detect your Windows version (32-bit or 64-bit) and offer the appropriate installer. Click the “Download” link.
-
Run the Installer:
- Once the download is complete, locate the
.exefile (e.g.,Git-2.xx.x-64-bit.exe) and double-click it to start the installation wizard. - You might see a security warning; click “Run” or “Yes” to proceed.
- Once the download is complete, locate the
-
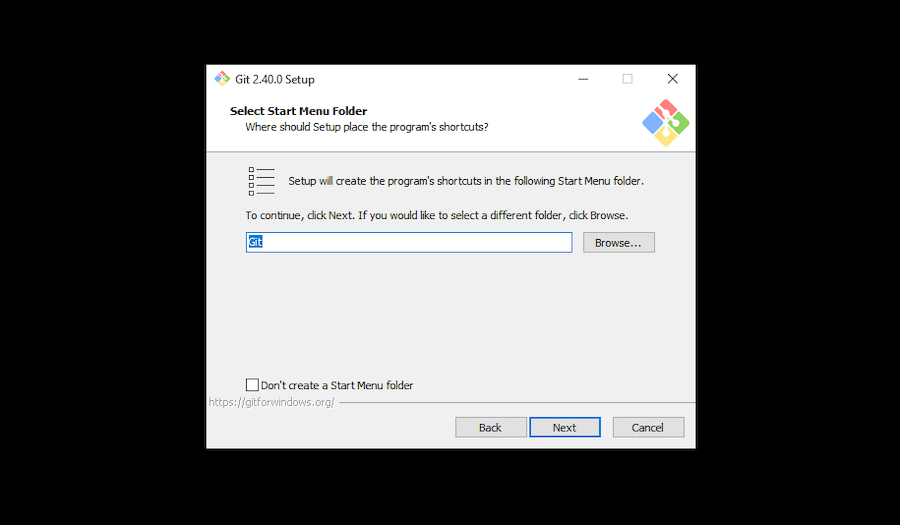
Follow the Installation Wizard:
- License Information: Read the GNU General Public License and click “Next.”
- Select Destination Location: The default location (
C:Program FilesGit) is usually fine. Click “Next.” - Select Components: You can typically leave the default selections. Ensure “Git Bash Here” and “Git GUI Here” are checked for convenience. “Git LFS” (Large File Support) is useful for larger assets. Click “Next.”
- Select Start Menu Folder: Default is fine. Click “Next.”
- Choosing the Default Editor used by Git: Git needs a text editor for writing commit messages. The default is typically Vim, which can be challenging for beginners. Consider selecting a more user-friendly editor like “Visual Studio Code,” “Notepad++,” or “Sublime Text” if you have one installed and prefer it. Click “Next.”
- Adjusting your PATH environment: This is a crucial step. Choose “Git from the command line and also from 3rd-party software.” This option adds Git to your system’s PATH, allowing you to use
gitcommands from any command prompt (CMD, PowerShell) or integrated terminal in your IDE. Click “Next.” - Choosing HTTPS transport backend: The default “Use the OpenSSL library” is generally recommended. Click “Next.”
- Configuring the line ending conversions: Select “Checkout Windows-style, commit Unix-style line endings.” This option handles line ending conversions automatically, preventing issues when collaborating across different operating systems. Click “Next.”
- Configuring the terminal emulator to use with Git Bash: The default “Use MinTTY (the default terminal of MSYS2)” is usually the best choice, as it provides a robust Unix-like terminal experience. Click “Next.”
- Choose the default behavior of
git pull: The default “Default (fast-forward or merge)” is often sufficient for beginners. Click “Next.” - Choose a credential helper: “Git Credential Manager Core” is recommended as it securely stores your credentials, avoiding repeated authentication for remote repositories. Click “Next.”
- Configuring extra options: “Enable file system caching” can improve performance. “Enable symbolic links” is also generally useful. Click “Next.”
- Configuring experimental options: You can leave these unchecked unless you have a specific need. Click “Install.”
-
Complete Installation:
- Wait for the installation to finish. Once complete, you can optionally view the Release Notes or launch Git Bash. Click “Finish.”
Installing Git on macOS
macOS users have a few excellent options for installing Git. Using Homebrew is often the most popular and flexible method.
Method 1: Using Homebrew (Recommended)
Homebrew is a package manager for macOS that simplifies the installation of various tools.
-
Install Homebrew (if you don’t have it):
- Open your Terminal application (you can find it in
Applications/Utilities). - Paste the following command and press Enter:
bash

/bin/bash -c "$(curl -fsSL https://raw.githubusercontent.com/Homebrew/install/HEAD/install.sh)"
- Follow the on-screen prompts, which may include entering your macOS password and confirming the installation. This might take a few minutes.
- After installation, follow any post-installation instructions from Homebrew, such as adding Homebrew to your PATH.
- Open your Terminal application (you can find it in
-
Install Git using Homebrew:
- Once Homebrew is installed, simply run this command in your Terminal:
bash

brew install git
- Homebrew will download and install the latest stable version of Git, along with any necessary dependencies.
- Once Homebrew is installed, simply run this command in your Terminal:
Method 2: Using Xcode Command Line Tools
macOS includes a feature where trying to run git for the first time will prompt you to install essential developer tools, which include Git.
- Open Terminal: Go to
Applications/Utilitiesand open Terminal. - Attempt to run Git: Type
git --versionand press Enter. - Follow the prompt: A dialog box should appear, asking if you want to install the Xcode Command Line Tools. Click “Install” and agree to the terms and conditions.
- Wait for installation: The tools will download and install automatically. This method installs a version of Git, though it might not always be the absolute latest.
Method 3: Using the Official macOS Installer
You can also download a dedicated Git installer for macOS, similar to Windows.
- Download the Installer:
- Visit git-scm.com/download/mac.
- Click on the installer package link (e.g.,
git-2.xx.x-intel-universal-mavericks.pkg).
- Run the Installer:
- Locate the downloaded
.pkgfile and double-click it. - Follow the on-screen instructions, accepting the license agreement and choosing an installation location. This is usually a straightforward process.
- Locate the downloaded
Installing Git on Linux
Installing Git on Linux is typically done through your distribution’s native package manager, making it a very simple process. Always update your package lists first to ensure you get the latest available version.
For Debian/Ubuntu-based Systems
(e.g., Ubuntu, Linux Mint, Debian)
- Update package lists:
bash

sudo apt update
- Install Git:
bash

sudo apt install git
- Confirm installation: Type
Yand press Enter when prompted.
For Fedora/CentOS/RHEL-based Systems
(e.g., Fedora, CentOS Stream, Red Hat Enterprise Linux)
- Update package lists (for DNF, modern Fedora/CentOS):
bash

sudo dnf update
Or for older CentOS/RHEL (YUM):
bash

sudo yum update
- Install Git (for DNF):
bash

sudo dnf install git
Or for older CentOS/RHEL (YUM):
bash

sudo yum install git
- Confirm installation: Type
Yand press Enter when prompted.
For Arch Linux-based Systems
(e.g., Arch Linux, Manjaro)
- Update package lists:
bash

sudo pacman -Syu
- Install Git:
bash

sudo pacman -S git
- Confirm installation: Type
Yand press Enter when prompted.
Other Linux Distributions
For other distributions, refer to their official documentation. The principle remains the same: update your package manager and then install Git using the appropriate command (e.g., zypper install git for openSUSE, apk add git for Alpine Linux).
Post-Installation Configuration and Verification
Once Git is installed, there are a few essential steps to verify its proper functioning and configure it for your specific user identity. These configurations are crucial for proper attribution of your contributions to any Git repository.
Verifying Your Git Installation
After completing the installation steps for your operating system, the first thing to do is to confirm that Git is correctly installed and accessible from your terminal or command prompt.
-
Open a Terminal/Command Prompt:
- Windows: Open “Git Bash” (installed with Git for Windows) or a standard Command Prompt/PowerShell.
- macOS/Linux: Open your default Terminal application.
-
Run the version command:
Type the following command and press Enter:git --version -
Expected Output:
If Git is installed correctly, you should see output similar to this, indicating the installed version:
git version 2.37.1.windows.1  (Windows)

git version 2.39.2 (macOS/Linux)
The version number may vary depending on when you installed Git and which updates are available. If you receive an error like “git: command not found” or similar, refer to the troubleshooting section.
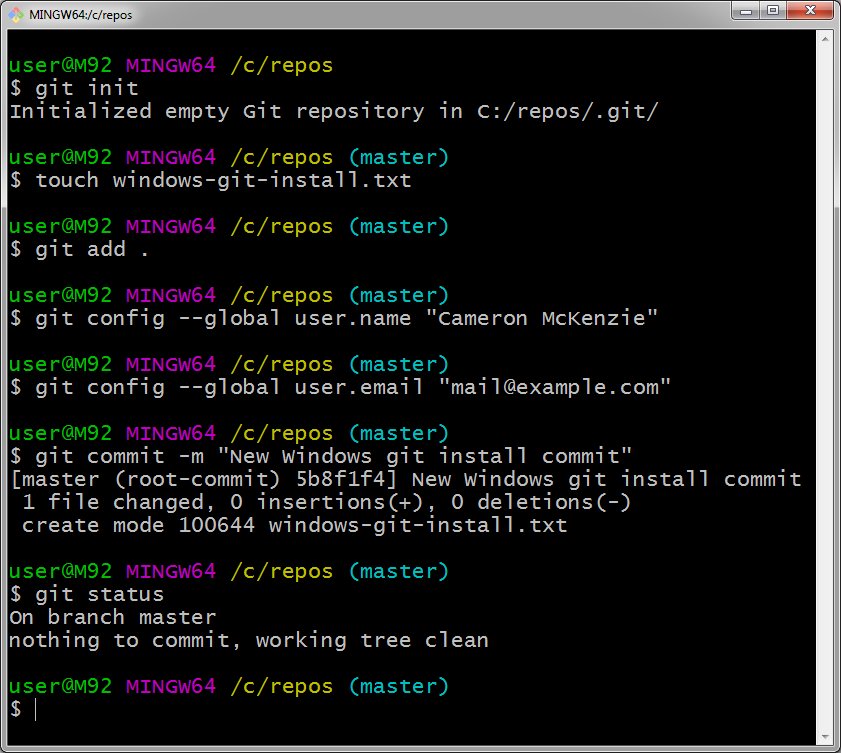
Initial Git Configuration: Identifying Yourself
Git uses your name and email address to identify you as the author of your commits. This information is embedded into every commit you make, making it vital for collaboration and tracking changes. These settings are stored globally for all your Git repositories on your machine.
-
Set your Username:
In your terminal, enter the following command, replacing"Your Name"with your actual name:git config --global user.name "Your Name"For example:
git config --global user.name "John Doe" -
Set your Email Address:
Next, set your email address. It’s common practice to use the same email address that you use for services like GitHub, GitLab, or Bitbucket.git config --global user.email "your.email@example.com"For example:
git config --global user.email "john.doe@example.com" -
Verify Configuration:
To confirm that your global user settings have been applied correctly, you can list all your Git configurations:
bash

git config --list
You should seeuser.nameanduser.emaillisted among the other configurations.
Exploring Advanced Configuration (Optional)
While the user.name and user.email are essential, Git offers many other configuration options that can customize your workflow.
-
Default Text Editor: If you didn’t set this during Windows installation or want to change it, you can specify your preferred text editor for commit messages and other Git operations (e.g.,
git rebase -i).- For Visual Studio Code:
bash

git config --global core.editor "code --wait"
- For Sublime Text:
bash

git config --global core.editor "subl -n -w"
- For Notepad++ (Windows):
bash

git config --global core.editor "'C:/Program Files/Notepad++/notepad++.exe' -multiInst -notabbar -nosession -noPlugin"
(Adjust path as necessary)
- For Visual Studio Code:
-
Line Endings: While the Windows installer usually handles this, cross-platform developers might sometimes need to explicitly set
core.autocrlftoinputfor Unix-like systems ortruefor Windows to manage line ending conversions, preventing spurious changes.- For Windows users (to convert CRLF to LF on commit):
bash

git config --global core.autocrlf true
- For Linux/macOS users (to prevent CRLF conversion):
bash

git config --global core.autocrlf input
- If you encounter issues,
core.autocrlf falsecan disable automatic conversion, but use with caution in cross-platform projects.
- For Windows users (to convert CRLF to LF on commit):
-
Aliases: You can create shortcuts for frequently used Git commands to save typing.
bash

git config --global alias.co checkout

git config --global alias.br branch

git config --global alias.ci commit

git config --global alias.st status

git config --global alias.hist "log --pretty=format:'%h %ad | %s%d [%an]' --graph --date=short"
Now,git stwill rungit status, andgit histwill show a pretty commit history.
Proper configuration ensures Git works seamlessly for you, making your development experience more efficient and your contributions accurately attributed.
Troubleshooting Common Git Installation Issues
Even with careful steps, you might encounter issues during or after Git installation. Here are some common problems and their solutions.
“Git command not found” or “git: command not recognized”
This is the most frequent issue and usually indicates that the Git executable is not in your system’s PATH environment variable, or your terminal hasn’t refreshed its PATH.
- Solution 1: Restart your Terminal/Command Prompt: Often, simply closing and reopening your terminal window (Git Bash, CMD, PowerShell, macOS Terminal) is enough to refresh the PATH variable and make Git accessible.
- Solution 2: Verify PATH variable (Windows):
- Search for “Environment Variables” in the Windows search bar and select “Edit the system environment variables.”
- Click “Environment Variables…”
- Under “System variables,” find the “Path” variable and click “Edit.”
- Look for a path similar to
C:Program FilesGitcmdorC:Program FilesGitbin. If it’s missing, you’ll need to add it. - If you used the Git for Windows installer, ensure you selected the “Git from the command line and also from 3rd-party software” option during installation. If not, you might need to re-run the installer and select this option.
- Solution 3: Verify PATH variable (macOS/Linux):
- On macOS/Linux, ensure your shell’s configuration file (
.bash_profile,.zshrc,.bashrc) includes Git’s directory in the PATH if you installed it manually or from source. Homebrew and package managers usually handle this automatically. - You can check your PATH by typing
echo $PATHin the terminal.
- On macOS/Linux, ensure your shell’s configuration file (
Permissions Errors During Installation (Linux/macOS)
If you’re getting permission denied errors when trying to install Git, especially on Linux, it means your user account doesn’t have the necessary privileges.
- Solution: Use
sudofor installation commands. As demonstrated in the Linux installation steps,sudo(SuperUser DO) temporarily grants administrative privileges to run a command. For example:sudo apt install git. You’ll be prompted for your user password.
Outdated Git Version
Sometimes, you might find that the Git version installed by your system’s default package manager isn’t the absolute latest.
- Solution 1 (Linux/macOS Homebrew): Regularly update your package lists and installed packages.
- Debian/Ubuntu:
sudo apt update && sudo apt upgrade git - Fedora:
sudo dnf update git - Arch Linux:
sudo pacman -Syu git - macOS (Homebrew):
brew update && brew upgrade git
- Debian/Ubuntu:
- Solution 2 (Windows/macOS Installer): Download and run the latest official installer from
git-scm.comagain. The installer typically handles updating your existing Git installation.
Issues with Specific Git Commands After Installation
If git --version works but other commands like git clone or git commit fail, it’s often a configuration issue rather than an installation problem.
git clonefailing (connection issues):- Check your internet connection.
- Ensure you have SSH keys set up correctly if you’re cloning via SSH (
git@github.com:...). - Verify repository URL is correct.
- Check firewall/proxy settings if you’re in a corporate network. Git Credential Manager Core (on Windows) or
git-credential-osxkeychain(on macOS) can help with authentication.
git commiterrors (missing user info):- This usually means you haven’t set your
user.nameanduser.email. Refer to the “Initial Git Configuration” section and set these global variables.
- This usually means you haven’t set your
By systematically addressing these common issues, you should be able to get Git up and running smoothly, ready to power your development and project management endeavors.

Conclusion
Congratulations! You’ve successfully navigated the intricacies of installing Git across different operating systems, from Windows and macOS to various Linux distributions. More than just a simple installation, you’ve also gained an appreciation for Git’s fundamental role in modern tech, understood its power as a distributed version control system, and configured it for your personal use.
Mastering Git is a critical step for anyone looking to thrive in the world of technology. Whether you’re coding the next big app, contributing to open-source projects, managing detailed documentation, or simply seeking a robust way to track changes in your work, Git provides the structure, safety, and collaborative capabilities you need. It enhances productivity, minimizes errors, and empowers teams to work together seamlessly, embodying the best practices in software development and project management.
Now that Git is installed and configured, the journey truly begins. We encourage you to explore its vast capabilities further – learn basic commands like git add, git commit, git push, git pull, and delve into the powerful concepts of branching and merging. Practical application is the best way to solidify your understanding. Start a new project, initialize a Git repository, and begin tracking your changes. You’ll quickly discover how Git becomes an invaluable partner in your digital endeavors, empowering you to build, innovate, and collaborate with confidence. This foundational tool will undoubtedly bolster your tech skills, enhance your professional “Brand,” and potentially open doors to new opportunities, proving that sometimes, the simplest tools unlock the greatest potential.