For developers and tech enthusiasts alike, the ability to compile and run C and C++ code seamlessly on their Windows machines is often a fundamental requirement. While Windows offers its own development environments, the GNU Compiler Collection (GCC) is a powerful, open-source compiler suite that is widely used across Linux and macOS. Fortunately, installing GCC on Windows is entirely achievable, opening up a world of possibilities for cross-platform development, learning, and leveraging a robust compiler. This guide will walk you through the process, ensuring you can get GCC up and running efficiently.
Understanding GCC and Its Importance
Before we dive into the installation process, it’s crucial to understand what GCC is and why it’s so valuable, particularly in the context of software development and technology trends.
What is GCC?
GCC, which originally stood for the GNU C Compiler, has evolved into the GNU Compiler Collection. It supports a vast array of programming languages, including C, C++, Objective-C, Fortran, Ada, Go, and D. Its open-source nature means it’s constantly being developed and improved by a global community of programmers.
GCC is renowned for its:
- Portability: It can be compiled to run on numerous hardware architectures and operating systems.
- Optimization: It produces highly efficient machine code, leading to faster program execution.
- Extensibility: Its modular design allows for easy integration of new languages and features.
- Standard Compliance: It adheres closely to the latest language standards, ensuring your code is portable and future-proof.
Why Install GCC on Windows?
While Visual Studio and other Windows-centric IDEs are popular, there are several compelling reasons why you might want to install GCC on your Windows system, especially when considering the broader tech landscape:
- Cross-Platform Development: If you’re developing applications that need to run on Linux or macOS, compiling with GCC on Windows allows you to test and build your code in an environment that closely mirrors your target platforms. This is crucial for ensuring compatibility and reducing post-deployment issues.
- Learning and Education: Many introductory programming courses and resources use GCC as the standard compiler. Installing it on Windows makes these learning materials accessible without requiring a dual-boot setup or a virtual machine for every learning session.
- Open-Source Projects: A significant portion of open-source software is developed and tested using GCC. If you intend to contribute to or use these projects, having GCC readily available on your Windows machine simplifies the process.
- Performance and Efficiency: For certain types of projects, GCC’s optimization capabilities might be preferable, even on Windows.
- Toolchain Integration: GCC is often part of a larger toolchain (like
binutilsfor assembly and linking). Having it installed can be a prerequisite for other development tools and frameworks that rely on these components.
In the realm of Tech, understanding and utilizing standard development tools like GCC is fundamental. Whether you’re exploring the latest AI tools, developing new apps, or focusing on digital security, a robust compiler is an indispensable part of your toolkit. For Productivity, being able to compile code efficiently and without friction directly impacts your development workflow.
Installation Methods for GCC on Windows
There are several effective ways to get GCC running on your Windows operating system. Each method has its advantages, catering to different user needs and technical comfort levels.
Method 1: Using MinGW-w64
MinGW-w64 (Minimalist GNU for Windows) is a popular choice for installing GCC and other GNU development tools on Windows. It provides a complete GCC toolchain that generates native Windows applications. This is often the preferred method for developers targeting Windows directly.
Steps:
-
Download the MinGW-w64 Installer:
- Navigate to the MinGW-w64 official website (e.g.,
mingw-w64.org). - Look for the download section and find the latest release of the installer. It’s usually an
.exefile. You’ll typically find options for different architectures (e.g.,x86_64for 64-bit systems) and thread models (posixorwin32). For most modern systems,x86_64withposixis recommended.
- Navigate to the MinGW-w64 official website (e.g.,
-
Run the Installer:
- Execute the downloaded
.exefile. - The installer will present several configuration options:
- Architecture: Choose your system’s architecture (e.g.,
x86_64). - Threads: Select
posixfor better compatibility with many open-source projects orwin32if you have specific compatibility needs. - Exception Handling: Choose
seh(Structured Exception Handling) orsjlj(Setjmp/Longjmp).sehis generally preferred on modern Windows versions. - Installation Directory: Choose where you want to install MinGW-w64. A common choice is
C:MinGW.
- Architecture: Choose your system’s architecture (e.g.,
- Execute the downloaded
-
Install the Components:
- Once you’ve configured the settings, proceed with the installation. The installer will download and set up the necessary GCC toolchain components.
-
Add MinGW-w64 to Your System’s PATH:
- This is a crucial step to allow you to run
gcccommands from any command prompt or terminal. - Go to your system’s Environment Variables:
- Search for “Environment Variables” in the Windows search bar and select “Edit the system environment variables.”
- Click the “Environment Variables…” button.
- Under “System variables,” find the
Pathvariable and select “Edit…”. - Click “New” and add the path to your MinGW
bindirectory. For example, if you installed toC:MinGW, you would addC:MinGWbin. - Click “OK” on all open windows to save the changes.
- This is a crucial step to allow you to run
-
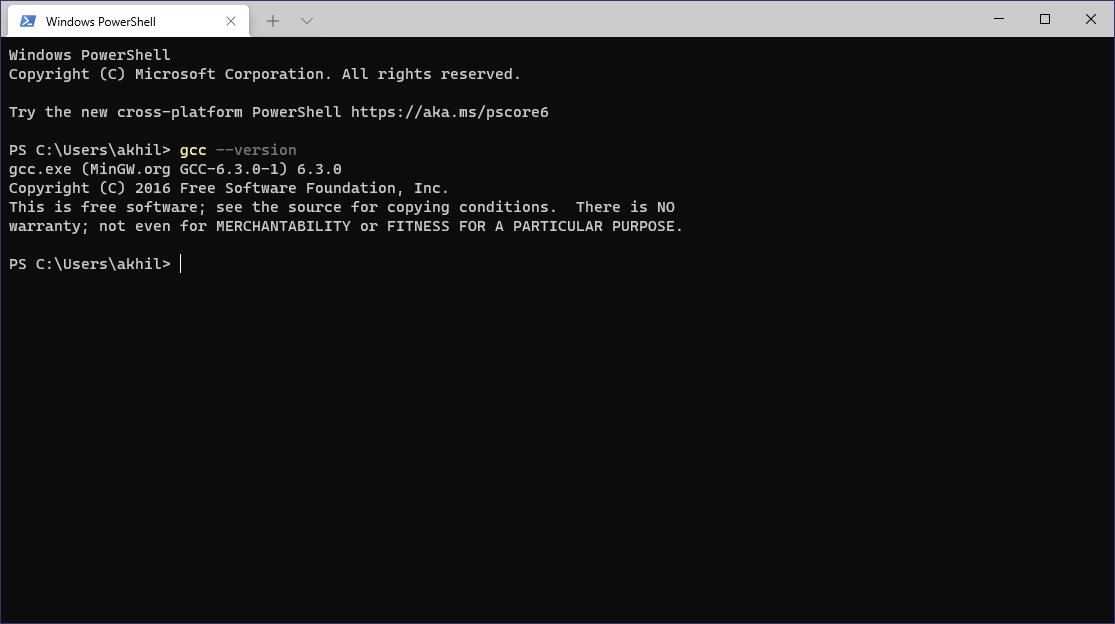
Verify the Installation:
- Open a new Command Prompt or PowerShell window (important: open a new one for the PATH changes to take effect).
- Type the following command and press Enter:
bash

gcc --version
- If GCC is installed correctly and the PATH is set up properly, you should see output displaying the GCC version information.
Method 2: Using MSYS2
MSYS2 (Minimal SYStem 2) is a software distribution and building platform for Windows. It provides a Unix-like environment and package manager (pacman) that makes installing GCC and many other development tools very straightforward. MSYS2 is particularly useful if you need a more comprehensive Unix-like environment alongside GCC.
Steps:
-
Download the MSYS2 Installer:
- Go to the MSYS2 official website (
msys2.org). - Download the latest installer (
msys2-x86_64-latest.exe).
- Go to the MSYS2 official website (
-
Run the Installer:
- Execute the downloaded installer.
- Follow the on-screen prompts to install MSYS2. It’s recommended to install it in the default location, usually
C:msys64.
-
Update MSYS2 Packages:
- After installation, launch the MSYS2 terminal by searching for “MSYS2 MSYS” in the Windows start menu.
- It’s crucial to update the package database and core system packages. Run the following commands:
bash

pacman -Syu
- You might be prompted to close the terminal and reopen it. If so, do that and run
pacman -Syuagain.
- You might be prompted to close the terminal and reopen it. If so, do that and run
- Next, update all installed packages:
bash

pacman -Su
-
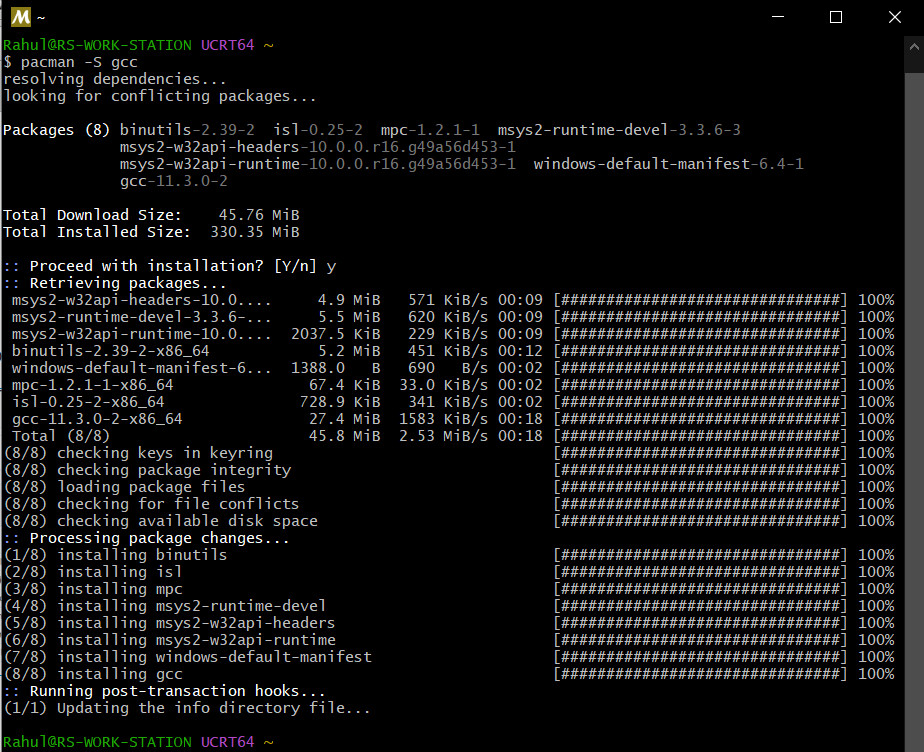
Install the GCC Toolchain:
- Now, you can install the GCC compiler. The most common GCC package for 64-bit Windows is
mingw-w64-x86_64-gcc. - Run the following command in the MSYS2 terminal:
bash

pacman -S mingw-w64-x86_64-gcc
- This command will download and install the GCC compiler, along with its dependencies. You can choose to install other related packages like
mingw-w64-x86_64-gdbfor debugging.
- Now, you can install the GCC compiler. The most common GCC package for 64-bit Windows is

-
Add MSYS2 GCC to Your System’s PATH (Optional but Recommended for Direct Command Prompt Use):
- While MSYS2 provides its own environment to run GCC, you might want to use GCC directly from the standard Windows Command Prompt or PowerShell.
- The GCC binaries are located within the MSYS2 installation, specifically in
C:msys64mingw64bin. - Follow the same steps as in Method 1 to add this
bindirectory to your system’s PATH environment variable.
-
Verify the Installation:
- Within MSYS2 Terminal: Open a new MSYS2 terminal and type:
bash

gcc --version
- Within Windows Command Prompt/PowerShell (if PATH is set): Open a new Command Prompt or PowerShell and type:
bash

gcc --version
- Both should display the GCC version information.
- Within MSYS2 Terminal: Open a new MSYS2 terminal and type:
Method 3: Using Cygwin
Cygwin is another comprehensive Unix-like environment for Windows. It provides a large collection of GNU and Open Source tools that provide functionality similar to a Linux distribution. Cygwin aims to provide a POSIX-compliant environment on Windows.
Steps:
-
Download the Cygwin Installer:
- Go to the Cygwin website (
cygwin.com). - Download the appropriate installer (e.g.,
setup-x86_64.exefor 64-bit Windows).
- Go to the Cygwin website (
-
Run the Installer:
- Execute the downloaded installer.
- Choose “Install from Internet” and select a download mirror.
- Select your installation directory (e.g.,
C:cygwin64). - Choose your internet connection settings.
-
Select Packages:
- This is the most critical step for Cygwin. In the package selection window, you need to find and select the GCC compiler.
- Expand the “Devel” category.
- Search for
gcc-core(for C compiler) andgcc-g++(for C++ compiler). Click on them to select them for installation. You might also want to selectmake. - Click “Next” to proceed with the installation. Cygwin will download and install the selected packages and their dependencies.
-
Add Cygwin to Your System’s PATH (Optional but Recommended):
- Similar to MinGW-w64, you’ll likely want to add the Cygwin
bindirectory to your system’s PATH for easier access. - The path will be something like
C:cygwin64bin. - Add this to your system’s Environment Variables as described in Method 1.
- Similar to MinGW-w64, you’ll likely want to add the Cygwin
-
Verify the Installation:
- Open a new Command Prompt or PowerShell (if PATH is set) or launch the Cygwin terminal.
- Type:
bash

gcc --version
- You should see the GCC version information.
Using GCC on Windows
Once GCC is installed, you can start compiling your C and C++ programs. The fundamental process remains the same as on other operating systems, with minor considerations for Windows file paths.
Compiling a Simple C Program
-
Create a Source File:
-
Open a plain text editor (like Notepad, VS Code, Sublime Text, etc.).
-
Write a simple C program:
#include <stdio.h> int main() { printf("Hello, GCC on Windows!n"); return 0; } -
Save this file as
hello.cin a directory of your choice (e.g.,C:devtest).
-
-
Open Your Terminal:
- Open a Command Prompt or PowerShell window.
- Navigate to the directory where you saved your
hello.cfile using thecdcommand:
bash

cd C:devtest
-
Compile the Program:
- Use the
gcccommand to compile your source file into an executable. For a basic C program, the command is:
bash

gcc hello.c -o hello.exe
hello.c: This is your input source file.-o hello.exe: This option specifies the output file name. On Windows, executables typically have the.exeextension.
- Use the
-
Run the Executable:
- Once compilation is successful, you can run your program from the same terminal:
bash

./hello.exe
or simply:
bash

hello.exe
- You should see the output:
Hello, GCC on Windows!
- Once compilation is successful, you can run your program from the same terminal:
Compiling a Simple C++ Program
The process for C++ is very similar, using g++ (which is part of the GCC suite).
-
Create a Source File:
-
Write a simple C++ program:
#include <iostream> int main() { std::cout << "Hello, g++ on Windows!" << std::endl; return 0; } -
Save this file as
hello_cpp.cppin the same directory.
-
-
Compile the Program:
- Use the
g++command:
bash

g++ hello_cpp.cpp -o hello_cpp.exe
- Use the
-
Run the Executable:
bash

./hello_cpp.exe
or
bash

hello_cpp.exe
- You should see the output:
Hello, g++ on Windows!
Important Considerations
- Compiler Flags: GCC offers numerous flags for optimization, debugging, warnings, and more. For example:
-Wall: Enables most common compiler warnings, which is highly recommended for writing robust code.-g: Includes debugging information, essential for using debuggers like GDB.-O2or-O3: Enables higher levels of optimization for performance.
- Linking Libraries: For more complex projects that use external libraries, you’ll need to specify the include paths (
-I) and library paths (-L) and the libraries themselves (-l) during compilation. - IDE Integration: Many modern Integrated Development Environments (IDEs) like VS Code, CLion, or even Eclipse CDT can be configured to use your newly installed GCC toolchain, providing a more user-friendly development experience with features like code completion, debugging, and build management.
Conclusion
Installing GCC on Windows might seem like a technical hurdle, but with the available methods like MinGW-w64, MSYS2, or Cygwin, it’s a straightforward process that significantly expands your development capabilities. Whether you’re a student learning the intricacies of programming, a professional working on cross-platform projects, or an open-source enthusiast, having GCC on your Windows machine is an invaluable asset. By following these steps, you can confidently set up this powerful compiler and leverage its capabilities to build and run your C and C++ applications on Windows with ease. This empowers you to stay at the forefront of Technology Trends, enhance your Productivity as a developer, and contribute effectively to the broader Tech community.
aViewFromTheCave is a participant in the Amazon Services LLC Associates Program, an affiliate advertising program designed to provide a means for sites to earn advertising fees by advertising and linking to Amazon.com. Amazon, the Amazon logo, AmazonSupply, and the AmazonSupply logo are trademarks of Amazon.com, Inc. or its affiliates. As an Amazon Associate we earn affiliate commissions from qualifying purchases.