In the ever-evolving digital landscape, where visual communication reigns supreme, the ability to customize your digital workspace with unique fonts is not just a preference, but often a necessity. Whether you’re a creative professional looking to inject personality into your designs, a student aiming to make your documents stand out, or simply someone who appreciates the aesthetic appeal of different typefaces, knowing how to install fonts on your computer is a fundamental skill. This comprehensive guide will walk you through the process, ensuring you can effortlessly expand your font library and elevate your digital output.

Our website focuses on a trifecta of crucial areas: Tech, Brand, and Money. This article, while seemingly simple, bridges all these domains. From a Tech perspective, it’s about understanding and manipulating your operating system’s capabilities. From a Brand standpoint, fonts are the bedrock of visual identity, influencing how your message is perceived and remembered. And even from a Money angle, while many fonts are free, premium fonts can represent an investment in your brand or creative projects, impacting your financial decisions. This guide will provide the practical knowledge to empower your choices in all these aspects.
Understanding Font Files and Installation Methods
Before we dive into the step-by-step instructions, it’s essential to understand what a font file is and the common methods for their installation. Fonts are essentially digital files that contain instructions for how characters and symbols should be displayed on your screen and printed on paper. The most common font file formats you’ll encounter are:
- TrueType Fonts (.ttf): This is a widely compatible format that works across both Windows and macOS. TTF fonts offer good scalability, meaning they look crisp at various sizes.
- OpenType Fonts (.otf): An evolution of TrueType, OpenType fonts offer more advanced typographic features, such as ligatures, alternative characters, and stylistic sets. They are also cross-platform compatible and generally preferred for professional design work.
- Web Open Font Format (.woff / .woff2): Primarily used for web design, these formats are optimized for faster loading times on websites. While you might download these, they are less commonly installed directly onto your operating system for general use.
The installation process, while varying slightly between operating systems, generally involves placing these font files into specific system folders or utilizing built-in font management tools.
For Windows Users: A Seamless Integration
Windows offers a straightforward and user-friendly approach to font installation, ensuring that even novice users can quickly add new typefaces to their system. The process is designed to be intuitive, allowing you to seamlessly integrate new fonts into your everyday applications.
Method 1: The Drag-and-Drop Simplicity
This is arguably the quickest and most common method for installing fonts on Windows.
- Locate Your Font Files: First, ensure you have downloaded the font files you wish to install. These are usually in
.ttfor.otfformat and are often found within a.ziparchive. If they are zipped, double-click the.zipfile and extract the font files to a readily accessible location, such as your Desktop or a dedicated “Fonts” folder. - Open the Fonts Folder: Navigate to the Windows Fonts folder. The easiest way to do this is by opening the Start Menu, typing “Fonts,” and selecting the “Fonts” control panel item. Alternatively, you can access it directly by typing
C:WindowsFontsinto your File Explorer address bar. - Drag and Drop: With both your font files and the Windows Fonts folder open, simply select the font files you want to install and drag them into the Fonts folder.
- Automatic Installation: Windows will automatically detect the font files and begin the installation process. You might see a progress bar briefly appear. Once it disappears, your fonts are installed and ready to use.
Method 2: The Context Menu Convenience
This method offers a slightly more direct approach without needing to open the Fonts folder manually each time.
- Locate Your Font Files: As with the drag-and-drop method, ensure your font files are extracted and accessible.
- Right-Click and Install: Right-click on the font file(s) you wish to install.
- Select “Install”: From the context menu that appears, select the “Install” option. If you are installing multiple fonts, you can select them all, right-click on one of them, and choose “Install.”
- User Account Control (UAC): You may be prompted by User Account Control to allow the program to make changes to your device. Click “Yes” to proceed.
- Font Installation: Windows will then install the selected fonts.
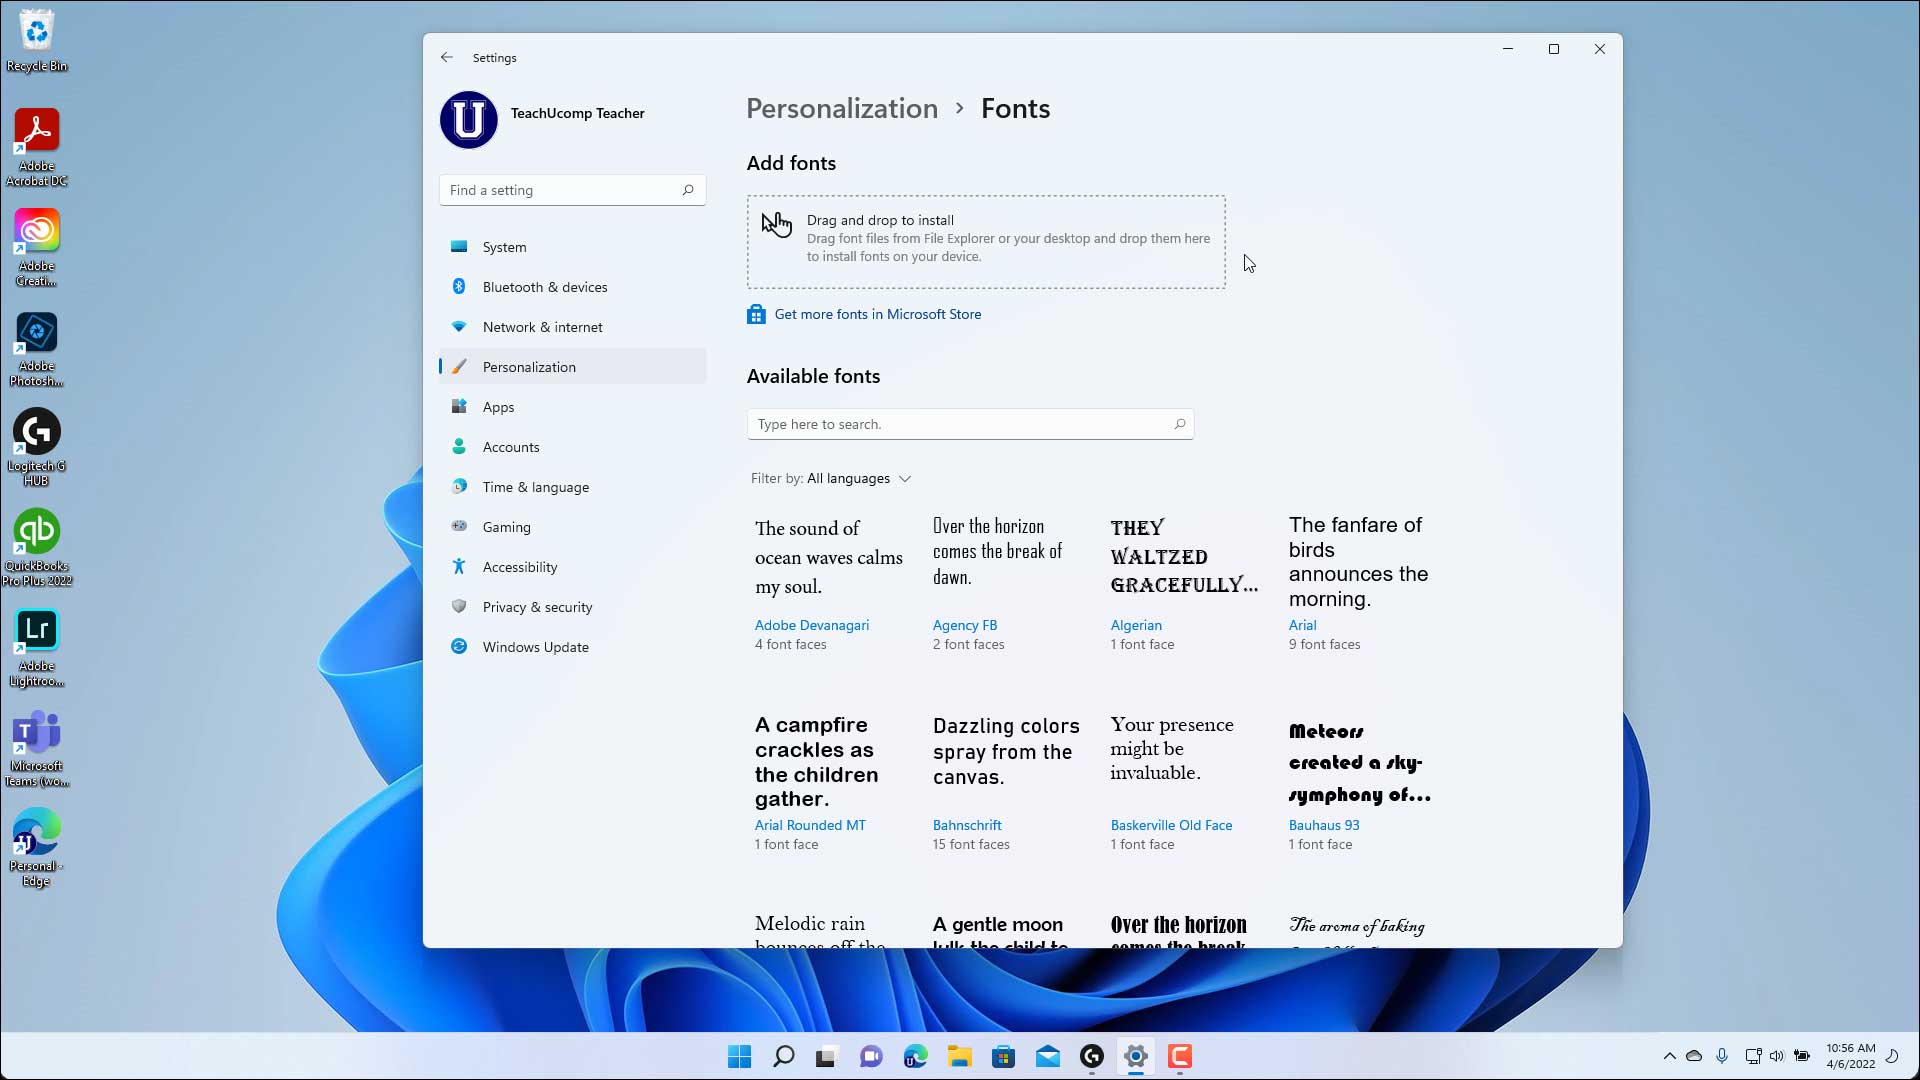
Method 3: Using the Font Settings Panel (Windows 10 and later)
Windows 10 and later versions introduce a more modern and integrated Font Settings panel, providing a centralized location for managing your fonts.
- Access Font Settings: Go to Start > Settings > Personalization > Fonts.
- Drag and Drop into Settings: Within the Fonts settings panel, you will see a section that says “Add fonts.” You can drag and drop your font files directly into this area.
- Automatic Installation: Similar to the Fonts folder method, Windows will automatically install the fonts once they are dropped into the designated area.
- Install from File: You can also click the “Get more fonts in Microsoft Store” option to browse and download free fonts directly from the store, or click the “Add fonts” button (which might be a plus icon or similar) to browse your computer for font files.
Once installed, your new fonts should be available in all applications that allow font selection, such as Microsoft Word, Adobe Photoshop, PowerPoint, and more. Simply open your desired application, go to the font selection dropdown menu, and your newly installed fonts will be listed alphabetically.
For macOS Users: A Streamlined System
macOS boasts a robust and user-friendly font management system, making it easy to add and organize your typography. The primary tool for this is the Font Book application.
Method 1: Using Font Book’s Interface
Font Book is the dedicated application for managing fonts on your Mac.
- Locate Your Font Files: Ensure your font files (
.ttf,.otf) are downloaded and accessible. If they are in a.zipfile, double-click it to extract them. - Open Font Book: You can find Font Book in your Applications folder, or by using Spotlight Search (Command + Spacebar) and typing “Font Book.”
- Add Fonts: There are several ways to add fonts within Font Book:
- Drag and Drop into Font Book: Simply drag your font files directly from Finder into the Font Book window.
- Using the “+” Button: With Font Book open, click the “+” button in the top-left corner of the window. Navigate to the location of your font files, select them, and click “Open.”
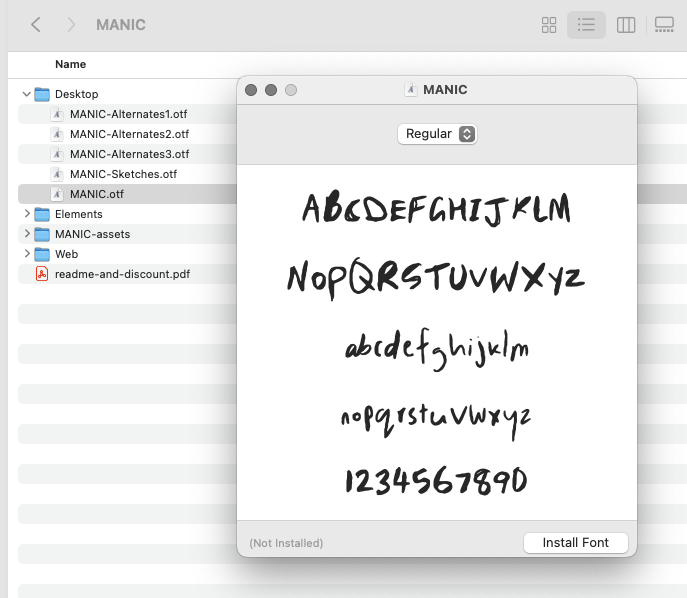
- Double-Clicking the Font File: In Finder, you can often simply double-click a font file. This will usually open a preview window for that font, and at the bottom, you’ll see an “Install Font” button. Click this button, and the font will be installed into Font Book.
- Validation and Installation: Font Book will typically validate the font for any potential issues. Once validated, it will be added to your library. Fonts are usually installed into your user’s “Fonts” folder (
~/Library/Fonts), making them available only to your user account. You can also choose to install fonts for all users by going to Font Book > Preferences > Default Install Location and selecting “Computer.”
Method 2: Direct Installation via Finder (Less Common but Possible)
While Font Book is the recommended and most efficient method, you can also manually place font files into the appropriate system folders, though this is less common and generally not recommended for users who aren’t familiar with macOS system architecture.
- Locate Font Files: Ensure your font files are downloaded and unzipped.
- Open the Fonts Folder:
- For your user only: In Finder, click “Go” in the menu bar, then hold down the
Optionkey. “Library” will appear in the dropdown menu. Click “Library,” then navigate to the “Fonts” folder within your user’s Library. - For all users: In Finder, click “Go” > “Go to Folder” (or press
Shift + Command + G) and type/Library/Fonts.
- For your user only: In Finder, click “Go” in the menu bar, then hold down the
- Copy Font Files: Drag and drop your font files into the chosen Fonts folder.
- Restart Applications: You may need to restart any open applications for the new fonts to appear in their font menus.
After installation, your new fonts will appear in the font lists of applications like Pages, Keynote, Microsoft Office, and design software like Adobe Creative Suite.
Font Management and Best Practices
Installing fonts is only half the battle. As your font collection grows, effective font management becomes crucial for maintaining system performance and a streamlined workflow. This is where understanding how to organize and maintain your font library comes into play, impacting both your Tech efficiency and your Brand consistency.
Organizing Your Font Library
A well-organized font library saves you time and prevents clutter. Consider these strategies:
- Create Custom Folders: Within your operating system’s Fonts folder (or in a separate designated folder for your font collection), create subfolders to categorize your fonts. Examples include:
- “Serif”
- “Sans-Serif”
- “Script”
- “Display”
- “Project Names” (e.g., “Client X Fonts”)
- “Free Fonts”
- “Premium Fonts”
- Use Font Management Software: For extensive font libraries, consider using dedicated font management software like FontBase (free and paid options), Suitcase Fusion (paid), or RightFont (paid). These tools offer advanced features such as:
- Previewing fonts without installation.
- Creating collections and sets.
- Activating and deactivating fonts on demand, which can significantly improve your computer’s performance by reducing the number of fonts loaded at startup.
- Finding duplicate fonts and managing licensing information.
- Document Your Fonts: Especially if you’re working on projects with specific branding guidelines, keep a record of the fonts you’re using and where you sourced them from. This is vital for maintaining brand consistency across all your marketing materials.
When to Activate and Deactivate Fonts
One of the biggest performance drains on a computer can be having too many fonts installed and activated simultaneously. This is particularly true for designers and creatives who might download hundreds or even thousands of fonts.
- Activate Only What You Need: For day-to-day use, only keep the most commonly used fonts activated. When you need a specific font for a particular project, activate it.
- Deactivate After Use: Once a project is completed, deactivate the project-specific fonts to free up system resources.
- Font Management Software is Key: As mentioned, font management software excels at this. You can create project-specific “sets” or “collections” that you can then activate or deactivate with a single click. This is far more efficient than manually uninstalling and reinstalling fonts.
By adopting these practices, you not only ensure your computer runs smoothly but also maintain a professional and organized approach to typography, which directly contributes to a strong and consistent Brand identity.
The Business and Creative Impact of Fonts
Beyond the technical aspect of installation, the choice and use of fonts have significant implications for both your personal and corporate Brand, as well as your financial decisions. Fonts are not merely decorative elements; they are powerful communication tools that shape perception and influence the success of your ventures.
Fonts as the Cornerstone of Branding
A company’s logo, website, marketing collateral, and even internal documents all rely on typography to convey its personality, values, and message.
- Perception and Emotion: Different font styles evoke different emotions and perceptions. Serif fonts (like Times New Roman) are often seen as traditional, authoritative, and trustworthy. Sans-serif fonts (like Arial or Helvetica) are perceived as modern, clean, and approachable. Script fonts can convey elegance, creativity, or informality, while display fonts are designed for impact and often used for headlines or logos.
- Brand Consistency: Using a consistent set of fonts across all your brand touchpoints is crucial for building recognition and trust. When customers consistently see the same typography associated with your brand, it reinforces their familiarity and understanding of who you are. This contributes to a strong corporate identity and reputation.
- Target Audience: The fonts you choose should also resonate with your target audience. A playful font might be perfect for a children’s toy brand, while a sophisticated serif font would be more appropriate for a luxury goods company.
Investing in Your Visual Identity
While many excellent fonts are available for free, investing in premium or professional fonts can be a strategic decision for businesses and individuals serious about their branding.
- Quality and Features: Professional fonts often come with a wider range of weights, styles, and advanced OpenType features (ligatures, alternate characters, etc.) that can enhance the visual appeal and readability of your designs.
- Licensing and Rights: Understanding font licensing is crucial. Free fonts often come with personal use licenses, meaning you can use them for your own projects but not for commercial products or redistribution. Premium fonts usually offer more comprehensive licenses, allowing for commercial use. Ignoring licensing can lead to legal issues and unexpected financial penalties.
- Return on Investment: A well-chosen font can elevate your marketing materials, improve user experience on your website, and ultimately contribute to higher engagement and conversion rates. In this sense, investing in quality typography is an investment in your business’s success and can yield a significant return. For individuals building a personal brand, unique and professional fonts can differentiate them from the competition.
By understanding the power of typography and managing your font library effectively, you are not just installing digital files; you are actively shaping perceptions, building a memorable Brand, and making informed Money decisions about where to invest in your visual identity. The ability to install and manage fonts is a fundamental Tech skill that empowers you to excel in all these areas.
aViewFromTheCave is a participant in the Amazon Services LLC Associates Program, an affiliate advertising program designed to provide a means for sites to earn advertising fees by advertising and linking to Amazon.com. Amazon, the Amazon logo, AmazonSupply, and the AmazonSupply logo are trademarks of Amazon.com, Inc. or its affiliates. As an Amazon Associate we earn affiliate commissions from qualifying purchases.