
In the vibrant ecosystem of macOS, typography plays a pivotal role in everything from personal expression to professional branding. Whether you’re a graphic designer crafting a new logo, a writer looking to differentiate your documents, a marketer ensuring brand consistency, or simply someone who appreciates aesthetic appeal, knowing how to manage and install fonts on your Mac is an essential skill. This guide delves into the straightforward process of enhancing your Mac’s typographic capabilities, ensuring your digital canvas always reflects your unique vision.
The Mac has long been a favorite platform for creatives, partly due to its intuitive interface and robust support for design tools. Fonts are more than just text; they convey emotion, establish tone, and significantly impact readability and brand perception. For professionals, access to a diverse font library is crucial for maintaining a distinct brand identity across various touchpoints, from digital marketing materials to print collateral. For individuals, personalized fonts can transform mundane tasks into more engaging experiences, boosting productivity and personal satisfaction.
This article will walk you through the native macOS methods for installing and managing fonts, explore where to find high-quality fonts, discuss advanced management techniques, and offer troubleshooting tips. By the end, you’ll be equipped to curate a font collection that empowers your creative and professional endeavors, allowing you to unlock the full potential of your Mac.
Understanding Font Types and Sources
Before diving into the installation process, it’s beneficial to understand the different types of font files you might encounter and where to ethically and effectively source them. Recognizing these distinctions will help you make informed decisions, especially concerning licensing and cross-platform compatibility.
Common Font File Formats: TTF, OTF, and Beyond
The digital world is home to several font formats, each with its own history and capabilities. The most common ones you’ll likely encounter on a Mac are TrueType Font (TTF) and OpenType Font (OTF).
-
TrueType Font (TTF): Developed by Apple in the late 1980s and later adopted by Microsoft, TTF revolutionized typography by embedding font data directly into files, making them scalable and ensuring consistent rendering across different devices and operating systems. TTF fonts are widely supported and are an excellent choice for general use. They contain a single file that stores both screen and print outline data, making them highly portable.
-
OpenType Font (OTF): A more advanced and versatile format, OpenType was co-developed by Adobe and Microsoft in the mid-1990s. OTF builds upon TTF’s capabilities, offering enhanced typographic features such as ligatures, alternative glyphs, small caps, old-style figures, and contextual alternates. These advanced features provide designers with greater control over text appearance, allowing for more sophisticated and aesthetically pleasing typography. OTF fonts can also contain up to 65,536 glyphs, significantly more than TTF, making them ideal for multilingual support and complex scripts. While slightly larger in file size, OTF is generally preferred by professional designers for its flexibility and feature richness.
Beyond TTF and OTF, you might encounter other formats, particularly if you’re involved in web design:
-
Web Open Font Format (WOFF/WOFF2): These are specifically optimized for web use, offering better compression and faster loading times compared to TTF or OTF, making them crucial for web performance. While you wouldn’t typically “install” these on your Mac in the traditional sense for use in desktop applications, understanding their existence is important in a broader digital context.
-
Scalable Vector Graphics (SVG) Fonts: While less common now, SVG fonts allow for vector graphic paths to describe the font shapes, offering unique visual possibilities, especially for intricate designs or animated typography on the web.
For most desktop publishing and design needs on a Mac, TTF and OTF files will be your primary focus.
Where to Find and Download Fonts
The internet offers a vast universe of fonts, ranging from free resources to premium paid options. Your choice will often depend on your project’s scope, budget, and licensing requirements.
Free Font Resources:
- Google Fonts: An indispensable resource for many, Google Fonts offers a massive library of high-quality, open-source fonts. All fonts are licensed under open licenses, making them free for both personal and commercial use. This is an excellent starting point for any project, providing a wide variety of styles and weights.
- DaFont and Font Squirrel: These websites host thousands of free fonts submitted by designers worldwide. While they offer immense choice, it’s crucial to pay close attention to the licensing agreements. Many fonts are free for personal use but require a commercial license for business applications. Font Squirrel, in particular, curates fonts that are 100% free for commercial use.
- Creative Bloq and similar design blogs: Often compile lists of free fonts, especially themed collections or those released by independent designers, providing a curated selection.
Paid Font Resources and Subscriptions:
For professionals and businesses, investing in premium fonts often yields better quality, more comprehensive character sets, and robust licensing. This is where the “Brand” and “Money” aspects of our website topics truly converge, as carefully selected premium fonts can significantly elevate a brand’s visual identity.
- Adobe Fonts (formerly Typekit): Included with Adobe Creative Cloud subscriptions, Adobe Fonts offers a vast library of high-quality fonts that can be synced directly to your desktop applications. This is incredibly convenient for designers already within the Adobe ecosystem, ensuring seamless font management across projects. The licensing is usually covered by your CC subscription for most commercial uses.
- MyFonts, Fontspring, and Fonts.com: These are major online marketplaces for purchasing commercial fonts from various foundries. They offer an extensive range of professional-grade fonts, often with multiple weights, styles, and advanced OpenType features. When purchasing, carefully review the licensing terms (desktop, web, app, server) to ensure they align with your intended use.
- Independent Type Foundries: Many smaller, independent foundries offer unique and innovative typefaces. Purchasing directly supports these designers and often provides access to exclusive fonts that can help a brand stand out.
When acquiring fonts, always prioritize reputable sources and always read the licensing agreement. Using a font without the proper license, especially for commercial purposes, can lead to legal issues. A well-chosen, appropriately licensed font is a valuable asset to any personal or professional brand.
The macOS Native Way: Installing Fonts with Font Book
macOS includes a dedicated application called Font Book, which is your primary tool for installing, previewing, activating, and deactivating fonts. It’s intuitive, powerful, and sufficient for most users’ needs.
Step-by-Step Guide for Individual Fonts
Installing a single font on your Mac is a breeze. Once you’ve downloaded a font file (typically a .ttf or .otf file) to your computer, follow these steps:
- Locate the Font File: Navigate to the folder where you downloaded your font (e.g., your Downloads folder).
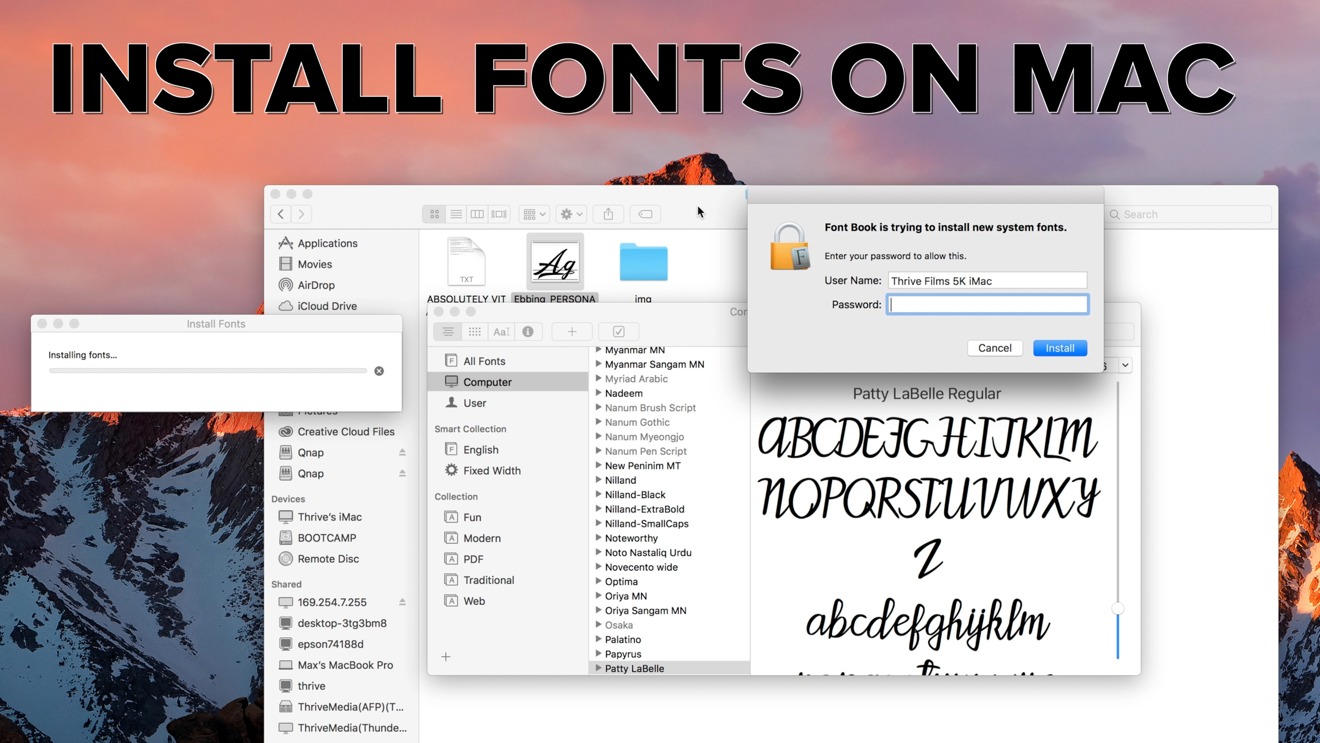
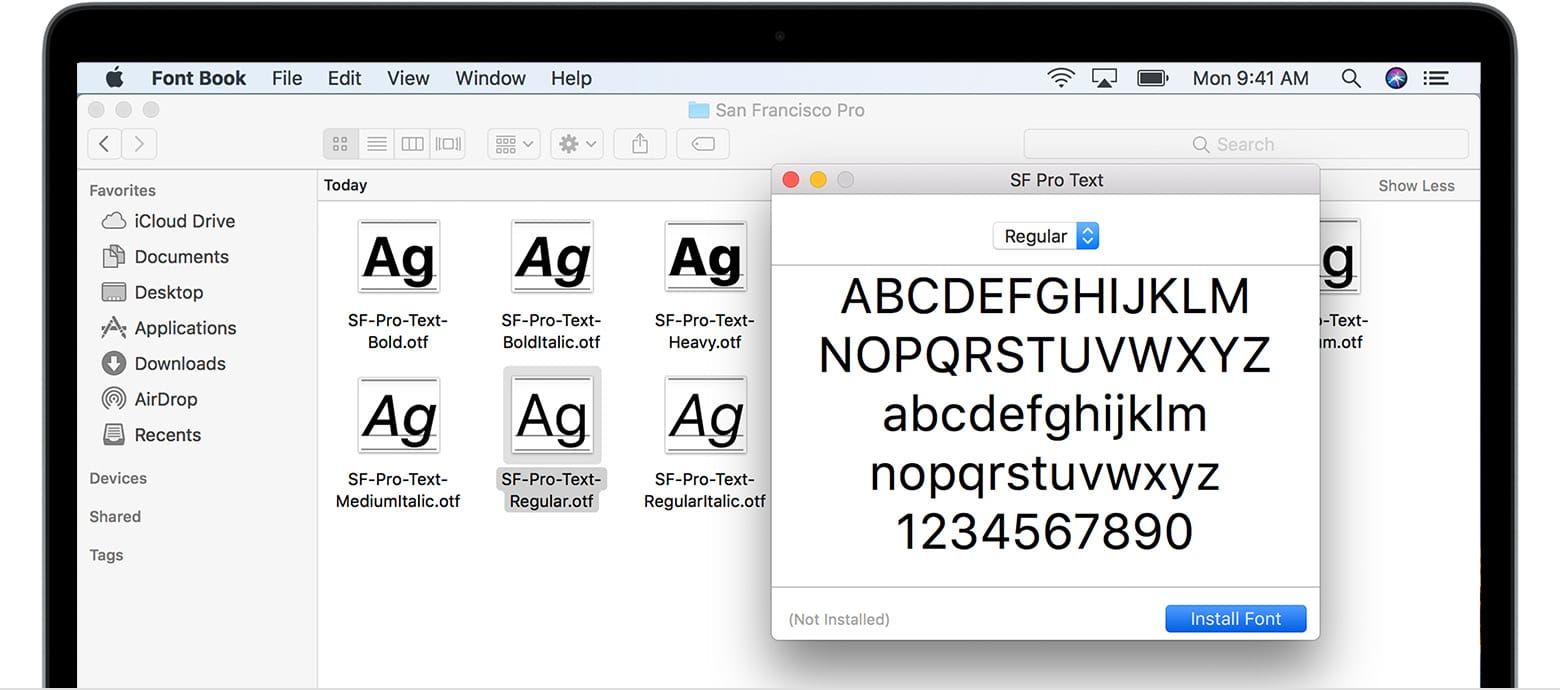
- Double-Click the Font File: Simply double-click on the .ttf or .otf file. This action will automatically open a preview window in Font Book.
- Review and Install: The Font Book preview window will display the font in various sizes and characters. At the bottom right of this window, you’ll see an “Install Font” button. Click it.
- Font Validation (Optional but Recommended): Font Book will perform a quick validation check. If the font has any issues (e.g., corrupt data, duplicate font already installed), it will notify you. For most clean fonts, it will simply proceed with the installation.
- Access Your New Font: Once installed, the font will be added to your Font Book library and immediately become available in most applications on your Mac, such as Pages, Microsoft Word, Adobe Photoshop, Keynote, and more. You might need to restart some applications for the new font to appear in their font menus.
Installing Multiple Fonts Simultaneously
If you’ve downloaded a font family or a collection of several fonts, installing them individually can be tedious. Font Book allows you to install multiple fonts at once:
- Collect Your Fonts: Place all the font files you wish to install into a single folder on your desktop or in your Documents.
- Select All Files: Open the folder, then select all the font files. You can do this by dragging a selection box around them, or by clicking one file and pressing
Command + A. - Open with Font Book:
- Drag and Drop: The easiest method is to drag the selected font files directly onto the Font Book application icon in your Dock or Applications folder.
- Right-Click: Alternatively, right-click (or Control-click) on any of the selected font files, choose “Open With,” and then select “Font Book.”
- Install All: Font Book will open and display a list of all the selected fonts. Click the “Install Font” button (it may say “Install [Number] Fonts”) in the preview window. Font Book will then validate and install all selected fonts in one go.

Verifying and Managing Installed Fonts
Font Book is not just for installation; it’s also a powerful management tool.
- Previewing Fonts: In Font Book, select any font from your library to see a preview of its appearance. You can change the sample text and size to get a better idea of how it looks.
- Deactivating/Activating Fonts: If you have too many fonts and notice a slowdown in your system or specific applications, or if you want to temporarily disable a font, you can deactivate it. Select the font (or multiple fonts) in Font Book, then go to Edit > Deactivate [Selected] Fonts. Deactivated fonts are still on your system but are not available in applications. You can reactivate them later using the same menu option. This is a useful feature for managing performance, especially if you have a vast font library.
- Organizing with Collections: For designers or users with many fonts, organizing them into collections can be incredibly helpful. You can create custom collections (e.g., “Client X Fonts,” “Script Fonts,” “Branding Fonts”) by clicking the
+button at the bottom of the Font Book sidebar. Then, drag and drop fonts from your main library into these collections for easy access and organization, aligning perfectly with brand management and productivity needs. - Resolving Duplicate Fonts: Font Book automatically detects duplicate fonts during installation. If you install a font that’s already present, it will prompt you to resolve the conflict. You can choose to keep both, replace the existing one, or simply skip the installation of the duplicate. It’s generally best to resolve duplicates to prevent potential issues in applications.
- Removing Fonts: To uninstall a font, select it in Font Book, then go to File > Remove [Selected] Fonts, or simply right-click the font and choose “Remove.” This will delete the font file from your system. Be cautious when removing system fonts (which are typically protected and Font Book will warn you about them), as this can affect system stability.
Advanced Font Management: Third-Party Tools and Best Practices
While Font Book is excellent for most users, creative professionals, agencies, or individuals managing vast font libraries might find its features somewhat limited. This is where third-party font management software comes into play, offering advanced functionalities for complex workflows.
When to Consider a Third-Party Font Manager
Third-party font managers offer benefits that go beyond Font Book’s capabilities, making them valuable for specific use cases:
- Large Font Libraries: If you have hundreds or thousands of fonts, a dedicated manager can handle them more efficiently, preventing system slowdowns and improving searchability.
- Auto-Activation: Many professional tools automatically activate fonts required by a document (e.g., an InDesign file) when you open it, and deactivate them when closed, saving system resources and ensuring project consistency.
- Cloud Syncing: For teams or individuals working across multiple devices, cloud syncing ensures your font library is consistent and accessible everywhere. This is crucial for maintaining brand consistency across a design team.
- Conflict Resolution: More sophisticated tools offer better detection and resolution of font conflicts (e.g., different versions of the same font).
- Licensing Management: Some managers help track font licenses, which is vital for commercial projects and compliance. This ties into the “Money” aspect, ensuring you’re not incurring legal liabilities.
Popular Third-Party Font Management Software
Several robust options are available, catering to different budgets and feature requirements:
- Adobe Fonts (Creative Cloud): As mentioned, this is integrated with Adobe Creative Cloud. It’s not a standalone manager in the traditional sense, but its seamless syncing and vast library make it an incredibly powerful tool for CC users.
- Suitcase Fusion (now part of Connect Fonts): A long-standing industry standard, Suitcase Fusion offers powerful auto-activation, detailed font previews, cloud sync via TypeSync, and robust organization features, making it ideal for design agencies and freelancers.
- Universal Type Server (for enterprise): Extensis also offers Universal Type Server, designed for large organizations to manage and distribute fonts centrally, ensuring brand consistency and licensing compliance across an entire team.
- FontBase: A modern, cross-platform (Mac, Windows, Linux) font manager that offers a clean interface, powerful search, and easy activation/deactivation. It has both free and paid (FontBase Awesome) versions, making it accessible to a broader audience.
- RightFont: Another popular choice for Mac users, RightFont offers a beautiful UI, cloud syncing with various services (Dropbox, Google Drive), and integration with Sketch, Adobe Creative Suite, and Figma.
These tools represent an investment, but for those whose work heavily relies on typography, the time savings, enhanced organization, and peace of mind regarding licensing often justify the cost.
Best Practices for Font Organization and Usage
Regardless of whether you use Font Book or a third-party manager, adopting some best practices can significantly improve your workflow:
- Only Install What You Need: A bloated font library can slow down your system and applications. Deactivate or uninstall fonts you don’t use regularly.
- Create Logical Collections: Group fonts by project, client, style (e.g., serif, sans-serif, display), or usage. This makes finding the right font much faster.
- Understand Licensing: Always be clear about the terms of use for each font, especially for commercial projects. Keep records of your licenses. This protects your brand and avoids legal issues.
- Regularly Clean Up Duplicates: Duplicate fonts can cause unpredictable behavior in applications. Use Font Book or your manager to resolve these conflicts.
- Back Up Your Font Library: Fonts are creative assets. Ensure your font files are included in your regular backup routine to prevent loss.
- Test Font Performance: Some fonts, particularly older or poorly constructed ones, can cause application crashes or slowdowns. If you experience issues after installing a new font, try deactivating it to see if the problem resolves.
Troubleshooting Common Font Installation Issues
Even with the most straightforward process, you might occasionally encounter issues. Here are some common problems and their solutions:
Font Validation Errors
During installation, Font Book may report a validation error.
- “Minor errors” or “Serious errors”: A minor error might be a malformed table or incorrect naming, which might not prevent the font from working but could cause issues in some applications. A “serious error” suggests the font file is corrupt or fundamentally flawed and likely won’t work correctly.
- Solution: For serious errors, it’s best to discard the font and try downloading it again from a reliable source. If it’s a minor error and you trust the source, you can often proceed with the installation, but be aware of potential issues. Some “errors” might simply be warnings about unusual font structures that are still functional.
Fonts Not Appearing in Applications
You’ve installed the font, but it’s not showing up in your design software or word processor.
- Restart Applications: Most applications need to be restarted to refresh their font menus and recognize newly installed fonts. Quit and reopen the application where you expect to use the font.
- Clear Font Caches: Sometimes, macOS or individual applications maintain font caches that don’t update immediately. You can try clearing system font caches (though this is rarely needed in modern macOS versions) or application-specific caches. A common way to clear system caches is to restart your Mac in Safe Mode, then restart normally. For individual applications, check their preferences or support documentation.
- Check Font Book Status: Ensure the font is active in Font Book. If it’s deactivated, it won’t appear.
- Corrupt Font File: If the font consistently fails to appear or causes application crashes, the file itself might be corrupt. Try redownloading it or obtaining it from a different source.
Performance Considerations with Many Fonts
A common complaint from users with large font libraries is that their Mac or specific applications become slow.
- Too Many Active Fonts: Every active font consumes system resources. While modern Macs are powerful, having thousands of fonts active can still impact performance.
- Solution: Use Font Book (or your third-party manager) to deactivate fonts you’re not actively using. Create specific collections for projects and only activate the fonts needed for that project. This helps keep your system lean and responsive.
- Old or Poorly Constructed Fonts: Some older fonts or those not professionally designed can be inefficient and contribute to performance issues. Prioritize high-quality, modern OpenType fonts when possible.
Conclusion
Installing fonts on your Mac is a straightforward process that significantly enhances your ability to personalize your digital environment and elevate your creative work. From the native elegance of Font Book to the advanced capabilities of third-party managers, macOS provides robust tools for every user, from casual enthusiasts to demanding design professionals.
By understanding font types, sourcing them responsibly, and mastering the installation and management techniques outlined in this guide, you gain control over a critical aspect of digital expression. This mastery not only boosts your personal productivity and design efficiency but also plays a vital role in establishing and maintaining a strong brand identity, which is invaluable in today’s visually driven world.
Embrace the power of typography. Explore new fonts, experiment with styles, and let your Mac be the canvas for your most imaginative and impactful ideas. The right font can transform a simple document into a compelling message, a basic design into a memorable brand, and your everyday Mac experience into something uniquely yours. So go ahead, install that perfect typeface, and unleash the full creative potential of your Mac.
aViewFromTheCave is a participant in the Amazon Services LLC Associates Program, an affiliate advertising program designed to provide a means for sites to earn advertising fees by advertising and linking to Amazon.com. Amazon, the Amazon logo, AmazonSupply, and the AmazonSupply logo are trademarks of Amazon.com, Inc. or its affiliates. As an Amazon Associate we earn affiliate commissions from qualifying purchases.