In the digital age, typography is more than just decorative; it’s a fundamental element of communication, branding, and personal expression. Whether you’re a graphic designer crafting a stunning visual identity, a writer aiming to evoke a specific mood, a student preparing a presentation, or simply someone who wants to personalize their Windows 10 experience, the ability to install new fonts is an invaluable skill. Windows 10, with its user-friendly interface, makes this process surprisingly straightforward. This comprehensive guide will walk you through every step, from finding and downloading fonts to integrating them seamlessly into your system, ensuring you can leverage the power of typography to its fullest.
Understanding Font Formats and Sources
Before diving into the installation process, it’s beneficial to understand the common font formats you’ll encounter and where to find them. This knowledge will not only streamline your installation but also ensure compatibility and quality.
Common Font File Types
The vast majority of fonts you’ll download and install on Windows 10 will be in one of two primary formats:
-
TrueType Font (.TTF): This is the most widely supported font format across various operating systems, including Windows and macOS. TTF fonts are scalable, meaning they maintain their clarity and sharpness regardless of size, making them ideal for both on-screen display and print. They are generally robust and reliable for everyday use.
-
OpenType Font (.OTF): Developed as an extension of TrueType, OpenType fonts offer enhanced features and greater flexibility. They can contain more advanced typographic elements such as ligatures (where two or more characters are combined into a single glyph), stylistic alternates, swashes, and even small caps. OTF fonts are also scalable and are increasingly becoming the standard for professional design work.
While less common for typical user installations, you might also encounter:
- Web Open Font Format (.WOFF and .WOFF2): These are specifically designed for web use and are optimized for faster loading times in web browsers. You generally don’t need to install these on your desktop system for everyday use, as they are handled by the browser.
- Font files within compressed archives (.ZIP, .RAR): Most font downloads come bundled in compressed folders to make downloading easier and to keep related files together. You’ll need to extract these files before you can install the fonts.
Reputable Sources for Fonts
The internet is awash with fonts, but not all sources are created equal. It’s crucial to obtain your fonts from reputable websites to ensure you’re downloading legitimate, high-quality files and to avoid potential malware. Here are some excellent places to start your font-hunting journey:
- Google Fonts: A fantastic resource offering a vast library of open-source, high-quality fonts that can be used for both personal and commercial projects without licensing fees. They are well-categorized and easy to browse.
- Adobe Fonts (formerly Adobe Typekit): If you’re an Adobe Creative Cloud subscriber, you have access to a massive library of premium fonts that can be activated and synced directly to your system.
- Font Squirrel: This site curates free, commercially licensed fonts, often from independent foundries. They also provide tools for font management and webfont kits.
- DaFont: A popular, albeit more eclectic, collection of free fonts. While it offers an immense variety, be sure to check the licensing terms for each font, as they can vary widely.
- MyFonts and FontSpring: These are professional marketplaces where you can purchase premium, often designer-quality fonts. They offer a wide range of styles and licenses for both personal and commercial use.
- Independent Font Foundries: Many talented typographers and design studios release their own fonts directly on their websites. Searching for specific design styles can lead you to these excellent resources.
When downloading from any source, always pay attention to the licensing information. Some fonts are free for personal use only, while others can be used commercially. Understanding these terms will prevent future complications, especially if you’re using fonts for business or client projects.
Installing Fonts in Windows 10: The Easy Ways
Windows 10 offers several intuitive methods for installing new fonts, catering to different user preferences and situations. Whether you’re installing a single font or a whole collection, these methods are quick and efficient.
Method 1: The Drag-and-Drop Approach (Quickest for a Few Fonts)
This is arguably the simplest and fastest way to install a font if you have just one or a few files to add.
- Locate Your Font Files: Navigate to the folder where you have downloaded and extracted your font files (.TTF or .OTF).
- Open the Fonts Folder: Open a new File Explorer window and navigate to the Windows Fonts folder. You can usually find this at
C:WindowsFonts. Alternatively, you can quickly access it by typingfontsinto the Windows search bar and selecting “Fonts” from the results. - Drag and Drop: Select the font file(s) you wish to install. Click and drag these files directly into the
C:WindowsFontsfolder. - Installation Process: Windows will automatically detect the files and begin the installation process. You’ll see a progress bar briefly as the font is added to your system.
Once the drag-and-drop is complete, your new font should be available for use in most applications.
Method 2: Using the Right-Click Context Menu (Simple and Direct)
This method is very similar to drag-and-drop in terms of simplicity and speed, especially for individual font files.
- Locate Your Font Files: Find the font file (.TTF or .OTF) you want to install. Ensure it has been extracted from any compressed archive.
- Right-Click the Font File: Right-click on the font file.
- Select “Install”: From the context menu that appears, choose the “Install” option. If the font is already installed, you might see an option to “Install for all users,” which is generally recommended if available.
- User Account Control (UAC): You may be prompted by User Account Control to confirm the installation. Click “Yes” to proceed.
Windows will then install the font, and it will become available in your applications. This method is particularly useful for installing fonts one by one without needing to open the Fonts folder manually.
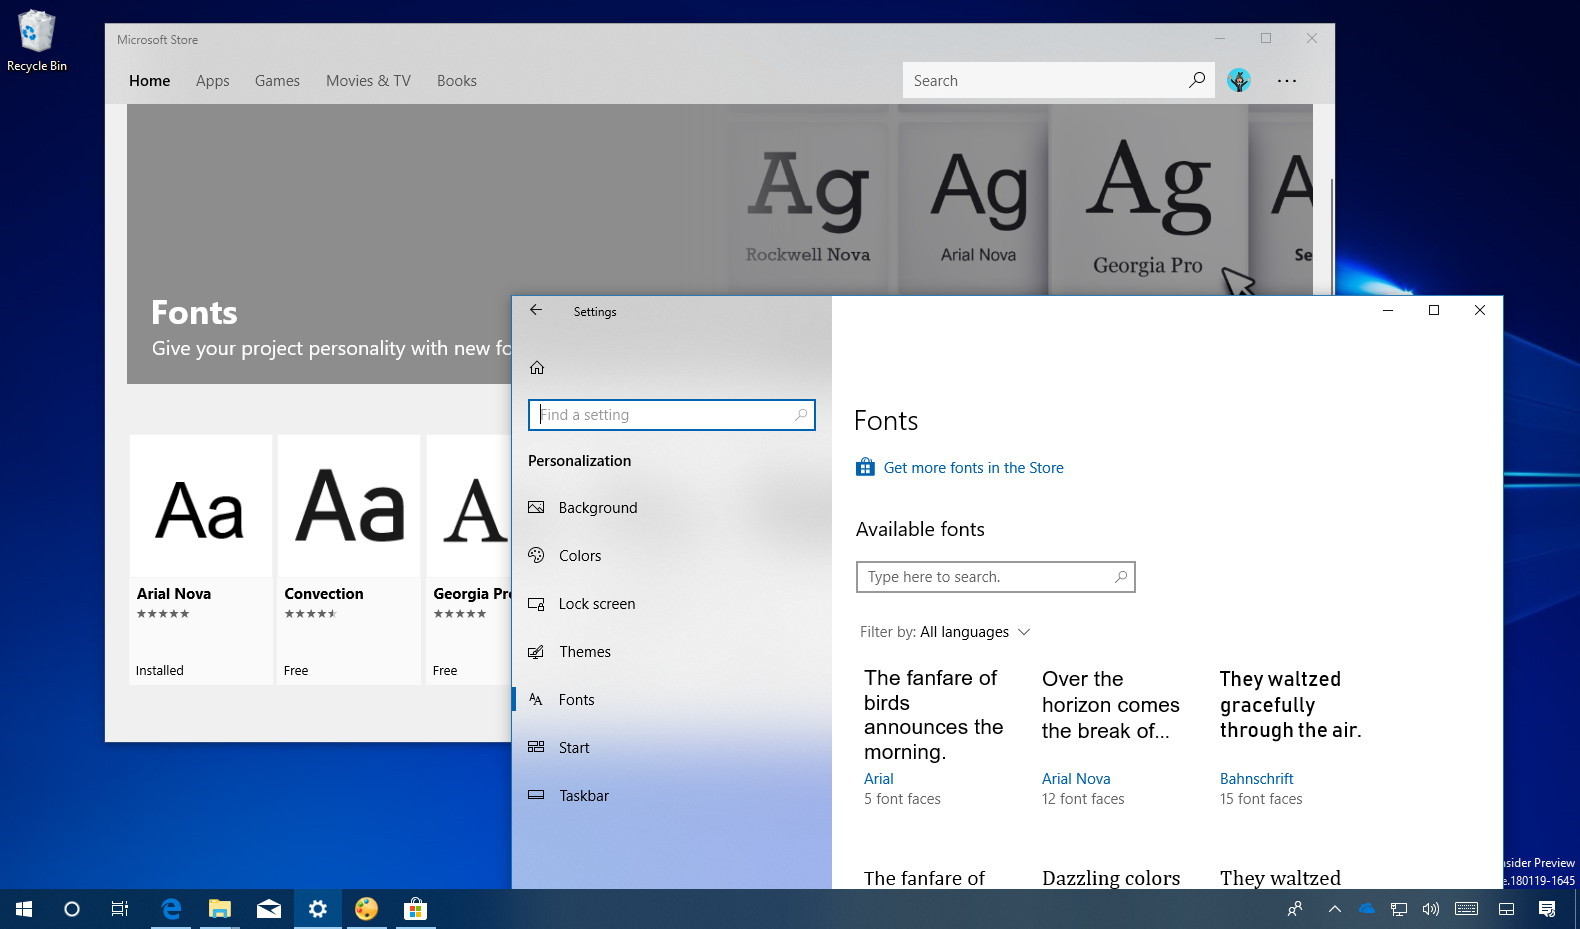
Method 3: Using the Settings App (A More Structured Approach)
For users who prefer a more guided or structured approach, the Windows 10 Settings app provides a dedicated interface for managing fonts.
- Open Settings: Click the Start button, then click on the gear icon to open the Settings app. Alternatively, press
Windows key + I. - Navigate to Personalization: In the Settings window, click on “Personalization.”
- Select “Fonts”: On the left-hand sidebar of the Personalization settings, click on “Fonts.”
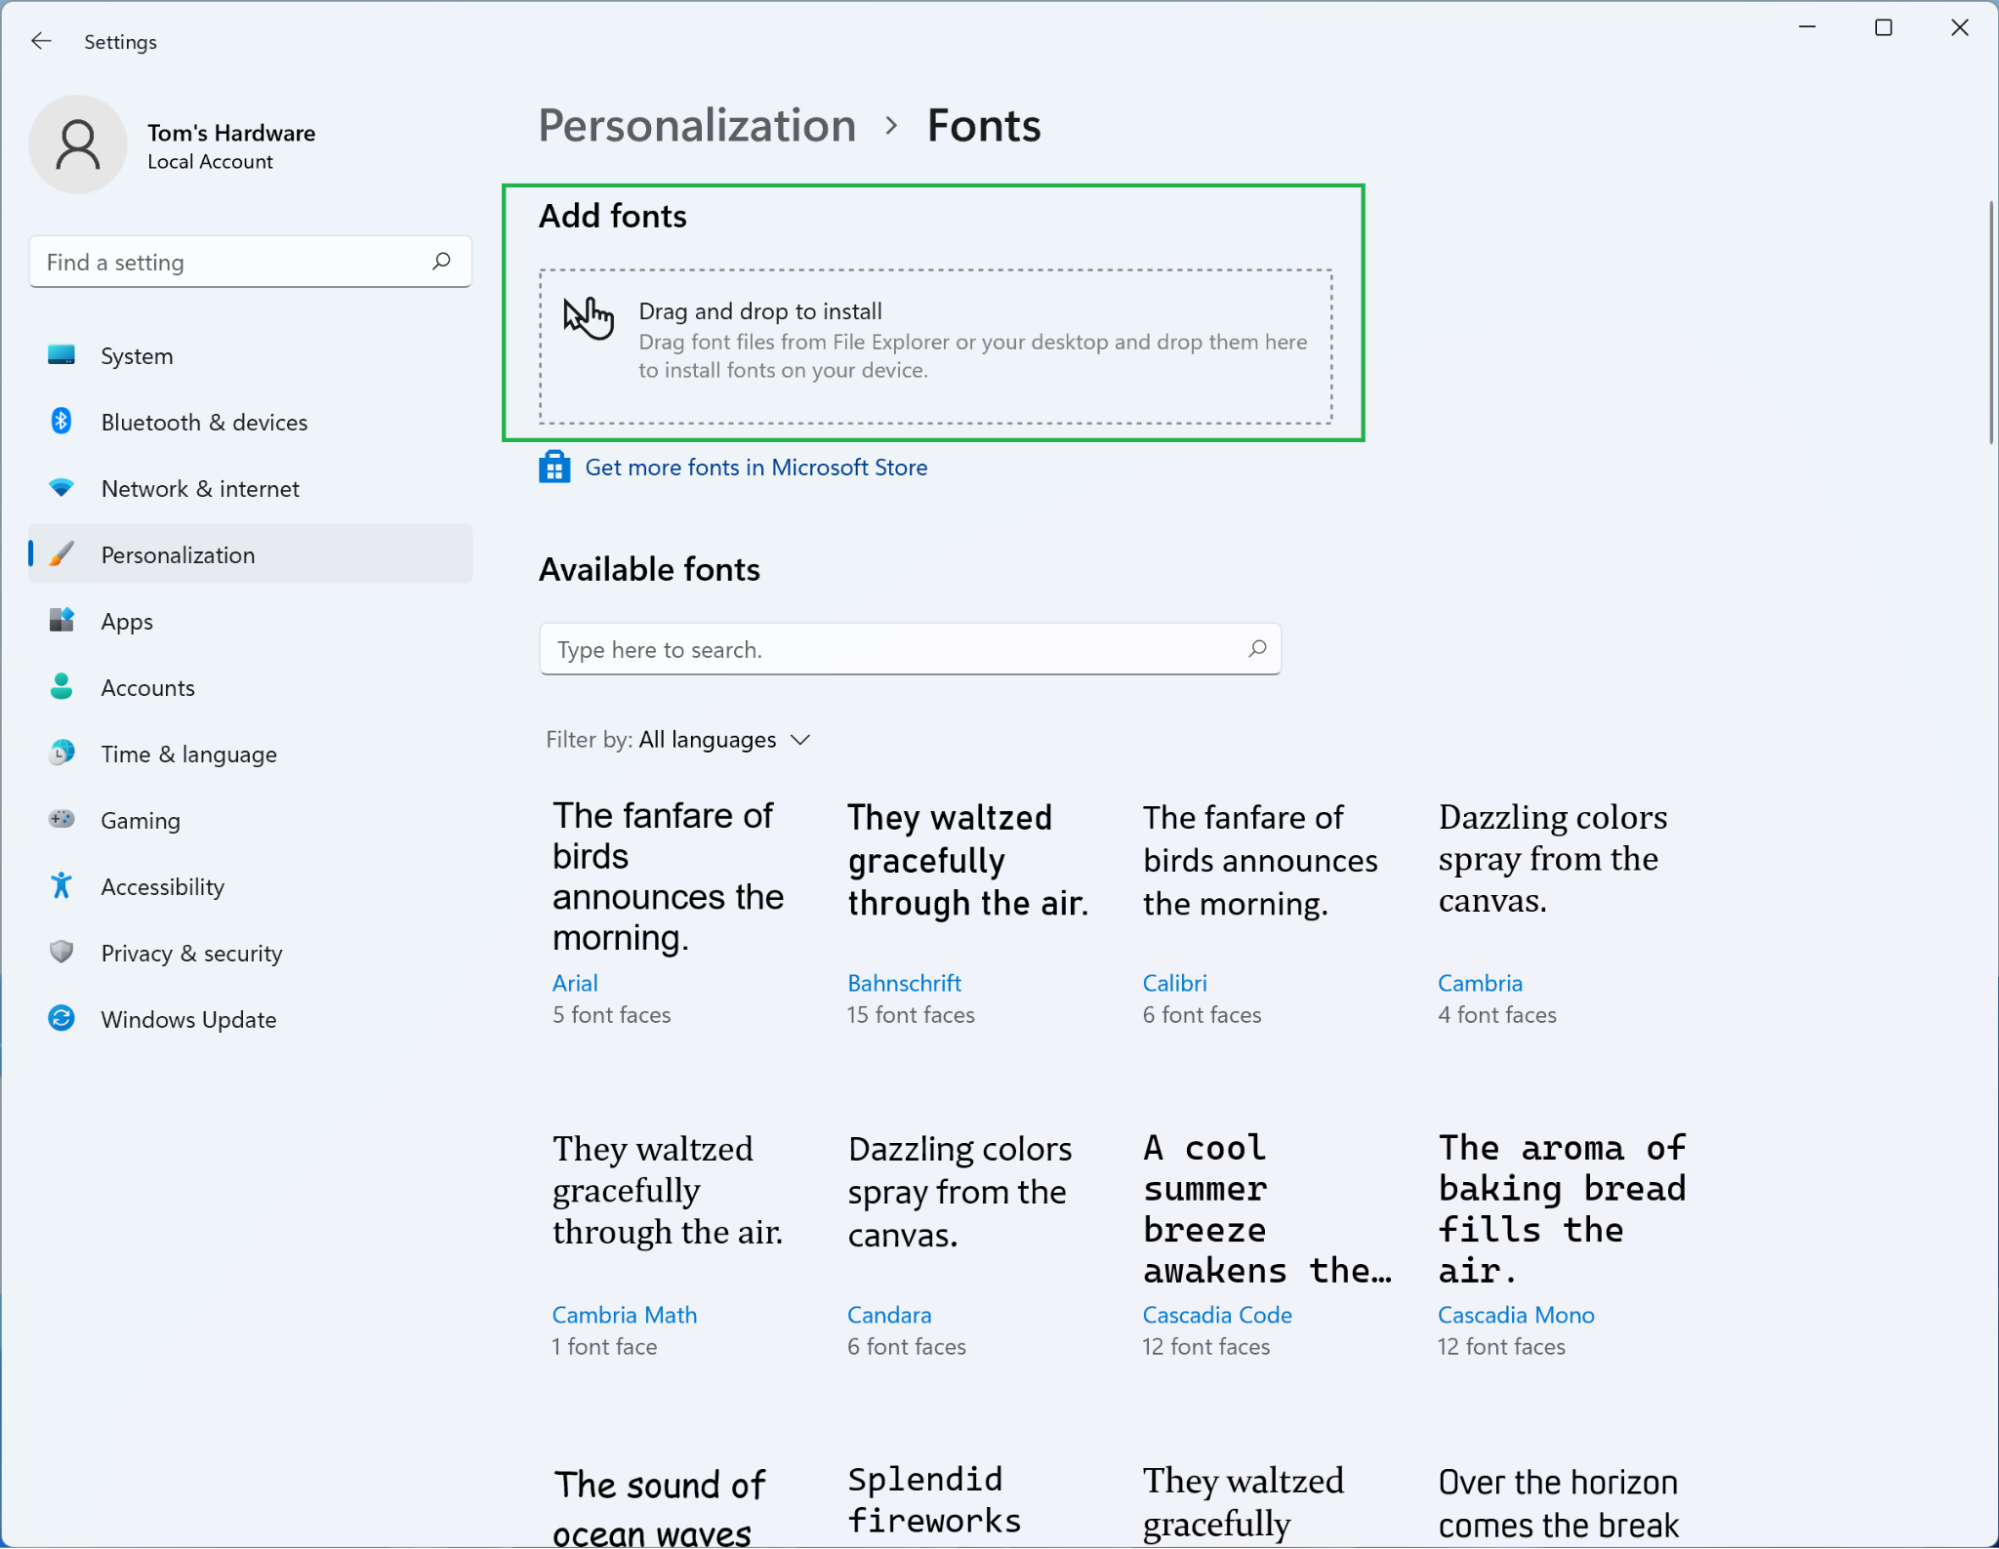
- Install Fonts: You will see a section titled “Add fonts.” There are two primary ways to install fonts here:
- Drag and Drop: You can drag font files directly from File Explorer onto the designated “Drag and drop to install” area within the Fonts settings.
- Browse Button: Click the “Browse” button to open a File Explorer window. Navigate to the location of your font files, select the font(s) you want to install, and click “Open.”
- Installation Confirmation: As with the other methods, Windows will install the font(s). You can see a list of your installed fonts below the “Add fonts” section, and your newly installed fonts will appear in this list.
The Settings app also provides useful information about each installed font, including its name, designer, and license information (if provided by the font file). It’s also where you can uninstall fonts if needed.

Verifying and Using Your New Fonts
Once you’ve installed a font, it’s essential to verify that it’s working correctly and then learn how to use it in your favorite applications.
Confirming Successful Installation
After completing any of the installation methods, you should always check if the font is recognized by Windows.
- Open the Fonts Folder (Again): Navigate to
C:WindowsFontsor search for “Fonts” in the Windows search bar and open the Fonts folder. - Search for Your Font: Use the search bar within the Fonts folder to type the name of the font you just installed.
- Check the List: If the font is installed correctly, it should appear in the list of installed fonts. You can click on it to see a preview of the font’s characters.
Alternatively, you can try to use the font in a common application.
- Open a Text Editor: Launch a simple text editor like Notepad or WordPad.
- Access the Font Dropdown: Type some text and then look for the font selection dropdown menu (usually found in the “Home” tab of most applications).
- Find Your Font: Scroll through the list of available fonts to find the one you just installed.
If you can locate the font in either the Fonts folder or an application’s font menu, your installation was successful.
Using Fonts in Applications
The process of using a newly installed font varies slightly depending on the application, but the general principle is the same: select the font from the font dropdown menu.
For Word Processors and Productivity Suites (e.g., Microsoft Word, Google Docs, LibreOffice Writer)
- Open Your Document: Start a new document or open an existing one.
- Select Text (Optional): If you want to change the font of existing text, select it. If you want to start typing with the new font, place your cursor where you want to begin.
- Access the Font Menu: Locate the font selection dropdown menu, typically found on the “Home” tab or in the formatting toolbar.
- Choose Your Font: Scroll through the list, find your newly installed font by name, and click on it.
- Start Typing or Apply: Any new text you type will be in the selected font. If you selected existing text, it will now appear in the new font.
For Graphic Design Software (e.g., Adobe Photoshop, Illustrator, GIMP, Canva)
Graphic design applications often offer more advanced typography controls, but the basic selection process is similar.
- Open or Create a Project: Start a new design or open an existing project.
- Select the Text Tool: Choose the text tool (often represented by a “T” icon).
- Create or Select a Text Layer: Click on your canvas to create a new text box or select an existing text layer.
- Find the Font Options: Look for the font selection dropdown, usually in a properties panel, a top toolbar, or an “Inspector” window.
- Select Your Font: Choose your installed font from the list.
- Adjust and Apply: You can then adjust font size, color, spacing, and other typographic features as needed.
For Other Applications (e.g., Email Clients, Web Browsers for Local Content)
Most applications that allow text input or display will recognize system-installed fonts. Simply look for a font selection option within the application’s formatting or preferences.
Troubleshooting Common Font Installation Issues
While installing fonts in Windows 10 is usually seamless, you might occasionally encounter a hiccup. Here are some common issues and their solutions.
Font Not Appearing After Installation
This is the most frequent problem.
- Restart the Application: Many applications load fonts when they start. If the application was open during the font installation, it might not have refreshed its font list. Close and reopen the application where you expect to see the font.
- Restart Your Computer: In some rare cases, a full system restart might be necessary for Windows to fully register the new font across all services.
- Check the Fonts Folder: Revisit
C:WindowsFontsto ensure the font file is actually present and correctly named. Sometimes, a file might appear to install but have a naming conflict or an error. - Corrupted Font File: The font file itself might be corrupted or incomplete. Try downloading the font again from a reputable source.
- Invalid Font File: Ensure the font file is a valid .TTF or .OTF file. Some files might be mislabeled or are not actual font files.
User Account Control (UAC) Prompts
You’ll often see UAC prompts during installation, especially if you’re not an administrator or if you’re installing for “all users.” This is a security feature. Simply click “Yes” to allow the installation. If you’re consistently encountering issues with UAC, ensure your user account has the necessary permissions.
Fonts with Duplicate Names
If you try to install a font that already exists on your system (even if it’s a different version or from a different source), Windows might prompt you to replace it or skip it. Be cautious when replacing fonts, as it might affect existing documents that rely on the older version. If you want to keep both, you might need to rename the new font file before installation (though this can sometimes break font metadata).
Installing Fonts for “All Users”
When using the right-click method or the Settings app, you might see an option to “Install” or “Install for all users.” Installing for “all users” typically places the font in a system-wide directory, making it accessible to any user profile on that computer. “Install” (without “for all users”) usually installs it only for the current user profile, placing it in a user-specific font directory. For most home users, installing for all users is a convenient default.
By understanding these methods and common troubleshooting steps, you can confidently expand your typographic toolkit in Windows 10, enhancing your creativity and productivity. The ability to choose and use the right font can dramatically impact the message and aesthetic of any digital content you create.
aViewFromTheCave is a participant in the Amazon Services LLC Associates Program, an affiliate advertising program designed to provide a means for sites to earn advertising fees by advertising and linking to Amazon.com. Amazon, the Amazon logo, AmazonSupply, and the AmazonSupply logo are trademarks of Amazon.com, Inc. or its affiliates. As an Amazon Associate we earn affiliate commissions from qualifying purchases.