
In today’s rapidly evolving technological landscape, staying connected is more crucial than ever. Whether you’re a globetrotting entrepreneur, a digital nomad, or simply someone who appreciates the convenience of managing multiple phone lines, the advent of eSIM technology has revolutionized how we connect our devices. This guide delves into the intricacies of installing an eSIM on your iPhone, transforming your smartphone into a more versatile and powerful communication tool. We’ll explore what eSIM is, why it’s beneficial, and provide step-by-step instructions for seamless integration, ensuring you’re always connected, wherever your journey takes you.
Understanding eSIM: The Future of SIM Technology
Before we embark on the installation process, it’s essential to grasp the fundamental concept of eSIM. Unlike traditional physical SIM cards that you slot into your iPhone, an eSIM (embedded SIM) is a small, digital SIM card that is built directly into your device’s motherboard. This integrated chip allows you to activate a cellular plan with your mobile carrier digitally, without the need for a physical card. This innovation not only streamlines the setup process but also opens up a world of possibilities for device design and functionality.
The “embedded” nature of eSIM means it’s a permanent part of your iPhone. Instead of swapping cards when changing carriers or adding a new line, you can simply download a carrier profile onto your eSIM. This digital approach offers several significant advantages:
- Convenience and Speed: Activating a new plan or switching carriers is significantly faster. No more trips to the store or waiting for a SIM card to be mailed. You can often activate a new plan within minutes, directly from your iPhone’s settings.
- Space Saving: By eliminating the physical SIM card slot, manufacturers can create smaller, more water-resistant, and more durable devices. This design flexibility contributes to the sleek aesthetics and enhanced resilience of modern iPhones.
- Multiple Plans on One Device: A key benefit of eSIM is its ability to store multiple carrier profiles simultaneously. This is incredibly useful for frequent travelers who can easily switch between their home carrier and a local carrier for better rates abroad, or for individuals who prefer to keep their personal and work lines separate on a single device.
- Enhanced Security: eSIMs are generally considered more secure than physical SIM cards. They are harder to physically remove from a device, reducing the risk of SIM swapping fraud. Furthermore, carrier profiles are digitally provisioned and secured.
- Environmental Benefits: By reducing the need for plastic SIM cards and their associated packaging and shipping, eSIM technology contributes to a more sustainable approach to mobile connectivity.
Who Can Benefit from eSIM?
The versatility of eSIM makes it a valuable technology for a wide range of users:
- Frequent Travelers: The ability to easily switch between local and international plans without physical SIM cards is a game-changer for globetrotters. You can avoid exorbitant roaming charges by purchasing a local data plan or a travel eSIM.
- Business Professionals: Maintaining separate work and personal phone numbers on a single device offers enhanced organization and privacy. This is particularly useful for those who handle multiple projects or have distinct professional and personal communication needs.
- Tech Enthusiasts: Early adopters of new technologies will appreciate the seamless integration and forward-thinking nature of eSIM.
- Users Seeking Simplicity: For those who want a hassle-free way to manage their mobile plans, especially if they frequently switch carriers or add new lines, eSIM offers unparalleled ease of use.
Installing an eSIM on Your iPhone: Step-by-Step
The process of installing an eSIM on your iPhone is straightforward, primarily revolving around obtaining a QR code or activation details from your mobile carrier. The exact steps might vary slightly depending on your carrier and the iPhone model, but the general procedure remains consistent.
Method 1: Using a QR Code Provided by Your Carrier
This is the most common and user-friendly method for installing an eSIM. Your carrier will typically provide a QR code that contains all the necessary information to activate your cellular plan on your iPhone.
- Ensure Your iPhone is Compatible: Most iPhones from iPhone XS and later models support eSIM. However, it’s always best to double-check your specific model’s compatibility with your carrier.
- Connect to Wi-Fi: Before you begin, ensure your iPhone is connected to a stable Wi-Fi network. This is crucial for downloading the eSIM profile.
- Obtain the QR Code: Your mobile carrier will provide you with a QR code. This is usually sent via email, displayed on their website after you order a plan, or sometimes even printed on a physical card.
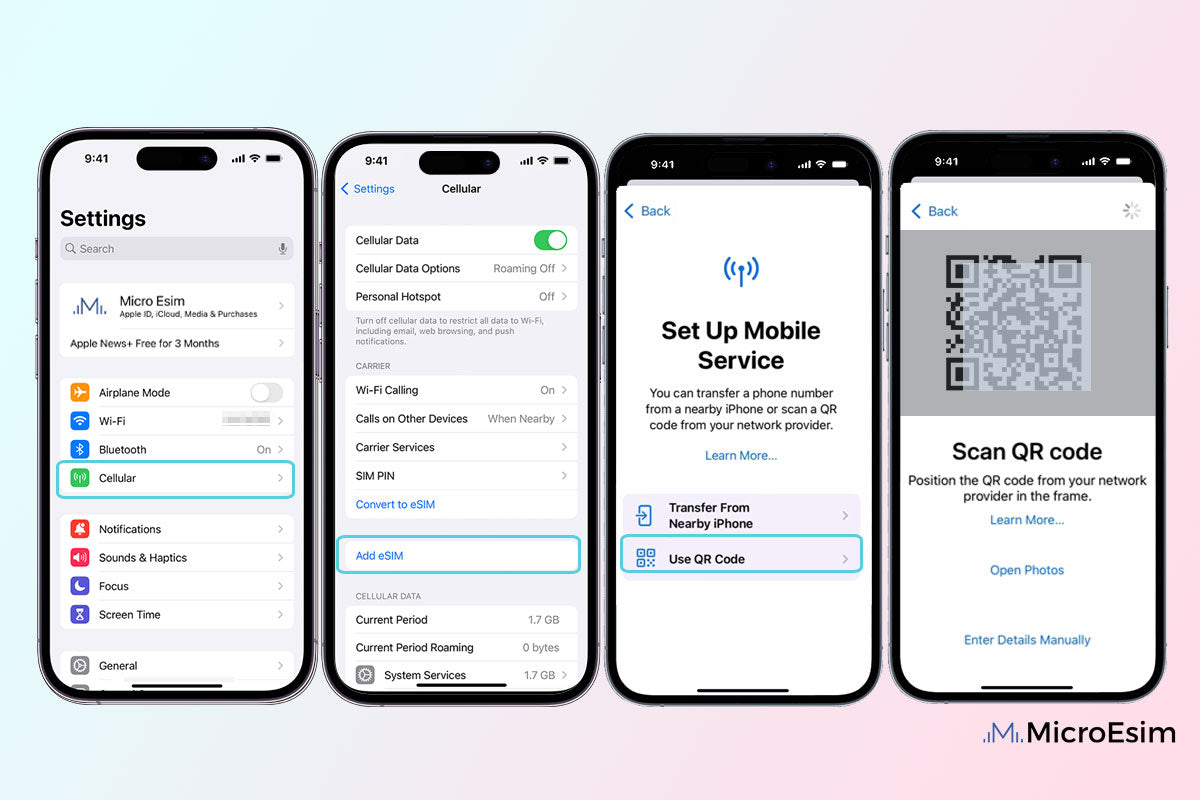
- Navigate to Settings: On your iPhone, go to Settings > Cellular (or Mobile Data).
- Add Cellular Plan: Tap on Add Cellular Plan (or Add Mobile Plan).
- Scan the QR Code: You will see an option to scan a QR code. Select this and point your iPhone’s camera at the QR code provided by your carrier.
- Important Note: If you’re scanning the QR code from another device (like a tablet or computer), ensure your iPhone’s camera can clearly focus on the code. Sometimes, having the QR code displayed full-screen on a bright monitor can help.
- Follow On-Screen Prompts: Once the QR code is scanned, your iPhone will begin to download the eSIM profile. You will be guided through a series of prompts to confirm the activation. This may include:
- Confirming the plan details: Review the plan you are about to activate.
- Assigning a label to the plan: You can label your eSIM plan, for instance, as “Personal,” “Work,” or “Travel.” This is particularly helpful if you have multiple plans.
- Setting a default line: Choose which line will be your primary line for calls, texts, and data.
- Activation Complete: Once the process is finished, your eSIM will be activated, and you should see your new cellular plan appear under the “Cellular Plans” section in your settings. You can then start using your new line.
Method 2: Manual eSIM Activation
In some cases, your carrier might not provide a QR code. Instead, they may give you a combination of activation codes and details that you need to enter manually into your iPhone.
- Navigate to Settings: Go to Settings > Cellular (or Mobile Data).
- Add Cellular Plan: Tap on Add Cellular Plan (or Add Mobile Plan).
- Enter Details Manually: Instead of scanning a QR code, look for an option like Enter Details Manually or Don’t have a QR code?. Tap on this.
- Input Carrier Information: You will be prompted to enter the following information provided by your carrier:
- SM-DP+ Address: This is a server address that your iPhone uses to communicate with your carrier’s network.
- Activation Code: This is a unique code to activate your specific eSIM profile.
- Confirmation Code (if applicable): Some carriers may require a second code for confirmation.
- Follow On-Screen Prompts: Similar to the QR code method, you will be guided through prompts to confirm the plan details, assign a label, and set a default line.
- Activation Complete: Once the manual details are entered and confirmed, your eSIM will be activated.
Managing Your eSIMs on iPhone
One of the key advantages of eSIM is the ease with which you can manage multiple cellular plans directly from your iPhone. Here’s how to navigate these settings:
Setting Up Primary and Secondary Lines
When you have two active cellular plans on your iPhone (one physical SIM and one eSIM, or two eSIMs), you can designate them as your Primary and Secondary lines.
- Primary Line: This is your main line for calls, iMessages, FaceTime, and cellular data.
- Secondary Line: This line can be used for calls and texts, and you can choose whether to use it for cellular data or rely on your primary line for data.
To set this up:
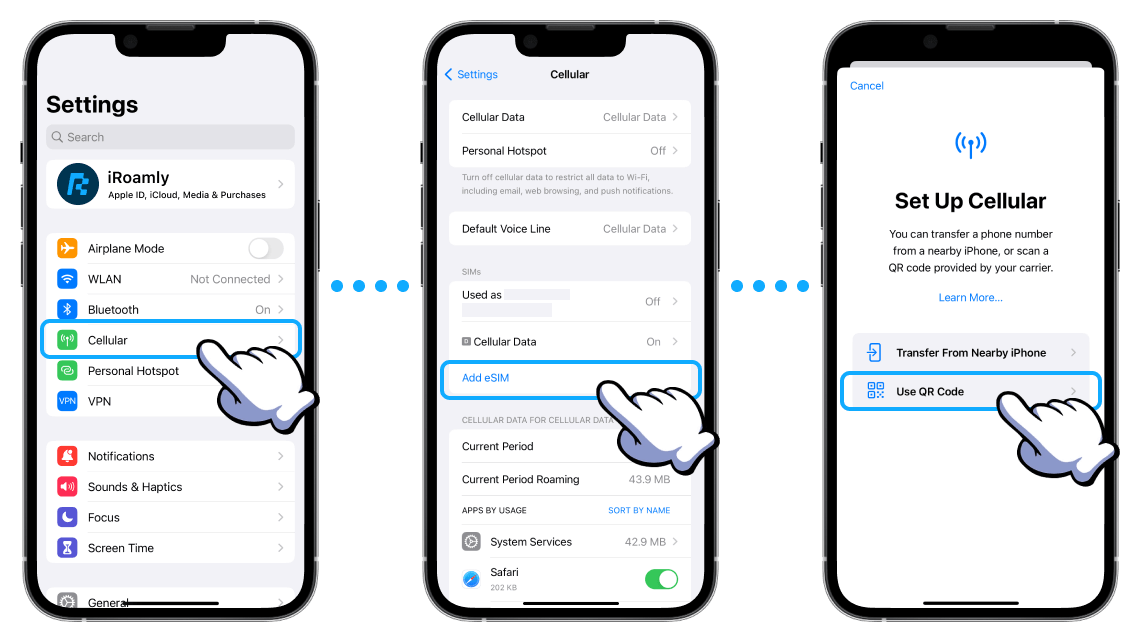
- Go to Settings > Cellular (or Mobile Data).
- Under “Cellular Plans,” you will see your activated lines.
- Tap on the line you want to designate as Primary or Secondary.
- Follow the prompts to set your preferred line for Calls, SMS/iMessage, and Cellular Data.
Switching Between Plans
If you have multiple plans installed, you can easily switch between them for calls, messages, and data.
- For Calls and Data: When making a call or using cellular data, you can choose which line to use directly from the Phone app or by tapping on the cellular indicator at the top of your screen.
- For Messages: iMessage and SMS/MMS will typically be sent from the line you’ve designated as primary for those services. You can usually choose the sending line before typing a new message.
Removing an eSIM
Should you need to remove an eSIM, perhaps because you’re switching carriers or no longer need a particular plan, the process is simple.
- Go to Settings > Cellular (or Mobile Data).
- Under “Cellular Plans,” tap on the eSIM plan you wish to remove.
- Scroll down and tap Remove Cellular Plan (or Remove Mobile Plan).
- Confirm your decision.
Important Note: Removing an eSIM from your iPhone does not cancel your service with the carrier. You will need to contact your carrier separately to cancel your plan.
Troubleshooting Common eSIM Installation Issues
While eSIM installation is generally smooth, occasional hiccups can occur. Here are some common issues and their solutions:
- QR Code Not Scanning:
- Ensure your iPhone’s camera lens is clean.
- Try displaying the QR code on a different device or at a different brightness level.
- Make sure you are within a reasonable distance and the QR code is well-lit.
- Confirm with your carrier that the QR code is still valid and hasn’t expired.
- “Unable to Add Cellular Plan” Error:
- Check Your Internet Connection: Ensure you have a stable Wi-Fi connection.
- Verify Carrier Compatibility: Confirm that your iPhone model is compatible with eSIM and that your carrier fully supports eSIM activation on iPhones.
- Restart Your iPhone: A simple restart can often resolve temporary software glitches.
- Contact Your Carrier: This error might indicate an issue on the carrier’s end. They can check your account and provisioning status.
- eSIM Activated but No Service:
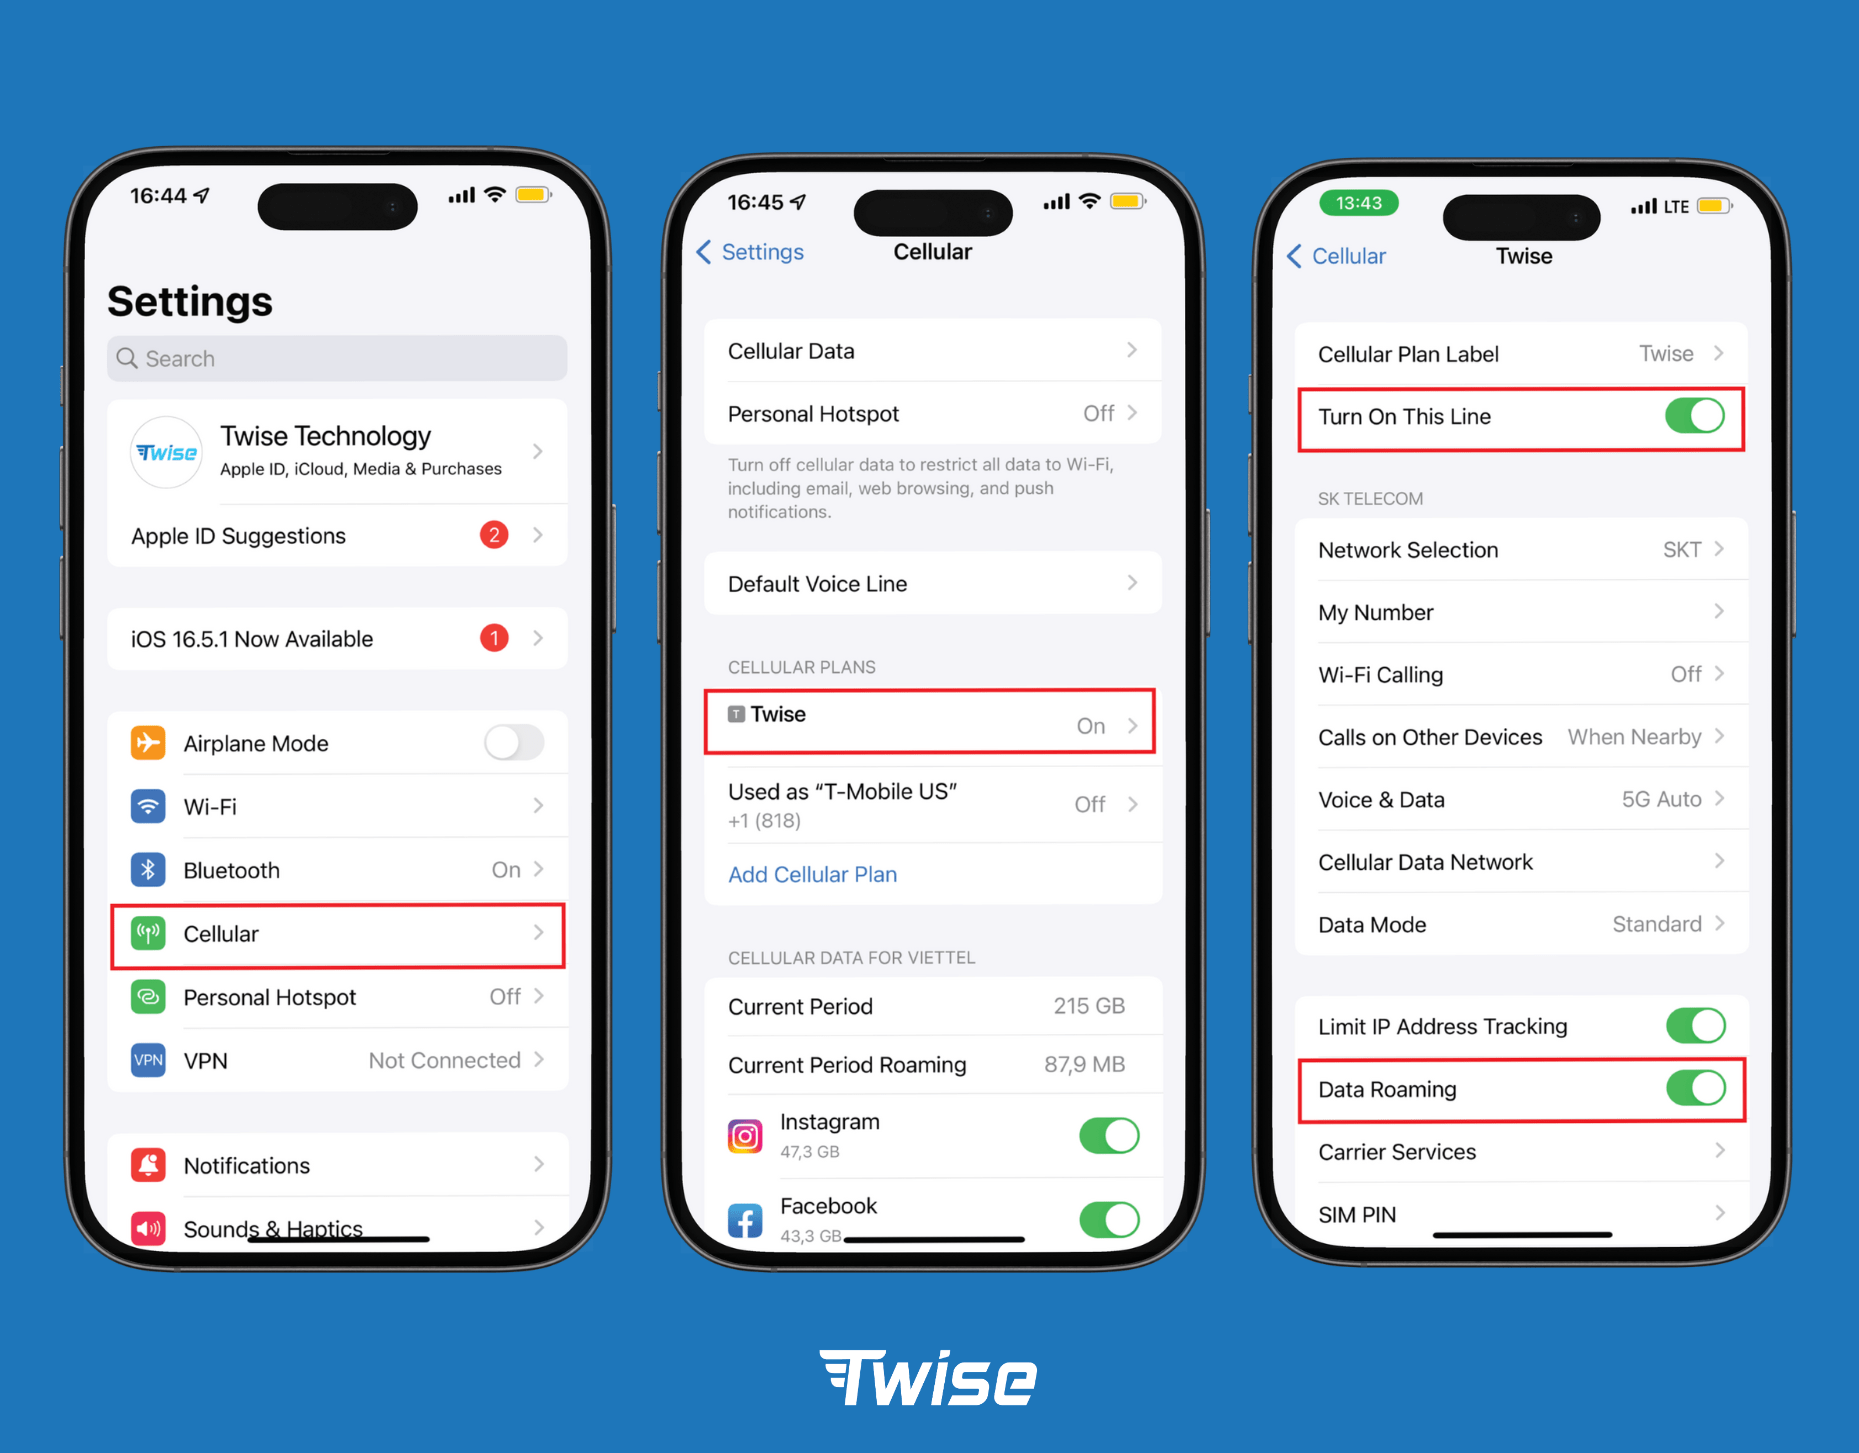
- Check Network Settings: Go to Settings > Cellular > Cellular Data Network (or Mobile Data Network) and ensure the APN settings (if required by your carrier) are correct. Your carrier can provide these.
- Toggle Airplane Mode: Turn Airplane Mode on for 30 seconds, then turn it off. This forces your iPhone to re-establish its connection to the cellular network.
- Reset Network Settings: Go to Settings > General > Transfer or Reset iPhone > Reset > Reset Network Settings. Note that this will erase all saved Wi-Fi passwords and Bluetooth pairings.
- Confirm Plan Activation with Carrier: Double-check with your carrier that your plan has been fully activated on their end.
- Unable to Make or Receive Calls/Texts:
- Verify Default Line Settings: Ensure you have correctly designated your primary line for calls and messages in Settings > Cellular.
- Check “Allow Cellular Data Switching”: If you’re using one line for calls and another for data, ensure “Allow Cellular Data Switching” is enabled in your cellular settings if you want your iPhone to automatically switch to your primary line for data when needed.
- Contact Your Carrier: This could be a provisioning issue on the carrier’s network.
By understanding the benefits and following these straightforward installation and management steps, you can effortlessly integrate eSIM technology into your iPhone, enhancing your connectivity and embracing the future of mobile communication.
aViewFromTheCave is a participant in the Amazon Services LLC Associates Program, an affiliate advertising program designed to provide a means for sites to earn advertising fees by advertising and linking to Amazon.com. Amazon, the Amazon logo, AmazonSupply, and the AmazonSupply logo are trademarks of Amazon.com, Inc. or its affiliates. As an Amazon Associate we earn affiliate commissions from qualifying purchases.