The digital landscape is a vibrant tapestry woven with a multitude of fonts. From the sleek sans-serifs gracing modern websites to the elegant serifs adorning professional documents, typography plays a crucial role in how we communicate, perceive brands, and even organize information. While your operating system comes pre-loaded with a respectable selection of fonts, the true power of customization and creative expression lies in your ability to incorporate new ones. This is where the art of installing downloaded fonts comes into play, opening up a universe of design possibilities for both personal projects and professional endeavors.

Whether you’re a graphic designer seeking that perfect typeface to define a brand’s identity, a writer looking to infuse a personal document with a unique flair, a web developer aiming for a specific user interface aesthetic, or simply someone who appreciates the power of good design, understanding how to install fonts is an essential skill. This article will guide you through the straightforward process of integrating newly acquired fonts into your digital workspace, empowering you to elevate your content and make your creations truly stand out. We will explore the fundamental steps across different operating systems, delve into font formats, and touch upon considerations for using fonts effectively.
Understanding Font Files and Formats
Before we dive into the installation process, it’s beneficial to understand what you’re actually downloading. Fonts come in various file formats, each with its own characteristics and compatibility. The most common formats you’ll encounter are:
TrueType Fonts (.ttf)
TrueType fonts have been a staple in digital typography for decades. Developed by Apple and later adopted by Microsoft, .ttf files are widely supported across most operating systems and applications. They offer good scalability and are generally easy to work with. If you download a font and see the .ttf extension, you can be confident it will likely work without issue.
OpenType Fonts (.otf)
OpenType fonts are a more modern and robust format, built upon the foundation of TrueType. Developed jointly by Adobe and Microsoft, .otf files offer enhanced features, including support for a wider range of characters and glyphs, advanced typographic features like ligatures and alternate characters, and better multilingual support. For professional design work, .otf fonts are often preferred due to their versatility and extended capabilities. While most modern applications support .otf, it’s still good practice to ensure your software is up-to-date.
Web Open Font Format (.woff and .woff2)
While not directly installed for use within your operating system applications in the same way as .ttf or .otf, the Web Open Font Format is crucial for web design. These formats are optimized for use on websites, offering efficient compression and faster loading times. If you are a web designer or developer, you will encounter these formats when embedding custom fonts into your web projects. For the purpose of this guide, we are focusing on installing fonts for use in desktop applications.
Installing Downloaded Fonts on Windows
Windows provides a user-friendly interface for managing fonts, making the installation process remarkably simple. Whether you’ve downloaded a single font for a specific project or a whole collection for your design arsenal, here’s how to get them integrated:
Method 1: The Easiest Way – Double-Click and Install
- Locate Your Font File: Navigate to the folder where you downloaded and extracted your font files (they might be in a .zip archive, which you’ll need to extract first by right-clicking and selecting “Extract All”).
- Open the Font File: Double-click on the font file. This will open a preview window displaying the font.
- Click “Install”: In the preview window, you’ll see an “Install” button, usually located in the top-left corner. Click this button.
- Grant Permissions (if prompted): Windows may ask for administrator permission to install the font. Click “Yes” or “Continue” to proceed.
- Font Installed: The font is now installed and ready to be used in your applications. You might need to restart the application you intend to use the font in for it to appear in the font list.
Method 2: Using the Fonts Folder
This method offers a slightly more direct approach for installing multiple fonts at once.
- Locate Your Font Files: As before, find the folder containing your downloaded font files.
- Open the Fonts Folder:
- Press the Windows key + R to open the Run dialog box.
- Type
fontsand press Enter, or click “OK.” This will open the Windows Fonts folder.
- Drag and Drop: Simply drag and drop your font files from their location directly into the Windows Fonts folder.
- Automatic Installation: Windows will automatically detect and install the fonts. You might see a progress bar as the fonts are added.
- Restart Applications: As with the previous method, it’s advisable to restart any applications where you want to use the new fonts.
Important Note for All Windows Installations: If you are trying to install a font and the “Install” button is greyed out or unavailable, it might be because you are not running the application or the Fonts folder with administrator privileges. Right-click on the font file or the Fonts folder shortcut and select “Run as administrator.”
Installing Downloaded Fonts on macOS
macOS also boasts a straightforward font management system, primarily handled by the Font Book application.

Method 1: Double-Click and Add to Font Book
- Locate Your Font File: Find the downloaded font file on your Mac. If it’s in a .zip archive, double-click it to extract its contents.
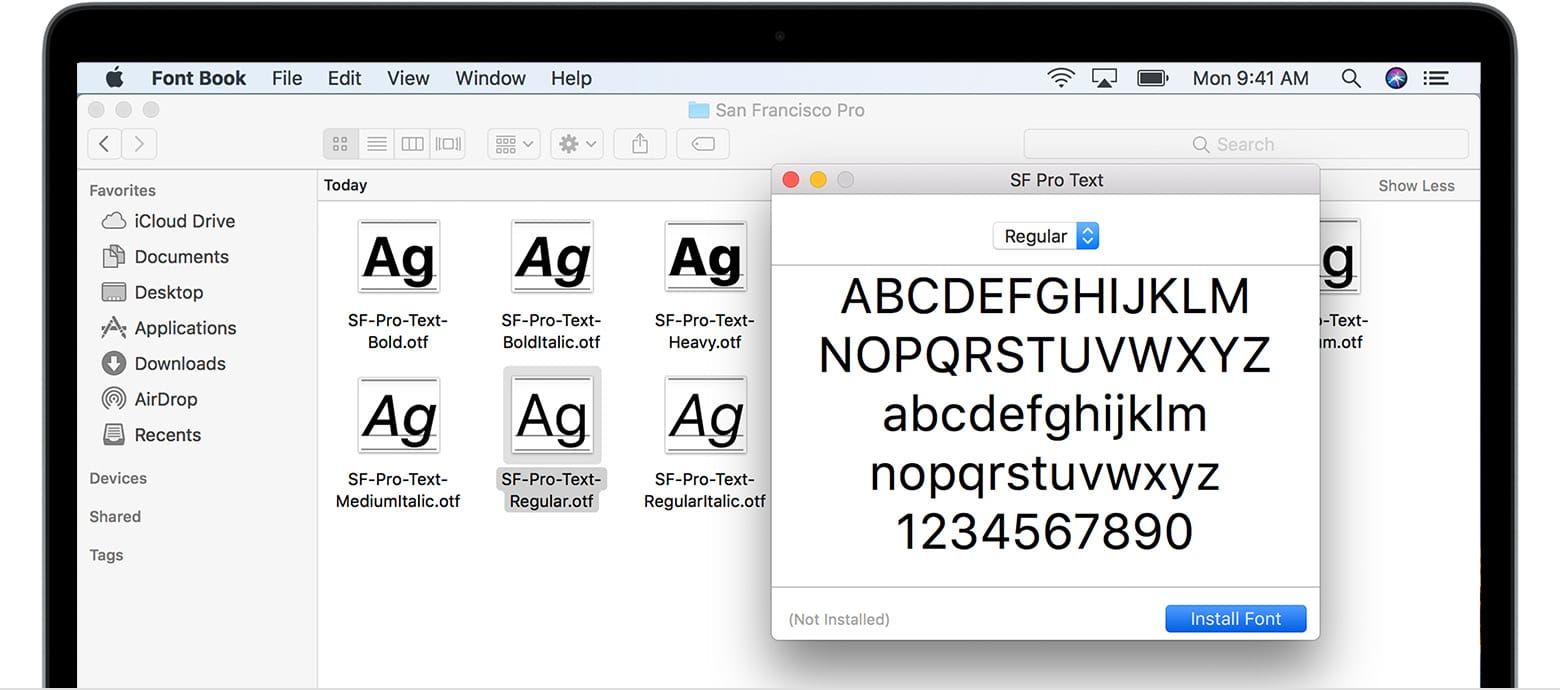
- Open the Font File: Double-click the font file (.ttf or .otf). This will launch the Font Book application and display a preview of the font.
- Click “Install Font”: In the Font Book preview window, you’ll see a button labeled “Install Font” in the bottom-right corner. Click it.
- Font Installed: The font will be added to your system and will be available in applications.
Method 2: Dragging to Font Book
This method is efficient for adding multiple fonts.
- Locate Your Font Files: Find where your downloaded fonts are stored.
- Open Font Book:
- You can find Font Book in your Applications folder.
- Alternatively, press Command + Spacebar to open Spotlight search, type “Font Book,” and press Enter.
- Drag and Drop: Drag the font files directly from your Finder window into the Font Book window.
- Automatic Installation: Font Book will process and install the fonts. You might see a brief verification process.
- Restart Applications: Similar to Windows, restarting your applications is often necessary for the newly installed fonts to appear in their font menus.
Font Validation: Font Book automatically validates fonts upon installation. If it detects any issues, it will usually prompt you to resolve them or offer to disable the problematic font.
Considerations for Using Downloaded Fonts
While the installation process is generally plug-and-play, there are a few important considerations to keep in mind to ensure a smooth and effective experience:
Font Licensing
This is perhaps the most critical aspect. When you download a font, you are often not purchasing the font itself, but rather a license to use it. Font licenses can vary significantly:
- Personal Use: Many free fonts are licensed only for personal projects. Using them for commercial work (e.g., on a business website, in marketing materials, or for a logo) might require purchasing a commercial license.
- Commercial Use: Fonts intended for professional and business use typically come with a commercial license. These licenses often specify the number of users, the types of media it can be used in, and other restrictions.
- Desktop vs. Web vs. App Licenses: Some licenses are specific to the platform. A desktop license allows you to use the font in applications on your computer, while a web font license allows you to embed it on a website, and an app license permits its inclusion in software applications.
Always check the licensing information provided by the font designer or foundry before downloading and using a font, especially for any project that has a commercial aspect. Ignoring licensing can lead to legal issues.
Font Management and Organization
As your font collection grows, it can become overwhelming. Consider using font management software or developing a consistent organizational system for your font files. This will make it easier to locate specific fonts when you need them and avoid duplicates. Many designers create folders for different font categories (e.g., “Serif,” “Sans-Serif,” “Display,” “Script”) or for specific projects.
Font Formats and Compatibility
While .ttf and .otf are the most common, some older or specialized fonts might come in other formats. Ensure your operating system and the applications you use have good support for the font format you’re installing. For most modern users, .ttf and .otf are universally compatible.
Application-Specific Font Loading
In rare cases, some older or specialized software might not automatically recognize newly installed system fonts. In such scenarios, restarting the application is usually sufficient. However, if a font still doesn’t appear, you might need to consult the software’s documentation or look for an in-app font management feature.
Font Aesthetics and Brand Identity
The choice of font is a powerful element in branding and communication. A font can evoke specific emotions, convey a particular message, and significantly influence how your audience perceives your brand or content.
- Legibility: Ensure the font is readable at various sizes and contexts. A decorative font that looks great in a large headline might be illegible in body text.
- Brand Alignment: Does the font align with your brand’s personality? A playful font might be unsuitable for a serious financial institution, while a rigid, formal font could undermine a whimsical children’s brand.
- Consistency: Once you choose a font family, aim for consistency in its application across your brand materials.
By understanding these aspects, you can not only install downloaded fonts efficiently but also leverage them strategically to enhance your digital presence and creative output. The ability to customize your typography is a key tool in crafting a unique and memorable identity, whether for a personal blog, a corporate website, or a groundbreaking new app.
aViewFromTheCave is a participant in the Amazon Services LLC Associates Program, an affiliate advertising program designed to provide a means for sites to earn advertising fees by advertising and linking to Amazon.com. Amazon, the Amazon logo, AmazonSupply, and the AmazonSupply logo are trademarks of Amazon.com, Inc. or its affiliates. As an Amazon Associate we earn affiliate commissions from qualifying purchases.