
In the intricate world of computing, where hardware and software converge to create a seamless user experience, device drivers act as the crucial interpreters, facilitating communication between your operating system and the countless hardware components within and connected to your PC. Without the correct drivers, even the most advanced graphics card might render nothing, a state-of-the-art printer could remain an inert paperweight, and your system’s overall performance could plummet into frustrating instability.
Windows 10, with its robust plug-and-play capabilities, often manages drivers automatically, ensuring that most devices work out of the box. However, there are numerous scenarios where manual intervention becomes essential: upgrading components, troubleshooting performance issues, resolving conflicts, or simply ensuring you have the latest features and security enhancements for your hardware. This comprehensive guide will demystify the process, providing you with the knowledge and steps needed to confidently install and manage device drivers on your Windows 10 system, transforming potential frustration into empowered control.
Understanding the Vital Role of Device Drivers in Windows 10
Before delving into the “how-to,” it’s imperative to grasp the fundamental “why.” Device drivers are not merely optional extras; they are foundational to your computer’s functionality and performance.
What is a Device Driver?
At its core, a device driver is a specific type of software program that enables a particular hardware device to communicate with the operating system of a computer. Think of it as a translator. Your operating system (Windows 10) speaks one language, and your graphics card, printer, webcam, or network adapter speaks another. The driver bridges this linguistic gap, translating commands from the OS into instructions the hardware understands, and vice versa. Each piece of hardware, from your CPU and motherboard chipset to your mouse and keyboard, requires a corresponding driver to function correctly.
Why are Drivers Indispensable for Your System’s Health?
The importance of well-maintained and correctly installed drivers cannot be overstated. They are indispensable for several critical reasons:
-
Functionality: Without the right driver, a device simply won’t work. The operating system won’t know how to send data to your printer or receive input from your gaming controller.
-
Performance: Optimized drivers unlock the full potential of your hardware. A generic or outdated graphics driver might result in choppy frame rates in games, while an updated audio driver could improve sound clarity. Manufacturers constantly release new drivers to fix bugs, enhance performance, and add new features.
-
Stability: Incorrect or corrupted drivers are a leading cause of system crashes, blue screens of death (BSODs), and general system instability. Ensuring your drivers are current and properly installed can significantly improve the reliability of your Windows 10 environment.
-
Security: Like any software, drivers can have vulnerabilities. Manufacturers periodically release driver updates that patch security flaws, protecting your system from potential exploits.
-
Feature Support: New hardware features often require updated drivers to be accessible. For example, a new driver might enable a previously unavailable power-saving mode or a new display technology.
When Does a Driver Installation or Update Become Necessary?
While Windows 10 is adept at handling many drivers automatically, there are specific scenarios where manual intervention is crucial:
-
New Hardware Installation: When you add a new component (e.g., a graphics card, sound card, external drive, printer), Windows might install a generic driver, but often the manufacturer’s specific driver is required for full functionality and performance.
-
Troubleshooting Issues: If a device isn’t working correctly, displaying error messages (e.g., “This device cannot start”), or causing system instability, an outdated or corrupted driver is a prime suspect. Reinstalling or updating the driver is often the first troubleshooting step.
-
Performance Problems: Experiencing lag, low frame rates, or slow response times, especially after a system update or game release, can often be remedied by updating relevant drivers (most commonly graphics, chipset, and network drivers).
-
After a Fresh Windows Installation: While Windows 10 typically installs basic drivers, a clean installation is the ideal time to ensure all specialized hardware drivers are installed directly from the manufacturer for optimal performance.
-
Windows Feature Updates: Major Windows 10 updates can sometimes introduce incompatibilities with older drivers, necessitating updates to maintain stability and functionality.
-
Legacy Device Support: For older hardware, finding and manually installing specific drivers might be the only way to get them working on a newer OS like Windows 10.
Essential Preparations Before Driver Installation
Before you embark on installing or updating drivers, taking a few preparatory steps can save you significant headaches down the line. These measures are about prevention and ensuring a smooth, reversible process.
Identifying Your Hardware and Sourcing Reliable Drivers
The most critical step is knowing exactly what hardware you have and where to get its drivers. Generic drivers might work, but manufacturer-specific drivers are always preferable.
-
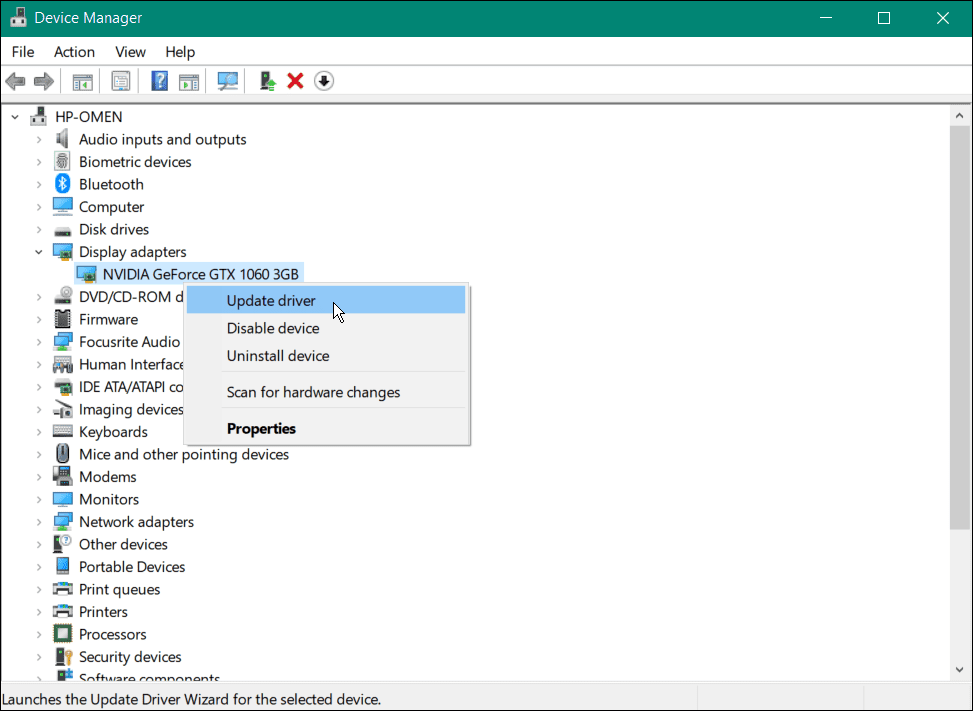
Device Manager: This is your go-to tool. Right-click the Start button and select “Device Manager.” Here, you’ll see a categorized list of all your hardware. Expand sections (e.g., “Display adapters,” “Sound, video and game controllers”) to identify your devices. Note down the manufacturer and model name. Devices with issues often show a yellow exclamation mark.
-
Physical Inspection: For components like graphics cards or motherboards, physically checking the component for manufacturer labels and model numbers can provide accurate identification.
-
System Information: Type
msinfo32into the Run dialog (Windows Key + R) for a detailed overview of your system’s hardware, including motherboard model, CPU, and other components. -
Manufacturer’s Website: Once you identify the manufacturer and model, visit their official support or download page. This is the most reliable source for drivers. For pre-built systems (e.g., Dell, HP, Lenovo), visit the PC manufacturer’s support site and enter your system’s service tag or serial number for a tailored list of drivers.
-
Compatibility: Ensure the driver you download is specifically for Windows 10 and matches your system’s architecture (32-bit or 64-bit). Mismatched drivers can cause instability or fail to install.
Creating a Safety Net: System Restore Points and Backups
Installing new drivers, especially for core components, carries a small risk of introducing instability. A system restore point acts as a snapshot of your system’s state, allowing you to revert to a working configuration if things go awry.
-
How to Create a System Restore Point:
-
Type “create a restore point” into the Windows search bar and select the corresponding option.
-
In the System Properties window, ensure “Protection” is “On” for your system drive (usually C:). If not, select the drive and click “Configure” to enable it.
-
Click “Create…”
-
Give the restore point a descriptive name (e.g., “Before new graphics driver installation”) and click “Create.”
-
-
Data Backup: While a restore point saves system files, it doesn’t back up your personal documents. Always maintain a regular backup strategy for your important files to an external drive or cloud service.
Checking System Architecture and Windows Version Compatibility
Drivers are built for specific operating system versions and architectures.
-
Checking System Type: Right-click the Start button, select “System.” Under “Device specifications,” look for “System type,” which will indicate “64-bit operating system” or “32-bit operating system.”
-
Windows Version: On the same “System” page, under “Windows specifications,” you’ll find your Windows 10 edition and version number. While most drivers are broadly compatible with Windows 10, some highly specific drivers might require a certain version or build. Always download drivers that explicitly state compatibility with your Windows 10 architecture.
Step-by-Step Guide: Core Methods for Installing Drivers
With your preparations complete, you’re ready to explore the various methods for installing device drivers on Windows 10. Each method has its strengths and ideal use cases.
Method 1: Leveraging Windows Update for Automatic Driver Management
This is often the simplest and safest method, as Microsoft digitally signs and distributes drivers through Windows Update, ensuring a degree of reliability.
-
How to Use Windows Update:
-
Go to
Settings > Update & Security > Windows Update. -
Click “Check for updates.” Windows will automatically download and install many drivers, especially for older or more common hardware.
-
Crucially, click “View optional updates” (if available). Here, you might find specific driver updates listed under “Driver updates.” Select the drivers you wish to install and click “Download and install.”
-
-
Pros: Highly convenient, drivers are typically stable and digitally signed, minimal user effort.
-
Cons: Drivers might not be the absolute latest version from the manufacturer, may not include all specialized software that comes with the manufacturer’s package.
Method 2: Manual Installation via Device Manager
The Device Manager offers granular control over individual devices and their drivers, making it invaluable for troubleshooting or installing specific drivers.
-
Open Device Manager: Right-click the Start button and select “Device Manager.”
-
Locate the Device: Find the device you want to update (e.g., under “Display adapters” for a graphics card). Devices with issues often have a yellow exclamation mark.
-
Right-click on the device and select “Update driver.” This will open the “Update Drivers” wizard.
-
Sub-Method A: Searching Automatically for Updated Driver Software
-
Choose “Search automatically for updated driver software.”
-
Windows will search your computer and online for the best available driver. If a newer driver is found, it will install it.
-
Use when: You want Windows to find a driver quickly, or you suspect Windows Update might have missed something.
-
-
Sub-Method B: Browsing Your Computer for Driver Software
-
Choose “Browse my computer for driver software.”
-
Click “Browse…” and navigate to the folder where you downloaded the driver files (e.g., from the manufacturer’s website). Ensure you point to the folder containing the
.infdriver files, not just the installer executable. -
Click “Next.” Windows will attempt to install the driver from the specified location.
-
Use when: You have downloaded a specific driver package from the manufacturer’s website, or you need to install an older, known-good driver.
-
-
Sub-Method C: Uninstalling and Reinstalling a Device
-
This is often effective for resolving stubborn driver issues or corrupted installations.
-
Right-click the device in Device Manager and select “Uninstall device.”
-
Crucially: Check the box “Delete the driver software for this device” if you want a clean slate (especially for graphics drivers or when installing a completely new driver version).
-
Click “Uninstall.”
-
Restart your computer. Upon reboot, Windows 10 will typically detect the hardware and attempt to reinstall a suitable driver, either from its internal repository or via Windows Update. You can then follow up with a manual installation if a specific manufacturer driver is needed.
-
Use when: A device is completely non-functional, causing system crashes, or you need to remove all traces of an old driver before installing a new one.
-
Method 3: Downloading Directly from the Manufacturer’s Website
For the latest features, best performance, and specific hardware optimizations, downloading drivers directly from the device manufacturer’s official website is often the preferred method.
-
Identify Manufacturer and Model: As discussed in the preparation stage, accurately identify your device (e.g., NVIDIA GeForce RTX 3080, Intel Wi-Fi 6 AX200).
-
Visit Official Support Page: Go to the official website of the hardware manufacturer (e.g., NVIDIA, AMD, Intel, Logitech, HP, Dell, Asus).
-
Navigate to Support/Downloads: Look for sections like “Support,” “Downloads,” “Drivers,” or “Customer Service.”
-
Find Your Product: Use the search bar or product categories to locate your specific device model. For pre-built PCs, use your system’s service tag or serial number.
-
Select OS and Architecture: Ensure you select “Windows 10” and your system’s architecture (64-bit or 32-bit).
-
Download the Driver Package: Download the latest recommended driver. These are usually
.exeinstaller files. -
Run the Installer: Double-click the downloaded
.exefile and follow the on-screen instructions. Most manufacturer installers are straightforward and guide you through the process, often including optional software or utilities.- Clean Installation: For graphics drivers, many installers offer a “clean installation” option, which uninstalls previous driver versions before installing the new one. This is highly recommended to prevent conflicts.
-
Restart Your PC: After installation, a restart is almost always required for the changes to take effect.
-
Pros: Latest features, bug fixes, performance optimizations, bundled utilities, full control over the installation.
-
Cons: Requires more user effort to identify and download, larger file sizes, incorrect downloads can cause issues.
A Word of Caution on Third-Party Driver Utilities
You might encounter various third-party driver update tools or software online. While some reputable ones exist, many are dubious.
-
Risks:
-
Malware/Spyware: Many free driver updaters are bundled with unwanted software or even malware.
-
Incorrect Drivers: They might install incorrect, generic, or outdated drivers, leading to instability or reduced performance.
-
Unnecessary Updates: They might prompt you to update drivers that are already working perfectly, creating problems where none existed.
-
-
Recommendation: Stick to Windows Update and direct downloads from manufacturer websites. If you absolutely must use a third-party tool, research it thoroughly, ensure it’s reputable, and use it with extreme caution, always creating a system restore point beforehand.
Navigating Common Driver-Related Challenges and Troubleshooting
Despite careful preparation and execution, driver installations can sometimes present unforeseen challenges. Knowing how to troubleshoot common issues is an essential skill for any Windows 10 user.
Dealing with Driver Signature Enforcement Issues
Windows 10, by default, enforces driver signature verification, meaning it will only install drivers that have been digitally signed by Microsoft or a trusted certificate authority. This is a crucial security feature designed to prevent malicious or unstable drivers from compromising your system.
-
When it’s an Issue: Occasionally, legitimate, but unsigned or self-signed drivers (common for very old hardware or specific development tools) might be necessary. Windows will block their installation, often with an error message like “The driver is unsigned” or “The third-party INF does not contain digital signature information.”
-
Temporary Disablement (Use with Extreme Caution): You can temporarily disable driver signature enforcement, but this should only be done for specific, trusted drivers you absolutely need, and re-enabled afterward.
-
Go to
Settings > Update & Security > Recovery. -
Under “Advanced startup,” click “Restart now.”
-
Your PC will restart to a blue screen with options. Choose
Troubleshoot > Advanced options > Startup Settings. -
Click “Restart.”
-
When the PC restarts again, you’ll see a list of startup options. Press
7orF7for “Disable driver signature enforcement.” -
Your PC will boot with enforcement temporarily disabled, allowing you to install the unsigned driver.
-
Crucially: Once the driver is installed, restart your PC normally. Driver signature enforcement will automatically re-enable.
-
-
Security Implications: Disabling this feature opens your system to potential security risks. Only proceed if you fully trust the source of the unsigned driver.
Resolving “This Device Cannot Start” and Other Error Codes
The Device Manager often provides error codes that can help diagnose driver issues. Right-click the problematic device, go to “Properties,” and check the “Device status” under the “General” tab. Common codes include:
-
Code 10: “This device cannot start.” A very generic error, often indicating a driver issue, resource conflict, or hardware failure.
-
Code 31: “This device is not working properly because Windows cannot load the drivers required for this device.” Clearly a driver-related problem.
-
Code 43: “Windows has stopped this device because it has reported problems.” Often seen with graphics cards or USB devices, indicating a driver or hardware fault.
Troubleshooting Steps for Error Codes:
-
Reinstall Driver: Try uninstalling the device (checking “Delete the driver software for this device”) and then restarting your PC to allow Windows to reinstall it.
-
Update Driver: Manually update the driver via Device Manager, either automatically or by browsing to a downloaded manufacturer driver.
-
Roll Back Driver: If the issue appeared after a recent driver update, try rolling back to a previous version (see next section).
-
Check Manufacturer Website: Search for the error code combined with your device model on the manufacturer’s support site for specific guidance.
-
Hardware Check: If driver solutions fail, the issue might be hardware-related. Test the device on another PC if possible, or consider replacing it.
Rolling Back Drivers When Problems Arise
Sometimes, a newly installed driver, even from an official source, might introduce new bugs or compatibility issues. Windows 10 offers a “Roll Back Driver” feature to revert to the previous working version.
-
Open Device Manager: Right-click the Start button and select “Device Manager.”
-
Locate the Device: Find the device that’s causing issues after a driver update.
-
Right-click on the device and select “Properties.”
-
Go to the “Driver” tab.
-
Click the “Roll Back Driver” button (if available and not grayed out).
-
Select a reason for rolling back and click “Yes.”
-
Restart your PC for the changes to take effect.
- Note: This option is only available if a previous driver version was stored on the system. It will be grayed out if you’ve done a clean install or if no previous driver is available.
Performing a Clean Driver Installation
For graphics drivers in particular, simply installing a new driver over an old one can sometimes leave residual files that cause conflicts. A “clean installation” ensures all previous driver components are removed before the new ones are installed.
-
Using Manufacturer Tools: Many graphics driver installers (NVIDIA, AMD) offer a “Custom” or “Express” installation option, often with a checkbox for “Perform a clean installation.” Always choose this for graphics drivers.
-
Display Driver Uninstaller (DDU): For a truly thorough clean-up, especially when troubleshooting persistent graphics driver issues, a third-party tool like Display Driver Uninstaller (DDU) is highly recommended.
-
Download DDU from a reputable source (e.g., Guru3D).
-
Boot Windows 10 into Safe Mode (refer to guides on how to do this via
Settings > Update & Security > Recovery > Advanced startup). -
Run DDU, select the driver type (NVIDIA, AMD, Intel), and choose “Clean and restart.”
-
Once the PC restarts in normal mode, proceed with installing the fresh driver from the manufacturer’s website.
-
Best Practices for Long-Term Driver Management
Effective driver management isn’t a one-time task; it’s an ongoing process that contributes significantly to the longevity and performance of your Windows 10 system.
Regular, Thoughtful Driver Updates
While it’s important to keep drivers updated, a balance must be struck. Don’t update drivers merely for the sake of it, especially if everything is working perfectly.
-
Prioritize Critical Updates: Focus on graphics drivers (especially for gamers/creatives), chipset drivers, and network drivers, as these often have the most significant impact on performance and stability.
-
Read Release Notes: Before updating, quickly review the driver’s release notes for bug fixes, new features, or known issues.
-
Monitor Performance: After an update, pay attention to system behavior. If new problems arise, be prepared to roll back.
-
Avoid “Bleeding Edge”: Unless you have a specific need or are troubleshooting, waiting a week or two after a major driver release can let early adopters uncover any widespread bugs.
Prioritizing Official Sources for Driver Downloads
Reiterating this crucial point: always download drivers from the official website of the hardware manufacturer or your PC manufacturer (for pre-built systems).
-
Security: This minimizes the risk of downloading malware or compromised drivers.
-
Compatibility: Ensures you get the correct driver for your specific hardware model and operating system version.
-
Reliability: Official drivers are tested and supported by the manufacturer.
Maintaining System Restore Points as a Safety Measure
Make creating a system restore point a habit before any significant driver installation or system change. This simple step can be a lifesaver, allowing you to revert your system to a stable state if a new driver causes unforeseen problems.
Understanding Driver Feedback and Community Support
For niche hardware, complex issues, or brand-new devices, manufacturer forums, tech communities (like Reddit’s r/techsupport or specific hardware subreddits), and tech news sites can be valuable resources. You can often find discussions about driver performance, compatibility issues, and unofficial workarounds that might not be available directly from the manufacturer. Always exercise caution and verify information from community sources.

Conclusion
Mastering the art of installing and managing device drivers on Windows 10 is an essential skill for anyone looking to maintain a healthy, high-performing, and stable PC. By understanding what drivers are, why they’re important, and how to correctly implement the various installation methods, you gain significant control over your system.
From the automated convenience of Windows Update to the precise control offered by the Device Manager and the optimized performance delivered by manufacturer-specific installers, each method has its place. Remember the golden rules: prepare thoroughly with system restore points, always prioritize official sources for downloads, and be ready to troubleshoot using the tools at your disposal. With these insights and practices, you’re now equipped to ensure your hardware and Windows 10 speak the same language, unlocking your computer’s full potential and safeguarding its operational integrity.
aViewFromTheCave is a participant in the Amazon Services LLC Associates Program, an affiliate advertising program designed to provide a means for sites to earn advertising fees by advertising and linking to Amazon.com. Amazon, the Amazon logo, AmazonSupply, and the AmazonSupply logo are trademarks of Amazon.com, Inc. or its affiliates. As an Amazon Associate we earn affiliate commissions from qualifying purchases.