Ubuntu, a leading Linux distribution, offers a robust and user-friendly environment for both casual users and seasoned developers. At its heart lies a sophisticated package management system built upon the Debian .deb package format. While Ubuntu’s official repositories provide access to a vast array of software, there are countless scenarios where you’ll encounter a .deb file that isn’t readily available through the standard channels. Whether it’s for proprietary software, cutting-edge applications, or niche utilities, knowing how to confidently install these files is a fundamental skill for any Ubuntu user. This guide will walk you through various methods, from simple graphical interfaces to powerful command-line tools, ensuring you can manage your software effectively and securely.

Understanding Debian Packages and Their Role in Ubuntu
Before diving into the installation process, it’s crucial to grasp what a .deb file is and why it’s so central to the Ubuntu ecosystem. This understanding empowers users to make informed decisions about the software they install and how they manage their system.
What Exactly is a .deb File?
A .deb file is the standard package format for the Debian GNU/Linux distribution and its derivatives, including Ubuntu. It’s essentially an archive file containing all the necessary components for a specific piece of software to run on your system. Think of it as a meticulously organized digital bundle. Inside a .deb file, you’ll find:
- Compiled Binaries: The actual executable programs that perform the software’s functions.
- Libraries: Shared code modules that the software depends on.
- Documentation: User manuals, README files, and other helpful information.
- Configuration Files: Settings specific to the application, often placed in
/etc. - Metadata: Crucial information about the package itself, such as its name, version, architecture (e.g., amd64, i386), a description, and most importantly, a list of its dependencies.
- Pre/Post-Installation Scripts: Shell scripts that run before and after the package installation to perform tasks like creating user accounts, updating caches, or configuring system services.
The .deb format is a cornerstone of Ubuntu’s stability and consistency. It allows developers to package their applications in a standardized way, making distribution and installation across millions of systems predictable. Compared to other emerging package formats like Snap or Flatpak, .deb files represent the traditional, tightly integrated approach where software components are installed directly into the system’s file hierarchy. While Snaps and Flatpaks offer sandboxing and universal compatibility, .deb files often provide native performance and seamless integration with the underlying operating system, making them a preference for many traditional Linux users and system administrators.
Why You Might Need to Install a .deb File
While Ubuntu’s official repositories boast thousands of applications accessible via the Ubuntu Software Center or apt command, there are several compelling reasons why you might find yourself needing to manually install a .deb file:
- Software Not in Official Repositories: Many niche tools, proprietary applications, or brand-new software might not yet be included in Ubuntu’s official repositories due to licensing restrictions, lack of maintainers, or simply being too new. For example, some specialized CAD software, certain VPN clients, or custom development tools are often distributed solely as
.debfiles by their vendors. - Newer Versions of Software: Ubuntu’s repositories prioritize stability, meaning software versions might lag behind the absolute latest releases. If you need a cutting-edge feature, a critical bug fix, or simply prefer the newest iteration of an application, a
.debfile from the developer’s website might be your only option. - Beta Software or Custom Builds: Developers often release beta versions of their software in
.debformat for testing purposes. Similarly, you might encounter custom-compiled.debfiles tailored for specific hardware or use cases that aren’t available generally. - Offline Installations: In environments without internet access, pre-downloaded
.debfiles can be a lifesaver. You can transfer them via USB and install them without an active connection, provided all dependencies are met. - Specific Architectural Needs: Occasionally, a developer might provide a
.debfile optimized for a particular CPU architecture or system configuration not broadly covered by the main repositories.
Understanding these scenarios helps you navigate the software landscape beyond the default offerings, granting you greater control and flexibility over your Ubuntu system.
Graphical User Interface (GUI) Methods for .deb Installation
For users who prefer a visual approach and want to avoid the command line, Ubuntu provides straightforward graphical methods for installing .deb files. These methods are intuitive and ideal for quick installations.
The Ubuntu Software Center: Simplicity for Everyday Users
The Ubuntu Software Center is the default application store for Ubuntu, offering a user-friendly interface to discover, install, and manage software from the official repositories. It also handles .deb files with remarkable ease, making it the go-to method for many.
How to Use the Ubuntu Software Center:
- Download the .deb File: First, download the
.debfile from its trusted source (e.g., the software developer’s official website) to your local machine. Typically, it will land in your “Downloads” folder. - Locate and Double-Click: Navigate to the directory where you saved the
.debfile using your file manager (Nautilus). Once found, simply double-click on the.debfile. - Software Center Opens: By default, Ubuntu is configured to open
.debfiles with the Ubuntu Software Center. A new window will appear displaying information about the package, including its name, description, size, and version. Crucially, it will also indicate if the software is already installed or if there are conflicts. - Initiate Installation: On this screen, you’ll see an “Install” button (or “Reinstall” if it’s already present). Click this button.
- Authenticate: For security reasons, Ubuntu will prompt you to enter your user password to authorize the installation. This prevents unauthorized software from being installed on your system.
- Installation Progress: The Software Center will display a progress bar as it downloads any necessary dependencies and installs the package. This process might take a few moments depending on the size of the application and your internet speed.
- Launch the Application: Once the installation is complete, the “Install” button will change to “Remove,” indicating success. You can then close the Software Center and find your newly installed application in the Applications menu or by searching for it.
Advantages: This method is incredibly user-friendly and requires no technical knowledge beyond navigating a file manager. It’s excellent for one-off installations and those new to Linux.
Disadvantages: While generally effective, the Ubuntu Software Center can sometimes struggle with complex dependency chains or provide less detailed error messages if an installation fails. For more robust handling, especially with challenging dependencies, another GUI tool might be preferred.
GDebi Package Installer: A Smarter GUI Approach
GDebi is a lightweight tool specifically designed to install .deb packages and, crucially, to resolve their dependencies automatically. Unlike the Software Center, which can sometimes be a heavier application, GDebi focuses solely on package installation and often provides clearer feedback regarding dependencies. If the Ubuntu Software Center encounters issues or you simply prefer a more focused utility, GDebi is an excellent alternative.
How to Install and Use GDebi:
- Install GDebi: GDebi is usually not pre-installed on Ubuntu. You can install it quickly using the command line:
bash

sudo apt update

sudo apt install gdebi
Enter your password when prompted. This command refreshes your package lists and then installs the GDebi package installer. - Download the .deb File: As with the Software Center method, ensure you have the
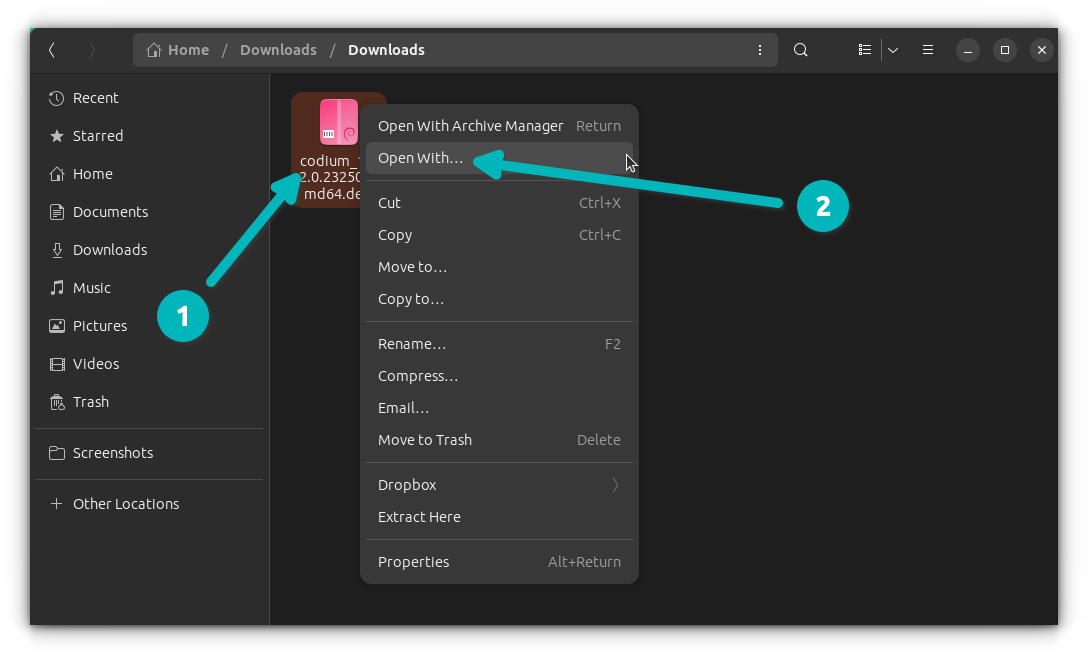
.debfile downloaded to your system. - Open with GDebi:
- Navigate to your
.debfile in the file manager. - Right-click on the
.debfile. - Select “Open With Other Application.”
- In the list of applications, choose “GDebi Package Installer” and click “Select.”
- Navigate to your
- Review Package Information: GDebi will open, presenting a clean interface with details about the package. Crucially, it will analyze the package and list any missing dependencies that need to be installed. If all dependencies are met, it will simply state “All dependencies are satisfied.”
- Initiate Installation: Click the “Install Package” button.
- Authenticate: Provide your user password when prompted.
- Installation and Feedback: GDebi will proceed with the installation, often showing more granular progress and dependency resolution steps than the Software Center. If there are any issues, GDebi is typically more verbose in its error messages, making troubleshooting easier.
- Completion: Once installed, the button will change to “Remove Package.” You can now close GDebi and launch your application.
Advantages: GDebi’s primary strength lies in its superior dependency resolution. It’s more lightweight than the full Software Center and provides clearer feedback. It’s an indispensable tool for GUI users who frequently install .deb files from outside the official repositories.
Disadvantages: Requires an initial command-line installation if not already present.
Command Line Interface (CLI) Methods: Power and Precision
For those who prefer efficiency, automation, or work in server environments without a graphical interface, the command line offers the most powerful and flexible ways to manage .deb packages. While it might seem daunting at first, mastering these commands unlocks a deeper level of system control.
Leveraging dpkg for Direct Package Management
dpkg is the foundational, low-level tool that handles the installation, removal, and management of .deb packages on Debian-based systems like Ubuntu. While powerful, it has a crucial characteristic: it does not automatically resolve dependencies.
How to Install a .deb File with dpkg:
- Open Terminal: Press
Ctrl + Alt + Tto open a new terminal window. - Navigate to the .deb File: Use the
cdcommand to change your current directory to where your.debfile is located. For example, if it’s in your Downloads folder:
bash

cd ~/Downloads
(The~symbol is a shortcut for your home directory). - Execute the Installation Command: Use
sudo dpkg -ifollowed by the name of your.debfile.
bash

sudo dpkg -i package_name.deb
Replacepackage_name.debwith the actual name of your file. You will be prompted for your user password.
Explanation of the Command:
sudo: Executes the command with superuser (root) privileges, which are necessary for system-wide installations.dpkg: The Debian package manager command.-i(or--install): Instructsdpkgto install the specified package.
Handling Dependencies with dpkg:
If the .deb file has dependencies that are not already installed on your system, dpkg will likely fail and report dependency errors. It won’t install them for you. This is where the apt command comes in to fix the situation:
sudo apt install -f
or the more modern equivalent:
sudo apt --fix-broken install
After dpkg fails due to dependencies, running either of these apt commands will instruct apt to find and install all missing dependencies that prevented the previous dpkg installation from completing. Once apt has resolved the dependencies, you might need to re-run the dpkg -i command for the original package, though often apt --fix-broken install will complete the original installation as well.
Advantages: dpkg offers granular control and is essential for understanding the underlying package management process. It’s valuable for scripting and in scenarios where you need to specifically handle individual packages without the apt layer of abstraction.
Disadvantages: The manual dependency resolution requirement can be cumbersome and error-prone for beginners.
Modern apt Command for Seamless .deb Installation (Ubuntu 17.10+)
Since Ubuntu 17.10, the apt command (which is a higher-level package manager built upon dpkg) gained the ability to directly install local .deb files and, crucially, automatically resolve all their dependencies. This method combines the directness of dpkg with the intelligence of apt, making it the recommended command-line approach.
How to Use apt for .deb Installation:
- Open Terminal:
Ctrl + Alt + T. - Navigate to the .deb File (or specify full path):
bash

cd ~/Downloads
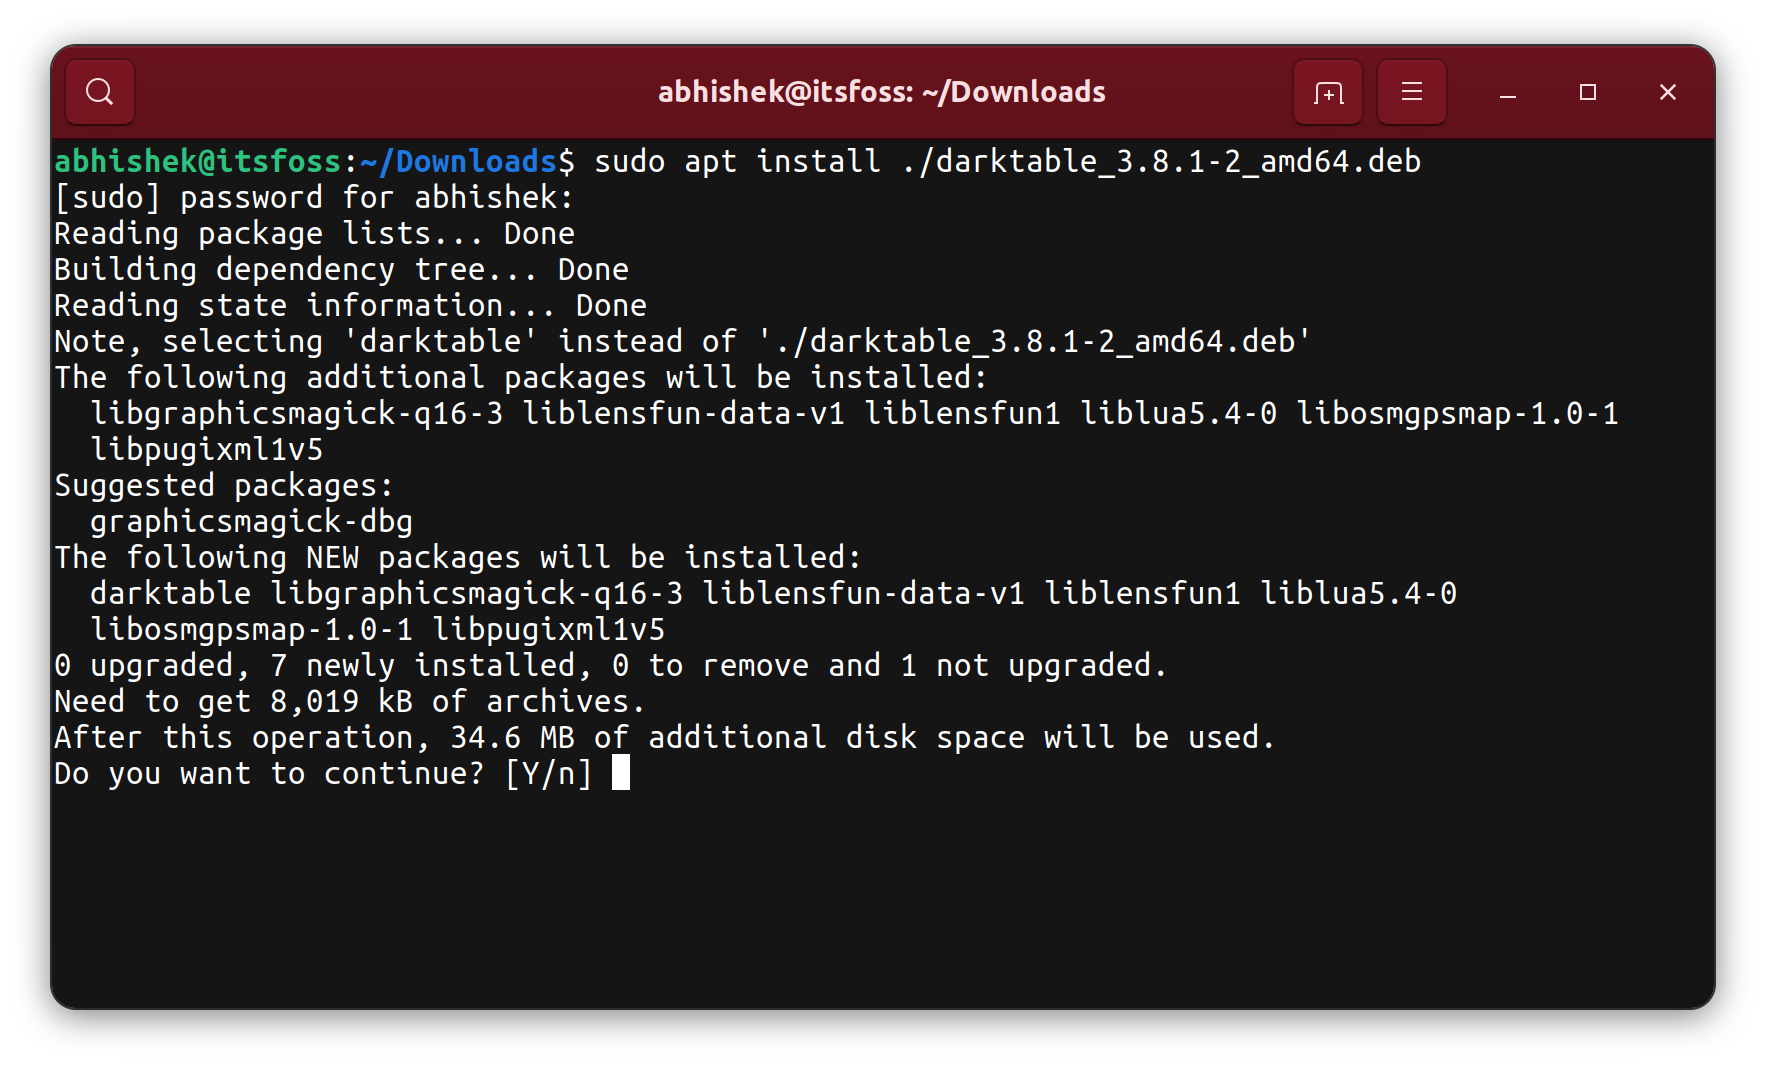
or simply ensure you know the full path to the.debfile. - Execute the
aptInstallation Command:
bash

sudo apt install ./package_name.deb
Important: The./prefix is crucial. It tellsaptthatpackage_name.debrefers to a local file in the current directory, not a package name to search for in the repositories. If you’re not in the same directory, use the full path, e.g.,sudo apt install /home/youruser/Downloads/package_name.deb.
Explanation:
When you use sudo apt install ./package_name.deb, apt does several things automatically:
- It calls
dpkgto attempt to install the local.debfile. - If
dpkgreports missing dependencies,aptidentifies them. aptthen searches its configured repositories, downloads, and installs all required dependencies.- Finally, it completes the installation of your original
.debfile.
Advantages: This is arguably the most convenient and powerful command-line method. It handles both the installation and dependency resolution in a single, elegant command, significantly reducing the chances of “dependency hell.” It brings the robust capabilities of apt to local .deb installations.
Removing and Purging .deb Packages from the Command Line
Just as important as installing software is the ability to remove it cleanly. dpkg and apt provide commands for this as well:
-
Removing a Package (Leaves Configuration Files):
sudo dpkg -r package_nameor
sudo apt remove package_nameThis command removes the application’s executable files and libraries but leaves behind its configuration files (often in
/etcor your home directory’s hidden files). This is useful if you plan to reinstall the software later and want to retain your settings. -
Purging a Package (Removes Everything):
bash

sudo dpkg -P package_name
or
bash

sudo apt purge package_name
Thepurgecommand not only removes the application files but also deletes all associated configuration files. This ensures a complete cleanup, which is beneficial for troubleshooting or reclaiming disk space.
Always replace package_name with the actual name of the installed package (e.g., google-chrome-stable, not google-chrome-stable_current_amd64.deb). You can find the installed package name using dpkg -l | grep 'partial_name'.
Troubleshooting Common Issues and Best Practices
Installing .deb files is generally straightforward, but like any system operation, it can occasionally lead to unexpected challenges. Knowing how to troubleshoot and following best practices can save you significant time and frustration.
Resolving Dependency Hell and Broken Packages
Dependency issues are by far the most common problem when installing .deb files manually. If a .deb package requires other software components (dependencies) that are not present on your system or are of an incompatible version, the installation will fail.
Common Scenarios and Solutions:
- “Dependency problems – leaving unconfigured” or “missing dependencies”: This is the classic error you’ll see with
dpkg -iif dependencies aren’t met.- Solution: Immediately run
sudo apt install -forsudo apt --fix-broken install. These commands instructaptto find and install any missing packages that are preventing a partially installed or broken package from completing its setup.aptwill try to resolve all unmet dependencies and finish any pending installations.
- Solution: Immediately run
- “Package is already installed and up-to-date” or “newer version”: This occurs if you’re trying to install an older
.debfile over a newer version already on your system, or if the package is already fully installed.- Solution: Verify the version of the
.debfile you’re trying to install against what’s already on your system. If you genuinely want to downgrade, you might need to force the installation (which is generally discouraged) or uninstall the newer version first. If it’s already installed and up-to-date, there’s nothing more to do.
- Solution: Verify the version of the
- Broken package status: Sometimes an installation fails in such a way that the package manager thinks a package is “broken” or partially installed.
- Solution: Again,
sudo apt --fix-broken installis your first line of defense. If that doesn’t work, you might need to manually remove the broken package (sudo dpkg --remove --force-remove-reinstreq package_name) and then try installing it again.
- Solution: Again,
- Permission Issues: If you encounter “permission denied” errors, ensure you are using
sudobefore your installation commands. Also, check the permissions of the.debfile itself, although this is rarely the cause for installation failures.
Security and Integrity: Downloading from Trusted Sources
This is perhaps the most critical best practice. When you install a .deb file, you are essentially granting system-level access to the code within that package. Installing software from untrusted sources is a significant security risk.
- Only Download from Official Sources: Always download
.debfiles directly from the software developer’s official website or a reputable, well-known mirror. Avoid third-party sites, forums, or random links unless you are absolutely certain of their trustworthiness. - Verify Integrity (Checksums): Many developers provide SHA256 or MD5 checksums alongside their
.debfiles. After downloading, you can generate a checksum for your downloaded file and compare it to the one provided by the developer. This verifies that the file hasn’t been tampered with during download.
bash

sha256sum package_name.deb
If the output checksum doesn’t match, do not install the file. - Understand What You’re Installing: Be cautious with
.debfiles from unknown origins. Malicious packages can contain malware, spyware, or code that compromises your system’s stability and security. If you’re unsure, search for reviews or official documentation. - Prioritize Official Repositories: Whenever possible, prefer software from Ubuntu’s official repositories. These packages are vetted, tested, and regularly updated for security and compatibility.
General Tips for a Smooth Installation Experience
- Update Your System First: Before installing any new software, it’s always a good idea to ensure your existing package lists and installed software are up-to-date:
bash

sudo apt update && sudo apt upgrade
This can prevent conflicts and ensure you have the latest versions of core libraries that new software might depend on. - Read Documentation: Take a moment to read any installation instructions or release notes provided by the software developer. They might have specific prerequisites or post-installation steps.
- Back Up Important Data: While
.debinstallation is usually safe, any system modification carries a small risk. Regularly backing up your important data is a fundamental digital security practice. - Test in a Virtual Machine: If you’re installing experimental or potentially unstable software, consider testing it first in a virtual machine (like with VirtualBox or VMware). This isolates the software from your main system, protecting its integrity.
- Use Tab Completion: When typing file names in the terminal, use the
Tabkey for auto-completion. This saves time and prevents typos.
Conclusion
Mastering the installation of .deb files is an invaluable skill for any Ubuntu user. It empowers you to venture beyond the confines of the official repositories, accessing a wider universe of software that caters to your specific needs, whether for advanced productivity tools, specialized development environments, or cutting-edge applications.
We’ve explored three primary avenues for installation: the user-friendly Ubuntu Software Center for its simplicity, the more robust GDebi Package Installer for its superior dependency handling in a graphical environment, and the powerful command-line methods using dpkg and the modern apt command for ultimate control and efficiency. While the GUI methods offer a gentle introduction, the command line, particularly with sudo apt install ./package_name.deb, provides the most comprehensive and seamless experience for complex installations.
Furthermore, we’ve emphasized the critical importance of troubleshooting common issues like dependency errors and, most importantly, adhering to stringent security practices. Downloading .deb files only from trusted sources and verifying their integrity are non-negotiable steps to maintain the health and security of your Ubuntu system.
As the tech landscape continues to evolve with new packaging formats like Snaps and Flatpaks, the .deb format remains a fundamental pillar of Debian and Ubuntu. By understanding its intricacies and the methods to manage it, you’re not just installing software; you’re becoming a more proficient and self-reliant Ubuntu user, capable of navigating the vast and dynamic world of Linux software with confidence and expertise. Embrace these techniques, and unlock the full potential of your Ubuntu machine.