In the rapidly evolving landscape of technology, efficiency is paramount. For Windows users, managing software installations, updates, and removals can often feel like a tedious, time-consuming chore. Manually downloading installers, clicking through wizard after wizard, and constantly checking for updates consumes valuable time that could be spent on more productive tasks. This is where a robust package manager like Chocolatey steps in, transforming the way you interact with software on your Windows machine.
Often hailed as “the missing package manager for Windows,” Chocolatey brings the convenience and power of Linux-style package management to the Microsoft ecosystem. Whether you’re a developer, an IT professional, a system administrator, or simply a power user eager to optimize your digital environment, Chocolatey offers an unparalleled solution for automating software deployment and maintenance. It’s a game-changer for anyone looking to embrace a more streamlined, hands-off approach to managing applications, ensuring your system remains up-to-date, secure, and ready for action.
This comprehensive guide will walk you through every step of installing Chocolatey on Windows, from understanding its core benefits to executing the installation commands and beyond. We’ll delve into the necessary prerequisites, provide clear, actionable instructions, and offer insights into how you can integrate Chocolatey into your daily workflow to boost productivity, enhance digital security by simplifying updates, and ultimately, free up your time for innovation. Get ready to unlock a new level of control and automation over your Windows software.
Understanding Chocolatey: The Package Manager for Windows
Before diving into the installation process, it’s crucial to grasp what Chocolatey is and why it’s become an indispensable tool for millions of Windows users. Its very existence addresses a fundamental gap in the Windows operating system, offering a solution that has long been a standard feature in other computing environments.
What is a Package Manager and Why Do You Need One?
At its core, a package manager is a collection of software tools that automates the process of installing, upgrading, configuring, and removing computer programs for a computer’s operating system in a consistent manner. Think of it as an app store for your entire operating system, but far more powerful and geared towards system-level management. Instead of individually downloading and running installers for each piece of software you need, a package manager allows you to issue a simple command, and it handles the rest: finding the software, downloading it, resolving any dependencies (other software it needs to function), installing it, and even configuring it.
For years, Windows users relied on manual processes, leading to “installer fatigue,” inconsistent installations, forgotten updates, and often, a fragmented software ecosystem. A package manager like Chocolatey consolidates this process, providing a single, unified interface to manage virtually all your software. This centralization not only saves time but also significantly reduces the potential for errors and security vulnerabilities that arise from outdated applications.
The Advantages of Using Chocolatey for Software Management
The benefits of integrating Chocolatey into your Windows workflow are extensive, touching upon aspects of productivity, security, consistency, and even resource management – indirectly linking to the ‘Money’ aspect by optimizing time and reducing potential downtime.
-
Automation and Time Savings: This is arguably the biggest draw. Instead of spending hours manually installing dozens of applications on a new machine or updating existing ones, you can write a simple script with Chocolatey commands to do it all automatically. This is invaluable for IT professionals managing multiple machines and for users setting up new systems. A command like
choco install googlechrome vlc spotify -ycan install multiple programs in minutes, unattended. -
Consistency and Reproducibility: Chocolatey ensures that software is installed consistently across different machines. This is critical in development environments or corporate settings where standardized setups are essential. You can easily reproduce an entire software environment with a single script, making onboarding new team members or setting up virtual machines a breeze.
-
Simplified Updates: Keeping software updated is vital for security and access to the latest features. Chocolatey makes this effortless. A single command,
choco upgrade all -y, can update every single Chocolatey-managed application on your system. This significantly reduces your attack surface by patching known vulnerabilities promptly, a critical component of digital security. -
Dependency Management: Many applications rely on other components or libraries to function correctly. Chocolatey automatically identifies and installs these dependencies, preventing frustrating errors and ensuring a smooth installation process.
-
Vast Software Repository: Chocolatey boasts a massive and ever-growing community package repository, containing thousands of popular applications, tools, and utilities. From web browsers and media players to development tools and productivity suites, chances are if you need it, Chocolatey has a package for it.
-
Unattended Installations: Chocolatey allows for “silent” or “unattended” installations, meaning software can be installed without user interaction. This is perfect for scripting, deployment, and automation tasks.
-
Version Control: You can specify exact versions of software to install, which is crucial for compatibility testing or maintaining specific development environments.
By embracing Chocolatey, you’re not just installing software; you’re adopting a smarter, more efficient paradigm for managing your entire digital toolkit on Windows. It aligns perfectly with modern tech trends emphasizing automation, productivity, and robust system management.
Preparing Your System for Chocolatey Installation
Before you can unleash the power of Chocolatey, a few preliminary checks and configurations are necessary to ensure a smooth and successful installation. These steps are straightforward but crucial, as they lay the foundation for Chocolatey to operate correctly within your Windows environment.
Essential Prerequisites: PowerShell and Administrator Rights
Chocolatey relies heavily on Windows PowerShell for its operation. PowerShell is a powerful command-line shell and scripting language developed by Microsoft, designed for automating tasks and configuration management. It’s pre-installed on all modern versions of Windows, making it the ideal environment for Chocolatey.
Equally important are Administrator Rights. To install system-wide software and make necessary configuration changes, Chocolatey requires elevated privileges. Attempting to install Chocolatey without running PowerShell as an administrator will result in permission errors and a failed installation.
Checking PowerShell Execution Policy
One common hurdle users encounter during Chocolatey installation relates to PowerShell’s “Execution Policy.” This security feature determines which PowerShell scripts are allowed to run on your system. By default, on many Windows systems, the Execution Policy might be set to Restricted, which prevents any scripts, including those required by Chocolatey, from running.
You can check your current PowerShell Execution Policy by opening PowerShell (you don’t need administrator rights for this initial check) and typing the following command:
Get-ExecutionPolicy
The output will tell you the current policy. Common policies include:
- Restricted: No scripts can run. This is usually the default on client versions of Windows.
- AllSigned: Only scripts signed by a trusted publisher can run.
- RemoteSigned: Scripts created on your local computer can run, but scripts downloaded from the internet must be signed by a trusted publisher. This is often a good balance for developers and power users.
- Bypass: Nothing is blocked and no warnings are issued. This is generally not recommended for long-term use due to security implications, but it can be used temporarily for installation.
For Chocolatey to install and function correctly, your Execution Policy needs to be set to at least RemoteSigned or Bypass. If your policy is Restricted or AllSigned, you will need to change it. We will cover how to do this in the next section during the actual installation process, but it’s good to understand why this step is necessary beforehand.
Step-by-Step: Installing Chocolatey on Your Windows Machine
Now that we understand the prerequisites, let’s proceed with the core installation process. This section provides precise instructions to get Chocolatey up and running on your system.
Launching PowerShell as Administrator (Crucial First Step)
The very first and most critical step is to open PowerShell with administrative privileges.
- Search for PowerShell: Click on the Windows Start button or search bar.
- Type “PowerShell”: You’ll see “Windows PowerShell” appear in the search results.
- Right-Click and Run as Administrator: Right-click on “Windows PowerShell” and select “Run as administrator.”
- User Account Control (UAC) Prompt: If prompted by User Account Control, click “Yes” to grant the necessary permissions.
You’ll now see a PowerShell window with a title bar indicating “Administrator: Windows PowerShell.” This confirms you have the elevated privileges required.
Adjusting PowerShell Execution Policy (If Needed)
If, after checking, your Execution Policy was Restricted or AllSigned, you’ll need to adjust it. We recommend setting it to RemoteSigned for a good balance of security and functionality.
In the Administrator PowerShell window, execute the following command:
Set-ExecutionPolicy RemoteSigned -Scope CurrentUser
Let’s break down this command:
Set-ExecutionPolicy: This cmdlet is used to change the PowerShell execution policy.RemoteSigned: This policy allows local scripts to run without signing, but requires scripts downloaded from the internet to be signed by a trusted publisher. This is a common and secure setting for many users.-Scope CurrentUser: This parameter specifies that the policy change should apply only to the current user, rather than system-wide. This is generally preferred for security reasons, limiting the impact of the change.- You might be prompted with a warning about changing the execution policy. Type
Yand press Enter to confirm.
Alternatively, for maximum compatibility during installation, some guides suggest using Bypass. If you choose Bypass, remember to change it back to a more secure setting like RemoteSigned after Chocolatey is installed.
# Temporarily set to Bypass for installation (less secure)
Set-ExecutionPolicy Bypass -Scope Process -Force
Note: Using -Scope Process makes the change temporary for the current PowerShell session only, which is a safer way to use Bypass.
Once the policy is set, you’re ready for the main event.
Executing the Chocolatey Installation Command
With PowerShell running as Administrator and the Execution Policy configured, you can now execute the Chocolatey installation script. This script is hosted on Chocolatey’s official website and is regularly updated.
The recommended installation command is as follows. Make sure you copy the entire block of code carefully:
Set-ExecutionPolicy Bypass -Scope Process -Force; [System.Net.ServicePointManager]::SecurityProtocol = [System.Net.ServicePointManager]::SecurityProtocol -bor 3072; iex ((New-Object System.Net.WebClient).DownloadString('https://community.chocolatey.org/install.ps1'))
Let’s dissect this command:
Set-ExecutionPolicy Bypass -Scope Process -Force: This part temporarily sets the execution policy toBypassfor the current PowerShell process only. This ensures the installation script can run, regardless of yourCurrentUserpolicy, without leaving your system permanently less secure.[System.Net.ServicePointManager]::SecurityProtocol = [System.Net.ServicePointManager]::SecurityProtocol -bor 3072: This ensures that PowerShell can communicate securely over TLS 1.2, which is required by modern websites, including Chocolatey’s.iex ((New-Object System.Net.WebClient).DownloadString('https://community.chocolatey.org/install.ps1')): This is the core of the command. It downloads the Chocolatey installation script from its official URL (install.ps1) and then executes it (iexstands forInvoke-Expression).
Paste and Execute:
- Copy the entire command block.
- Paste it into your Administrator PowerShell window (right-click on the title bar or within the window, then choose Paste).
- Press Enter to execute the command.
The installation process will begin. You will see various messages scroll by, indicating the progress of the installation, including downloading files, setting up environment variables, and configuring Chocolatey. This usually takes a few moments.
Verifying a Successful Chocolatey Installation
Once the installation script finishes running, you should see a message indicating that Chocolatey has been installed successfully. To confirm everything is working as expected, you need to open a new PowerShell window (as Administrator) or restart your current one, as Chocolatey adds itself to your system’s PATH environment variable.
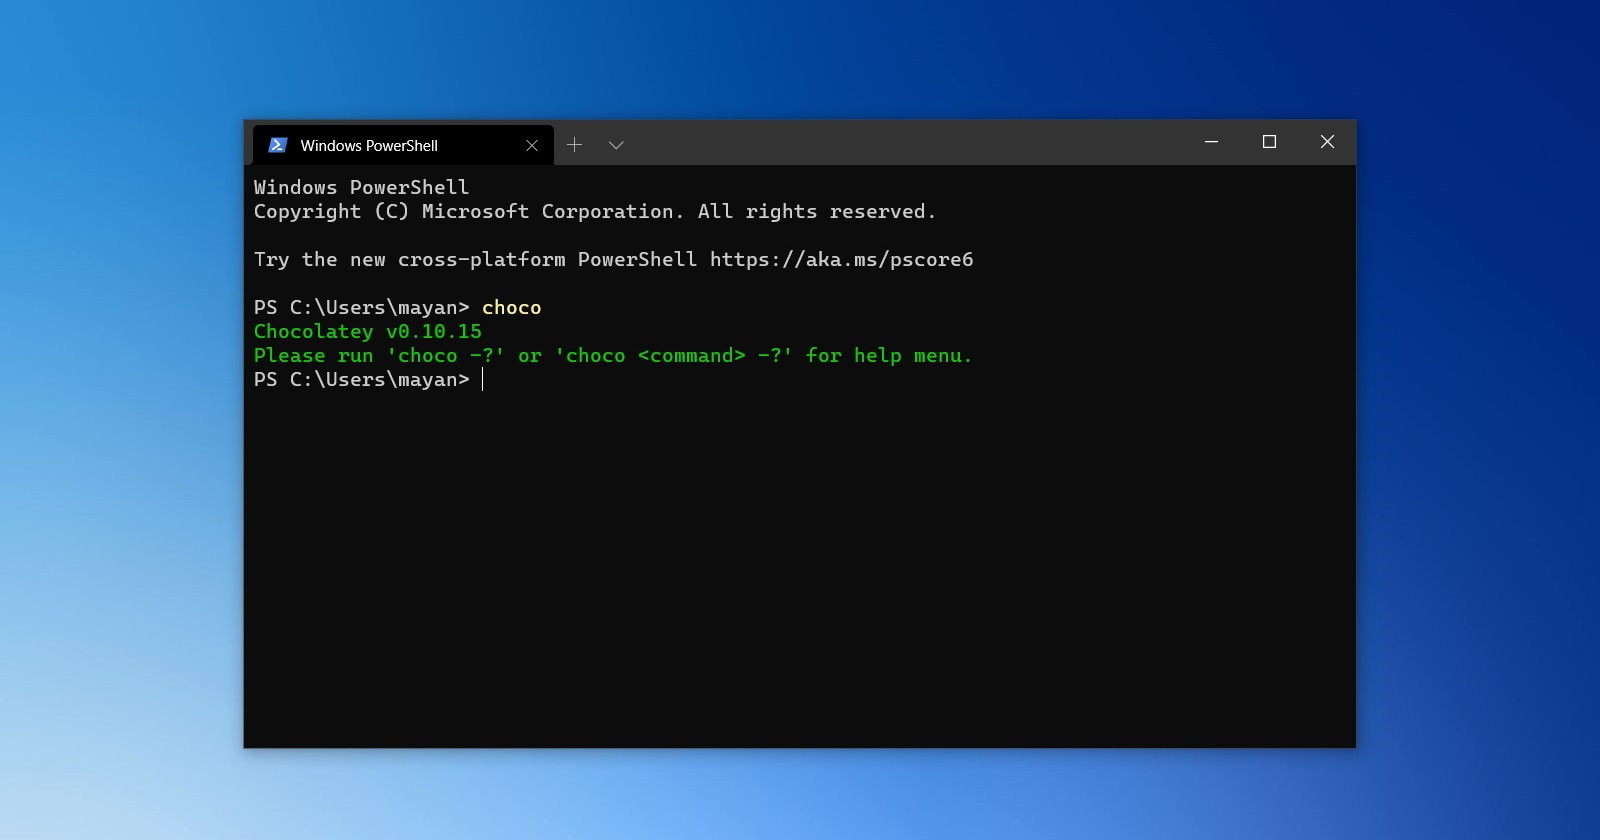
In a new Administrator PowerShell window, type the following command:
choco
Or, to check the version:
choco -v
If Chocolatey is installed correctly, you will see output listing Chocolatey’s available commands, or its version number. If you get an error message like “choco is not recognized as the name of a cmdlet, function, script file, or operable program,” it indicates that Chocolatey’s path might not have been correctly added or recognized. In such a case, simply closing and reopening your PowerShell window (as Administrator) should resolve it. If not, a full system restart might be necessary.
Congratulations! You have successfully installed Chocolatey on your Windows machine. You are now ready to harness its power for efficient software management.
Getting Started with Chocolatey: Basic Package Management
With Chocolatey installed, you can now begin to explore its capabilities. This section will guide you through the fundamental commands to manage software packages, providing you with the essential tools to kickstart your automated software management journey.
Installing Your First Software Package
The primary function of Chocolatey is to install software. The command for this is simple and intuitive: choco install [package_name]. Let’s install a popular web browser, like Google Chrome, as an example.
Open a new PowerShell window as Administrator (if you closed the previous one) and type:
choco install googlechrome
Or, to bypass confirmation prompts for multiple packages:
choco install googlechrome vlc spotify -y
choco install: The command to tell Chocolatey you want to install something.googlechrome: The name of the package you want to install. Package names are typically intuitive and often match the software’s common name.-y(or--yes): This flag automatically answers “yes” to any prompts during the installation process, making it fully unattended. It’s incredibly useful for scripting multiple installations.
Chocolatey will then:
- Search its community repository for the
googlechromepackage. - Download the installer for Google Chrome (or a Chocolatey-specific package).
- Execute the installer silently.
- Report the successful installation.
You can install almost any popular software this way. Want Visual Studio Code? choco install vscode. Need Zoom? choco install zoom. The possibilities are vast, covering hundreds of common applications.
Upgrading and Uninstalling Software with Chocolatey
Chocolatey isn’t just for installing; it’s also excellent for maintaining your software. Keeping applications updated is crucial for security and performance.
Upgrading Software:
To upgrade a specific package:
choco upgrade googlechrome
To upgrade all Chocolatey-managed packages on your system to their latest versions:
choco upgrade all -y
This single command can save immense amounts of time and effort compared to manually checking and updating each application.
Uninstalling Software:
If you need to remove a package installed via Chocolatey:
choco uninstall googlechrome
This will trigger the silent uninstallation process for the specified package.
Exploring the Chocolatey Package Repository
To discover what software is available through Chocolatey, you can browse the official community package repository online or use the choco search command.
Online Repository:
Visit https://community.chocolatey.org/packages in your web browser. Here, you can search for packages, view their details, and find the exact installation command.
Using choco search:
To search for packages directly from your PowerShell window:
choco search vlc
This will return a list of packages matching “vlc,” allowing you to quickly find the correct package name for installation.
These basic commands form the foundation of using Chocolatey effectively. Mastering them will significantly streamline your software management tasks, contributing directly to your overall digital productivity.
Advanced Tips and Troubleshooting Common Issues
While the basic installation and usage of Chocolatey are straightforward, delving into some advanced tips and understanding how to troubleshoot common issues can further enhance your experience and ensure a robust software management setup.
Managing Multiple Packages and Sources
Chocolatey’s true power shines when managing multiple packages, especially in scripted environments. You can install multiple packages at once, as shown earlier:
choco install git.install python -y
For more complex scenarios, you can create a .config file or a script (e.g., a .ps1 file) listing all the applications you want to install. This is perfect for setting up a new development machine or standardizing environments.
Furthermore, Chocolatey supports multiple package sources. While the community repository is the most common, organizations can host their own internal Chocolatey repositories (e.g., Nexus, Artifactory) for proprietary software or curated versions of public software. You can add a new source with:
choco source add -n=MyInternalRepo -s="https://my.internal.repo/choco"
And then specify the source when installing:
choco install MyApp --source=MyInternalRepo
This level of control is invaluable for enterprise environments or specialized workflows.
Dealing with Installation Errors and Proxy Settings
Even with the best preparation, you might encounter issues. Here are some common ones and how to troubleshoot them:
-
Network or Proxy Issues: If you’re behind a corporate proxy, Chocolatey might struggle to download packages. You can configure Chocolatey to use your proxy settings:
choco config set proxy "http://your.proxy.server:port"
choco config set proxyUser "your_username"
choco config set proxyPassword "your_password"
Replace the placeholders with your actual proxy details. You might also need to ensure PowerShell can communicate through the proxy, which can involve setting environment variables or configuring PowerShell’s
WebProxysettings. -
Package Not Found / Installation Failed:
- Typos: Double-check the package name. Use
choco search [keyword]to confirm the exact name. - Repository Issues: Sometimes a package might temporarily be unavailable or have issues. Check the community repository website for the package status.
- Corrupted Download: Clear Chocolatey’s cache:
choco cache remove all. - Dependency Issues: Chocolatey usually handles dependencies, but if an underlying component fails, the main package might also fail. Review the output for specific error messages.
- Typos: Double-check the package name. Use
-
Permissions Errors: If you forgot to run PowerShell as Administrator, or if your user account has very restricted permissions, you might see access denied errors. Always ensure your PowerShell session has elevated privileges.
-
Antivirus Interference: Occasionally, aggressive antivirus software might interfere with downloads or script executions. Temporarily disabling it (with caution and at your own risk) can help diagnose if it’s the culprit. Remember to re-enable it immediately after troubleshooting.
Reviewing Logs: Chocolatey provides detailed logs. If an installation fails, check the output in the PowerShell window. For more in-depth analysis, you can find logs at %TEMP%chocolateylogs.
Integrating Chocolatey into Your Workflow for Enhanced Productivity
Beyond basic installations, integrating Chocolatey more deeply into your workflow can yield significant productivity gains:
- Startup Scripts: For power users or system administrators, create PowerShell scripts that run on system startup to ensure critical applications are always updated.
- Dev Environment Setup: Automate your entire development environment setup. A single script can install compilers, IDEs (like VS Code, IntelliJ), version control systems (Git), runtimes (Node.js, Python), and more. This significantly reduces the time to productivity for new team members or when provisioning new machines.
- Batch Updates: Schedule
choco upgrade all -yto run periodically using Windows Task Scheduler, ensuring your system always has the latest versions of your software, bolstering security and performance without manual intervention. - Continuous Integration/Deployment (CI/CD): In professional settings, Chocolatey can be used in CI/CD pipelines to ensure build servers or deployment targets have the exact software versions required for consistent builds and deployments.
- Personal Branding & Efficiency: For those focusing on ‘Personal Branding’, demonstrating mastery over efficient system management tools like Chocolatey can highlight technical prowess and commitment to productivity, reflecting positively on one’s professional image.
By adopting these advanced practices, Chocolatey evolves from a simple installation tool into a powerful system management utility, saving you time, reducing headaches, and keeping your Windows environment optimized and secure.

Conclusion
The installation of Chocolatey on your Windows system marks a pivotal step towards a more efficient, automated, and secure software management experience. Gone are the days of tedious manual downloads, endless click-through installers, and forgotten updates. With Chocolatey, you’ve embraced a modern paradigm for handling your digital toolkit, bringing the robust capabilities of a package manager directly to your fingertips on Windows.
We’ve covered everything from understanding the fundamental advantages of Chocolatey – its ability to automate installations, streamline updates, and ensure consistency – to the precise steps required for a successful setup. You now know how to prepare your system by ensuring the correct PowerShell execution policy and administrative privileges, execute the installation command, and verify its proper functioning. Furthermore, you’ve been equipped with the basic commands for installing, upgrading, and uninstalling software, and even learned advanced tips for managing multiple packages, troubleshooting common issues, and integrating Chocolatey deeper into your daily routines for unparalleled productivity.
In a world where technology moves at an unrelenting pace, having your software management automated is not just a convenience; it’s a competitive edge. Chocolatey empowers you to spend less time managing your tools and more time utilizing them for innovation, creation, and problem-solving. Make Chocolatey a cornerstone of your Windows experience, and unlock a new level of control and efficiency in your digital life. Embrace the future of software management on Windows today.
aViewFromTheCave is a participant in the Amazon Services LLC Associates Program, an affiliate advertising program designed to provide a means for sites to earn advertising fees by advertising and linking to Amazon.com. Amazon, the Amazon logo, AmazonSupply, and the AmazonSupply logo are trademarks of Amazon.com, Inc. or its affiliates. As an Amazon Associate we earn affiliate commissions from qualifying purchases.