In the vast landscape of digital technology, understanding the various file formats we encounter is crucial for efficient operation and problem-solving. Among these, .cab files, short for Cabinet files, play a significant role, particularly within the Windows operating system. While they might not be as commonly discussed as .exe or .zip files, knowing how to handle them, especially for installation purposes, can be vital for users and IT professionals alike. This guide delves into the intricacies of .cab files, demystifying their purpose and providing clear, actionable steps on how to install them.
Understanding .CAB Files: What Are They and Why Are They Used?
Before diving into the installation process, it’s essential to grasp the fundamental nature of .cab files. Think of them as compressed archives, similar in concept to .zip or .rar files, but specifically designed by Microsoft for storing and distributing system files, drivers, and software components for Windows.
The Core Functionality: Compression and Distribution
The primary purpose of .cab files is to efficiently package and compress multiple files into a single, smaller unit. This offers several advantages:
- Reduced Storage Space: By compressing files,
.cabarchives take up less disk space, making them ideal for distribution over the internet or on physical media. - Faster Downloads: Smaller file sizes translate to quicker download times, which is especially important for large driver packages or system updates.
- Streamlined Installation:
.cabfiles allow for the bundling of related files – such as driver binaries, configuration settings, and associated metadata – ensuring that all necessary components are installed together. This simplifies the installation process for both software and hardware drivers. - Data Integrity: Cabinet files employ error detection and correction mechanisms, helping to ensure that the data within them remains intact during transfer and storage.
Where Do You Encounter .CAB Files?
You’re most likely to encounter .cab files in a few key scenarios:
- Hardware Drivers: This is perhaps the most common use case. When you install new hardware, such as a printer, graphics card, or network adapter, the manufacturer often provides drivers packaged in
.cabfiles. These files contain the software that allows Windows to communicate with and control your hardware. - Windows Updates and Service Packs: Microsoft uses
.cabfiles to deliver certain updates, patches, and service packs for the Windows operating system. These files contain critical system components and security fixes. - Software Installation Packages: Some older or specialized software installations might utilize
.cabfiles as part of their installation routine.
Understanding these contexts helps to appreciate why knowing how to install them is a valuable skill.
Installing .CAB Files on Windows
The installation of .cab files isn’t typically a direct double-click-and-run affair like with .exe installers. Instead, it often involves leveraging Windows’ built-in tools or specific command-line utilities. The method you choose will depend on the source of the .cab file and your specific needs.
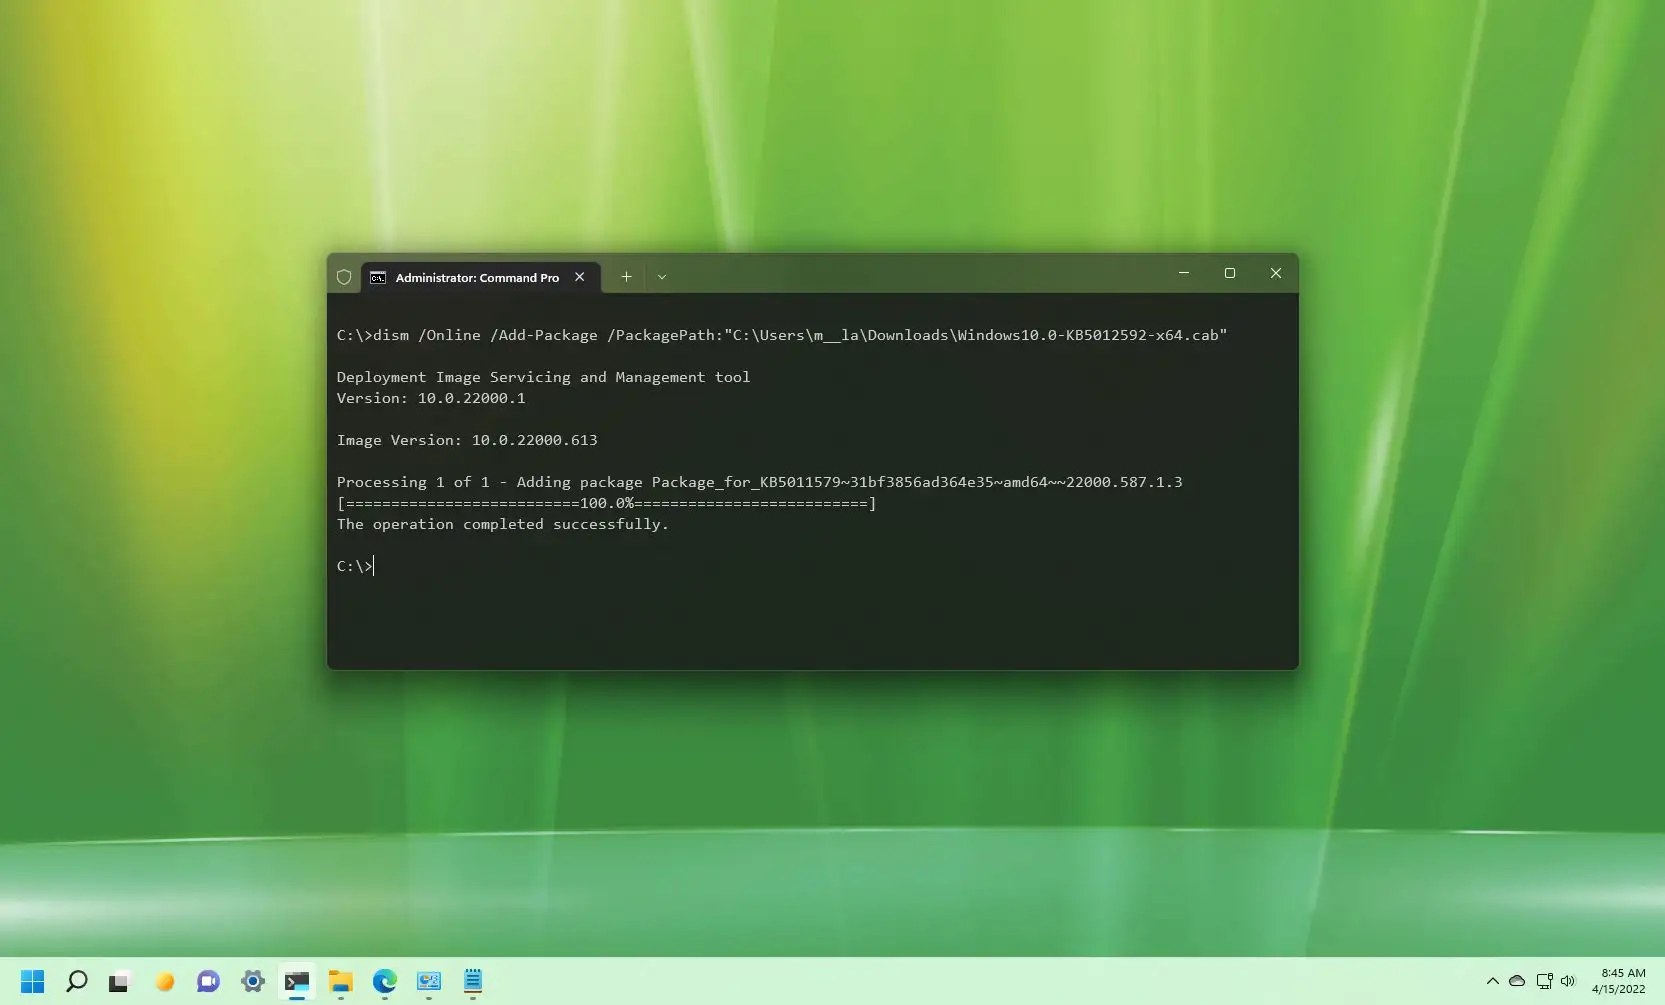
Method 1: Using the Command Prompt with expand
The expand command is a powerful, built-in Windows utility designed to decompress files, including those in .cab format. This method is particularly useful for extracting the contents of a .cab file or for installing drivers when a graphical interface isn’t readily available or functioning.
Step-by-Step Guide to Using expand
-
Open Command Prompt as Administrator:
- Click the Start button.
- Type
cmd. - Right-click on “Command Prompt” in the search results.
- Select “Run as administrator.” This is crucial for system-level operations.
-
Navigate to the Directory Containing the .CAB File:
- Use the
cdcommand to change your current directory to where the.cabfile is located. For example, if your file is on your Desktop in a folder named “Drivers,” you would type:
bash

cd %USERPROFILE%DesktopDrivers
- Press Enter.
- Use the
-
Extract the .CAB File Contents:
- To simply extract the files from the
.cabarchive to your current directory, use the following command, replacingyour_file.cabwith the actual name of your.cabfile:
bash

expand your_file.cab -F:* .
The-F:*tellsexpandto extract all files, and the.at the end indicates the current directory as the destination.
- To simply extract the files from the
-
Install Drivers from Extracted Files (If Applicable):
- If the
.cabfile contained drivers, after extracting them, you might need to manually point Windows to these drivers through the Device Manager. - Open Device Manager (search for it in the Start menu).
- Locate the device for which you are installing the driver. If it’s an unknown device, it might have a yellow exclamation mark.
- Right-click on the device and select “Update driver.”
- Choose “Browse my computer for drivers.”
- Click “Let me pick from a list of available drivers on my computer” or “Browse…” and navigate to the folder where you extracted the
.cabfile contents. - Windows will then attempt to find and install the appropriate driver from the extracted files.
- If the
When to Use the expand Command:
- When you need to inspect the contents of a
.cabfile. - When a graphical driver installation utility isn’t working.
- For automated driver installations in scripting or deployment scenarios.
- When dealing with older Windows versions where direct
.cabinstallation might be more common.
Method 2: Using Device Manager for Driver Installation
For hardware driver installation, Windows provides a more integrated approach through the Device Manager, which can often directly utilize .cab files.
Step-by-Step Guide Using Device Manager
-
Locate the .CAB File: Ensure you know the exact path to the
.cabfile containing the driver. -
Open Device Manager:
- Press
Windows Key + Xand select “Device Manager.” - Alternatively, search for “Device Manager” in the Start menu.
- Press
-
Identify the Target Device:
- Find the hardware device for which you need to install or update the driver. It might be under a category like “Display adapters,” “Network adapters,” or appear as an “Unknown device” with a yellow exclamation mark if no driver is currently installed.
-
Update the Driver:
- Right-click on the device.
- Select “Update driver.”
-
Specify the Driver Location:
- In the “Update Drivers” window, choose “Browse my computer for drivers.”
- You will be prompted to enter a location for the driver software. Click the “Browse…” button.
- Navigate to the folder that contains your
.cabfile. Important: You generally don’t select the.cabfile itself at this stage. You point to the directory. Windows is smart enough to look for driver components within the.cabfile in that directory. - Ensure the “Include subfolders” checkbox is ticked.
- Click “Next.”
-
Installation Process:
- Windows will search the specified location and its subfolders for suitable drivers. If it finds a valid driver package within the
.cabfile, it will proceed with the installation. - You might see a security warning; click “Install” if you trust the source of the driver.
- Once the installation is complete, you should see a confirmation message.
- Windows will search the specified location and its subfolders for suitable drivers. If it finds a valid driver package within the
Considerations for Device Manager Installation:
- Trustworthy Sources: Always download
.cabfiles from the official manufacturer’s website or trusted sources. Installing drivers from unverified sources can lead to system instability or security vulnerabilities. - Correct Driver Version: Ensure you are downloading the
.cabfile for the correct version of Windows (e.g., Windows 10, Windows 11, 64-bit or 32-bit) and the specific hardware model. - Automatic Detection: In many cases, Windows might automatically detect the need for a driver and offer to install it when you connect new hardware. If this happens and it fails, manual installation using the methods described is necessary.
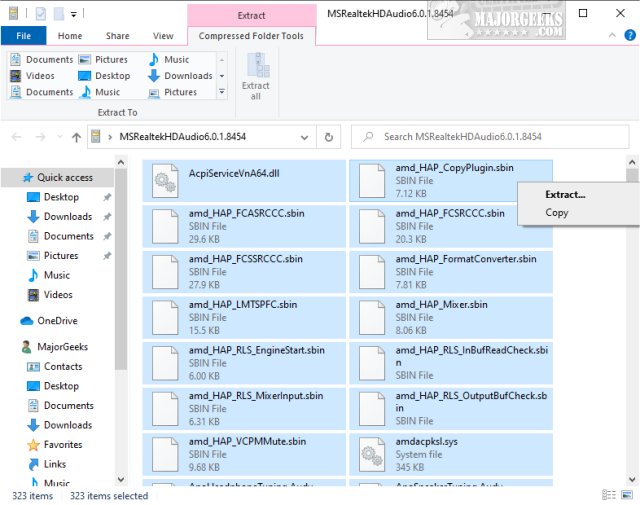
Method 3: Third-Party Extraction Tools
While Windows has built-in capabilities, sometimes you might want to simply extract the contents of a .cab file without installing anything, perhaps to examine its contents or use specific files within another application. In such cases, third-party archiving tools can be very useful.
Popular Extraction Tools
- 7-Zip: A free and open-source file archiver that supports a wide range of formats, including
.cab. You can open.cabfiles with 7-Zip like any other archive and extract their contents. - WinRAR: A popular commercial file archiver that also has excellent support for
.cabfiles.
How to Use Third-Party Tools
- Download and Install: Download and install your preferred archiving tool (e.g., 7-Zip).
- Right-Click and Extract:
- Locate the
.cabfile in File Explorer. - Right-click on the
.cabfile. - In the context menu, you’ll usually find options related to your archiving tool (e.g., “7-Zip” or “WinRAR”).
- Select an option like “Extract files…” or “Extract here.”
- “Extract files…” will allow you to choose a destination folder, while “Extract here” will unpack the contents into the same directory as the
.cabfile.
- Locate the
When to Use Third-Party Extraction Tools:
- When you only need to extract files and not necessarily install them as drivers.
- If you are more familiar and comfortable with a specific archiving tool.
- For inspecting the contents of
.cabfiles without involving Windows’ system update mechanisms.
Troubleshooting Common Issues
While installing .cab files is generally straightforward, you might encounter a few hiccups. Here are some common issues and how to address them:
Issue 1: “The specified cabinet file is corrupt or invalid.”
- Cause: The
.cabfile you downloaded might be incomplete or damaged. - Solution:
- Re-download the file: Try downloading the
.cabfile again from the official source. Ensure your internet connection is stable during the download. - Verify file size: Compare the size of the downloaded file with the size listed on the download page.
- Check MD5/SHA checksums: If the provider offers checksums, use a checksum utility to verify the integrity of your downloaded file.
- Re-download the file: Try downloading the
Issue 2: “Windows couldn’t find any drivers for your device.” (After extraction)
- Cause:
- The extracted files don’t contain compatible drivers for your specific hardware or Windows version.
- You might have pointed Windows to the wrong folder or the extraction process didn’t complete successfully.
- The
.cabfile was not actually a driver package but contained other system components.
- Solution:
- Double-check the source: Ensure the
.cabfile is from the hardware manufacturer and is intended for your specific device model and Windows version. - Use the
expandcommand: Try using theexpandcommand to extract the contents and then manually point Device Manager to the extracted folder. - Search for specific driver files: Look for
.inffiles within the extracted contents. These are the driver information files that Windows uses. - Contact manufacturer support: If you’re still struggling, reach out to the hardware manufacturer’s support for assistance.
- Double-check the source: Ensure the
Issue 3: Permissions Errors during Installation
- Cause: You are not running the command prompt or installer with administrative privileges.
- Solution: Always ensure you are running Command Prompt or any installation utilities “as administrator.” Right-click on the application shortcut or executable and select “Run as administrator.”

Conclusion
.CAB files are an integral part of the Windows ecosystem, primarily serving as efficient containers for system files and drivers. While their installation might seem less direct than other executable formats, understanding how to handle them, whether through the command line with expand, the intuitive Device Manager, or third-party extraction tools, empowers you to manage your system effectively. By following the steps outlined in this guide, you can confidently install .cab files, ensuring your hardware functions optimally and your Windows system remains up-to-date and secure. Remember to always prioritize downloading files from trusted sources to safeguard your digital environment.