In the dynamic world of cloud computing, particularly with Amazon Web Services (AWS), efficiency and automation are paramount. Whether you’re a seasoned developer deploying complex applications, a system administrator managing infrastructure, or a data scientist analyzing vast datasets, interacting with AWS resources programmatically can significantly streamline your workflow. The AWS Command Line Interface (CLI) is your essential tool for this purpose. It empowers you to manage your AWS services from the command line, automating tasks, scripting complex operations, and integrating AWS into your existing development pipelines. This comprehensive guide will walk you through the installation process for the AWS CLI, ensuring you can harness its power across various operating systems.
Understanding the AWS CLI: More Than Just a Tool
Before diving into the installation steps, it’s crucial to appreciate what the AWS CLI offers. At its core, the AWS CLI is a unified tool that combines AWS-specific commands into a single application. This means you don’t need to learn separate tools for each AWS service. Instead, you can use a consistent command structure to interact with services like S3, EC2, Lambda, RDS, and hundreds more.
The benefits of using the AWS CLI are far-reaching:
- Automation: Script repetitive tasks like creating or deleting resources, configuring services, and performing backups. This saves immense time and reduces the risk of human error.
- Efficiency: Quickly perform operations that would be cumbersome or impossible through the AWS Management Console. For example, bulk uploading files to S3 or launching multiple EC2 instances with specific configurations.
- Integration: Seamlessly integrate AWS into your CI/CD pipelines, build tools, and other automation frameworks.
- Cost Management: Programmatically monitor and manage your AWS spending, set up alerts, and identify cost-saving opportunities.
- Development and Testing: Quickly spin up and tear down development or testing environments, ensuring consistency and reducing manual configuration overhead.
- Troubleshooting: Gather logs, check resource statuses, and diagnose issues directly from your terminal.
The AWS CLI is not just for developers. System administrators can leverage it for infrastructure management, security teams for auditing and compliance checks, and even data professionals for data transfer and manipulation. Its versatility makes it an indispensable component of any AWS-centric workflow.
Installing AWS CLI: A Step-by-Step Guide
The installation process for the AWS CLI varies slightly depending on your operating system. We will cover the most common platforms: Windows, macOS, and Linux. For each, we’ll provide clear instructions to get you up and running quickly.
For Windows Users
Windows users have a few installation options, but the most straightforward method is using the MSI installer.
Option 1: Using the MSI Installer (Recommended for Windows)
-
Download the Installer:
- Navigate to the official AWS CLI download page: https://aws.amazon.com/cli/
- Under the “Installing the AWS CLI” section, find the link for the Windows MSI installer. You’ll typically see links for both 32-bit and 64-bit versions. Download the appropriate installer for your system architecture. If you’re unsure, most modern Windows systems are 64-bit.
-
Run the Installer:
- Locate the downloaded
.msifile (e.g.,AWSCLIV2.msi) and double-click it to start the installation wizard. - Follow the on-screen prompts. Accept the license agreement, choose the installation directory (the default is usually fine), and proceed with the installation.
- The installer will automatically add the AWS CLI to your system’s PATH environment variable, which is crucial for running commands from any directory.
- Locate the downloaded
-
Verify the Installation:
- Open a new Command Prompt or PowerShell window. It’s important to open a new window after installation so that the system can recognize the updated PATH.
- Type the following command and press Enter:
bash

aws --version
- If the installation was successful, you will see output similar to this:
aws-cli/2.x.x Python/3.x.x Windows/10 exe/x86_64.xxxxxxxx
(The version numbers and build details may vary.)
Option 2: Using pip (Python Package Installer)
If you have Python and pip installed on your system, you can also install the AWS CLI using pip. This method is generally preferred if you are already working with Python development environments.
-
Ensure Python and pip are installed:
- Open a Command Prompt or PowerShell.
- Check if Python is installed by typing:
python --version - Check if pip is installed by typing:
pip --version - If not, you’ll need to install Python from python.org (make sure to check the “Add Python to PATH” option during installation). Pip is usually included with Python installations.
-
Install AWS CLI using pip:
- In your Command Prompt or PowerShell, run the following command:
bash

pip install awscli
- If you encounter permission errors, you might need to use
pip install --user awsclior run the Command Prompt as an administrator.
- In your Command Prompt or PowerShell, run the following command:
-
Verify the Installation:
- Open a new Command Prompt or PowerShell window.
- Type:
bash

aws --version
- You should see the AWS CLI version information.
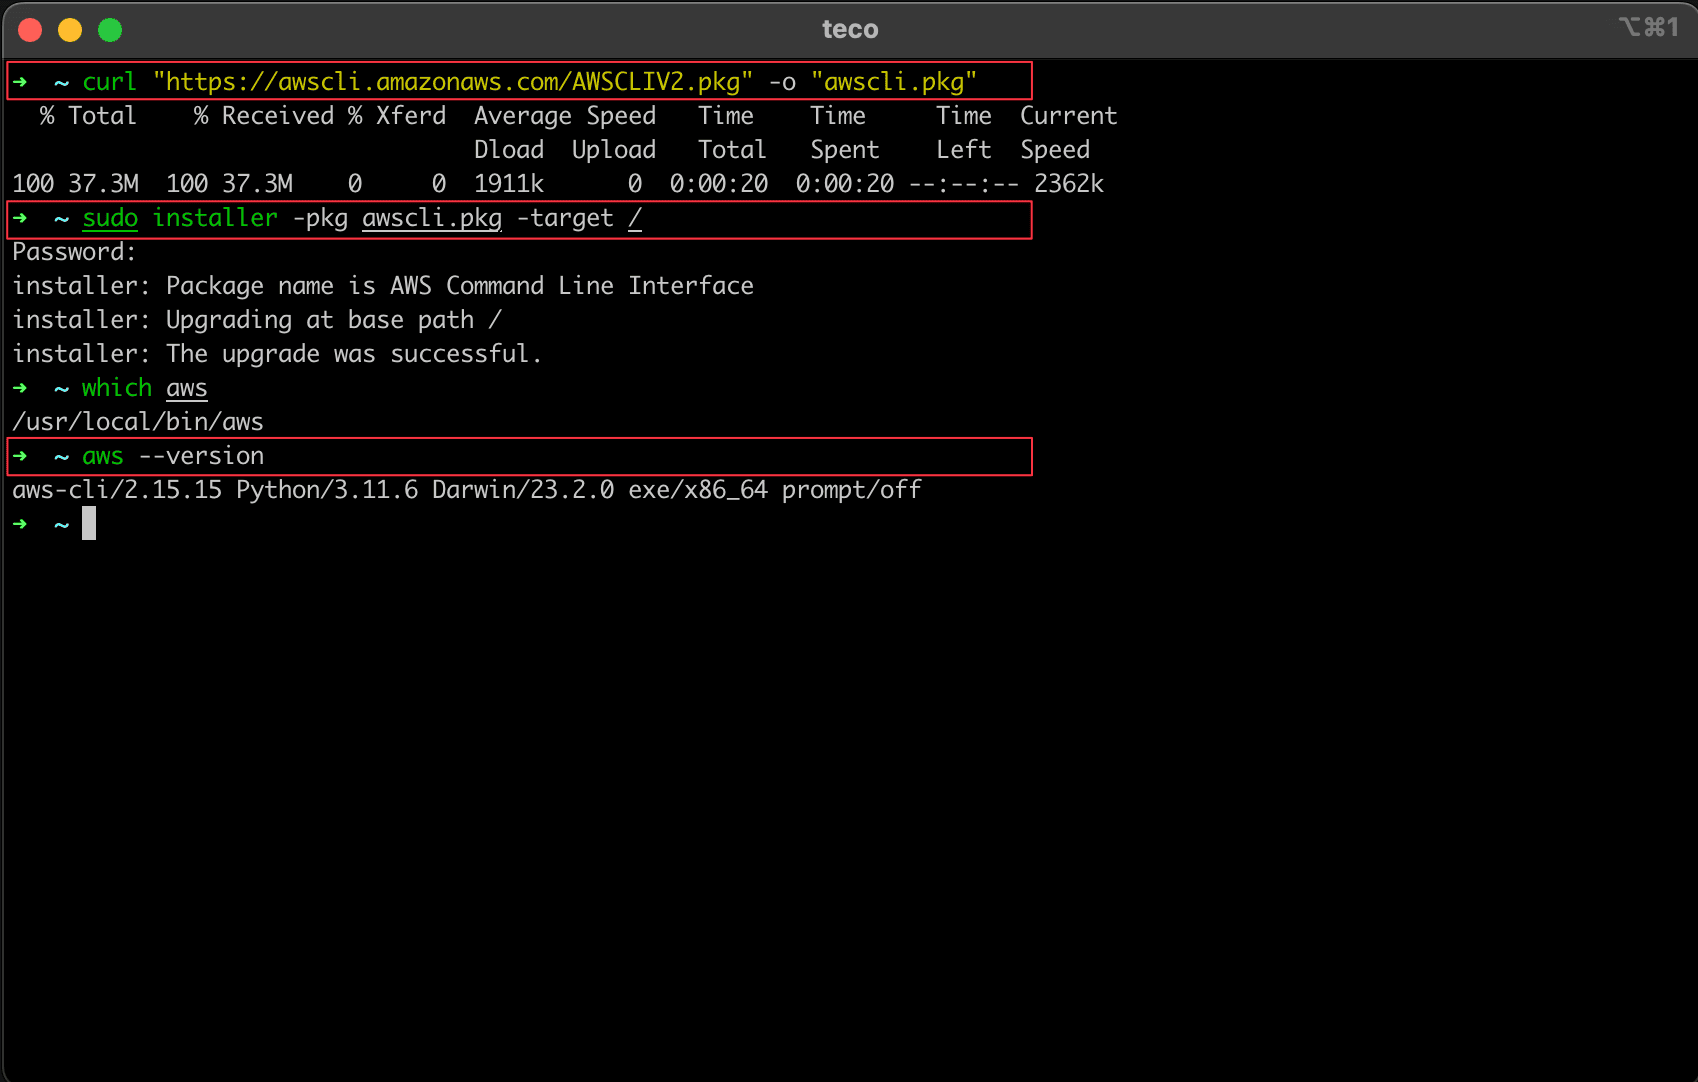
For macOS Users
macOS users can also choose between a recommended installer and using pip.
Option 1: Using the Installer Package (Recommended for macOS)
-
Download the Installer:
- Go to the official AWS CLI download page: https://aws.amazon.com/cli/
- Download the macOS installer package (
.pkgfile).
-
Run the Installer:
- Double-click the downloaded
.pkgfile. - Follow the on-screen instructions. The installer will guide you through the process and automatically configure your system.
- Double-click the downloaded
-
Verify the Installation:
- Open the Terminal application (Applications > Utilities > Terminal).
- Type:
bash

aws --version
- You should see the AWS CLI version information, confirming a successful installation.
Option 2: Using pip (Python Package Installer)
This method is also viable on macOS if you have Python and pip installed.
-
Ensure Python and pip are installed:
- Open your Terminal.
- Check Python:
python3 --version(macOS often usespython3) - Check pip:
pip3 --version - If not present, install Python 3 from python.org or using a package manager like Homebrew (
brew install python).
-
Install AWS CLI using pip:
- In your Terminal, run:
bash

pip3 install awscli
- If you encounter issues, you might need to use
pip3 install --user awscli.
- In your Terminal, run:
-
Verify the Installation:
- Open a new Terminal window.
- Type:
bash

aws --version
For Linux Users
Linux users have several options, with the installer script being a common and robust choice.
Option 1: Using the AWS CLI Installer Script (Recommended for Linux)
This method is highly recommended as it handles dependencies and installation paths correctly.
- Download the Installer Script:
- Open your Terminal.
- Download the Amazon Corretto distribution of the AWS CLI v2 using
curl:
bash

curl "https://awscli.amazonaws.com/awscli-exe-linux-x86_64.zip" -o "awscliv2.zip"
Note: For different architectures, refer to the official AWS CLI documentation for the correct download URL.
-
Unzip the Archive:
- Unzip the downloaded file:
bash

unzip awscliv2.zip
- This will create a directory named
awsin your current location.
- Unzip the downloaded file:
-
Run the Installer Script:
- Navigate into the extracted
awsdirectory:
bash

cd aws
- Execute the installation script. You will likely need
sudoprivileges for system-wide installation:
bash

sudo ./install
- The script will prompt you for confirmation. Press
yto proceed. - This will install the AWS CLI to
/usr/local/aws-cliand create symbolic links in/usr/local/bin.
- Navigate into the extracted
-
Verify the Installation:
- Open a new Terminal window.
- Type:
bash

aws --version
- You should see the AWS CLI version information.
Option 2: Using pip (Python Package Installer)
This is another viable option for Linux users, especially if you manage Python environments carefully.
-
Ensure Python and pip are installed:
- Open your Terminal.
- Check Python:
python3 --version - Check pip:
pip3 --version - If not present, install Python 3 and pip using your distribution’s package manager (e.g.,
sudo apt update && sudo apt install python3 python3-pipon Debian/Ubuntu, orsudo yum install python3 python3-pipon RHEL/CentOS/Fedora).
-
Install AWS CLI using pip:
- In your Terminal, run:
bash

pip3 install awscli
- If you encounter permission issues, use
pip3 install --user awscli.
- In your Terminal, run:
-
Verify the Installation:
- Open a new Terminal window.
- Type:
bash

aws --version
Configuring AWS CLI for First Use
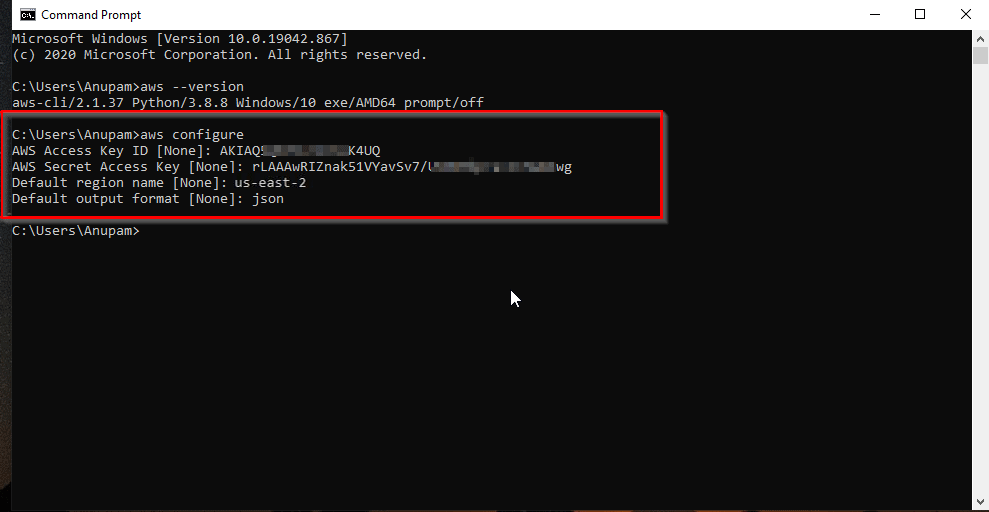
Once the AWS CLI is successfully installed, the next critical step is to configure it with your AWS credentials. This allows the CLI to authenticate your requests to AWS services.
Setting Up Your Credentials and Region
You can configure the AWS CLI using the aws configure command. This command will prompt you for four key pieces of information:
- AWS Access Key ID: This is a unique identifier for your AWS account. You can generate this by creating an IAM user with the necessary permissions and then generating access keys for that user. It is highly recommended to create a dedicated IAM user with the principle of least privilege rather than using your root account credentials.
- AWS Secret Access Key: This is a secret key associated with your Access Key ID. Treat this like a password and keep it secure.
- Default Region Name: This is the AWS region where you want your commands to run by default (e.g.,
us-east-1,eu-west-2). You can always override this in individual commands. - Default Output Format: This determines how the CLI presents its output. Common options include
json,text, andtable.jsonis often preferred for programmatic use, whiletableis more human-readable.
To start the configuration process, open your Terminal or Command Prompt and run:
aws configure
You will be prompted for each of the above items. For example:
AWS Access Key ID [None]: YOUR_ACCESS_KEY_ID
AWS Secret Access Key [None]: YOUR_SECRET_ACCESS_KEY
Default region name [None]: us-west-2
Default output format [None]: json
Important Security Notes:
- Never commit your AWS credentials directly into your code or public repositories.
- Use IAM roles for EC2 instances or other AWS services when possible, as this eliminates the need to manage access keys directly on those resources.
- For local development, consider using environment variables or the
~/.aws/credentialsfile for storing credentials.
The aws configure command saves your credentials and region settings in the ~/.aws/credentials and ~/.aws/config files (or equivalent locations on Windows), respectively. These files are used by the AWS CLI to authenticate your requests automatically.
Advanced Configuration Options
Beyond the basic aws configure, the AWS CLI offers several advanced configuration options:
-
Multiple Profiles: You can create multiple configuration profiles to manage credentials for different AWS accounts or environments. You can do this by creating a new file or by editing the
~/.aws/credentialsfile to include named profiles:[default] aws_access_key_id = YOUR_DEFAULT_ACCESS_KEY_ID aws_secret_access_key = YOUR_DEFAULT_SECRET_ACCESS_KEY [development] aws_access_key_id = YOUR_DEV_ACCESS_KEY_ID aws_secret_access_key = YOUR_DEV_SECRET_ACCESS_KEY [production] aws_access_key_id = YOUR_PROD_ACCESS_KEY_ID aws_secret_access_key = YOUR_PROD_SECRET_ACCESS_KEYTo use a specific profile, you would use the
--profileflag:aws s3 ls --profile development -
Environment Variables: You can also set AWS credentials and region using environment variables, which can be useful for CI/CD pipelines. For example:
bash

export AWS_ACCESS_KEY_ID='YOUR_ACCESS_KEY_ID'

export AWS_SECRET_ACCESS_KEY='YOUR_SECRET_ACCESS_KEY'

export AWS_DEFAULT_REGION='us-east-1'
-
Credential Process: For more sophisticated credential management, such as integrating with external identity providers, you can use a
credential_processin your AWS config file.
Troubleshooting Common Installation Issues
While the installation process is generally straightforward, you might encounter a few common hiccups. Here are some solutions:
Command Not Found
- Problem: After installation, when you type
aws --version, you get an error like “awsis not recognized as an internal or external command, operable program or batch file” (Windows) or “aws: command not found” (macOS/Linux). - Solution: This almost always means the AWS CLI executable is not in your system’s PATH environment variable.
- Windows: Ensure you ran the MSI installer and that it completed without errors. If you used pip, ensure the Python Scripts directory is in your PATH. Try closing and reopening your Command Prompt or PowerShell.
- macOS/Linux: If you used the installer script, it should have added it to
/usr/local/bin. If you used pip, ensure the~/.local/binor Python’s script directory is in your PATH. You might need to manually add it to your~/.bashrc,~/.zshrc, or~/.profilefile. For example, addexport PATH=$PATH:~/.local/binto your shell’s configuration file and then runsource ~/.bashrc(or your respective file).
Permission Denied
- Problem: When trying to install with pip, you encounter a “Permission denied” error.
- Solution:
- On Linux/macOS, try using
pip3 install --user awsclito install it for your current user only, which typically doesn’t require root privileges. - Alternatively, you might need to run the command with
sudoif you intend to install it system-wide, but this is less recommended for user-level tools.
- On Linux/macOS, try using
Outdated Version
- Problem: You’ve installed the AWS CLI, but
aws --versionshows an older version, and you need a newer feature. - Solution:
- Windows (MSI): Uninstall the existing AWS CLI from “Add or Remove Programs” and then download and install the latest MSI installer.
- macOS/Linux (Installer Script): You can typically upgrade by re-running the installer script. The script usually handles overwriting the old installation.
- Pip: Use
pip3 install --upgrade awscli.

Internet Connectivity Issues
- Problem: The download or installation process fails due to network errors.
- Solution: Ensure you have a stable internet connection. If you are behind a proxy, you may need to configure your proxy settings for
curlorpip.
By following these steps and troubleshooting tips, you should be able to successfully install and configure the AWS CLI, opening up a world of cloud automation and efficiency. This powerful tool is your next step towards mastering AWS management and integrating it seamlessly into your technology stack, ultimately enhancing your productivity and the scalability of your projects.
aViewFromTheCave is a participant in the Amazon Services LLC Associates Program, an affiliate advertising program designed to provide a means for sites to earn advertising fees by advertising and linking to Amazon.com. Amazon, the Amazon logo, AmazonSupply, and the AmazonSupply logo are trademarks of Amazon.com, Inc. or its affiliates. As an Amazon Associate we earn affiliate commissions from qualifying purchases.