Audacity, the free, open-source, and cross-platform audio editor, is a powerful tool for recording, editing, and mixing sound. While its built-in features are robust, the true magic of Audacity unfolds when you delve into its extensive world of plugins. These small software components act as powerful extensions, unlocking a vast array of effects, analysis tools, and processing capabilities that can transform your audio projects from good to professional-grade. Whether you’re a podcaster looking to clean up your vocals, a musician seeking specific effects, or a content creator refining your soundscapes, mastering plugin installation is a fundamental skill.
This comprehensive guide will walk you through everything you need to know about installing Audacity plugins. We’ll explore the different types of plugins available, provide detailed, step-by-step instructions for Windows, macOS, and Linux users, and equip you with the knowledge to troubleshoot common issues. By the end of this article, you’ll be confidently integrating new tools into your Audacity setup, ready to push the boundaries of your audio creativity and production quality.
Understanding Audacity Plugins: Enhancing Your Audio Workflow
Before diving into the installation process, it’s crucial to understand what Audacity plugins are, why they’re so valuable, and the various formats they come in. This foundational knowledge will empower you to make informed decisions about which plugins to use and how to integrate them effectively.
What Exactly Are Audacity Plugins?
At its core, an Audacity plugin is a piece of software that extends the functionality of the main Audacity application. Think of Audacity as a workshop; the default tools are excellent for general repairs and basic construction. Plugins, however, are like specialized machinery or custom tools that allow you to perform highly specific tasks with greater precision, efficiency, or creative flair.
These extensions can introduce a wide range of new features, including:
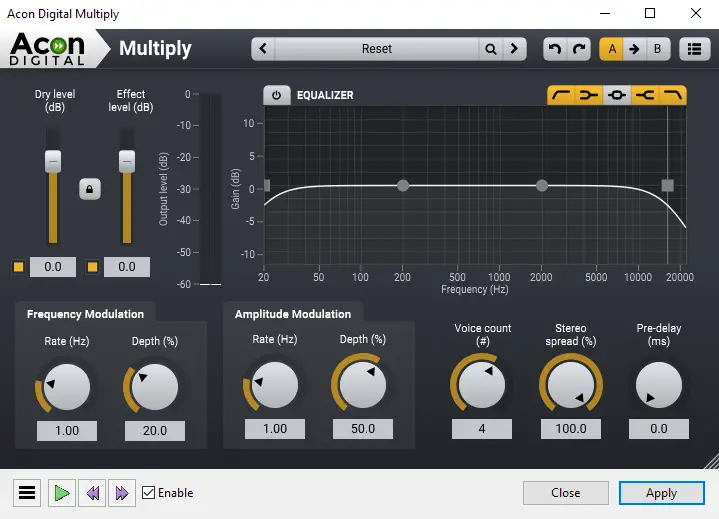
- Audio Effects: From classic reverb, delay, and chorus to advanced compression, equalization (EQ), and mastering tools.
- Noise Reduction and Restoration: Sophisticated algorithms to clean up unwanted background noise, hums, clicks, and pops.
- Instrument Emulation: While Audacity isn’t a Digital Audio Workstation (DAW) in the traditional sense, some plugins can add basic instrument capabilities or synthesizers.
- Analysis Tools: Advanced meters, spectral analyzers, and other tools to visualize and understand your audio in detail.
- Creative Sound Design: Unique filters, pitch manipulators, and sound generators to craft distinct audio textures.
Plugins are typically developed by third-party companies or independent developers and are often designed to be compatible with multiple audio software applications, not just Audacity. This broad compatibility means a single plugin can potentially serve you across different stages of your audio production journey, even if you eventually move to a more advanced DAW.
Why You Should Consider Using Plugins
The benefits of incorporating plugins into your Audacity workflow are numerous and can significantly elevate the quality and efficiency of your audio projects. Here are some compelling reasons to explore the world of Audacity plugins:
- Professional-Grade Sound: Many free and commercial plugins offer algorithms and features found in high-end studio equipment. By using them, you can achieve a more polished, professional sound without investing in expensive hardware or software.
- Creative Freedom: Plugins unlock a universe of creative possibilities. Want to add a vintage tape delay effect? Auto-tune a vocal track? Create an alien voice? There’s likely a plugin for it, allowing you to experiment and find unique sonic textures.
- Workflow Enhancement: Specialized plugins can streamline repetitive tasks. For instance, a sophisticated noise gate can automatically silence quiet sections of a track, saving you manual editing time.
- Access to Specialized Tools: Audacity’s default effects are general-purpose. Plugins fill niche requirements, offering tools for specific tasks like de-essing vocals, advanced multiband compression, or precise spectral editing that might not be available natively.
- Cost-Effectiveness: While there are paid plugins, a vast library of high-quality free plugins (often called “freeware VSTs”) is available. This allows you to expand your toolkit without breaking the bank, perfectly complementing Audacity’s open-source nature.
- Staying Current: The audio technology landscape evolves rapidly. New plugin developments often introduce cutting-edge algorithms and features before they might be integrated into core applications, keeping your Audacity setup modern and capable.
Ultimately, plugins transform Audacity from a capable editor into a formidable audio production suite, enabling you to tackle more complex projects and achieve superior results.
Diverse Plugin Formats for Audacity
Audacity supports several plugin formats, each with its characteristics and platform compatibility. Understanding these formats is key to successful installation and troubleshooting.
-
VST (Virtual Studio Technology):
- Description: Developed by Steinberg, VST is the most widely adopted plugin format across the audio industry. Most third-party effects and virtual instruments are available as VSTs. They come in 32-bit and 64-bit versions, and it’s crucial to match the plugin’s bit version with your Audacity installation (modern Audacity is 64-bit). VSTs are typically found as
.dllfiles on Windows and.vstor.componentfiles (inside bundles) on macOS. - Compatibility: Excellent cross-platform compatibility, primarily Windows and macOS, with some support on Linux. Audacity natively supports VST2 and VST3.
- Description: Developed by Steinberg, VST is the most widely adopted plugin format across the audio industry. Most third-party effects and virtual instruments are available as VSTs. They come in 32-bit and 64-bit versions, and it’s crucial to match the plugin’s bit version with your Audacity installation (modern Audacity is 64-bit). VSTs are typically found as
-
LADSPA (Linux Audio Developer’s Simple Plugin API):
- Description: An open-source, simple plugin format initially designed for Linux audio applications. LADSPA plugins are generally less complex than VSTs, focusing on core effects like EQ, compression, and delay. They are often found as
.sofiles (shared objects) on Linux, but compiled versions exist for Windows (.dll) and macOS. - Compatibility: Supported across Linux, Windows, and macOS. Audacity has strong native support for LADSPA plugins.
- Description: An open-source, simple plugin format initially designed for Linux audio applications. LADSPA plugins are generally less complex than VSTs, focusing on core effects like EQ, compression, and delay. They are often found as
-
AU (Audio Units):
- Description: Apple’s proprietary plugin format, native to macOS. Audio Units are deeply integrated into the macOS audio system and are often seen as
.componentfiles. They offer excellent performance on Apple hardware. - Compatibility: Exclusively for macOS. Audacity on macOS supports Audio Unit plugins.
- Description: Apple’s proprietary plugin format, native to macOS. Audio Units are deeply integrated into the macOS audio system and are often seen as
-
Nyquist:
- Description: This is Audacity’s own built-in scripting language for creating plugins. Nyquist plugins are text-based (
.nyfiles) and can be easily created and modified by users. They are excellent for simple effects, sound generation, and analysis. - Compatibility: Native to Audacity on all platforms. They require no separate compilation or complex installation, making them very accessible.
- Description: This is Audacity’s own built-in scripting language for creating plugins. Nyquist plugins are text-based (
While other formats like RTAS (Pro Tools) or AAX (Avid) exist, Audacity does not natively support them. For most users, VST, LADSPA, and AU (on Mac) will be the primary formats you encounter and install.
Preparing for Plugin Installation
A smooth plugin installation process begins with proper preparation. Taking a few precautionary steps can save you time and frustration down the line.
Essential Pre-Installation Checks
Before you even download your first plugin, consider these important checks:
- Audacity Version: Ensure your Audacity version is up-to-date. Newer versions often have improved plugin management and compatibility, particularly with 64-bit VST plugins. You can check your version by going to
Help > About Audacity. - System Bit-Architecture (Critical for VSTs): Modern Audacity (versions 2.3.0 and newer) is generally a 64-bit application. This means it will primarily work best with 64-bit plugins. While some versions might support bridging 32-bit plugins, it’s best practice to download 64-bit versions of VSTs whenever possible to avoid compatibility issues and potential crashes.
- Operating System: Be aware of your operating system (Windows, macOS, Linux) and its specific version. Plugins often have system requirements, and some are platform-exclusive (e.g., AU for Mac).
- System Requirements: Check the plugin developer’s website for any specific system requirements (OS version, RAM, CPU). While most basic effects are light on resources, some complex plugins can be demanding.
- Backup Your Project: Always a good habit. Before installing new software or making system changes, back up any important Audacity projects. While plugin installation is generally safe, unexpected issues can sometimes occur.
- Close Audacity: It’s imperative that Audacity is completely closed before you begin moving plugin files. Audacity scans for plugins when it starts, so changes won’t be recognized if it’s open.
Locating and Downloading Plugins Safely
The internet is teeming with Audacity plugins, both free and paid. However, just like any software, it’s crucial to download them from reputable sources to protect your system from malware or poorly coded software.
- Official Developer Websites: The safest place to download a plugin is directly from its developer’s official website. This ensures you’re getting the latest version, proper documentation, and avoiding malicious modifications.
- Reputable Plugin Repositories/Marketplaces: Websites like KVR Audio, Plugin Boutique, and Rekkerd are well-known and trusted platforms that host or link to a vast array of plugins. They often have user reviews and clear indications of plugin types and compatibility.
- Open-Source Communities: For LADSPA and Nyquist plugins, communities dedicated to open-source audio software (e.g., Linux audio forums, Audacity’s own forums) can be excellent sources.
- Avoid Suspicious Downloads: Be wary of direct download links from untrustworthy forums, obscure websites, or unsolicited emails. If a deal seems too good to be true for a paid plugin, it probably is.
- Read Reviews: Before downloading, quickly search for reviews of the plugin. This can help you gauge its quality, stability, and whether it’s suitable for your needs.
- File Format Awareness: When you download, pay attention to the file format. It’s usually a
.zipor.rararchive containing the actual plugin files (e.g.,.dll,.vst3,.component,.so,.ny).
Once downloaded, you’ll typically need to extract the contents of any compressed archive. Use a standard unzipping tool (built into your OS or third-party like 7-Zip or WinRAR). Inside, you’ll find the actual plugin file(s) that you need to move into Audacity’s plugin folder.
Step-by-Step Installation Guides for Different Platforms
The installation process varies slightly depending on your operating system and the type of plugin. Below are detailed instructions for Windows, macOS, and Linux users.
Installing VST/LADSPA Plugins on Windows

Windows users will primarily work with VST and LADSPA plugins, which share a similar installation method.
- Download and Extract: Download the plugin, typically a
.zipfile. Extract its contents to a temporary folder on your desktop. You’re looking for.dllfiles (for VST2/LADSPA) or folders ending in.vst3(for VST3). - Locate Audacity’s Plugin Folder:
- For VST2/LADSPA (
.dllfiles): The standard location isC:Program FilesAudacityPlug-Ins. If you installed Audacity to a different directory, navigate there. - For VST3 (
.vst3folders): VST3 plugins have a dedicated system-wide folder:C:Program FilesCommon FilesVST3. If a plugin includes a.vst3folder, place it here. - Custom VST Folder (Recommended for better organization): You can also create a dedicated folder for all your VST plugins (e.g.,
C:VST Plugins) and point Audacity to it. This makes plugin management easier if you have many or use other DAWs.
- For VST2/LADSPA (
- Move the Plugin Files:
- Copy the
.dllfile(s) into theC:Program FilesAudacityPlug-Insfolder. - If it’s a
.vst3folder, copy the entire folder intoC:Program FilesCommon FilesVST3.
- Copy the
- Start Audacity: Launch Audacity.
- Open the Plugin Manager: Go to
Effect > Add/Remove Plug-ins...(orTools > Plugin Managerin newer Audacity versions). - Scan for New Plugins: In the Plugin Manager window, you’ll see a list of plugins. New plugins will often appear with a status like “New” or “Disabled.” Click the “Rescan” button if they don’t appear immediately.
- Enable the Plugin: Find your newly installed plugin(s), select them, and change their status to “Enabled.”
- Click “OK”: Close the Plugin Manager. The plugin should now appear in the
EffectorAnalyzemenu, ready for use.
Installing VST/LADSPA/AU Plugins on macOS
macOS users have the benefit of supporting VST, LADSPA, and Apple’s native Audio Unit (AU) formats.
- Download and Extract: Download the plugin. It might be a
.zipfile, a.dmginstaller, or a.pkginstaller.- If it’s a
.zip, extract its contents. You’ll be looking for.vstbundles,.componentfiles, or.sofiles (for LADSPA). - If it’s a
.dmgor.pkginstaller, run it. These installers usually place the plugins in the correct system-wide locations automatically.
- If it’s a
- Locate Plugin Folders (Manual Placement if no installer):
- VST2 (
.vstfiles/bundles):- System-wide (available to all users):
/Library/Audio/Plug-Ins/VST - User-specific (only for your user account):
~/Library/Audio/Plug-Ins/VST(The~denotes your home directory. To access the user Library, holdOptionkey, then goFinder > Go > Library).
- System-wide (available to all users):
- VST3 (
.vst3folders):- System-wide:
/Library/Audio/Plug-Ins/VST3 - User-specific:
~/Library/Audio/Plug-Ins/VST3
- System-wide:
- Audio Units (
.componentfiles):- System-wide:
/Library/Audio/Plug-Ins/Components - User-specific:
~/Library/Audio/Plug-Ins/Components
- System-wide:
- LADSPA (
.sofiles):- Audacity’s internal plugin folder:
/Applications/Audacity.app/Contents/Plug-Ins(Right-click Audacity.app, ‘Show Package Contents’ to access). This is less common for LADSPA on Mac, but possible.
- Audacity’s internal plugin folder:
- VST2 (
- Move the Plugin Files: Copy the appropriate plugin files or folders into one of the designated system or user Library plugin folders. If the plugin came with an installer, it likely handled this automatically.
- Start Audacity: Launch Audacity.
- Open the Plugin Manager: Go to
Effect > Add/Remove Plug-ins...(orTools > Plugin Manager). - Scan and Enable: New plugins will appear as “New” or “Disabled.” Click “Rescan” if needed, then select the new plugin(s) and change their status to “Enabled.”
- Click “OK”: The plugin should now be available in the
EffectorAnalyzemenu.
Installing VST/LADSPA Plugins on Linux
Linux users generally rely on VST and LADSPA plugins, with LADSPA being particularly prevalent in the open-source Linux audio ecosystem.
- Download and Extract: Download the plugin, usually a
.zipor.tar.gzarchive. Extract its contents. You’ll primarily be looking for.sofiles (for LADSPA) or.sofiles (for VST on Linux). Some VSTs might come as self-contained executable installers. - Locate Audacity’s Plugin Folder:
- System-wide LADSPA/VST: Often
/usr/local/lib/audacity/pluginsor/usr/lib/audacity/plugins. - User-specific LADSPA/VST:
~/.audacity-data/plugins(the~denotes your home directory, and.audacity-datais a hidden folder, so you might need to enable “Show Hidden Files” in your file manager). - Custom VST Folder: You can create a dedicated VST folder, e.g.,
~/VST_Plugins, and then tell Audacity to scan this directory.
- System-wide LADSPA/VST: Often
- Move the Plugin Files: Copy the
.sofiles (for LADSPA or VST) or the entire VST plugin folder into one of the designated plugin directories. - Configure Audacity to Scan Custom VST Paths (if applicable): If you created a custom VST folder, go to
Edit > Preferences > Directories(orLibrariesin older versions). Here you can add or remove paths where Audacity should search for VST plugins. - Start Audacity: Launch Audacity.
- Open the Plugin Manager: Navigate to
Effect > Add/Remove Plug-ins...(orTools > Plugin Manager). - Scan and Enable: Find your new plugins, which might be marked as “New” or “Disabled.” Click “Rescan” if necessary, then change their status to “Enabled.”
- Click “OK”: The installed plugin(s) should now be accessible from the
EffectorAnalyzemenu.
Working with Nyquist Plugins
Nyquist plugins are Audacity’s native scripting format and are the easiest to install.
- Download the
.nyfile: Nyquist plugins are typically distributed as single.nyfiles. - Locate Audacity’s Plugin Folder:
- Windows:
C:Program FilesAudacityPlug-Ins - macOS:
/Applications/Audacity.app/Contents/Plug-Ins(Right-click Audacity.app, ‘Show Package Contents’, then navigate). - Linux: Often
/usr/local/lib/audacity/pluginsor~/.audacity-data/plugins. - You can also place Nyquist plugins in a custom folder and add that folder to Audacity’s preferences under
Edit > Preferences > Directories.
- Windows:
- Move the
.nyfile: Simply copy the.nyfile into the appropriate Audacity plugin folder. - Restart Audacity: Close and reopen Audacity.
- No Manual Activation Needed: Nyquist plugins generally do not require manual “Enabling” in the Plugin Manager. They should automatically appear under the
EffectorAnalyzemenu after restarting Audacity. If not, check the Plugin Manager (as described for VST/LADSPA) just in case it was flagged for review.
Activating and Managing Plugins Within Audacity
Once plugins are placed in the correct directory, Audacity needs to scan for them and you may need to enable them. The Plugin Manager is your central hub for this.
The Plugin Manager: Your Command Center
The Plugin Manager (found under Effect > Add/Remove Plug-ins... or Tools > Plugin Manager in newer Audacity versions) is where you control all aspects of your installed plugins.
- Accessing the Manager: Open Audacity and navigate to the Plugin Manager.
- Scanning for New Plugins: When you first open it after adding new plugins, Audacity usually performs an automatic scan. If your new plugins don’t appear or are not showing the correct status, click the “Rescan” button. This forces Audacity to re-examine all plugin directories.
- Enabling/Disabling Plugins:
- Plugins are listed with their name, type (VST, AU, LADSPA, Nyquist), and status.
- To enable a newly installed plugin, select it from the list and choose “Enabled” from the status dropdown.
- You can also disable plugins you don’t frequently use. This can help keep your menus tidy and potentially improve Audacity’s startup time if you have a vast collection.
- Managing Plugin Information: The manager often provides details about each plugin, such as its developer, version, and the path to its file. This is useful for identifying the source of a plugin or locating its file for troubleshooting.
- Removing Plugins: While the Plugin Manager doesn’t directly delete files, you can mark plugins as “Disabled” or “New” to effectively remove them from your active menus. To fully uninstall, you’d need to delete the plugin file from your system’s plugin folder.
After making any changes in the Plugin Manager, always click “OK” to apply them.
Applying Plugins to Your Audio Tracks
Once enabled, using a plugin in Audacity is straightforward:
- Select Audio: In your Audacity project, select the audio track or specific portion of audio you wish to apply the effect to.
- Open Effect/Analyze Menu: Go to the
Effectmenu (for most processing plugins) or theAnalyzemenu (for analysis tools). - Choose Your Plugin: Your enabled plugins will appear in these menus, often categorized or listed alphabetically. Select the plugin you want to use.
- Adjust Settings: A new window will open with the plugin’s interface. This is where you’ll adjust parameters, presets, and other settings specific to that plugin. Take your time to understand the controls; many plugins come with excellent documentation or tutorials online.
- Preview and Apply: Most plugins offer a “Preview” button, allowing you to hear the effect of your settings on a short selection of your audio before committing. Once satisfied, click “Apply” to render the effect onto your selected audio. Remember that applying effects in Audacity is generally destructive (it modifies the audio directly), so it’s always wise to work on a copy of your track or save your project frequently.
Troubleshooting Common Plugin Installation Issues
Even with careful preparation, you might encounter issues during plugin installation or usage. Here are some common problems and their solutions.
Plugin Not Appearing in Manager or Menus
- Audacity Not Restarted: After placing plugin files, you must restart Audacity for it to scan for new additions.
- Incorrect Folder: Double-check that you’ve placed the plugin file (
.dll,.vst,.component,.so,.ny) in the correct Audacity plugin folder for your operating system and plugin type. Remember system-wide vs. user-specific paths. - Not Enabled: Go to the Plugin Manager (
Effect > Add/Remove Plug-ins...) and ensure the plugin’s status is set to “Enabled.” Click “Rescan” if necessary. - Wrong Bit-Architecture: If Audacity is 64-bit (most modern versions) and you installed a 32-bit VST, it might not appear or function correctly. Always try to download 64-bit plugins.
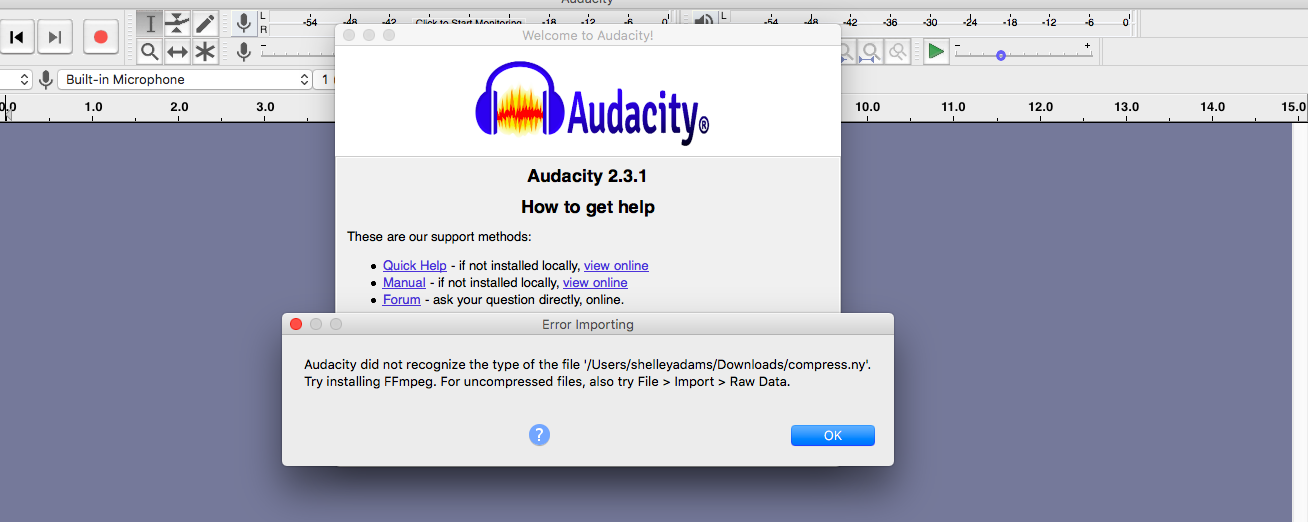
- Corrupted Download/File: The plugin file itself might be corrupted. Try downloading it again from a reputable source.
- Installation Failure (for installers): If you used an installer, it might have failed silently. Re-run the installer or check its log for errors.
Plugin Causing Crashes or Errors
- Incompatible Plugin: Some older or poorly coded plugins might simply not be compatible with newer Audacity versions or your operating system.
- 32-bit vs. 64-bit Mismatch: This is a common culprit. If you’re running 64-bit Audacity with a 32-bit VST, it can cause instability. Try to find a 64-bit version of the plugin.
- Resource Demands: Very complex plugins, especially those designed for high-end DAWs, can sometimes overwhelm Audacity’s resources, leading to crashes.
- Conflicting Plugins: Rarely, two plugins might conflict with each other. Try disabling other plugins to see if the issue persists.
- Solution: Identify the problematic plugin. First, disable it in the Plugin Manager. If Audacity still crashes, you may need to manually remove the plugin file from your system’s plugin folders. Restart Audacity and see if stability returns. If you suspect a specific plugin, research its compatibility with your Audacity version online.
Performance Considerations
- High CPU Usage: Some plugins, especially those with complex algorithms (e.g., advanced noise reduction, convolution reverb), can be very CPU intensive. Applying them to long tracks or multiple instances can slow down Audacity or cause stuttering during playback.
- Memory Usage: Plugins can consume RAM, particularly if you have many open or are using sample-based instruments.
- Solutions:
- Render Tracks: After applying an effect with a plugin, select the track and choose
Tracks > Mix > RenderorTracks > Mix > Mix and Render. This bakes the effect into the audio, freeing up CPU resources that were being used to process the live plugin. - Disable Unused Plugins: Keep only the plugins you actively use enabled in the Plugin Manager.
- Work in Chunks: For very long audio files, process them in smaller segments.
- Upgrade Hardware: If you frequently work with demanding plugins, more RAM or a faster CPU might be necessary.
- Render Tracks: After applying an effect with a plugin, select the track and choose
By systematically approaching these troubleshooting steps, you can resolve most plugin-related issues and ensure a stable and efficient Audacity workflow.
Conclusion
Installing Audacity plugins might seem daunting at first, given the different formats and platform-specific nuances, but with this guide, you now possess the knowledge to confidently expand your audio toolkit. From understanding the power of VSTs and LADSPAs to navigating the Plugin Manager and troubleshooting common hurdles, you’re well-equipped to integrate new capabilities into your Audacity projects.
Remember, the world of audio plugins is vast and constantly evolving. Don’t be afraid to experiment, explore new effects, and customize your Audacity environment to suit your unique creative needs. By leveraging these powerful extensions, you can significantly enhance your audio production quality, streamline your workflow, and unlock Audacity’s full potential as a professional-grade sound editing solution. Happy editing, and may your audio always be pristine!
aViewFromTheCave is a participant in the Amazon Services LLC Associates Program, an affiliate advertising program designed to provide a means for sites to earn advertising fees by advertising and linking to Amazon.com. Amazon, the Amazon logo, AmazonSupply, and the AmazonSupply logo are trademarks of Amazon.com, Inc. or its affiliates. As an Amazon Associate we earn affiliate commissions from qualifying purchases.