
In the dynamic world of Linux, where a multitude of distributions caters to every conceivable user preference, software installation has historically been a topic of both robust debate and diverse methodologies. From apt on Debian-based systems to dnf on Fedora and pacman on Arch Linux, each package manager offers a powerful, yet often distribution-specific, approach to handling software. This landscape, while rich in choice, can sometimes present a fragmentation challenge for software developers and users alike. Enter AppImage – a groundbreaking universal software packaging format that promises to simplify software distribution and enhance user experience across virtually all Linux distributions.

AppImage represents a significant leap forward in making Linux software as accessible and portable as applications on other operating systems. It encapsulates an application and all its dependencies into a single, self-contained executable file, eliminating the need for traditional installation procedures or worrying about conflicting libraries. For users, this translates to unparalleled flexibility, allowing them to run software directly from a USB drive, cloud storage, or any directory on their system, without requiring administrative privileges. For developers, it means wider reach and reduced maintenance overhead. This article will delve into the intricacies of AppImage, guiding you through the process of installing and managing these versatile applications, while also exploring the broader implications for productivity, digital security, and the future of software distribution on Linux.
Understanding AppImage: A Paradigm Shift in Linux Software Distribution
At its core, AppImage is not an installer in the traditional sense, but rather a portable application format that bundles an application and everything it needs to run into one single file. This innovative approach addresses many of the long-standing challenges associated with software deployment on Linux, offering a harmonious solution for both users and developers.
What is AppImage? The Self-Contained Revolution
An AppImage file is essentially a compressed disk image that contains the application, all its required libraries, and other dependencies. When you run an AppImage, it’s mounted as a file system, and the application inside is executed directly from this virtual file system. This mechanism relies on technologies like FUSE (Filesystem in Userspace) and SquashFS, which allow a regular user to mount a compressed file as a filesystem without root privileges. The beauty of this design lies in its simplicity: a single file, downloaded once, that can run on almost any Linux distribution released in the last decade. There’s no unpacking, no complex setup scripts, and no modification of the host system’s libraries. This “one file, one app” philosophy radically simplifies the user experience, moving away from the often-intimidating command-line package management to a more intuitive, double-click-and-run approach reminiscent of macOS or Windows. This aspect alone makes AppImage a compelling example of how technology trends are moving towards greater user accessibility and ease of use, even within a traditionally more technical environment like Linux.
Why Choose AppImage? The Advantages that Drive Adoption
The benefits of AppImage extend far beyond mere convenience, impacting various facets of software usage, from system stability to user freedom.
- Unparalleled Portability: AppImages are designed to be truly portable. You can copy an AppImage file to a USB drive, an external hard drive, or even a cloud storage service, and then run it on any compatible Linux machine without needing to reinstall or configure anything. This is invaluable for field technicians, multi-OS users, or anyone who needs their specific toolset available on demand.
- Distribution Agnostic (Universal Compatibility): This is perhaps the most significant advantage. Developers no longer need to package their software for Ubuntu, Fedora, Arch, openSUSE, and countless other distributions separately. A single AppImage works across them all, drastically reducing development overhead and ensuring a wider user base can access the latest software without compatibility headaches. This universal appeal directly contributes to broader technology adoption.
- No Root Privileges Required: Installing software often demands
sudoor root access, which can be a security concern and a barrier in shared computing environments. AppImages run entirely in user space, meaning you don’t need elevated permissions to download and execute them. This enhances digital security by limiting the scope of potential damage if an application were compromised, as it cannot modify core system files. - Elimination of “Dependency Hell”: One of the most frustrating aspects of traditional Linux software installation is dependency management. Applications often require specific versions of libraries, which might conflict with other installed software or simply be missing from the system. AppImage bundles all necessary dependencies, completely sidestepping this issue and guaranteeing that the application runs as intended, regardless of your system’s library configuration.
- Simplified Updates and Rollbacks: Updating an AppImage is as simple as downloading a newer version of the file and replacing the old one. There’s no complex update mechanism or system-wide package upgrades. Similarly, if a new version introduces an issue, rolling back is just as easy: replace the new file with the previous one you saved. This straightforward approach provides users with greater control over their software lifecycle.
- Minimal System Impact: Since AppImages don’t “install” anything onto your system in the conventional sense, they leave very little footprint. No scattered files, no registry entries (Linux doesn’t have one, but the analogy holds), and no complex uninstall procedures. Deleting an AppImage file completely removes the application from your system, making cleanup effortless. This contributes to better system hygiene and performance over time, aligning with principles of efficient technology management.
When Might AppImage Not Be the Best Fit?
While AppImage offers numerous advantages, it’s not a panacea for all software distribution challenges. There are scenarios where traditional package managers or other container formats like Flatpak and Snap might be more suitable:
- Larger File Sizes: Bundling all dependencies can lead to larger file sizes for AppImages compared to native packages that rely on shared system libraries. For bandwidth-constrained users or very small applications, this might be a minor drawback.
- No Automatic Updates (by default): Unlike system package managers that can update all installed software with a single command, AppImages generally require manual updating by downloading a newer file. Some AppImages integrate update mechanisms, but it’s not a universal feature.
- Limited Desktop Integration (out-of-the-box): While AppImages run flawlessly, they don’t automatically integrate into your desktop environment’s application menus or provide icons in the same way native installations do. This often requires an extra step, either manually or using tools like AppImageLauncher.
- Not Ideal for System-Level Tools: AppImages are best suited for graphical desktop applications. System services, drivers, or tools that require deep integration with the operating system are better managed through traditional package managers.
Despite these minor caveats, the advantages of AppImage often outweigh the disadvantages, especially for desktop productivity tools and specialized applications that might not be available in standard distribution repositories.
The Step-by-Step Guide to Installing and Running AppImages
The process of “installing” an AppImage is refreshingly simple, eschewing complex commands and system modifications for a direct, user-friendly approach. Here’s how you can get your AppImage applications up and running.
Step 1: Locating and Downloading Your AppImage
The journey begins with finding the AppImage file for the software you wish to use.
- Official Websites: Many software projects now offer AppImages directly on their official download pages. This is usually the most reliable and secure source. Look for a section dedicated to “Linux” or “AppImage” downloads.
- AppImageHub: This is a centralized repository and discovery platform for AppImages. While not every AppImage is hosted directly on AppImageHub, it often provides links to the official download pages. It’s an excellent resource for exploring available AppImages.
- Verify Sources: Always prioritize downloading AppImages from official developer websites or well-known, reputable sources. Just like any executable file, an AppImage from an untrusted source could potentially contain malicious code. This is a critical aspect of digital security and maintaining a secure computing environment. Always check for HTTPS connections and look for checksums (MD5, SHA256) on the download page, which you can use to verify the integrity of the downloaded file.
Once you’ve identified your desired AppImage, click the download link. The file will typically have a .AppImage extension (e.g., krita-5.1.5-x86_64.AppImage). Save it to a location that’s convenient for you, such as your Downloads folder, or better yet, create a dedicated AppImages folder in your home directory for better organization. This aligns with good productivity practices, ensuring your files are easily accessible and managed.
Step 2: Making the AppImage Executable
A newly downloaded AppImage file is typically not executable by default, a security measure implemented by operating systems. You need to grant it execution permissions before it can run.
-
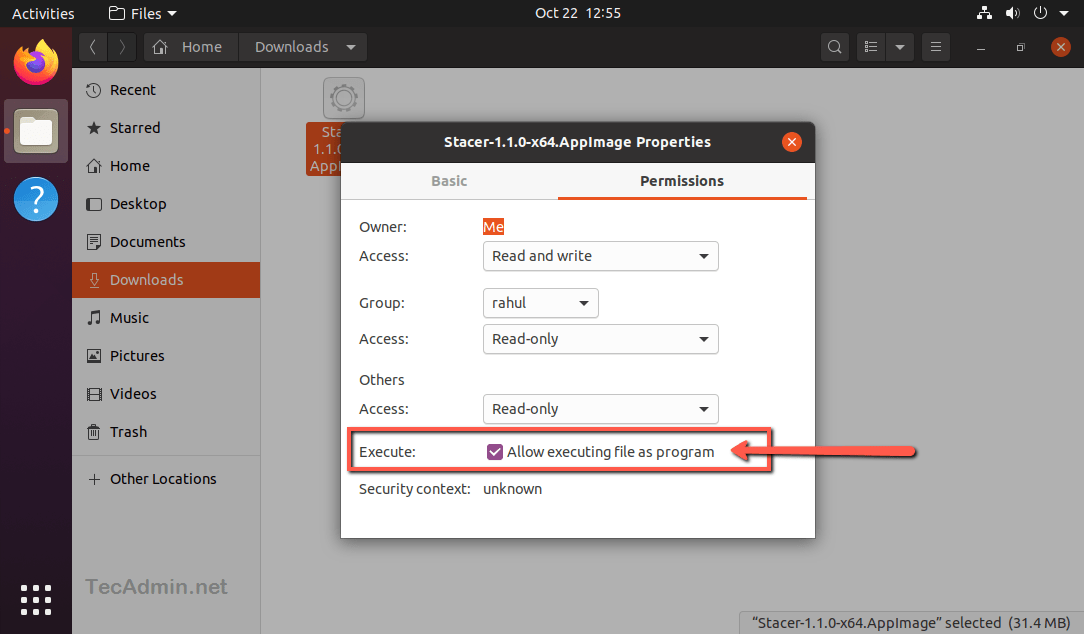
Graphical Method (File Manager): This is the easiest method for most users.
- Open your file manager (e.g., Nautilus on GNOME, Dolphin on KDE, Thunar on XFCE).
- Navigate to the directory where you saved the
.AppImagefile. - Right-click on the
.AppImagefile. - Select “Properties” or “Permissions” (the exact wording may vary depending on your file manager).
- Look for an option like “Allow executing file as program,” “Is executable,” or “Execute.” Check this box.
- Close the properties window.
-
Terminal Method: For users comfortable with the command line, this method is quick and universally applicable.
- Open your terminal.
- Navigate to the directory where you saved the
.AppImagefile using thecdcommand. For example, if you saved it in~/AppImages, you would type:
bash

cd ~/AppImages
- Grant execute permissions using the
chmodcommand:
bash

chmod +x your_app_name.AppImage
Replaceyour_app_name.AppImagewith the actual filename of your AppImage. The+xoption adds execute permission to the file. This command is fundamental to understanding file permissions on Linux, a crucial aspect of digital security.
After performing either of these steps, your AppImage is now ready to be launched.
Step 3: Launching Your AppImage
With execution permissions granted, running your AppImage is straightforward.
- Graphical Method (Double-Click):
- Simply navigate to the AppImage file in your file manager.
- Double-click on the file.
- The application should launch. On the first launch, some AppImages might prompt you whether you want to integrate them into your desktop environment (add to application menus, create shortcuts). It’s generally a good idea to accept this if you plan to use the application frequently.

- Terminal Method:
- Open your terminal.
- Navigate to the directory containing the AppImage file (if you haven’t already).
- Execute the AppImage by typing
./followed by the filename:
bash

./your_app_name.AppImage
The./prefix is important as it tells the shell to look for the executable in the current directory.
Your AppImage should now be running! This simple three-step process is a testament to the ease of use that AppImage brings to the Linux ecosystem, significantly lowering the barrier to entry for accessing a wide range of software.
Enhancing Your AppImage Experience: Integration and Management
While running an AppImage is simple, integrating it seamlessly into your daily workflow and managing multiple AppImages efficiently can further elevate your Linux experience. This is where tools and best practices come into play, turning a basic executable into a fully integrated application.
Desktop Integration for a Seamless Workflow
The initial run of an AppImage often presents a standalone application, lacking the automatic desktop integration that native packages provide. This means no icon in your application launcher, no entry in the start menu, and no convenient shortcuts. For casual use, this might be fine, but for applications you use regularly, proper integration is key to maximizing productivity.
- AppImageLauncher: The Ultimate Integration Tool: For most users, AppImageLauncher is the recommended solution for seamless AppImage integration. This utility simplifies the entire process by:
- Detecting new AppImages: When you download an AppImage, AppImageLauncher can automatically detect it.
- Prompting for integration: It will ask you if you want to integrate the AppImage into your system, moving it to a standard location (
~/Applicationsby default) and creating a.desktopfile. - Creating
.desktopfiles: It generates the necessary.desktopfiles, which are standard Linux desktop entries that tell your desktop environment how to display and launch the application (icon, name, categories). - Handling updates: It also helps manage updates by allowing you to replace the integrated AppImage with a newer version.
To install AppImageLauncher, you typically download a .deb (for Debian/Ubuntu) or .rpm (for Fedora/openSUSE) package from its GitHub releases page and install it using your system’s package manager (e.g., sudo dpkg -i appimagelauncher_*.deb or sudo dnf install appimagelauncher_*.rpm). Once installed and running, AppImageLauncher dramatically improves the user experience, making AppImages feel like natively installed applications.
- Manual Integration (for advanced users): If you prefer not to use AppImageLauncher or encounter a rare scenario where it doesn’t work, you can manually create a
.desktopfile. This involves creating a text file namedyour_app.desktopin~/.local/share/applications/with specific content, including the path to your AppImage, its name, and an icon path. While more involved, it offers complete control. Several online tutorials provide detailed instructions for this process.
Updating and Managing AppImages
Managing your AppImage collection effectively is crucial for maintaining up-to-date software and a clutter-free system.
- Manual Updates: The most common way to update an AppImage is simply to download the newer version from the official source and replace the old
.AppImagefile with the new one. If you’ve integrated it with AppImageLauncher, it will often detect the new version and update the desktop entry accordingly. Before replacing, it’s a good practice to back up the old AppImage or rename it (e.g.,app-old.AppImage) in case the new version introduces issues. - AppImages with Built-in Updaters: Some AppImages incorporate an update mechanism, often using tools like AppImageUpdate or a custom updater implemented by the developer. If an AppImage has this feature, it will usually prompt you to update directly from within the application or offer an “Update” option in its menu.
- Organizing Your AppImages: Creating a dedicated folder, such as
~/Applicationsor~/AppImages, is highly recommended. This keeps all your AppImages in one place, making them easy to find, manage, and back up. This simple organizational strategy is a cornerstone of productivity, helping you keep track of your digital assets.
Digital Security and Best Practices with AppImages
While AppImages offer convenience, maintaining strong digital security practices is paramount, especially when dealing with executable files from the internet.
- Download from Trusted Sources ONLY: This cannot be stressed enough. Only download AppImages from the official developer’s website or highly reputable platforms like AppImageHub (which typically links to official sources). Avoid downloading from unofficial mirrors or suspicious websites. Malicious actors can easily embed malware into an AppImage, as it’s a self-contained executable.
- Verify Checksums: Whenever a developer provides a checksum (MD5, SHA256) for their AppImage, always use it to verify the integrity of your downloaded file. This ensures that the file hasn’t been tampered with during download or by a malicious third party. Tools like
sha256sum(e.g.,sha256sum your_app_name.AppImage) can be used in the terminal to compare the calculated checksum with the one provided by the developer. - Consider Sandboxing: For critical applications or if you’re concerned about potential vulnerabilities, consider running AppImages within a sandboxing tool like Firejail. Firejail allows you to restrict an application’s access to your system, limiting what it can see and do, even if it were compromised. This adds an extra layer of digital security, protecting your system from potentially rogue applications.
- Regularly Review AppImage Permissions: While AppImages don’t require root, it’s still good practice to be mindful of what permissions they might inherit. Regularly review the
chmodpermissions to ensure only execute access is granted where necessary.
By following these best practices, you can enjoy the benefits of AppImages while maintaining a robust and secure Linux computing environment, a key concern for any technology-savvy user.
Troubleshooting Common AppImage Issues
Even with a straightforward process, you might occasionally encounter minor hiccups when working with AppImages. Here are some common issues and their solutions:
-
“Permission denied” or “Cannot execute binary file” error: This is by far the most common issue and almost always means you haven’t granted execution permissions to the AppImage.
- Solution: Follow “Step 2: Making the AppImage Executable” described earlier. Use either the graphical file manager method (right-click -> Properties -> Permissions -> Allow executing) or the terminal command (
chmod +x your_app_name.AppImage).
- Solution: Follow “Step 2: Making the AppImage Executable” described earlier. Use either the graphical file manager method (right-click -> Properties -> Permissions -> Allow executing) or the terminal command (
-
AppImage doesn’t launch, and no error message appears (or a cryptic one):
- Solution 1: Check System Dependencies: While AppImages bundle most dependencies, very old Linux systems or minimalist installations might sometimes lack fundamental components, particularly FUSE (Filesystem in Userspace), which AppImages rely on.
- Check for FUSE: You can usually install FUSE using your distribution’s package manager:
- Debian/Ubuntu:
sudo apt install libfuse2 - Fedora:
sudo dnf install fuse-libs - Arch:
sudo pacman -S fuse2
- Debian/Ubuntu:
- Check for FUSE: You can usually install FUSE using your distribution’s package manager:
- Solution 2: Check Integrity: The download might have been corrupted.
- Action: Re-download the AppImage from the official source. If a checksum is provided, verify it.
- Solution 3: Check Logs (for advanced users): Running the AppImage from the terminal might reveal more verbose error messages that can help diagnose the problem. For example,
./your_app_name.AppImage.
- Solution 1: Check System Dependencies: While AppImages bundle most dependencies, very old Linux systems or minimalist installations might sometimes lack fundamental components, particularly FUSE (Filesystem in Userspace), which AppImages rely on.
-
“Cannot open display” or graphical issues when launching from terminal: This can happen if you’re trying to launch a graphical AppImage over SSH without X forwarding, or if there are issues with your display server.
- Solution: Ensure you are launching the AppImage from a graphical session or, if via SSH, that X forwarding is correctly configured (
ssh -X user@host).
- Solution: Ensure you are launching the AppImage from a graphical session or, if via SSH, that X forwarding is correctly configured (
-
AppImage launches but doesn’t appear in the application menu/launcher:
- Solution: This is a desktop integration issue. Install and use AppImageLauncher, or manually create a
.desktopfile as described in “Desktop Integration for a Seamless Workflow.”
- Solution: This is a desktop integration issue. Install and use AppImageLauncher, or manually create a
-
AppImage feels sluggish or consumes a lot of resources:
- Solution: While rare, some AppImages might be poorly optimized or inherently resource-intensive.
- Check for Updates: A newer version might have performance improvements.
- Consider Alternatives: If performance is consistently poor, evaluate if a native package or an alternative application (Flatpak/Snap) is available.
- Hardware Limitations: Ensure your system meets the minimum requirements for the application.
- Solution: While rare, some AppImages might be poorly optimized or inherently resource-intensive.
By systematically addressing these common issues, you can quickly overcome most hurdles and enjoy the convenience of AppImage applications without significant disruption to your workflow.
Conclusion
AppImage stands as a testament to the ongoing innovation within the Linux ecosystem, addressing long-standing fragmentation challenges with an elegant, user-centric solution. By packaging applications into single, self-contained executable files, it empowers users with unparalleled portability, distribution universality, and freedom from “dependency hell.” The process of installing an AppImage is remarkably simple: download, grant execute permissions, and run – a paradigm shift from traditional package management.
Beyond its straightforward operation, AppImage plays a significant role in broader technology trends, promoting ease of use and accessibility that resonates with a wider audience. Its design inherently supports enhanced digital security by allowing applications to run without root privileges and by simplifying the removal process, leaving minimal system footprint. When coupled with tools like AppImageLauncher, these portable applications seamlessly integrate into the desktop environment, transforming a simple executable into a fully functional and convenient part of your daily workflow, thereby boosting productivity.
While considerations regarding file size and automatic updates exist, the benefits of AppImage often outweigh these minor drawbacks, particularly for accessing niche software, development tools, or newer application versions not yet available in distribution repositories. As Linux continues to evolve and attract more users, solutions like AppImage will be crucial in making the operating system more approachable and versatile. Embracing AppImage not only simplifies software management but also represents a forward-thinking approach to how we acquire, use, and maintain applications in an increasingly diverse and dynamic computing landscape.
aViewFromTheCave is a participant in the Amazon Services LLC Associates Program, an affiliate advertising program designed to provide a means for sites to earn advertising fees by advertising and linking to Amazon.com. Amazon, the Amazon logo, AmazonSupply, and the AmazonSupply logo are trademarks of Amazon.com, Inc. or its affiliates. As an Amazon Associate we earn affiliate commissions from qualifying purchases.