The macOS ecosystem has long been celebrated for its intuitive user interface and robust performance. For newcomers transitioning from other operating systems or even seasoned users looking to refine their workflow, understanding the nuances of software installation is fundamental. While the process is generally streamlined, Apple provides multiple avenues for adding software to your machine—each with its own set of protocols, security measures, and management requirements.
In this guide, we will explore the technical landscape of macOS application installation, from the curated environment of the App Store to the more flexible world of third-party installers and command-line package managers.
The Mac App Store: A Curated Software Experience
The Mac App Store is the primary and most secure method for acquiring software on a Mac. Modeled after the iOS experience, it offers a centralized location where every application has undergone a rigorous review process by Apple to ensure it meets specific standards for security, privacy, and performance.
Finding and Downloading Applications
To begin, users navigate to the App Store icon in the Dock or through the Applications folder. The store utilizes a unified Apple ID system, meaning any purchase or download is tied to your account across all your Apple devices. When you click “Get” or the price button, macOS handles the entire lifecycle of the installation. Unlike traditional installers, App Store apps are “sandboxed,” meaning they operate within a restricted environment to prevent them from accessing sensitive system data without explicit permission. This architecture is the cornerstone of macOS security, minimizing the risk of malware and system instability.
Managing Updates and Re-downloads
One of the primary technical advantages of using the App Store is the automated update mechanism. The appstored daemon runs in the background, checking for software patches and security updates. For users with multiple Macs, the “Purchased” tab allows for seamless re-installation of previously owned software without needing to hunt for license keys or installation media. This centralized management simplifies the maintenance of a “clean” system, as the OS keeps a tight log of where these files reside.
Beyond the Store: Installing Third-Party Software
While the App Store is convenient, many professional-grade tools, open-source projects, and niche utilities are distributed directly by developers. These files usually come in three primary formats: DMG, PKG, and ZIP.
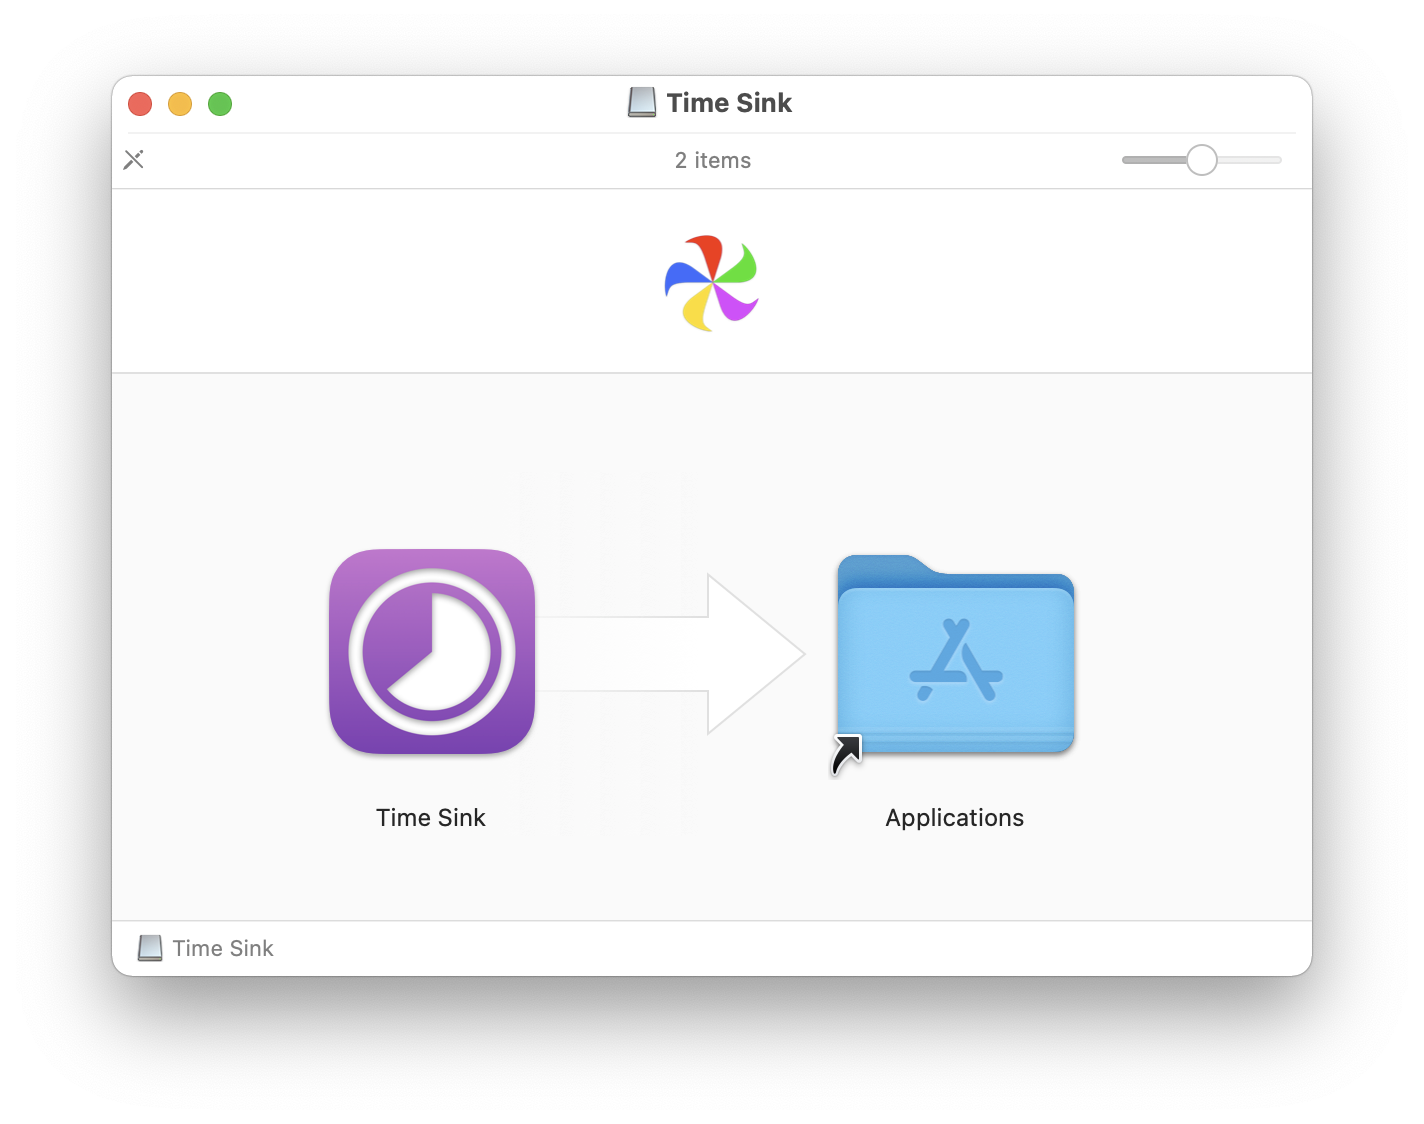
The Classic DMG Drag-and-Drop Method
A DMG (Disk Image) is a digital version of a physical disc. When you double-click a DMG file, macOS “mounts” it as a virtual drive on your desktop. Typically, a window opens showing the application icon and a shortcut to your Applications folder.
Technically, this is not an “installer” in the traditional Windows sense. It is a simple file copy. By dragging the .app bundle into the Applications folder, you are moving a self-contained directory that holds all the necessary executable code, resources, and frameworks the app needs to run. Once the copy is complete, you should “Eject” the DMG to unmount the virtual disk and keep your file system tidy.
Using PKG Installers for Complex Software
Some software requires deeper integration with the operating system, such as drivers, system extensions, or shared libraries. These are usually distributed as .pkg files. When you run a PKG file, the macOS Installer app takes over.
This process often requires administrative privileges because the installer may write files to protected system directories like /Library/Application Support/ or /Library/Extensions/. Unlike the drag-and-drop method, PKG installers often include “pre-install” and “post-install” scripts that configure the system environment specifically for that software. This is common for heavy-duty suites like Adobe Creative Cloud or virtualization software like VMware.
Extracting ZIP and Compressed Archives
Occasionally, developers distribute apps as simple ZIP archives. When downloaded, Safari often automatically expands these files using the Archive Utility. If the result is a .app file, the user should manually move it to the Applications folder. Running an app directly from the “Downloads” folder can lead to issues with “Translocation,” a security feature where macOS runs the app from a randomized path to prevent it from being modified by other malicious files in the same download directory.
Security and Gatekeeper: Navigating Apple’s Protection
Apple’s security philosophy is built on the concept of “Gatekeeper.” This technology is designed to ensure that only trusted software runs on your Mac.
Understanding the “Unidentified Developer” Warning
When you attempt to open an app downloaded from the internet for the first time, macOS checks for a digital signature. If the developer is not registered with Apple or the app hasn’t been “notarized” (a process where Apple scans the software for malicious content before distribution), you will see a warning stating the app “cannot be opened because it is from an unidentified developer.”
This is not a bug, but a protective barrier. From a technical standpoint, the OS is flagging that the chain of trust has been broken. For power users who trust the source, this can be bypassed by Control-clicking (right-clicking) the app and selecting “Open,” or by navigating to System Settings > Privacy & Security and clicking “Open Anyway.”
Configuring Security and Privacy Settings
In recent versions of macOS (Ventura and Sonoma), Apple has consolidated these settings. Within the Privacy & Security pane, users can choose to allow apps from “App Store” only or “App Store and identified developers.”
Furthermore, macOS utilizes “System Integrity Protection” (SIP) to prevent even authorized apps from modifying core system files. If an app requires such access, it must use specific Apple-approved APIs or Apple-signed extensions. Understanding these layers is vital for troubleshooting why certain legacy apps or deep-system utilities might fail to install or function correctly on modern hardware.
Advanced Installation: Package Managers for Power Users
For developers and IT professionals, the graphical interface can sometimes be slower than the command line. This is where third-party package managers come into play.
Homebrew: The Missing Package Manager for macOS
Homebrew has become the industry standard for installing software on Mac via the Terminal. By using a simple command like brew install <package>, users can download and configure software without ever opening a web browser.
Homebrew works by installing files into its own prefix (typically /usr/local on Intel Macs and /opt/homebrew on Apple Silicon) and then symlinking them into the user’s path. This prevents the “dependency hell” often found in manual installations, as Homebrew automatically manages versioning and required libraries.
Using Terminal for Command-Line Tools
Beyond Homebrew, macOS includes a built-in utility called installer. By using the command sudo installer -pkg /path/to/package.pkg -target /, administrators can deploy software across multiple machines remotely via SSH. This level of control is essential for managing enterprise environments or setting up automated development workflows.
Maintaining a Clean System: Uninstallation and Optimization
Installation is only half the battle; maintaining a healthy system requires knowing how to properly remove software and manage its impact on system resources.
Beyond Emptying the Trash
Dragging an app from the Applications folder to the Trash deletes the .app bundle, but it often leaves behind “residue.” These are preference files, caches, and application support data stored in the hidden ~/Library folder.
To ensure a “clean” uninstallation, tech-savvy users often use uninstaller utilities or manually check ~/Library/Preferences/ and ~/Library/Application Support/. Removing these leftover files can reclaim disk space and prevent background processes from consuming CPU cycles long after the main app is gone.
Managing Startup Items and Background Tasks
Many modern apps install “Login Items” or “Background Items” that launch automatically when you boot your Mac. While some are necessary (like cloud syncing tools), too many can lead to “system bloat.”
Users should periodically audit these through System Settings > General > Login Items. Here, you can toggle off “Allow in the Background” for apps that don’t need to be running constantly. This technical housekeeping ensures that your Mac’s RAM and processing power are reserved for the tasks you are currently working on, rather than being drained by forgotten helper apps.
By mastering these different installation vectors and security protocols, users can ensure their Mac remains a high-performance tool tailored to their specific needs. Whether you stick to the curated App Store or dive into the Terminal, the key is understanding the underlying mechanics that keep macOS both flexible and secure.
aViewFromTheCave is a participant in the Amazon Services LLC Associates Program, an affiliate advertising program designed to provide a means for sites to earn advertising fees by advertising and linking to Amazon.com. Amazon, the Amazon logo, AmazonSupply, and the AmazonSupply logo are trademarks of Amazon.com, Inc. or its affiliates. As an Amazon Associate we earn affiliate commissions from qualifying purchases.