In today’s fast-paced digital landscape, automation isn’t just a luxury; it’s a fundamental necessity for organizations and individual developers alike. From managing sprawling cloud infrastructures to deploying complex applications, the demand for efficient, repeatable, and scalable solutions has never been higher. Enter Ansible – a powerful, open-source automation engine that has revolutionized the way IT operations are handled. Designed for simplicity and ease of use, Ansible stands out for its agentless architecture, meaning it doesn’t require any special software to be installed on the managed nodes. This dramatically simplifies setup, enhances security, and reduces overhead.

Whether you’re a seasoned system administrator looking to streamline your workflows, a developer aiming to automate deployment pipelines, or an IT professional eager to minimize human error and ensure consistency across your environments, mastering Ansible installation is your first crucial step. By leveraging Ansible, businesses can achieve significant cost savings by reducing manual labor, improve service delivery through consistent deployments, and fortify their digital security posture by enforcing uniform configurations. This guide will walk you through the process of installing Ansible, covering various operating systems and best practices to ensure you hit the ground running, paving the way for a more productive and secure technological future.
Choosing Your Ansible Installation Method
Ansible, being a Python-based tool, offers remarkable flexibility in its installation across a variety of operating systems. The method you choose will primarily depend on your host operating system and your preference for package management. While the core functionality remains the same, understanding these different approaches is key to a smooth setup and future maintenance. Each method leverages the native package manager or a dedicated Python tool to fetch and install Ansible and its dependencies, ensuring compatibility and ease of updates.
Installing Ansible on Linux/macOS (using pip)
For many, installing Ansible via pip (Python’s package installer) is the most straightforward and often recommended method, especially if you want the latest version or prefer to manage Python packages directly. This approach is highly versatile, working seamlessly across most Linux distributions and macOS. It also offers the advantage of allowing you to install Ansible into a Python virtual environment, which is excellent for isolating dependencies and preventing conflicts with other Python projects.
Before you begin, ensure you have Python 3 and pip installed on your system. Most modern Linux distributions and macOS come with Python pre-installed. You can check their versions with python3 --version and pip3 --version. If pip is missing, you can usually install it via your system’s package manager (e.g., sudo apt install python3-pip on Debian/Ubuntu, or brew install python on macOS via Homebrew, which includes pip).
Steps:
-
Ensure Python and pip are up-to-date:
sudo apt update && sudo apt install python3 python3-pip # For Debian/Ubuntu
sudo yum install python3 python3-pip # For CentOS/RHEL
# For macOS, Python 3 and pip usually come with Homebrew's Python
You might also want to upgrade pip itself:
pip3 install --upgrade pip -
(Optional but Recommended) Create a Python Virtual Environment:
A virtual environment allows you to install packages in an isolated directory, preventing conflicts.python3 -m venv ansible_env source ansible_env/bin/activateYour prompt should now indicate that you are inside the
ansible_envvirtual environment. -
Install Ansible using pip:
pip install ansibleThis command downloads and installs the latest stable version of Ansible and its necessary dependencies.
-
Verify the installation:
bash

ansible --version
You should see output detailing the Ansible version, Python version, and other configuration information.
Installing Ansible on Debian/Ubuntu (using apt)
Debian and Ubuntu users can leverage the apt package manager to install Ansible. This is a robust and convenient method as it integrates Ansible directly into your system’s package management, simplifying updates and dependency handling. While the version available through apt might sometimes lag slightly behind the absolute latest release available via pip, it’s generally stable and well-supported for production environments. For the very latest version, you might need to add Ansible’s official PPA (Personal Package Archive).
Steps:
-
Add Ansible PPA (for the latest stable version):
This step is optional. If you’re content with the version available in the default repositories, skip to step 2.sudo apt update sudo apt install software-properties-common sudo add-apt-repository --yes --update ppa:ansible/ansible -
Update package lists and install Ansible:
sudo apt update sudo apt install ansible -
Verify the installation:
bash

ansible --version
Installing Ansible on RHEL/CentOS/Fedora (using yum/dnf)
For Red Hat Enterprise Linux (RHEL), CentOS, and Fedora distributions, Ansible is readily available through their respective package managers, yum (for older RHEL/CentOS) and dnf (for Fedora and newer RHEL/CentOS). On these systems, Ansible is typically found in the EPEL (Extra Packages for Enterprise Linux) repository, which needs to be enabled first.
Steps:
-
Enable EPEL repository:
- For RHEL/CentOS 7:
bash

sudo yum install epel-release
- For RHEL/CentOS 8/9 and Fedora:
bash

sudo dnf install epel-release
- Confirm EPEL is enabled:
bash

sudo yum repolist # For yum systems

sudo dnf repolist # For dnf systems
- For RHEL/CentOS 7:
-
Install Ansible:
- Using yum (RHEL/CentOS 7):
bash

sudo yum install ansible
- Using dnf (RHEL/CentOS 8/9, Fedora):
bash

sudo dnf install ansible
- Using yum (RHEL/CentOS 7):
-
Verify the installation:
bash

ansible --version
Installing Ansible on macOS (using Homebrew)
Homebrew is the de facto package manager for macOS, making it an incredibly convenient way to install and manage open-source tools like Ansible. If you’re on a Mac, Homebrew is likely your preferred method.
Steps:
-
Install Homebrew (if not already installed):
Open your terminal and run:/bin/bash -c "$(curl -fsSL https://raw.githubusercontent.com/Homebrew/install/HEAD/install.sh)"Follow the on-screen instructions.
-
Install Ansible via Homebrew:
brew install ansible -
Verify the installation:
bash

ansible --version
Installing Ansible on Windows (via WSL2 or Virtual Machine)
Direct native installation of Ansible on Windows is not officially supported due to its reliance on SSH and other Linux-centric utilities. However, Windows users have excellent alternatives:
-
Windows Subsystem for Linux (WSL2): This is the recommended and most popular method. WSL2 allows you to run a full Linux environment (like Ubuntu or Debian) directly on Windows without the overhead of a traditional virtual machine. Once WSL2 is set up with your chosen Linux distribution, you can follow the Linux installation instructions (e.g., using
aptorpip) within your WSL terminal. This method offers near-native performance and seamless integration with your Windows filesystem.- Basic WSL2 setup (shortened):
- Enable WSL and Virtual Machine Platform features in Windows.
- Install a Linux distribution from the Microsoft Store (e.g., Ubuntu).
- Launch the Linux distribution and set up a user account.
- Follow the appropriate Linux installation steps (e.g.,
apt install ansiblefor Ubuntu).
- Basic WSL2 setup (shortened):
-
Virtual Machine: A more traditional approach involves setting up a virtual machine (VM) using software like VirtualBox or VMware Workstation. You would install a preferred Linux distribution (e.g., Ubuntu Server, CentOS Stream) as a guest OS within the VM and then install Ansible on that Linux VM following the relevant distribution-specific instructions. This provides a completely isolated environment, which can be beneficial for testing or specific project requirements.
Initial Configuration and First Steps
Once Ansible is successfully installed, the next crucial phase involves setting up its basic configuration and performing a quick test to ensure everything is working as expected. This includes verifying the installation, defining your inventory of managed hosts, and ensuring secure communication channels are established. These initial steps are fundamental to leveraging Ansible’s power effectively.
Verifying the Installation
After installing Ansible through any of the methods above, the first thing to do is to confirm that it’s correctly installed and accessible from your command line.
How to verify:
Open your terminal or command prompt (if using WSL) and run:
ansible --version
Expected Output:
You should see output similar to this:
ansible [core 2.15.5]
  config file = /etc/ansible/ansible.cfg
  configured module search path = ['/home/youruser/.ansible/plugins/modules', '/usr/share/ansible/plugins/modules']
  ansible python module location = /path/to/your/python/site-packages/ansible
  ansible collection location = /home/youruser/.ansible/collections:/usr/share/ansible/collections
  executable location = /usr/local/bin/ansible
  python version = 3.9.18 (main, Sep 11 2023, 14:09:26) [GCC 11.2.0] (/usr/bin/python3)
  jinja version = 3.1.2
  libyaml = True
This output provides essential information:
ansible [core X.Y.Z]: The version of Ansible you have installed.config file: The path to your main Ansible configuration file (usually/etc/ansible/ansible.cfgor a user-specific one).python version: The Python version Ansible is utilizing.executable location: The path where the Ansible executable is located.
If you encounter a command not found error, it likely means Ansible wasn’t installed correctly, or its executable path isn’t in your system’s PATH environment variable. In such cases, review the installation steps for your specific OS.
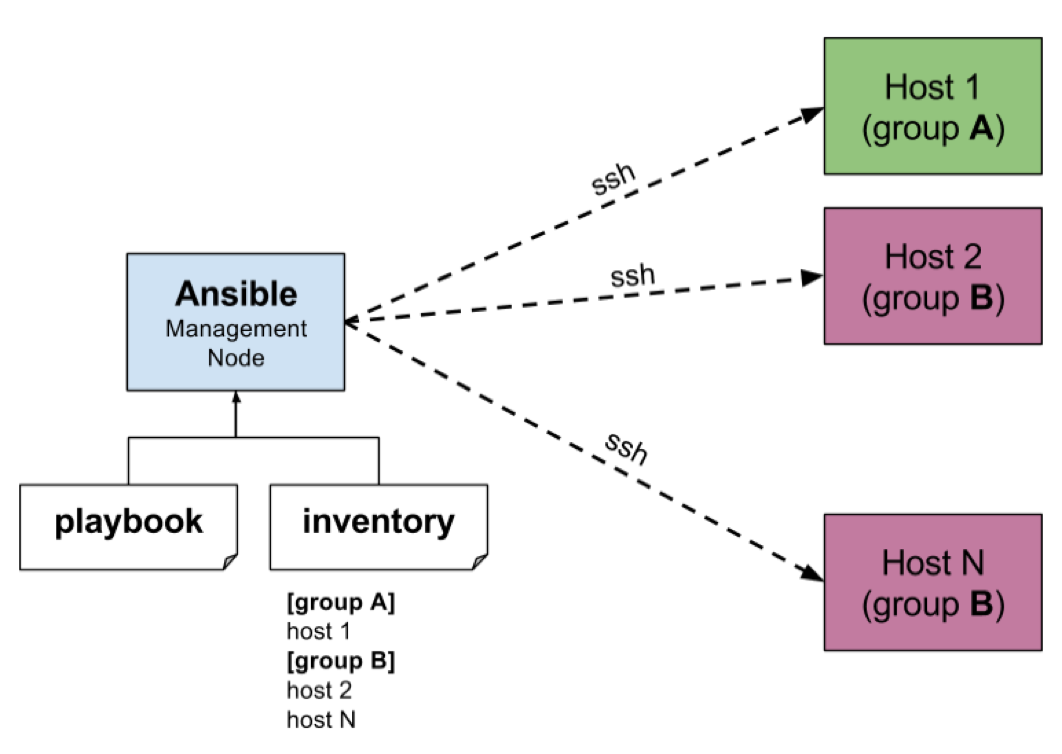
Setting Up an Inventory File
Ansible is an agentless automation engine, meaning it manages remote machines without needing any special software on them. Instead, it relies on an inventory file to define the hosts it will manage. This file acts as a list of managed nodes and can organize them into groups for easier management.
What it is and why it’s crucial:
The inventory file (hosts) is a plain text file, typically in INI or YAML format, that lists your target servers. It’s crucial because it tells Ansible where to run tasks and allows you to logically group servers (e.g., webservers, databases) for targeted automation.
Default and Custom Locations:
By default, Ansible looks for an inventory file at /etc/ansible/hosts. However, it’s common practice to keep project-specific inventory files within your project directory and specify its path using the -i flag with Ansible commands, or by configuring it in ansible.cfg.
Basic INI Format Example:
Create a file named inventory.ini (or hosts):
[webservers]
web1.example.com
web2.example.com ansible_ssh_port=2222


<p style="text-align:center;"><img class="center-image" src="https://cdn.educba.com/academy/wp-content/uploads/2019/04/How-to-Install-Ansible.jpg" alt=""></p>


[databases]
db1.example.com
db2.example.com

[all:vars]
ansible_user=your_remote_username
ansible_ssh_private_key_file=~/.ssh/id_rsa
In this example:
[webservers]and[databases]are host groups.web1.example.comis a host with default SSH port 22.web2.example.comspecifies a custom SSH port 2222.[all:vars]defines variables that apply to all hosts in the inventory. Here,ansible_userspecifies the remote user Ansible will connect as, andansible_ssh_private_key_filepoints to the SSH key for authentication.
Establishing SSH Connectivity
Ansible communicates with managed hosts primarily over SSH. For secure and efficient automation, it’s highly recommended to use SSH key-based authentication rather than passwords. This ensures your automations are secure and don’t require manual password entry.
Key-based Authentication (Best Practice):
-
Generate an SSH key pair on your control node (where Ansible is installed) if you don’t have one:
ssh-keygen -t rsa -b 4096Press Enter to accept default locations and an empty passphrase (or set one if desired, though it requires
ssh-agentsetup for automation). -
Copy your public key to the managed hosts:
Use thessh-copy-idcommand, replacingyour_remote_usernameandyour_managed_hostwith your actual details:
bash

ssh-copy-id your_remote_username@your_managed_host
You will be prompted for the remote user’s password once. After this, you should be able to SSH into the remote host without a password.
Repeat this for all managed hosts.
Password-based Authentication (Less Secure, for Quick Tests):
While not recommended for production, you can use password-based authentication by adding ansible_ssh_pass='your_password' to your inventory or passing --ask-pass (-k) to Ansible commands.
Running Your First Ad-Hoc Command
With Ansible installed, an inventory created, and SSH connectivity established, you can now run your very first Ansible command. Ad-hoc commands are single-task operations executed directly from the command line, useful for quick tasks or testing connectivity.
The ping module:
The ping module is perfect for testing connectivity and ensuring Ansible can reach your managed hosts. It doesn’t actually use ICMP ping; instead, it checks SSH connectivity and Python availability on the remote machine.
Command structure:
ansible <group_or_host_name> -i <path_to_inventory_file> -m <module_name> -a "<module_arguments>"
Example:
To ping all hosts defined in your inventory.ini file:
ansible all -i inventory.ini -m ping
Expected Output:
For each successfully reached host, you’ll see something like:
web1.example.com | SUCCESS => {
    "ansible_facts": {
        "discovered_interpreter_python": "/usr/bin/python3"
    },
    "changed": false,
    "ping": "pong"
}
If a host is unreachable, you’ll get a UNREACHABLE! error with details. This simple ping command confirms that Ansible is installed correctly, can read your inventory, and can connect to your remote hosts via SSH. Congratulations, you’ve taken your first step into the world of Ansible automation!
Best Practices and Advanced Considerations
Once you’ve successfully installed Ansible and executed your first commands, it’s time to delve into best practices and more advanced considerations. Adopting these early on will ensure your Ansible projects are maintainable, secure, scalable, and collaborative, aligning with modern tech operations and potentially leading to significant financial and brand benefits through robust automation.
Using Virtual Environments
A Python virtual environment is a self-contained directory containing a Python installation for a specific project, along with its own set of installed packages. It’s an indispensable tool for managing dependencies and preventing conflicts, especially when working on multiple projects that might require different versions of Ansible or other Python libraries.
Isolation of Dependencies:
Imagine Project A needs Ansible version 2.10 and library X version 1.0, while Project B needs Ansible 2.15 and library X version 2.0. Without virtual environments, installing these conflicting versions globally would lead to issues. A virtual environment allows each project to have its own isolated set of dependencies, ensuring consistency and reproducibility.
Creation and Activation:
-
Create:
python3 -m venv ~/ansible_projects/my_project_envReplace
~/ansible_projects/my_project_envwith your desired path. -
Activate:
source ~/ansible_projects/my_project_env/bin/activateYour terminal prompt will change to indicate the active virtual environment. Now,
pip install ansiblewill install Ansible only within this environment. -
Deactivate:
bash

deactivate
This returns you to your system’s global Python environment.
By always working within a virtual environment for your Ansible projects, you establish a clean and controlled workspace, preventing “dependency hell” and making your automation solutions more reliable.
Ansible Vault for Sensitive Data
In any automation scenario, handling sensitive information like API keys, database passwords, or SSH private keys is a critical security concern. Hardcoding these credentials directly into playbooks or inventory files is a major security vulnerability. Ansible Vault provides a robust solution for encrypting variables and files, ensuring that sensitive data remains secure at rest.
Security Importance:
Ansible Vault uses strong encryption (AES256) to protect your secrets. When you encrypt a file or variable, it becomes unreadable without the correct vault password. This allows you to store your playbooks and inventory in version control systems (like Git) without exposing sensitive data.
Basic Usage Overview:
-
Creating an encrypted file:
ansible-vault create secret.ymlYou’ll be prompted to set a vault password. An editor will open, allowing you to enter your sensitive data, which will then be encrypted upon saving.
-
Editing an encrypted file:
ansible-vault edit secret.ymlYou’ll be prompted for the vault password before the file opens in your editor.
-
Viewing an encrypted file:
ansible-vault view secret.yml -
Encrypting an existing file:
ansible-vault encrypt my_passwords.yml -
Decrypting a file (rarely done, usually
editis sufficient):ansible-vault decrypt secret.yml -
Using vault files in playbooks:
You can include encrypted variables or files in your playbooks. Ansible will automatically prompt for the vault password when needed during execution, or you can provide it via a password file or environment variable for automated runs (--vault-password-file).
Implementing Ansible Vault from the outset is a crucial step towards building secure and compliant automation practices, protecting your brand’s reputation and your financial assets from potential breaches.
Version Control Integration
For any serious Ansible project, integrating with a version control system (VCS), most commonly Git, is non-negotiable. Version control allows you to track changes to your playbooks, inventories, and roles, facilitating collaboration, auditing, and rollback capabilities.
Git for Playbooks:
- Tracking changes: Every modification to your Ansible code is recorded, showing who made what change and when. This is invaluable for debugging and understanding the evolution of your automation.
- Collaboration: Multiple team members can work on the same project concurrently, merging their changes efficiently.
- Rollback capabilities: If a change introduces a bug or undesirable behavior, you can easily revert to a previous working version.
- Branching and merging: Develop new features or test changes in isolated branches before merging them into your main codebase.
- Documentation: Commit messages often serve as a concise history of why changes were made.
Treating your Ansible code (playbooks, roles, inventories, configuration) as code and storing it in a Git repository (e.g., GitHub, GitLab, Bitbucket) is fundamental to professional automation practices. This also aligns with DevOps principles, ensuring consistency, reliability, and auditability in your infrastructure-as-code efforts.
Scalability and Performance Tips
As your infrastructure grows and your automation demands become more complex, optimizing Ansible’s performance and scalability becomes increasingly important.
-
ControlPersist: Ansible uses SSH for communication. Each task typically opens a new SSH connection, which can be slow over time.
ControlPersistallows Ansible to reuse existing SSH connections, significantly speeding up subsequent tasks on the same host. This is configured in youransible.cfgfile under the[ssh_connection]section.[ssh_connection] ssh_args = -o ControlMaster=auto -o ControlPersist=60s60skeeps the connection open for 60 seconds;1hfor one hour. -
Forks: The
forksparameter inansible.cfg(or passed via-fflag) determines how many parallel processes Ansible will use to communicate with managed hosts. A higher number of forks can speed up execution by performing tasks on more hosts simultaneously. However, setting it too high can overwhelm your control node or the network.[defaults] forks = 20 # Default is 5Adjust this based on your control node’s CPU/memory and network bandwidth.
-
Strategy Plugins: Ansible’s execution strategy defines how tasks are executed across hosts. The default
linearstrategy waits for each task to complete on all hosts before moving to the next. Thefreestrategy, on the other hand, allows hosts to complete tasks at their own pace, moving to the next task on a given host as soon as the previous one is done. This can be beneficial for large, diverse inventories where some hosts might be slower than others.[defaults] strategy = free -
Fact Caching: For large environments, gathering facts from all hosts at the beginning of every playbook run can be time-consuming. Ansible can cache facts to a local file, database, or Redis, reducing the need to recollect them every time.
By implementing these best practices and considering advanced optimizations, you can ensure your Ansible automation remains robust, efficient, and secure as your needs evolve. This proactive approach not only enhances technical performance but also underpins a strong operational posture, contributing to your brand’s reliability and prudent financial management by minimizing downtime and maximizing resource utilization.
Conclusion
Installing Ansible is the foundational step towards unlocking a world of powerful IT automation. Throughout this comprehensive guide, we’ve navigated the various installation methods tailored for different operating systems – from the flexibility of pip on Linux and macOS to the convenience of apt for Debian/Ubuntu, yum/dnf for RHEL/CentOS/Fedora, and Homebrew for macOS, not forgetting the essential workaround for Windows users via WSL2 or virtual machines. Each method offers a reliable path to getting Ansible up and running, ensuring you can choose the approach best suited for your environment.
Beyond the initial installation, we delved into the critical first steps of verifying your setup, configuring your inventory to define managed hosts, and establishing secure SSH connectivity – the backbone of Ansible’s agentless communication. Running your first ad-hoc ping command served as the triumphant confirmation that your Ansible control node is ready to orchestrate tasks across your infrastructure.
Finally, we explored essential best practices and advanced considerations that elevate your Ansible projects from functional to professional. Embracing Python virtual environments provides a clean, isolated workspace for dependencies. Implementing Ansible Vault secures sensitive data, safeguarding your operations and maintaining your brand’s integrity. Integrating with version control systems like Git ensures collaboration, auditability, and easy rollbacks, turning your automation into a robust, maintainable codebase. Lastly, understanding scalability and performance tips like ControlPersist, forks, and strategic plugins ensures your Ansible deployments remain efficient and responsive as your infrastructure grows.
By diligently following these steps, you’ve not only installed Ansible but have also laid a solid groundwork for building resilient, secure, and scalable automation solutions. This journey into automation is more than just a technical exercise; it’s an investment in efficiency, consistency, and the future-proofing of your IT operations, ultimately contributing to both financial savings and a stronger technological brand. The next step is to explore Ansible playbooks and roles, where the true power of this automation engine comes to life. Happy automating!
aViewFromTheCave is a participant in the Amazon Services LLC Associates Program, an affiliate advertising program designed to provide a means for sites to earn advertising fees by advertising and linking to Amazon.com. Amazon, the Amazon logo, AmazonSupply, and the AmazonSupply logo are trademarks of Amazon.com, Inc. or its affiliates. As an Amazon Associate we earn affiliate commissions from qualifying purchases.