In an increasingly connected world, the anxiety of losing track of our most cherished possessions is a common modern stressor. From keys and wallets to backpacks and luggage, a momentary lapse in attention can lead to significant inconvenience, financial loss, or even emotional distress. Enter Apple AirTags – a discreet, powerful, and remarkably simple solution designed to put your mind at ease. These small, coin-sized tracking devices leverage Apple’s vast global Find My network, turning millions of Apple devices into a protective web that can help you locate misplaced items with astonishing precision.
This comprehensive guide will walk you through everything you need to know about “installing” your AirTag – from unboxing and initial activation to seamless pairing, strategic placement, and understanding its robust privacy features. Whether you’re a tech enthusiast eager to integrate the latest gadget into your digital ecosystem, a meticulous individual looking to safeguard your valuable assets, or simply seeking a practical way to streamline your daily routine, mastering AirTags is a straightforward process that offers profound peace of mind. Let’s delve into how to get your AirTag up and running and explore how this clever piece of technology enhances your personal productivity and digital security.
Unboxing and Initial Setup: Getting Your AirTag Ready
The journey to effortlessly tracking your belongings begins with a few simple steps. Apple has meticulously designed the AirTag experience to be as intuitive as possible, ensuring that even users new to the Apple ecosystem can get started without a hitch. This initial phase focuses on preparing your AirTag for its primary purpose: helping you find what matters most.
What You’ll Need
Before you even touch your new AirTag, ensure you have the necessary components and conditions for a smooth setup:
- An Apple AirTag: Naturally, this is the star of the show.
- An iPhone or iPod Touch with iOS 14.5 or later, or an iPad with iPadOS 14.5 or later: Compatibility is key. Ensure your device’s software is up to date for optimal functionality and access to all AirTag features, including Precision Finding.
- An Apple ID: Your AirTag will be tied to your personal Apple ID, linking it securely to your account within the Find My app. If you don’t have one, it’s free and easy to create.
- A strong internet connection: Wi-Fi or cellular data is required during the initial setup to communicate with Apple’s servers and register your AirTag.
- Bluetooth turned on: AirTags use Bluetooth Low Energy (LE) to communicate with nearby devices and with your own iPhone/iPad.
- Location Services enabled for the Find My app: This is crucial for tracking your AirTag’s location. Go to
Settings > Privacy & Security > Location Servicesand ensure it’s turned on, and that Find My is set to ‘While Using the App’ or ‘Always’.
Having these prerequisites in place will ensure your installation process is quick, efficient, and free of unnecessary hiccups.
Activating Your AirTag
Unlike complex electronic devices that might require extensive charging or configuration out of the box, activating an AirTag is delightfully straightforward. Apple has integrated the battery activation directly into the packaging design.
- Unwrap the AirTag: Carefully remove the AirTag from its packaging. You’ll notice a clear plastic tab protruding from the side of the AirTag itself, often tucked beneath a metal cover. This tab is a battery insulator.
- Pull the Battery Tab: Firmly pull the clear plastic tab until it is completely removed from the AirTag. As the tab slides out, you should hear a distinctive chime. This sound confirms that the AirTag’s internal CR2032 coin cell battery has been activated and is now supplying power to the device. This ingenious design prevents battery drain during storage and shipping, ensuring maximum battery life from day one.
- Hold Near Your Apple Device: Once activated, bring the AirTag close to your iPhone, iPad, or iPod Touch. Your device should automatically detect the AirTag and display an animation on the screen, much like when pairing AirPods. This proximity-based recognition is a hallmark of Apple’s user-friendly ecosystem, simplifying the connection process. If the AirTag doesn’t appear, try moving it slightly or ensuring your device’s screen is unlocked.
This initial activation is the first step in bridging the physical AirTag with your digital Apple environment, setting the stage for seamless integration into your personal tracking network.
Seamless Integration: Pairing and Customizing Your AirTag
With your AirTag activated, the next phase involves linking it to your Apple ID and personalizing its settings. This is where the magic of Apple’s ecosystem truly shines, making the AirTag an extension of your digital life and providing a powerful tool for asset management.
The Pairing Process
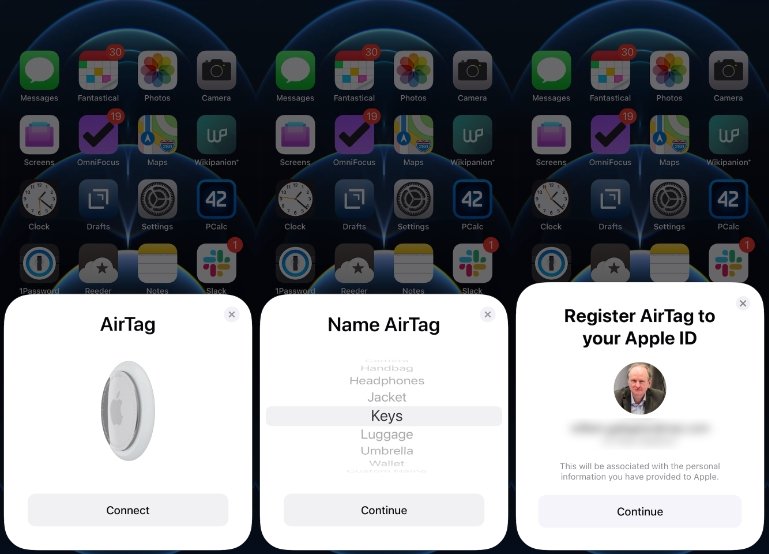
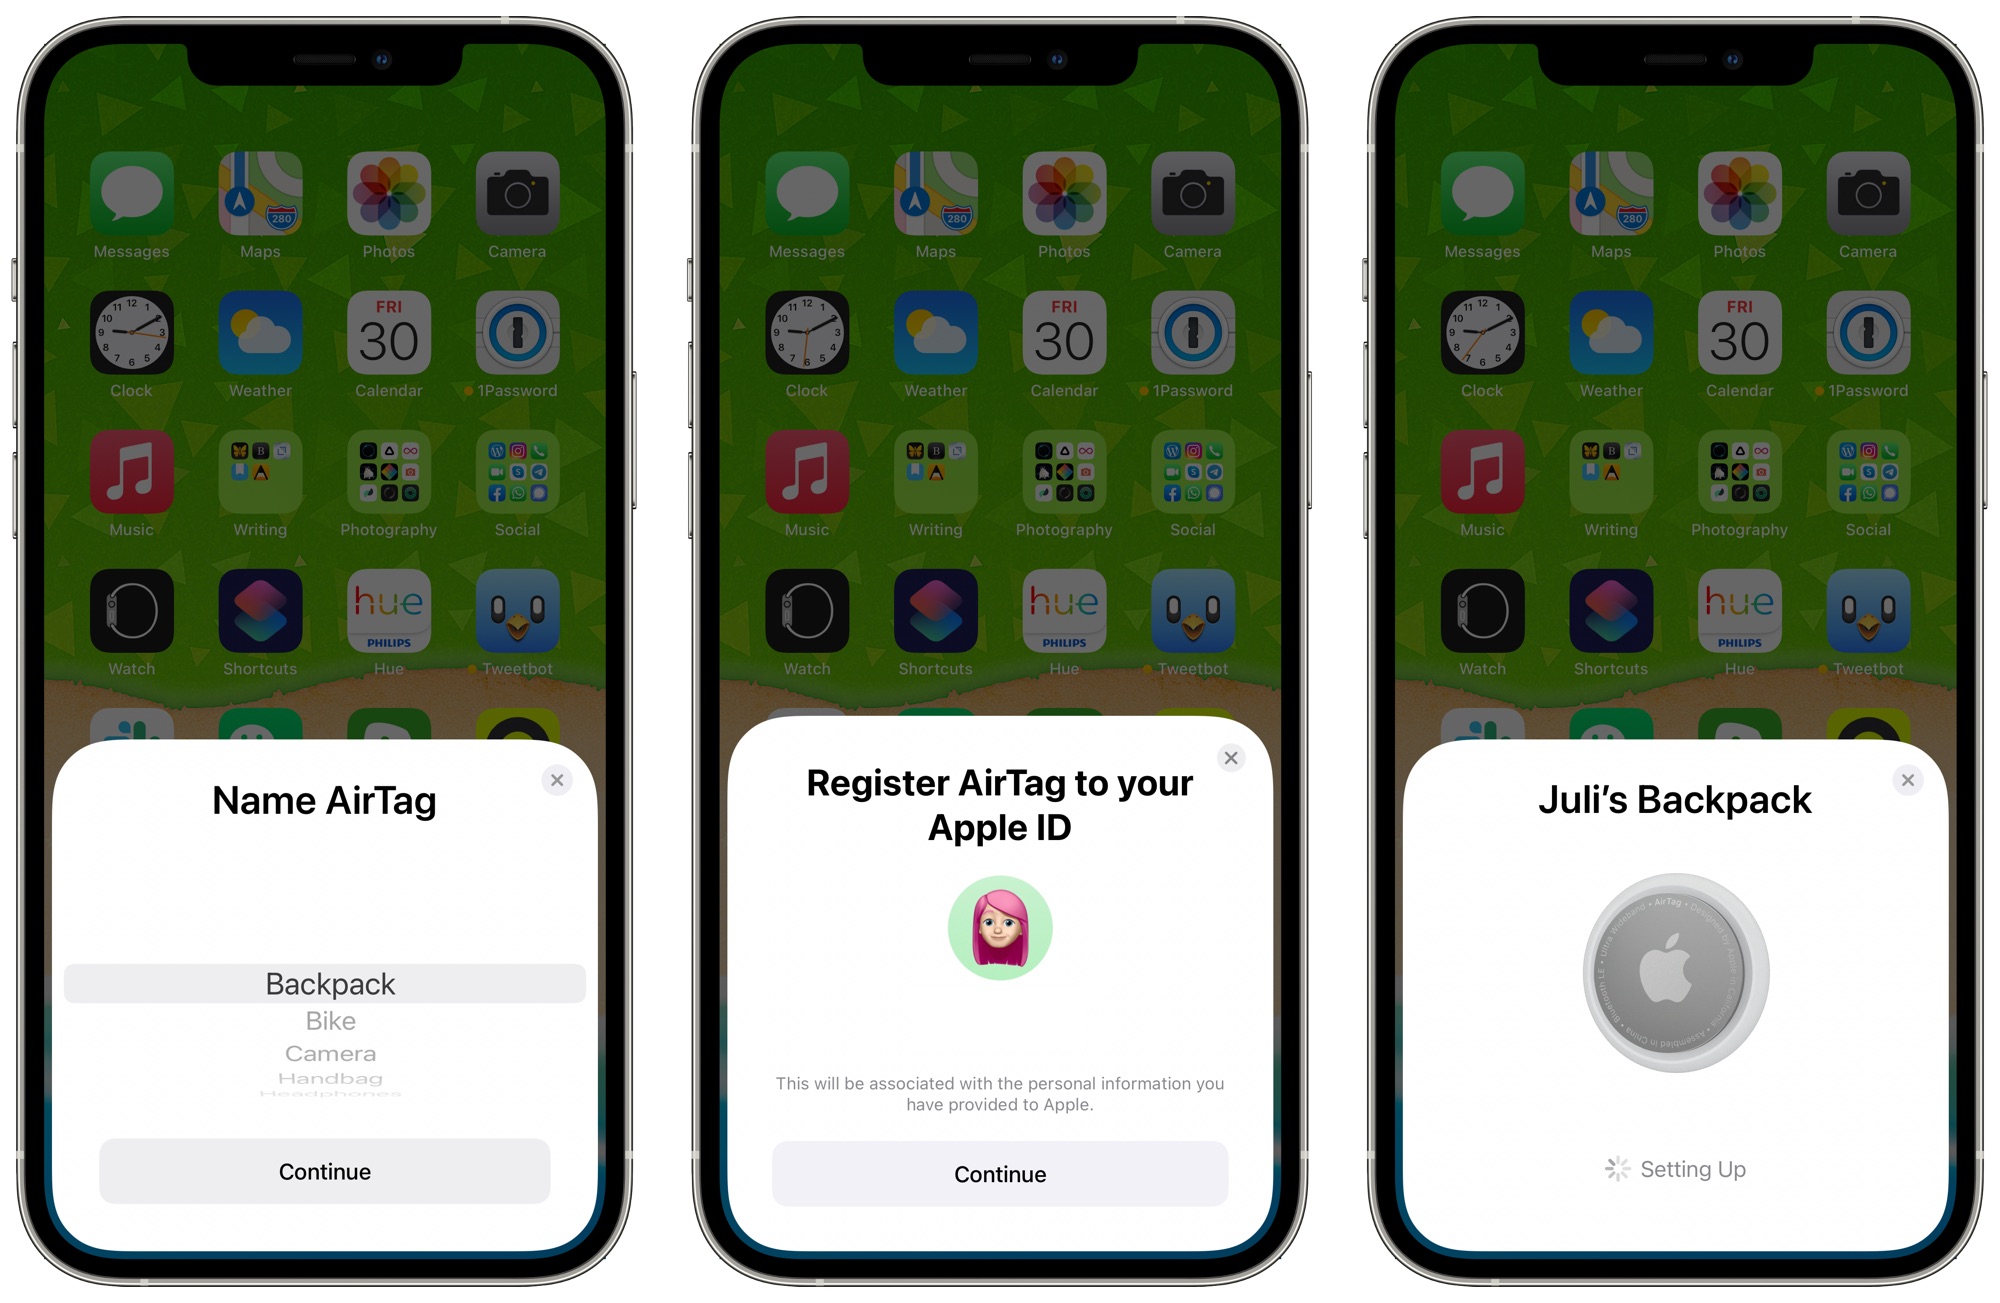
The moment your Apple device detects the activated AirTag, a prompt will appear on your screen, guiding you through the pairing process.
- Tap “Connect”: On your iPhone, iPad, or iPod Touch, you’ll see a card pop up identifying an “AirTag Found.” Tap the “Connect” button to initiate the pairing.
- Choose a Name: Apple provides a list of common items (Keys, Backpack, Jacket, Wallet, Luggage, Bike, Umbrella, Car, Headphones, etc.) to which you might attach an AirTag. Select the most appropriate name from the list. This helps organize your tracked items within the Find My app.
- Assign a Custom Name (Optional): If none of the default options fit, or if you prefer a more specific label, you can scroll down and select “Custom Name.” This allows you to type in any name you wish, such as “Work Laptop Bag,” “Camera Gear,” or “Dog’s Collar,” giving you ultimate flexibility in identifying your items.
- Confirm Apple ID Linkage: Your device will then confirm that the AirTag will be registered to your Apple ID. This is a crucial security step, ensuring only you have control over its tracking capabilities. Tap “Continue.”
- Registering the AirTag: Your Apple device will take a moment to register the AirTag with your Apple ID and add it to your Find My network. You might see a brief loading indicator.
- Tap “View in Find My” or “Done”: Once registered, you’ll have the option to immediately view your new AirTag in the Find My app or simply tap “Done” to close the setup window. The AirTag is now successfully paired and ready to be used.
This streamlined pairing process underscores Apple’s commitment to user experience, making the addition of new devices to your ecosystem feel natural and effortless.
Naming Your AirTag for Easy Identification
Choosing the right name for your AirTag is more than just a label; it’s an organizational strategy. In the Find My app, each AirTag’s location is displayed alongside its assigned name. A clear, descriptive name ensures that at a glance, you know exactly which item you’re looking for, especially if you plan to use multiple AirTags.
For instance, naming an AirTag “Car Keys” is far more practical than just “Keys” if you also have an AirTag on your “House Keys.” Similarly, “Travel Backpack” distinguishes it from a “Gym Bag.” Thoughtful naming saves time and reduces potential confusion, enhancing the overall utility of your tracking system. You can always rename an AirTag later through the Find My app by selecting the item, swiping up for details, and tapping on its current name.
Personalizing Settings and Notifications
Beyond just naming, you can further customize your AirTag experience within the Find My app.
- Play Sound: Once paired, you can tap “Play Sound” in the Find My app to make your AirTag emit a chime, helping you locate it when it’s nearby but out of sight (e.g., under a couch cushion).
- Lost Mode: For items that are truly lost and not just misplaced, you can enable “Lost Mode.” This feature allows you to enter a phone number and a message. If someone finds your AirTag and scans it with an NFC-capable smartphone, they’ll see your contact information and message, facilitating its return. This acts as a digital lost-and-found, adding another layer of security for your valuable assets.
- Notifications: You can customize when and how you receive notifications about your AirTag’s location. For example, you might want to be notified if you leave a specific AirTag behind at a certain location, or if it moves unexpectedly. This proactive notification system is a powerful tool for preventing loss.
These customization options transform your AirTag from a simple tracker into a personalized guardian for your belongings, offering tailored alerts and recovery mechanisms.
Smart Placement: Attaching and Securing Your AirTag
Once your AirTag is activated and paired, the next critical step is physically attaching it to the item you wish to track. While the “installation” process is primarily digital, the physical placement and security of the AirTag are paramount to its effectiveness. This section delves into the practical considerations for securing your AirTag.
Choosing the Right Accessories
Given its small, disc-like form factor, an AirTag needs a way to be securely fastened to an item. Apple and third-party manufacturers offer a wide array of accessories designed for this purpose, leveraging the AirTag’s built-in loop (or lack thereof, making accessories even more vital).
- Key Rings and Loops: These are the most common accessories, allowing you to attach an AirTag to keychains, bag zippers, or pet collars. Apple offers its own leather and silicone key rings, while numerous third-party options provide various materials, colors, and designs to match your style and durability needs.
- Holders and Cases: For items like wallets, backpacks, or luggage where a loop might not be practical, specialized holders and cases are available. Some are designed to slip discreetly into pockets, while others are built into the fabric of the item itself. These often provide an extra layer of protection for the AirTag from bumps and scratches.
- Adhesive Mounts: For items where a discreet, semi-permanent attachment is desired (e.g., inside a camera bag, on a drone, or under a bike seat), adhesive mounts can be very useful. These typically encase the AirTag and feature a strong adhesive backing.
- Pet Collars: Many brands offer collars with integrated AirTag holders, ensuring your furry friend can be tracked if they wander off. Ensure the holder is secure and comfortable for your pet.
When selecting an accessory, consider the item it will be attached to, the level of discretion required, and the environment it will encounter. Durability, weather resistance (if applicable), and secure fastening mechanisms are key factors.
Strategic Placement for Optimal Tracking
Beyond just securing the AirTag, where you place it on an item can influence its effectiveness and longevity.
- Visibility vs. Discretion: For items like keys, a visible AirTag might be fine. For valuables like a camera or a laptop, a more discreet placement (e.g., inside an internal pocket of a bag, or a hidden compartment) might be preferable to deter potential theft or tampering.
- Signal Obstruction: While AirTags use Bluetooth LE and the Find My network is robust, extreme metal enclosures or very dense materials can sometimes slightly reduce signal range, particularly for Precision Finding. Aim for placements where the AirTag isn’t completely buried under layers of metal. However, for most everyday items, this is rarely an issue.
- Environmental Factors: If the item is exposed to the elements (like a bike or outdoor gear), ensure the AirTag and its accessory offer adequate protection from water, dust, and impact. While AirTags are IP67 water and dust resistant, accessories can provide an extra layer of robust defense.
- Security: If you’re tracking a particularly valuable item, consider placement that makes it difficult for someone to easily remove or discover the AirTag. A well-placed AirTag can be a powerful deterrent and recovery tool, but only if it stays with the item.
Thoughtful placement transforms your AirTag from a mere gadget into a reliable sentinel for your possessions, contributing significantly to your digital security and peace of mind.

Best Practices for Attaching AirTags to Various Items
Let’s look at some specific examples:
- Keys: Use a sturdy keyring accessory. Attach it directly to your key ring or to a larger fob that holds all your keys.
- Wallets: Opt for a thin, flat AirTag holder that slides into a card slot or a dedicated compartment without adding excessive bulk. Discretion is key here.
- Backpacks/Bags: Place the AirTag in an internal, zippered pocket or use an accessory that clips securely to an internal loop. Avoid external placements that could be easily cut or removed.
- Luggage: Secure it inside an internal pocket. While external tags are common, an internal placement offers more protection against removal or accidental detachment during transit.
- Bikes: Many riders use adhesive mounts to place AirTags discreetly under the saddle, on the frame, or even within the handlebar grips, making them less obvious to potential thieves.
- Pets: Use a specially designed pet collar with an integrated AirTag holder. Ensure it’s comfortable for your pet and securely fastened, but also easily accessible for battery changes.
By following these best practices, you can maximize the effectiveness of your AirTag, turning it into a reliable and discreet tracking companion for virtually anything you own. This simple “tech installation” step is crucial for the AirTag to effectively serve its purpose as an invisible guardian of your assets.
Maintaining and Maximizing Your AirTag Experience
Installing an AirTag isn’t just a one-time setup; it involves ongoing management and understanding its full capabilities to ensure continuous peace of mind. Regular maintenance and familiarization with its features will help you get the most out of your investment in item tracking.
Battery Life and Replacement
AirTags are designed for convenience, and part of that convenience is their impressive battery life. Each AirTag uses a standard, user-replaceable CR2032 coin cell battery, which typically lasts about one year with normal use.
- Checking Battery Status: Your iPhone or iPad will automatically notify you when your AirTag’s battery is running low. You can also check the battery status manually within the Find My app. Simply open Find My, tap the “Items” tab, select your AirTag, and swipe up to view its details. The battery level icon will be displayed there.
- Replacing the Battery: When it’s time for a new battery, the process is simple:
- Press down on the polished stainless steel battery cover of the AirTag and rotate it counter-clockwise until it stops.
- Remove the cover and the old CR2032 battery.
- Insert a new CR2032 lithium 3V coin battery with the positive (+) side facing up. Avoid using bitterant-coated CR2032 batteries, as they might interfere with the AirTag’s contacts.
- Replace the cover, aligning the three tabs on the cover with the three slots on the AirTag.
- Press down on the cover and rotate it clockwise until it locks into place. You should hear a chime confirming it’s active.
Regular battery replacement ensures uninterrupted tracking and prevents the frustration of a dead AirTag when you need it most.
Managing Multiple AirTags
For users tracking multiple items, the Find My app becomes a central hub for managing all your AirTags.
- Organized View: The “Items” tab in the Find My app provides a clean, map-based overview of all your AirTags. Each AirTag’s last known location is displayed, along with its assigned name.
- Renaming and Customization: As mentioned earlier, you can easily rename any AirTag, change its icon, or adjust its notification settings at any time through the Find My app. This flexibility allows you to adapt your tracking system as your needs evolve.
- Sharing Location (Limited): While an AirTag is tied to a single Apple ID, you can use Family Sharing to allow others in your family group to see the location of items tracked by AirTags you own. This can be useful for shared items like a family car or luggage.
Effective management of multiple AirTags enhances the utility of the system, turning potential clutter into an organized network of tracked possessions.
Troubleshooting Common Issues
While AirTags are generally reliable, occasional issues can arise. Here’s how to troubleshoot some common problems:
- AirTag Not Connecting/Found:
- Check Battery: Ensure the battery is not dead or improperly installed.
- Bluetooth/Location Services: Verify both are enabled on your iPhone/iPad.
- iOS/iPadOS Version: Confirm your device is running iOS/iPadOS 14.5 or later.
- Proximity: Bring the AirTag closer to your device during initial setup.
- Restart Device: A quick restart of your iPhone/iPad can often resolve minor connectivity glitches.
- AirTag Not Updating Location:
- Battery: A low battery can prevent location updates.
- Network Coverage: AirTags rely on nearby Apple devices to relay their location. In very remote areas without active Apple devices, location updates might be sparse.
- Find My Network: Ensure Find My Network is enabled on your device (
Settings > Apple ID > Find My > Find My iPhone).
- Resetting an AirTag: If you need to re-pair an AirTag to a different Apple ID or resolve persistent issues, you might need to reset it. This involves a specific sequence of battery removals and reinsertions (remove battery, press down and reinsert, repeat 4 more times, listening for a chime each time). Full instructions are available on Apple’s support page.
Understanding how to troubleshoot ensures your AirTag remains a dependable part of your personal security and item recovery strategy. This proactive approach to tech maintenance safeguards your investment and enhances your digital productivity.
AirTag Security, Privacy, and Advanced Use Cases
Beyond simple item tracking, AirTags incorporate sophisticated security and privacy features, addressing potential concerns and opening up innovative applications. Understanding these aspects is crucial for a complete “installation” experience.
Understanding AirTag’s Privacy Safeguards
Apple has engineered AirTags with privacy at their core, specifically to prevent unwanted tracking.
- Randomized Identifiers: AirTags don’t store your location data or history on the device itself. Instead, they use unique, rotating Bluetooth identifiers that change frequently. This prevents long-term tracking of an AirTag’s movement by unauthorized parties.
- End-to-End Encryption: All communication between an AirTag and the Find My network is end-to-end encrypted. Only the owner of the AirTag can see its location, and even Apple does not know the location of an AirTag or the identity of the Apple devices that relay its location.
- No Personal Data Stored: No personal data is stored on the AirTag itself. If someone finds your AirTag and scans it, they only see the Lost Mode message and contact information you provided, not your personal details from your Apple ID.
These privacy-by-design principles reflect Apple’s strong brand commitment to user data protection, setting a high standard for connected personal devices.
Digital Security and Anti-Stalking Features
A significant concern with any tracking device is the potential for misuse, such as unwanted tracking or stalking. Apple has built robust anti-stalking measures into the AirTag system:
- Unwanted Tracking Alerts: If an AirTag that isn’t yours is traveling with you over time, your iPhone or iPad will automatically detect it and send you an alert: “AirTag Found Moving With You.” This proactive notification empowers you to find the unknown AirTag and disable it.
- Audible Alerts for Unknown AirTags: If an AirTag is separated from its owner for an extended period (currently between 8 and 24 hours) and is moving, it will automatically play a sound to alert anyone nearby of its presence. This is designed to help individuals find an AirTag that might have been secretly placed on them.
- NFC Scan for Information: Any NFC-capable smartphone (Android or iPhone) can tap an unknown AirTag to reveal its serial number and, if the owner has enabled Lost Mode, their contact information. This empowers anyone who finds an unwanted AirTag to identify and report it, or return it to its rightful owner.
These features highlight Apple’s responsible approach to technology, balancing convenience with stringent ethical considerations regarding digital security and personal safety.
Beyond Basic Tracking: Innovative Uses
While primarily designed for locating lost items, AirTags’ versatility extends to more innovative use cases that can enhance productivity and even save money by preventing loss or speeding up recovery.
- Travel Safety: Attach AirTags to checked luggage, carry-ons, and even children’s backpacks. Knowing where your bags are at all times can significantly reduce travel stress and provide crucial information if items are misplaced by an airline. This small investment can save you money on replacement costs or the inconvenience of lost items on a trip.
- Vehicle Tracking (Limited): While not a dedicated car tracker, an AirTag discreetly placed in a car glove compartment or under a seat can help locate your vehicle in a vast parking lot or potentially aid in recovery if stolen, especially in urban areas with high concentrations of Apple devices.
- Equipment Management: For professionals who manage valuable equipment (e.g., photographers with multiple lenses, contractors with tools), AirTags can help keep track of individual items, preventing costly losses on job sites or during transport.
- Pet Safety (with caution): AirTags on pet collars can help locate a lost pet. However, it’s important to remember that AirTags rely on the Find My network; if a pet wanders into an area with no Apple devices, tracking will be limited. They are best used as an additional layer of safety, not a primary pet tracker.
These advanced uses underscore the AirTag’s potential to go beyond mere gadgetry, integrating seamlessly into various aspects of life to offer tangible benefits in terms of security, organization, and peace of mind.
Conclusion
The “installation” of an AirTag is far more than just a physical act; it’s a journey into a seamless world of personal asset management powered by Apple’s robust technology. From the moment you pull the battery tab and hear that satisfying chime, you’re not just activating a device; you’re enlisting a silent guardian for your most valued possessions.
This guide has walked you through every step, from ensuring you have the right tech prerequisites and effortlessly pairing your AirTag, to strategically choosing accessories and understanding the nuances of optimal placement. We’ve explored the importance of thoughtful naming, delved into the practicalities of battery maintenance, and equipped you with troubleshooting tips. Crucially, we’ve also highlighted Apple’s unwavering commitment to privacy and digital security, showcasing how AirTags are designed to protect you from unwanted tracking while empowering you to recover your lost items.
Whether you’re protecting your everyday essentials, safeguarding expensive equipment, or simply seeking that extra layer of assurance, AirTags offer an elegant, effective, and user-friendly solution. By following these steps, you’ve not only “installed” your AirTag but have also integrated a powerful tool into your life, bringing a new level of peace of mind and control over your belongings. Embrace the simplicity and sophistication of AirTags, and say goodbye to the anxiety of losing what matters most.
aViewFromTheCave is a participant in the Amazon Services LLC Associates Program, an affiliate advertising program designed to provide a means for sites to earn advertising fees by advertising and linking to Amazon.com. Amazon, the Amazon logo, AmazonSupply, and the AmazonSupply logo are trademarks of Amazon.com, Inc. or its affiliates. As an Amazon Associate we earn affiliate commissions from qualifying purchases.